
Holland ’44: Operation Market-Garden from GMT Games is a masterful game that focuses on the Allied invasion of the German occupied Netherlands in September 1944. The goal of the operation was to attack and capture three bridges, located in Arnhem, Nijmegen and Eindhoven, with surprise Airborne troop landings (Market) to secure a crossing of the Lower Rhine River into Germany in an attempt to bring World War II to an end by
December 1944. In addition to the Airborne landings, the plan called for massive ground forces led by XXX Corps (Garden) and General Montgomery to race up Hell’s Highway to capture and relieve the beleaguered Airborne troops before these key bridges could be destroyed. A daring but masterful plan that almost worked, or according to Field Marshall Sir Bernard Montgomery, whose plan the operation was, “[Market-Garden] was 90% successful”. The only problem with that statement is that with 10% of the operation failing, namely the Allies not being able to hold and reach the final of the three bridges located in Arnhem, the whole operation failed. But, prophetically speaking before the operation was British Lieutenant-General Frederick Browning, who was a Deputy Commander of the First Allied Airborne Army. He’d supposedly said ‘I think we may be going a bridge too far’ before the operation to Field Marshal Bernard Montgomery.
With all of that being said, I want to do a bit of a different type of review than I have done in the past. I will comment on the production, the game play and some of the really interesting parts of the design but I want to do it on an evaluation of the game based on how the design treats several factors that were at the heart of the operation. These elements will include things such as Airborne Operations, including paradrop landings, supply sources, landing zones and bridge capture, traffic congestion on Hell’s Highway, bridge destruction and rebuilding, and the terrain of Holland amongst other things. In this review I will give my opinion on how the design handles these topics.

Airborne Operations (this is an airborne game after all)
As this game is at least partly an Airborne game, we must take a look at how it models the various aspects involved with that type of tactic, namely dropping troops into battle, how they fight after their arrive, how they maintain supply and how they have to deal with the strategic objectives given to them. First off, the Airlanding Phase can only occur once each day, either in the AM or PM part of the turn, but never during a night turn. The Turn 1 Procedure is slightly different as the Allies will be landing a lot of units and don’t have to worry about weather as it is Clear on Turn 1. [A note that I learned the hard way in our first play. There are several elements that are special Turn 1 only rules, such as the Airlanding Phase, as well as the Germans only being able to use Tactical Movement during Turn 1. Pay attention, you will thank me later!] For our purposes in this review, weather only effects the amount of units that can be dropped each turn. There are a number of Airlanding Points that are allowed in each type of weather and 1 Airlanding Point is equal to one unit of any size. If the Allied player has more scheduled reinforcements than are allowed to land in any given turn due to weather, they get to choose which units to land and the other units just have to wait. One note here right off the bat, this was fairly frustrating as I literally rolled poor weather in Turns 2-4 and then again on Turn 6 in our first full play through. In my solo learning games, this very rarely happened. By that point in our play, I was unable to hold a few of the Supply Heads from the advancing Germans and my chances to do any real damage with the Allies was lost. This must be planned for and players must come up with tactics to deal with fewer units, such as properly using the ZOC Bond rules.
Each airborne unit has a specific drop zone printed on their counters and these are the zones that they have to attempt to land at. On Turn 1, there is no leeway to where the units can land but in later turns there is leeway and units can land on or adjacent to their printed drop zone. After Turn 6, the Airborne units can choose to land on any one of their division’s drop zones or choose to land on the hex containing their Airborne Supply Head. This rule change is due to the changing conditions as fighting continues and drop zones are either held or lost to enemy units. This is one of the elements that I think was really well done with the system as it injects some realism into the decision of where to land.
Airlanding Procedure
The Airlanding Procedure is pretty simple, especially during Turn 1. On Turn 1, the Allied player will roll 1 die per hex and simply consult The Airlanding Table and use those results to affect only one infantry type unit in that landing hex. Later in the game though, the Allied player will roll a die for EACH unit in EACH hex and apply the results separately. Talk about stress.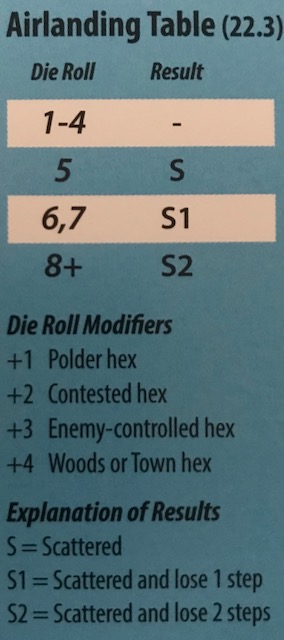
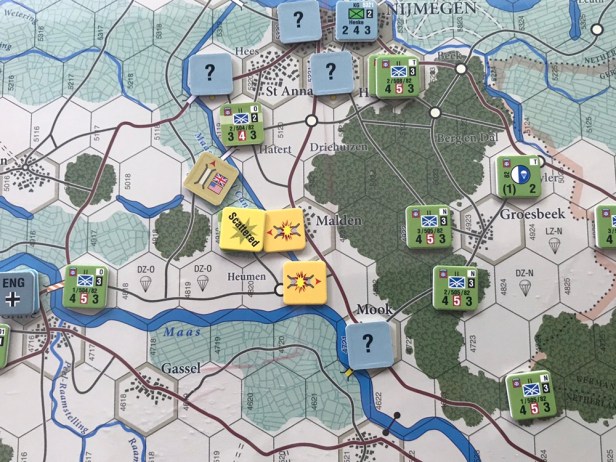
During Turn 1, any roll less than 4 is a no effect result and means that the landing went as planned. The units are not effected and all units in this drop zone land ready to move and fight. If a 5 is rolled, this is an “S” result which means the unit is Scattered. Scattered units can only use Tactical Movement (which is limited to 2 hexes) and can attack but have their Attack Strength halved. If the Scattered unit is an Artillery unit, it will be unable to offer Artillery Support to combat this turn. These negative effects of being Scattered are indicative of being too far spread to properly communicate and receive orders but also represents weapon teams potentially being separated temporarily as they have to get back together to be fully effective.
Other results include “S1” and “S2”, which means Scattered with resulting reductions, either one step or 2 steps. These steps are then tracked on the Airborne Replacement Track with the appropriate division marker. With the result of S2, the first reduction is tracked on the Airborne Replacement Track but the second reduction is lost. Artillery units are handled a bit differently with an S1 result. They will not lose a step but will be flipped to their Fired side and marked with a Scattered marker. An S2 result will eliminate Artillery units.
You will also notice on the Airlanding Table, that there are modifiers for different situations or when the landing spot is not on a clear terrain hex. As the game advances, pressure from the German defense will close or hold certain landing zones and if the zone is a contested or enemy-controlled hex, landing units will suffer a +2 or +3 modifier to their rolls, which will make it more likely that the landing units suffer S1 and S2 results.
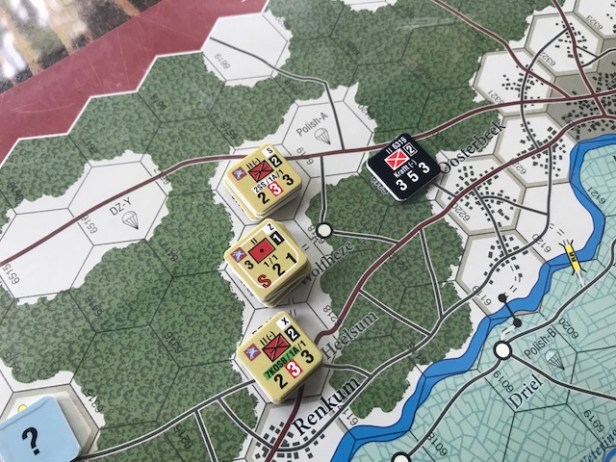
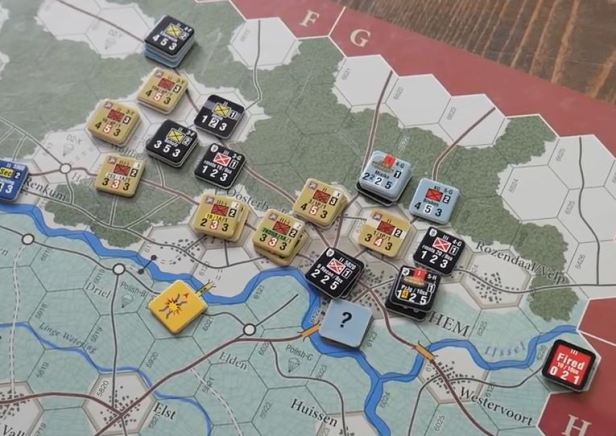
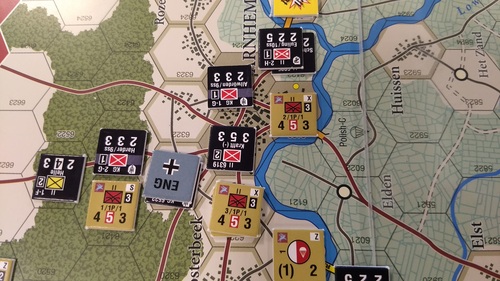
In Holland ’44, Airborne units are considered Elite and gain a combat bonus for this status. If a majority of the steps contained in the lead formation are Elite, they will gain a favorable 1 column shift to the right on the CRT for what is referred to as the Morale Shift. In the example picture below, this Morale Shift is really key in the 1st Airborne units being able to damage the SS units that they will encounter on their way to their Turn 1 objectives, mainly that of Arnhem Bridge.
In looking at the Airborne units counters, you will notice that they are generally 4-5-3 or 3-3-3 units. Their Attack Strength is a 4 or 3, their Defense Strength is a 5 or 3 and their Movement Allowance is a 3. You will also notice that their Defense Strength has a red box around the number which designates them as Elite units. Notice by contrast the German Security Forces unit to the far left which has a white box which means it is a Low Quality unit and it will suffer a negative column shift when fighting if all units involved are Low Quality.
On the right side of the counter, you can also see a small white number in a black box. On the Airborne units, most of them have a 2 or a 3. This means that the unit is either a 2 or 3 step unit and can take multiple reductions before being eliminated.
We really felt that the model used for the Airborne units was spot on. We absolutely loved each Airlanding Phase and those die rolls can be very stressful, especially when negative modifiers are being encountered as German resistance begins to close in on the Allies and encroach on landing zones. They have to hold the Germans from these drop zones to allow for later reinforcements to come onto the board in relatively good shape and their ability to do this is directly tied to their use of various elements in the rules, such as the infamous ZOC Bond.
In Holland ’44, any two units that have at least 2 steps and are in good order and an open space between them form a ZOC Bond, or Zone of Control Bond, that prevents enemy units from moving through between them. These ZOC Bonds are also good as if an enemy unit is forced to retreat across the ZOC Bond, they will be eliminated. Hard to accomplish but very satisfying when it happens. This specific rule is well utilized by the Airborne units as they have a large area to cover with only a few units and this allows them to spread out to quickly address incoming German units.
Supply
When Airborne units jump into combat behind enemy lines, they have to take what will sustain them through combat until those enemy lines are breached and a link is created with other friendly units. This is the case in Holland ’44 as the British 1st Airborne Division, the American 82nd and 101st Airborne will jump into combat with no immediate hope of linking up with their allies. They have to carry their supply, which includes medical supplies, ammunition, food and water amongst other items with them into their drops. Supply is something that you have to worry about as the Allies. Out of Supply units are not effective fighters and cannot be depended upon to meet their objectives.
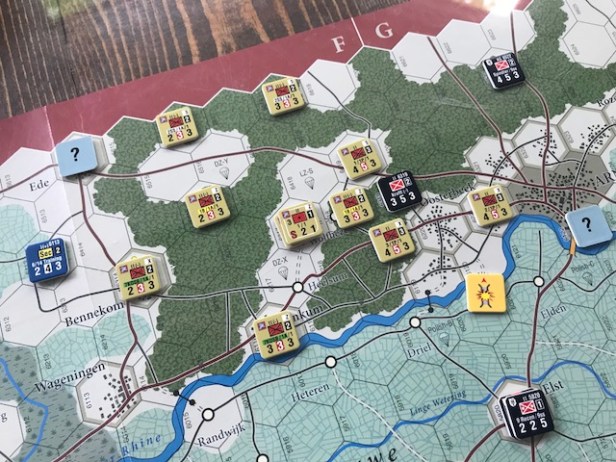
In the picture below, you can see the 101st Airborne Division’s Supply Head located near their initial landing zone north of Son and the Wilhelmina Canal. This Supply Head will last for 5 full rounds, at which time it will be flipped to its depleted side. This will mean that at the end of round 6, the units that depend on it for Supply will be considered Out of Supply if they cannot link up with XXX Corps coming from the south. 6 rounds may sound like a lot but it is really not as each of these Airborne units must get to their objectives quickly and then hold on, hoping that XXX Corps can get to them before they are Out of Supply. This hope burns pretty brightly for the 101st and 82nd Airborne, as it is very likely that they can hold on until they are linked up with XXX Corps but this is a tall order for the British 1st Airborne Division. There main hope is that they capture the bridge head at Arnhem quickly and simply go on the defensive as their Supply depletes itself. You see, when units are Out of Supply, their movement is limited, as they are then only allowed to use Tactical Movement, their Attack Strength is halved and Artillery will not be flipped back to their ready side so are out of the fight. So when Out of Supply, those hefty Elite Airborne units start to look like green rookies as their Attack Strength will be reduced from 4, 3 or 2 to 2, 2 and 1 respectively. Not really numbers that will strike fear into the heart of the German player!

Supply is also very brutal in the terrain of Holland as it is criss-crossed with rivers, polder and large distances. If you are located on a road or next to one, you have no problem reaching your Supply Source as there is no limit to the range of a Supply Path on a road, but when you have to go overland, there is a maximum of 4 hexes allowed and then you will be Out of Supply. The Supply Path also cannot cross an un-bridged major river. Planning is very important and also protecting these vulnerable Supply Heads. If they are attacked, they do offer some resistance with an Attack Strength of 1, but if this happens you are in trouble. Be cautious, plan well how to maintain supply and you will be fine.
British 1st Airborne Division is the Key (for longer scenarios)
My final point in the look at the Airborne units is the plight of the British 1st Airborne. These poor brave chaps jumped into the battle at the location that was the furthest from any form of assistance or rescue. They had to hold their bridge for any hope of success and they had to do it alone, at least for 12-15 rounds in the game. This is a tall order and they will have a tough time of it. But, the entire plan hinges on their success, or at a minimum, them holding out for as long as possible and offering a distraction to the German units in and around the area. If the 1st Airborne Division utterly fails and never is able to at least secure the northern half of Arnhem bridge, those German units that would be used to attempt to stop them can then be diverted south to harass the 82nd Airborne and make their job doubly tough. So why do I bring this up?
Well, for the Allies, the 1st Airborne is the lynchpin. They have to play the game well and not make any critical errors. I don’t want you to confuse my intent here. They don’t have to single handedly destroy every German unit around the bridge and hold each and every bridge hex to be considered successful. Far from it. They simply have to make the Germans continue to fight for the bridge. This will mean that upon landing, the 1st is able to advance toward Arnhem bridge using Tactical Movement or Infiltration Movement to get by that first large Krafft Division counter that is sitting right in the middle of every road that goes to the bridge. They don’t have to outright destroy it but should be able to bring enough fire power against it to make it retreat at a minimum. It is then a foot race to the northern bridgehead hexes. The 1st must secure at least 2-3 of those hexes as quickly as possible and then begin to set up their defensive shield to the west to prevent German reinforcements from dog-piling them from that direction. I an not necessarily a tactical genius by this has to happen. The 1st has about 2 rounds before it begins to get very hairy and they are still somewhere between 12-15 rounds from having any form of support or relief, although they will have reinforcements over time from the Polish Airborne units as well as replacements.
Protecting landing zones is also very important and should be considered their 1A priority, only secondary to capturing the northern bridge hexes. If the Germans are able to push to the east and occupy those landing zones, you will have trouble in the future as your units landing will be exposed to enemy fire and will take more reductions upon landing leading to lessened fighting effectiveness. I really liked this sense of urgency in the design and feel that it is very accurate. Remember that in the historic event, the Red Devils failed to achieve their objectives, because it was not an easy one, and then were totally surrounded and cut off but were able to hold out for 9 days! 9 days without proper supply, food, water and even ammunition. They weren’t called the Red Devils for their table manners I can assure you that! This historical result is very skillfully modeled in Holland ’44. The Red Devils have a chance of succeeding BUT it is very slim. They can hold out BUT it takes proper execution and a little bit of luck. They can be relieved by XXX Corps and the rest of the Allies BUT it will be hard.
In the end, Mark Simonitch did a wonderful job of simulating the Airborne element of Operation Market-Garden. We had a blast with this game and the Airborne units, and the Germans trying their hardest to get in their way, was the best part of the game. We would hang on every single Airlanding roll. We would cheer when they succeeded and groan when the dice were unkind and the paratroopers would land scattered and reduced. Protecting supply was a major challenge and it seemed like the Airborne never had quite enough units to do their job. Great part of the game that gets a superior grade from me in how it simulates the history and also engages players in the struggle.
XXX Corps…and the Support Cast 12th Corps and 8th Corps
Now that we have covered the Airlandings, we will now move on to the major focus of the game. The main event in Holland ’44 is the race of XXX Corps up Highway 69 (affectionately referred to as Hell’s Highway) to attempt to connect with and take Eindhoven Bridge and then on to the more northern bridges over the next few days of the operation. XXX Corps consists of some very powerful armored units, led by Vandaleur’s 2nd Irish Guards battalion, and supported by two equally powerful Artillery units (5 AGRA and Gds Div Artillery) along with a cadre of other support units including Engineers, Bridging units and Motorized Infantry. Their goal is simple, attack and keep moving up the highway, doing all that they can to advance, almost at all costs and without care for losses. Remember, time is against them and they know it as they see what their compatriots are doing or not doing at the various bridges.
But as with all good games and with military operations, if the Allied player doesn’t do some early planning, like properly over stacking units to allow for Breakthrough Combat and Advance After Combat, they will find themselves in an overcrowded quagmire being clogged up by the infamous German Traffic Markers.
12th Corps located on the left is to cross over the Bocholt-Herentals Canal and dislodge the German Fallschirmjager and Penal division from the flanks of the advance. They need to work quickly to get these units out of the way as their main job is to offer a defensive shield from German reinforcements from the west getting onto the highway to slow down the advance. As XXX Corps advances, their supply lines have to stay intact or there is no hope of reaching the embattled 101st at Grave and Son, much less the 82nd at Nijmegen and British 1st Airborne at Arnhem.
8th Corps serves a similar purpose on the right as they will attempt to push across the same Bocholt-Herentals Canal and set up a defensive screen to the east to slow the advance of the German reinforcements from the east. They also can serve a significant role in crossing over the Wilhelmina Canal near Son in case that bridge falls as they will have to focus on crossing the canal and then converging on the German units holed up in the town hexes there defending against assaults across the bridge. They also have Engineers and a Bridging unit that might need to be used on blown bridges as XXX Corps advances, which is a very slow and painful process by the way, just like you would imagine having to build a temporary bridge while under fire is.

Traffic Markers
One of the really great parts of the design is the use of Traffic Markers by the German player to simulate the traffic jams that plagued XXX Corps as they advanced up the highway. Single lane roads jammed with lines of tanks, trucks and other vehicles, worked against the Allies and their meticulous plan. This is very well modeled in the design with Traffic Markers. 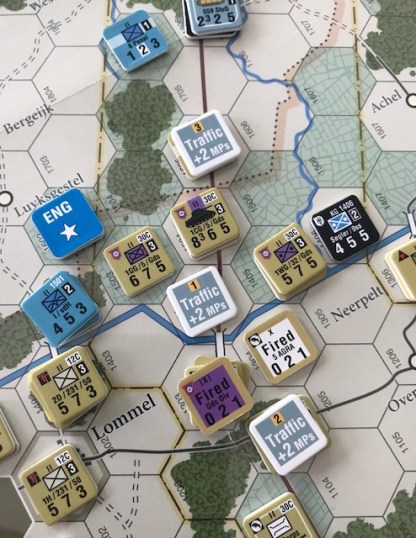
During the Traffic Marker Phase, the German player will be able to place any number of Traffic Markers that are located in the Traffic Marker Holding Box. At the beginning of the game during Turn 1, there will be three available markers and they can be placed by the German according to very specific rules. They cannot be placed on or adjacent to another Traffic marker and cannot be placed in a hex north of the advance of XXX Corps.
These markers cause any mechanized unit entering them to increase the Movement Cost by +2MPs. This has the effect of simply slowing down the advance. The markers cannot be removed by the Allied player. Each of the markers are numbered 1-6 and after placement of new markers, the German player will roll 2d6 and remove the appropriate numbered marker according to the dice roll. So, if the German player rolls a 1 and a 4, if Traffic Marker number 1 and 4 are placed on the map, they will be removed and relocated to the Traffic Marker Holding Box. At any given time, there will be at least 1 Traffic Marker on the road after Turn 1. If the Allies are unlucky, there can be as many as 5 active markers on the board, in the case where all markers are present and doubles are rolled. Then only that numbered marker will be removed leaving the rest languishing on the board slowing down the Allies. The Traffic Markers were pure genius and a well chosen way to abstractly model the problems that XXX Corps had with the small one lane roads. I can tell you that after playing, I don’t want to get in any traffic jams as I may simply have a flashback to the game and lose it. Nice work Mark!
Combat with the Big Guns
 The tanks of XXX Corps are pretty powerful. The previously mentioned Vandaleur’s 2nd Irish Guards battalion are the spear head’s workhorse as they have the best statistics in the bunch. Their Attack Strength of 8, with Armor Rating of 3, is the best amongst the Allies, and their Movement Allowance of 5 is only slightly less than other lighter tanks.
In this example of combat, the Allies are attacking the StuG support unit along with the 3-5-3 Kerutt battalion that has been forced to retreat previously. The Allied Attack Strength is a 14 and there is no positive Armor Shift bonus because of the presence of the German StuG unit which has the same Armor Rating of 3, bringing the total to 14-7 or 2-1. There is however a column shift granted due to the use of an Allied Air Support unit so the final odds are 3-1. The Allies roll a 4 and the result is a DR forcing the Defender to retreat 2 hexes and become disrupted. The Allies then can follow through with a Breakthrough Attack on the retreating unit up to 3 spaces away.
I wanted to show you this example of combat to illustrate how hard combat can be. With 2-1 odds and a roll of 4 on a 6 sided die, you would think that the result would be a bit better for the attacking unit, wouldn’t you? But, in Holland ’44, combat is very tough. The game is designed to take advantage of the various column shifts that are built into the design. Straight up odds superiority of 2-1, 3-1 or even 5-1 will not guarantee great results unless the attacker has column shifts. Column shifts come from elements such as Elite units, Air Support units, Artillery Support or from Armor bonuses in combat. When the Allies are planning attacks, they had better look for not only good solid odds of 2-1, 3-1 or even 5-1, but need to have at least a few column shifts in order to make any real headway. That is one thing that I loved about the design and playing as the Allies. It was tough to make any headway against the defense. I would attack, once again with good odds, and didn’t really ever get results other than DR.
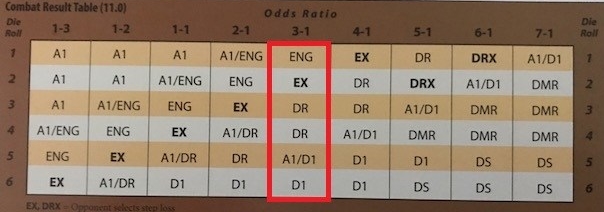
As you can see in the CRT pictured above, even at 3-1 odds, the attacker has 2 results that are detrimental to them, being a roll of 2 with an Exchange (where each side loses one step) and an A1/D1 where each side loses a step. If you follow the chart out to the 7-1 column, you will see that results finally get really good for the attacker. DMR is really good for the attacker because it forces a mandatory retreat and grants the attacker a Bonus Advance and allows them to conduct Breakthrough Combat which can do even more forced retreats to the defender. This becomes very important for XXX Corps as they have to continue to push up the road, never stopping, but always advancing. DS (Defender Shattered) is also a very good result for the attacker as the defender loses a step, must retreat and also grants a Bonus Advance and Breakthrough Combat.’
Now I am not a statistical genius, nor am I so comfortable with CRT’s and odds based combat that I fully understand all of the nuances included, but the CRT in Holland ’44 is brutally difficult to get good advantage. The best that the Allies typically can hope for is to force a retreat and then follow that up with a Bonus Advance and Breakthrough Combat to again force retreat. This can be very effective though as remember the goal, to get XXX Corps up the road to relieve the beleaguered paratroopers and get them aid. With each Bonus Advance you are closer to your goal.
The CRT and combat system in Holland ’44 is very interesting and will lead to lots of tough choices as attackers will find themselves sifting through the units around their targets looking for that elusive advantage through adding a column shift to their attacks. This can be fun and will create lots of analysis paralysis so be ready to think.
Blowing and Rebuilding of Bridges
 Probably should have covered this in the Airborne section above, as this will mostly be a problem that is dealt with by those troops as they look for ways to get across the major rivers that criss-cross the landscape. This was one element with the game that I was not totally sold on. The blowing of bridges seemed to be a bit random and came down to a dice roll.
As you can see on the Bridge Demolition Table to the left, the German player will have to make a decision about when to blow each bridge as an Allied unit occupies the hex directly adjacent to the bridge. The German player will then make a roll on a 6 sided die and consult the Table. On a roll of 3-5, the bridge will be demolished and a marker will be placed on that bridge denoting that it cannot be used until it is rebuilt by Engineer units. On a roll of 1-2, the demolition failed and will not be able to be tried again until the German player resets the charges, which will take a turn. There is a difference on Turn 1 though that tries to simulate the concept of the Germans being taken by surprise. On Turn 1 only, there is a -1 DRM to these demolition attempts so they will only be blown on rolls of 4-6. I believe that this model is a good one for this game as the Germans did attempt to blow many of the bridges rather than lose them to Allied hands and allow for an unfettered crossing into occupied territory. The odds are generally such that the Allies can expect to have at least one crossable bridge over each of the major waterways along Hell’s Highway. I think this inclusion is one more feather in the cap of the design and shows us that this game is a really good simulation of Operation Market-Garden.
Overall Play Experience
Alexander and I both loved this game. I loved it so much that I included it at #8 on my Top 10 Wargames Released in 2017 list published in February. Holland ’44 is a fantastic ballet of mechanics that creates a very interesting and extremely challenging game for both the Allies, who are racing up Hell’s Highway to take three key bridges to enable an invasion over the Rhine River and into Germany proper, ending the war by December 1944, and the Germans who are desperately trying to prevent the Allies from reaching their goals through the use of explosives to blow bridges, and trying their best to envelope and eradicate the 1st Airborne desperately trying to capture Arnhem Bridge until the cavalry in the form of XXX Corps can arrive.
One of the great things about this game is the ZOC Bond system that allows both the Allies and the Axis to use this mechanic to aid in the accomplishment of their ultimate goals. The ZOC Bonds allows for a thinly spread line of troops to work together to prevent enemy units from simply blowing through gaps in the line. When two friendly units have an open hex in between them, this hex is in the middle of a ZOC Bond, or Zone of Control Bond that allows each unit to hold the hex from outside of the hex. Amazing design element as it is used equally as well by both sides, but at different parts of the battlefield. The surprised and relatively weak German units stationed at the south of the map have to delay the advance of XXX Corps for as long as they can and the ZOC Bonds really help them here. While in the north near Arnhem (the famous Bridge Too Far), the 1st Airborne have to hold their own at their drop zone while being overmatched by the SS units until they get reinforcements later while simultaneously pushing to the east toward the bridge.
This game is fantastic and I have really enjoyed my two solo plays and our lengthy 10 hour marathon play. I can say that this game rewards aggressive action, both on the Allied part to move as fast they can toward the bridges and with the Germans as they receive reinforcements that must push to the center of the map to fill the gaps and delay the Allies advance for as long as possible. I also really enjoy the Traffic Markers that can be placed by the Germans on the highway, simulating traffic jams and destroyed vehicles on small one lane country roads. Lots to like here that will be received well by many acolytes of the ’44 system.
Please let me know your thoughts on this great game and your experiences. I know that this review was very long but I could have made it longer as there were several parts that I didn’t discuss, like victory conditions and hidden units (oh man, when you uncover one of those 88s, it almost makes your heart stop!).
-Grant

