
Continuing along in this new series devoted to the best looking boards found in the wargaming world where every other Friday, I will highlight the art and layout of a different board in a wargame that we have played to show you the various talents of the artists and graphic designers involved. In my humble opinion, a well designed and attractive board can make all the difference in the world to me enjoying a wargame. Don’t get me wrong, the game has to be good, but if it’s also good looking it always is a better experience. A board can draw me in. Can make me feel that I’m there. Can set the stage for the thematic immersion that we all crave. And I have found many of these type of boards and I want to make sure that I share them with you.
Mark Simonitch is a veteran game designer and artist as he typically does much of his own map and counter artwork and layout. He has designed some really great wargames including titles such as Ardennes ’44: The Battle of the Bulge (2003) from GMT Games, Normandy ’44: D-Day and the Battle for Normandy (2010) from GMT Games, The U.S. Civil War (2015) from GMT Games and most recently Salerno ’43: The Allied Invasion of Italy, September 1943 (2022) from GMT Games. A few years ago, we played and simply fell in love with Holland ’44: Operation Market-Garden, September 1944 and a big part of that was the gorgeous map and its graphics. At that time, we were still fairly new in our journey into hex and counter wargames and the map just was so amazing that it urged us on to explore other games in the genre. I would characterize Mark’s style as clear and very functional but he always puts nice touches on terrain and important aspects such as bridges, roads and cities. His maps just seem to pop and really set a great mood for his games.
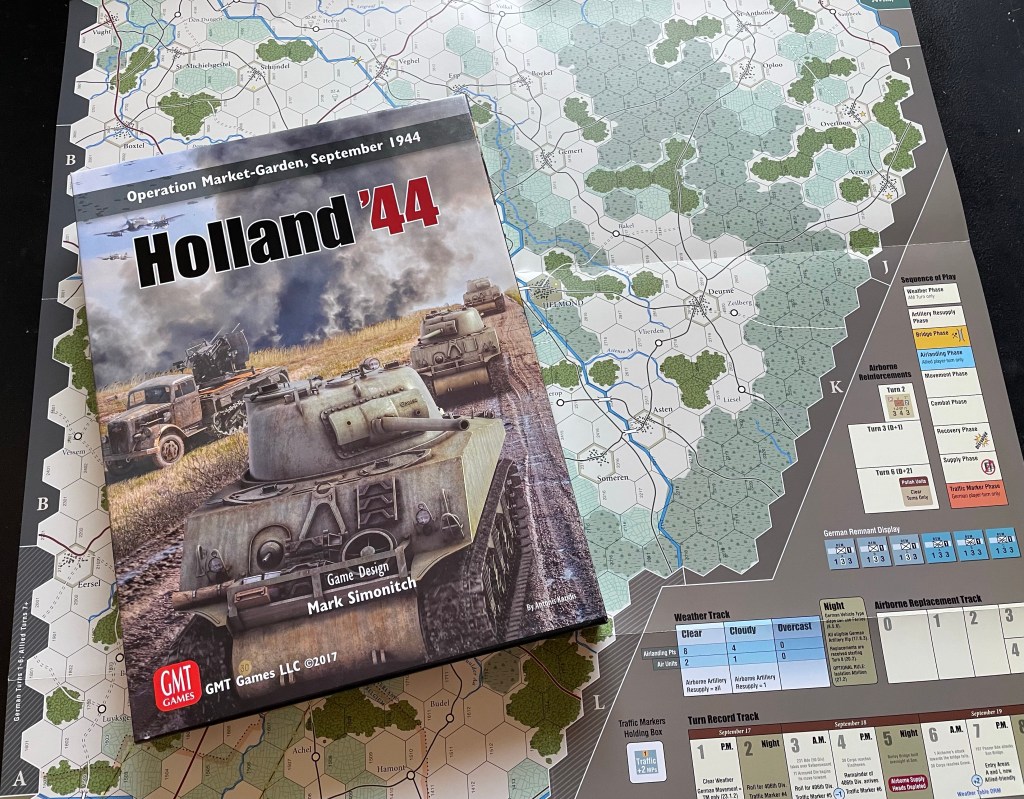
Holland ’44: Operation Market-Garden from GMT Games is a hex and counter wargame that focuses on the September 1944 invasion of German occupied Holland in an attempt by the Allies to secure a bridge head over the Rhine River leading into Germany itself. The game uses a system that has been used in 2 others games designed by Mark Simonitch, Normandy ’44 and Ardennes ’44, which is pretty simple to understand and provides realism in the various aspects that are being modeled. In this game, airlandings, bridge demolition and traffic congestion are all expertly modeled to create a fun, interactive and most importantly tense experience for either side. The particular historical elements from the campaign are really important to the game but also to the design and layout and functionality of the map, including Airborne Operations, such as paradrop landings, supply sources, landing zones and bridge capture, as well as a focus on traffic congestion on Highway 69 (Hell’s Highway), bridge destruction by the Germans and rebuilding them by the Allies, and the terrain of Holland amongst other things.

In looking at the board, it is very long and tall and is actually divided up into 2 separate halves. The bottom half of the board, which commences just to the south of the Bocholt-Herentals Canal and extends just to the north side of Nijmegen, is a 22 x 34″ full color board. The 2nd part of the board is a smaller 17 x 22″ full color board that starts with an overlap at Nijmegen to the north side of Arnhem. Together the board covers a whopping 22 x 43.5″ of beautiful full color playing surface! Now you might be questioning my addition there but remember there are a few inches of overlap to take into account.
The functionality of the board is fantastic as the hexes are large and roomy and the terrain is very well done with rivers (both Major and Minor), canals, streams, roads (both Primary, Secondary and Minor all different) and bridges shown with consistency but with color differentiation for easy identification. I really like the use of the trees in the Woods hexes and the more difficult to pass terrain such as Polder and Marsh have really clear illustrations. We will discuss each of these aspects a bit further later in this post but I felt that this board was an excellent wargame canvas and made the game highly playable.
There also is a clear distinction about where the various boundaries are in the game including National Border and Corps Boundary Lines. In the below picture, you can see the National Border between Belgium and the Netherlands shown with a dotted peach colored line and crossing through the same area of the map you can see a Corps Boundary Line that has a dashed line with a single black dot in the middle and highlighted in yellow. These markings become important to the activation of the different armies involved and matter as the game progresses.

At the very bottom of the board is the source of these Corps Boundary Lines. Printed atop the title found on the board, you will see the 3 different Corps entry areas printed including 12 Corps on the left, 30 Corps in the center and 8 Corps on the right. The Corps Boundary Lines meander around a bit but all come to the bottom to link up with the source so players can trace back these boundaries as they push to the north attempting to quickly cross the Bocholt-Herentals Canal and get into the action so they can push on Eindhoven and get moving on Hell’s Highway.

Let’s now take a closer look at the 3 main bridges which were the primary targets of Operation Market-Garden and were key in keeping the road open for XXX Corps to assist in the operation and push the Germans out of Holland. Now I understand that there are dozens of smaller bridges involved in this operation but just want to highlight the 3 major objectives. Also, Highway 69, which would later come to be known as “Hell’s Highway”, leads through the planned route and was a pretty simple two lane wide road, partly which had been constructed and raised above the surrounding flat terrain of polder or floodplain. The ground on either side of the highway was generally too soft to support vehicle movement and there were numerous dikes and drainage ditches. Along this route, there were six major water obstacles between the XXX Corps’ jumping-off point and the objective of the north bank of the Nederrijn River, including the Wilhelmina Canal at Son en Breugel, the Zuid-Willems Canal at Veghel, the Maas River at Grave, the Maas-Waal Canal, the Waal River at Nijmegen and the Nederrijn River at Arnhem. The plan was to seize and secure bridges across all these water obstacles as simultaneously and quickly as possible using airdrops in nearby areas. If the plan failed, it could result in various crossings and bridges being blown and a serious delay in the advance of XXX Corps leading to ultimate defeat. Also, the operation was broken into 2 distinct parts. Market included airborne forces of Lieutenant General Lewis H. Brereton’s First Allied Airborne Army to seize bridges and other terrain, under tactical command of I Airborne Corps under Lieutenant-General Frederick Browning. Garden consisted of the ground forces of the Second Army to move north spearheaded by XXX Corps under Lieutenant-General Brian Horrocks.
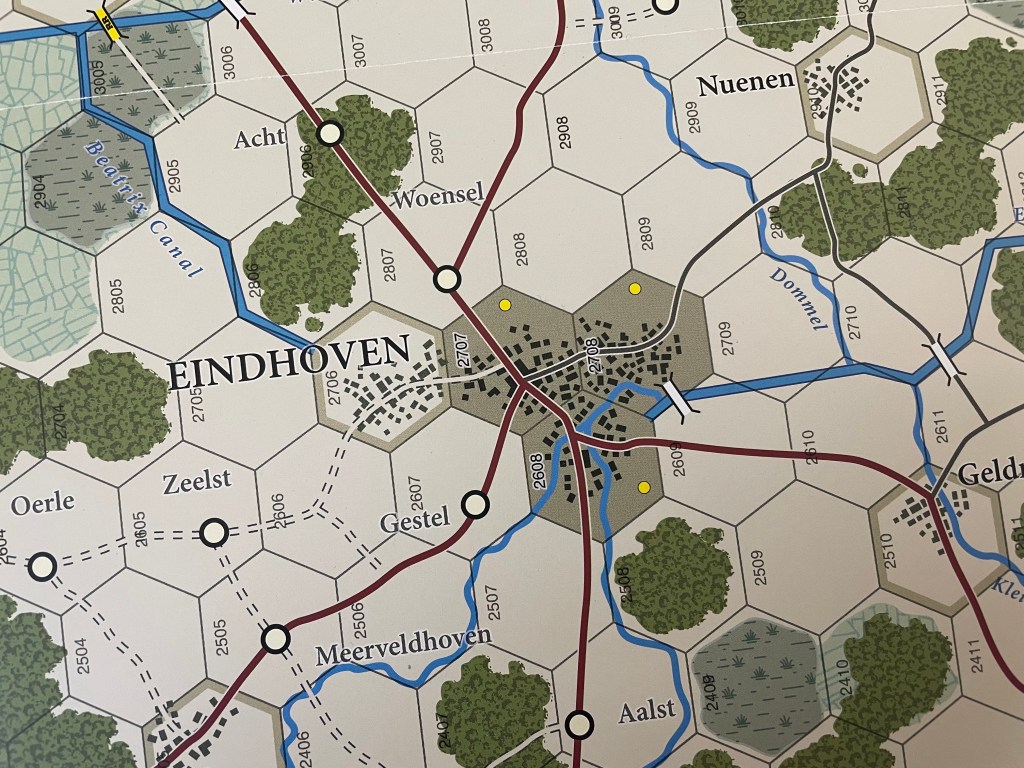
First up, let’s take a look at Eindhoven.
On the board, Eindhoven is shown as a mix of 4 different hexes located to the west of Eindhovensche Canal including hex 2708, 2707, 2706 and 2608, and at the crossroads of 2 major roads. 3 of those hexes are made up of dark gray coloring with clusters of black squares and rectangles representing buildings to form the City terrain. You will also notice the presence of small yellow circles drawn in those hexes that denote that an unknown German defensive unit similar to a garrison will be setup in those hexes. The final Eindhoven hex is a Town terrain hex and has the similar squares and rectangles but is missing the dark grey fill for the hexes. When playing, I thought this choice for color differentiation was important as it is readily recognizable when absent counters but once counters move in it can be a bit trickier to differentiate the City from the Town hexes.
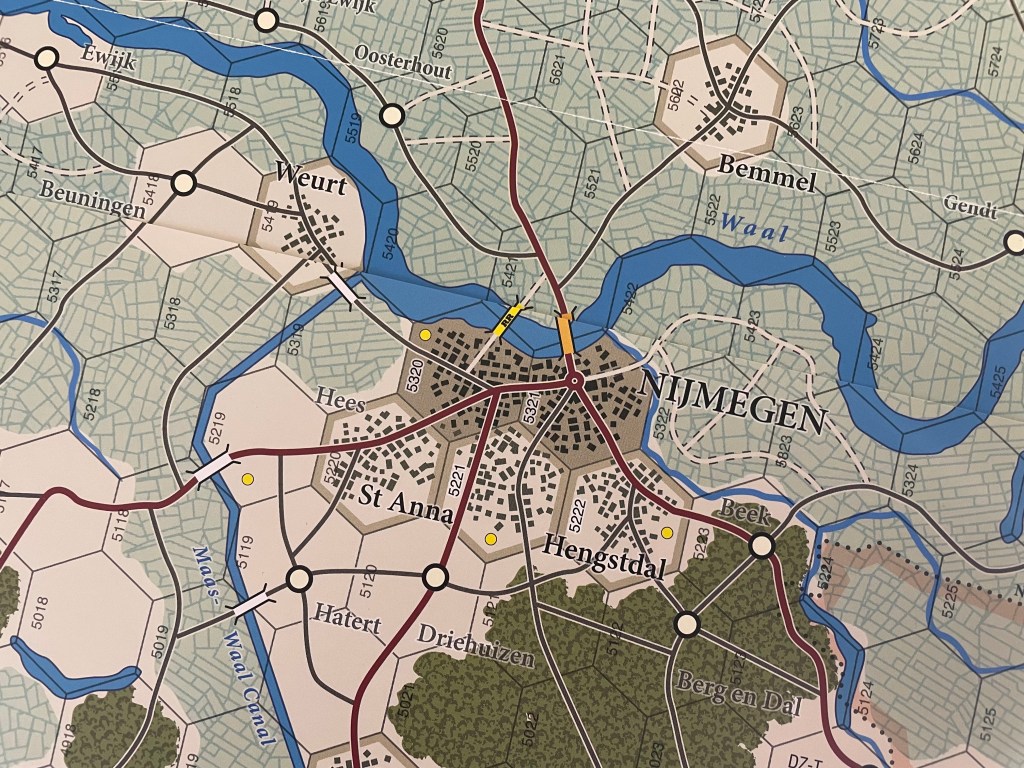
Next up comes Nijmegen.
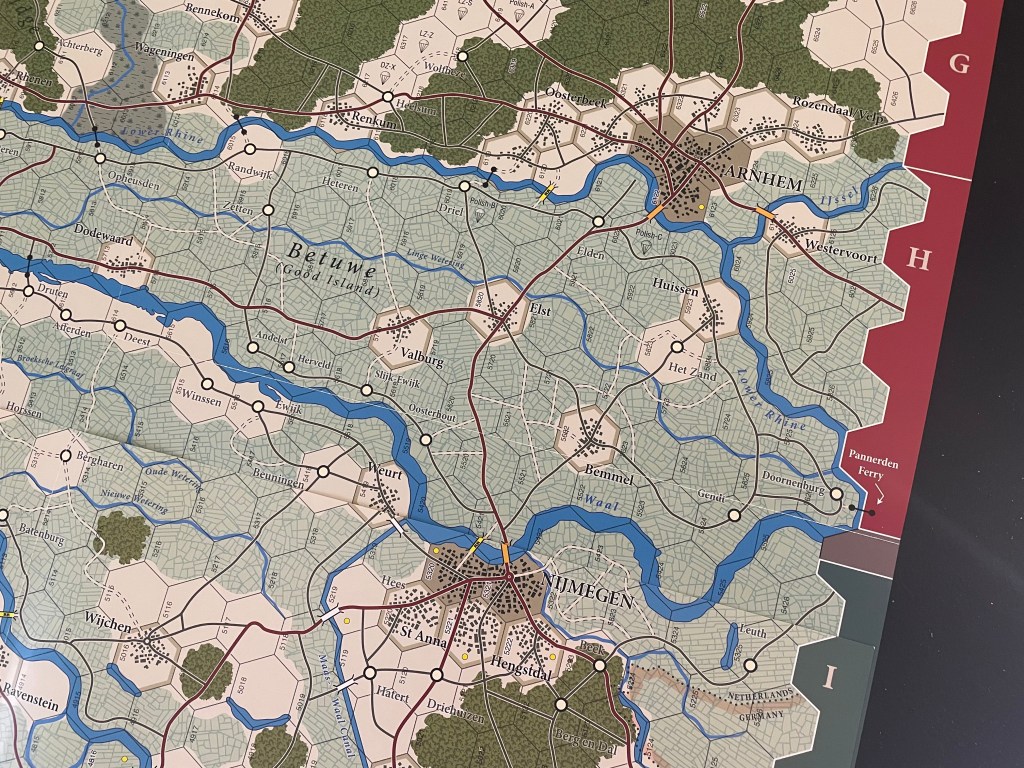
On the board, Nijmegen is shown as a mix of 5 different hexes located to the south of the Wall Canal including hex 5320, 5321, 5220, 5221 and 5222, and is the only really reliable way across the canal via its two bridges. 2 of those hexes are made up of dark gray coloring with clusters of black squares and rectangles representing buildings to form the City terrain. Again, you will notice the presence of small yellow circles drawn in those hexes that denote that an unknown German defensive unit similar to a garrison will be setup in those hexes. The final 3 Nijmegen hexes are Town terrain and has the similar squares and rectangles but is missing the dark grey fill for the hexes. One thing that I want to point out here is that this is where the two different board segments overlap. You can see that the overlap is a bit off in this picture but I did that to show you when in reality with careful placement you can match these two different segments up perfectly and there will be no appearance of anything being off.
You will also notice one of the most prevalent Terrain types in the middle of the board is Polder. Polder is a representation of the soft marshy ground here that is very difficult to pass through. These areas are segments of land that have been reclaimed from the surrounding rivers and canals using a system of dikes. It is shown with a steel blue color and many different lines and polygons representing the different dikes. Here is a look at a real picture of the terrain and how well Mark has captured it on the board.
Finally there is Arnhem.
Arnhem is shown as a mix of 7 different hexes located on the north bank of the Lower Rhine River including hex 6122, 6221, 6222, 6223, 6321, 6322 and 6323. 3 of those hexes are made up of dark gray coloring with clusters of black squares and rectangles representing buildings to form the City terrain. Again, you will notice the presence of one small yellow circle drawn in hex 6122 that denote that an unknown German defensive unit similar to a garrison will be setup in this hex. The final 4 Arnhem hexes are Town terrain and has the similar squares and rectangles but is missing the dark grey fill for the hexes.
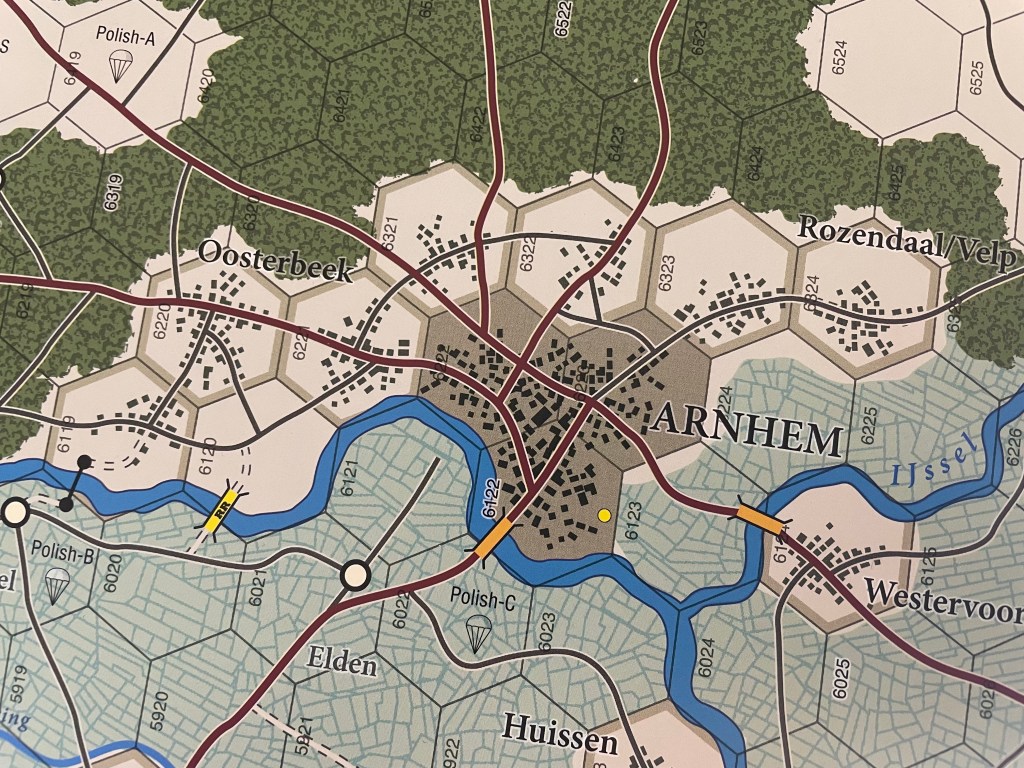
This Polder terrain is a real challenge and will be the most difficult part of the game for the Allies as they reach Nijmegen and approach Arnhem to capture the bridge there and relieve the 1st Airborne. This is just a huge swath of impassable Polder terrain and it is quite striking when you see it on the board and realize how difficult to maneuver this No Man’s Land is.
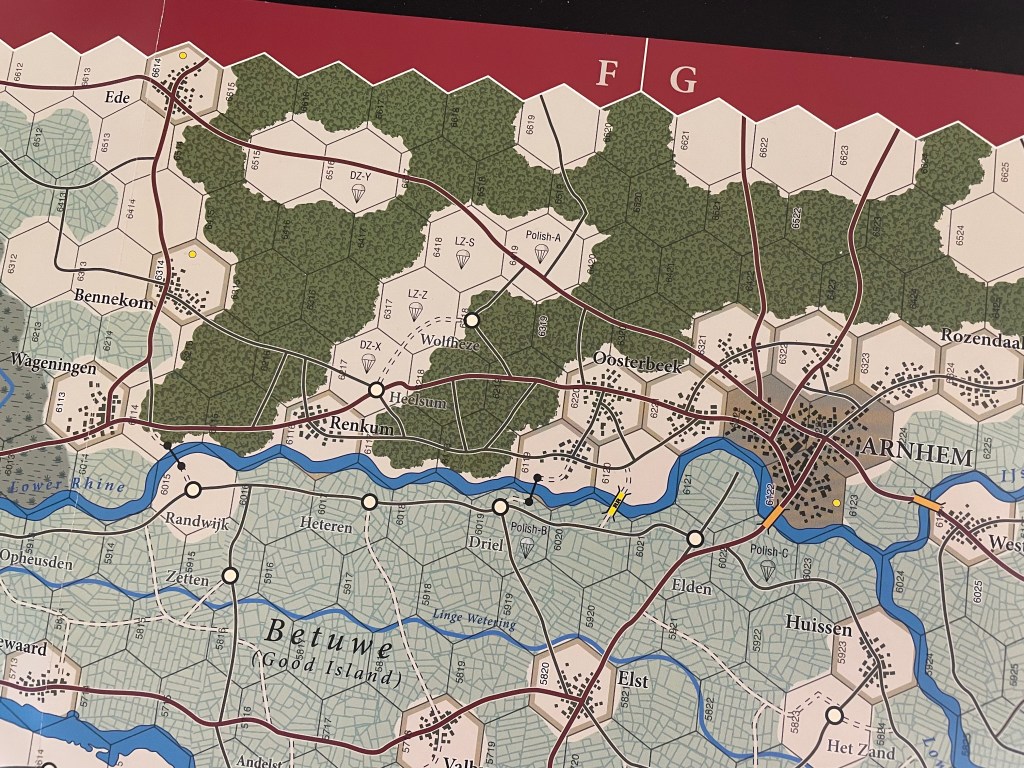
The next part of the board that I would like to focus on are the various Drop Zones that are identified on the map with a parachute symbol. As you know, the three participating Airborne Divisions all had different objectives. The Drop Zones near Arnhem are a really tough meat grinder area as they will be on their own in the fight for many turns until 30th Corps can get to Arnhem. You can see that there are multiple Drop Zones for the British 1st Airborne in DZ-Y, LZ-S, LZ-Z, DZ-X as well as some for the later round Polish Drop Zone in Polish-A.
The 1st Airborne are trying desperately to create perimeter around their landing zones near Arnhem while also putting up a defensive screen for German units approaching from the west and simultaneously racing the German SS units to the hexes outside of Arnhem Bridge. These objectives are critical and will not be easy. In fact, it is possible for the 1st Airborne to control at most 3 hexes in that area, one Town hex and two City hexes, at the end of Round 2. Their first combat against the Krafft SS unit cannot end in an elimination result so the SS unit will retreat and on the German half of Turn 1 will simply use Tactical Movement to snug up next to the British 2/1P/1 unit in Town hex 6221. The unit can however use Infiltration movement to make it into hex 6122 to attack the Unknown unit on Turn 2 but I am not sure that is more beneficial than holding the SS units back allowing the British 3/1P/1 unit to take their place so they can move to hex 6223 to hold both City hexes. Interesting tactical decisions here for the 1st Airborne Division.

The 82nd have their hands full as they have to somehow land intact and make a rush to Nijmegen Bridge to establish themselves in this area. There are several Unknown units in the City and Town hexes here which can be a real cakewalk, if they all end up being 0-0-0 Garrison units (that get removed upon being uncovered). The also must immediately be concerned about attempting to gain control of the bridges at Mook (in this picture not yet controlled), Malden (shown as blown) and Hatert (intact and captured) as well as make progress toward capturing the bridge at Grave (shown as contested with 2 82nd Airborne units attacking from each direction), which can be attacked from both sides. Aside from taking bridges, they must also be concerned about protecting their drop hexes outside of Groesbeek from pressure coming from the German 406th Division that will arrive over a period of the next three turns to harass the 82nd’s flank. If the 82nd can’t get control of Grave by the end of Turn 2 and control their landing area, they are in for a very tough fight and will have to simply hunker down and await support from 30th Corps that is coming from the south.

The 101st Airborne Division has a tough task ahead of them as well, although they do not have much resistance at first as they are only Unknown units at the bridges they are targeting including Veghel, Son and Best. These bridges have to be taken and you will have to hope that they are not blown by the German as part of their Bridge Phase. Here is a look at the Best and Son Bridge Drop Zones. You will notice that there are 3 Drop Zone hexes including hex 3206, 3207 and 3306. These Drop Zones are very important and have the objective of capturing both the bridge at Best and Son.

Of the three bridges here, Veghel and Son are the most important. They must have a way for 30th Corps to be able to get across the Wilhelmina Canal without having to do bridge assaults as they are simply brutal, as they halve the attacking units Attack Strength. The Germans will also have significant reinforcements coming onto the board to the west of this area following Turn 2 and the 101st must be quick about their work.

Holland ’44 is quite the game and has a beautiful board to back up the fantastic game play! The board just transports one to the battlefield and really sets out the tone of the game and creates a unique vantage point on this ill fated and probably overly optimistic plan by the Allies during late 1944. Prophetically speaking before the operation was British Lieutenant-General Frederick Browning, who was a Deputy Commander of the First Allied Airborne Army under Montgomery. He’d supposedly said ‘I think we may be going a bridge too far’ before the operation. Well, that statement came to be true and the Allied campaign failed just one bridge shy of victory. I have played Holland ’44 several times, mostly solo, but I will play this one at any time the opportunity presents itself.
Here is a look at our unboxing video for Holland ’44: Operation Market-Garden, September 1944:
We also did a video review and you can watch that at the following link:
I also wrote a fairly in-depth review for the blog and you can read that at the following link: https://theplayersaid.com/2018/07/19/i-think-we-may-be-going-a-bridge-too-far-a-review-of-holland-44-operation-market-garden-from-gmt-games/
The next board that we will take a look at in the series is Maori Wars: The New Zealand Land Wars, 1845-1872 from Legion Wargames designed by John Poniske and illustrated by Nils Johansson.
Here are links to the previous entries in the series:
Kekionga!: A Dark and Bloody Battleground, 1790 from High Flying Dice Games
Campaigns of 1777 in Strategy & Tactics Magazine #316 from Decision Games
Battle Hymn Volume 1: Gettysburg and Pea Ridge from Compass Games
From Salerno to Rome: World War II – The Italian Campaign, 1943-1944 from Dissimula Edizioni
This War Without an Enemy: The English Civil War 1642-1646 from Nuts! Publishing
-Grant

Nice assessment! The board captures the campaign, and you capture the board 🙂
LikeLiked by 1 person
That was an interesting read. I thought “board beauty is in the eye of the beholder” but explaining the attention to detail really opened my eyes (pun unintended). Especially the comparison to real world Polder.
Informative and well written article!
LikeLiked by 1 person
Great article and very cool idea for a series. I have not had the chance to play any of Simonitch’s ‘40’s games yet but but I do have France ‘40 on my P500.
LikeLiked by 1 person
I see Mr. Simonitch’s graphic work as “evolved Redmond Simonson”.
To me, that is high praise as the unambiguous clarity in service to playing the game is paramount.
Computer graphics have made it possible to enhance the aesthetics to make the map very pleasing.
LikeLiked by 1 person