Mark Simonitch is a pretty amazing designer. He has a talent for distilling conflicts down to a simple, not simplistic, understandable and playable system that models the important points of its history. This is especially true with his ZOC Bond System more commonly known as the ‘4X Series of hex and counter wargames. The ZOC Bond System is a combination of the traditional concept of a Zone of Control or ZOC with the additional concept of a Bond that extends along the hex spines from one unit to another creating an area that cannot be exploited by enemy units. In a normal Zone of Control, a unit will generate a ZOC in the hexes they are adjacent to that forces enemy units to stop when they enter. These units can on a later turn move through the ZOC, usually with a movement penalty or cost of some kind, and get at non-combat units in the rear such as HQ’s, artillery or disrupt supply.
The main difference with a ZOC Bond is that the area between 2 units that are separated by only one hex is considered to be impassible., with the exception of certain terrain features that will nullify this ZOC Bond. As an added kicker, this ZOC Bond also will prevent free retreats through the area and also will stymie supply from reaching units on the other side of an enemy ZOC Bond. This system is the perfect situation for a low counter density game. Because you don’t have as many units to create a long, unbroken line of units preventing enemy units from getting through, these smaller scale units use their maneuverability, fire power and positioning to create the same effect.
We have played several of the games in this series, including Holland ’44, Stalingrad ’42 and now Salerno ’43. We also own, but have yet to play, Normandy ’44, Ardennes ’44 and Ukraine ’43. I personally really enjoy this system and find that Mark does a fantastic job with adding the bits and pieces from history, including the historical OOB, and providing interesting and competitive victory conditions. We found this to hold true for Salerno ’43. In this First Impressions post, I want to simply share my thoughts after our first play of the 8-turn Avalanche scenario.

Landing Procedure is Interesting and Abstracted….but Important
In a lot of wargames that deal with a famous amphibious landing, such as Fortress Europa or the recently released The Dark Summer, designers are forced to instill a fairly lengthy and complex process to simulate the contested landings on those beaches. In several of these games, I have found the procedure burdensome, difficult and time consuming without much of a better outcome than if it was just an abstracted process. But in Salerno ’43, this landing procedure is fairly simple and very abstracted and interesting enough that I found it to be fascinating and very well done. The landings at Salerno Bay were not as heavily contested by a dug-in enemy force that had months to plan for an invasion like at Normandy or some of the Pacific beach landings like Tarawa, Saipan or Peleliu. This landing also was not preceded by a protracted naval bombardment of bombing campaign. The Allies landed the British Eight Army in Calabrio south of the Bay of Salerno and the Germans had to siphon some forces off to meet them as they traveled the 300 miles to this area. I think because of that Mark wanted to make the landings less about the resistance to them and more about the advantage from a clean landing.
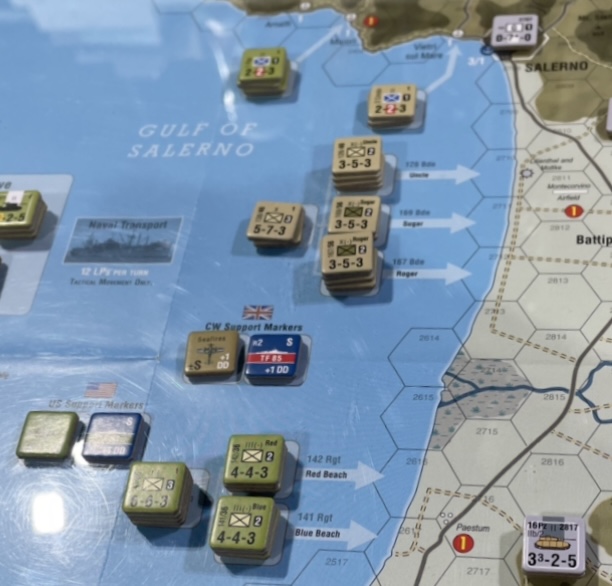
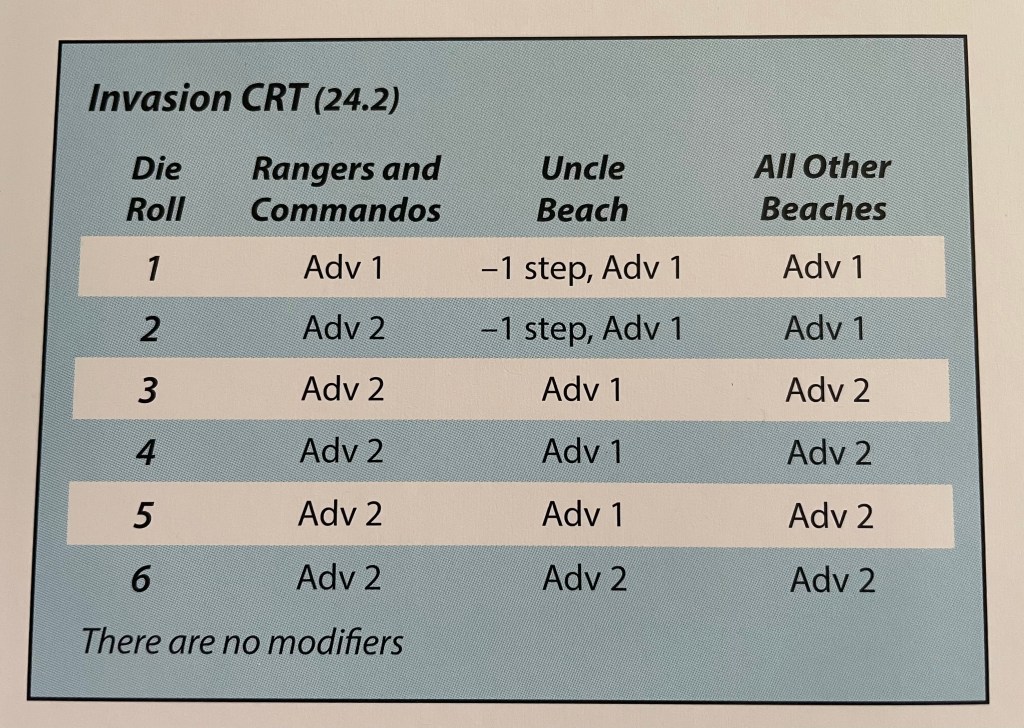
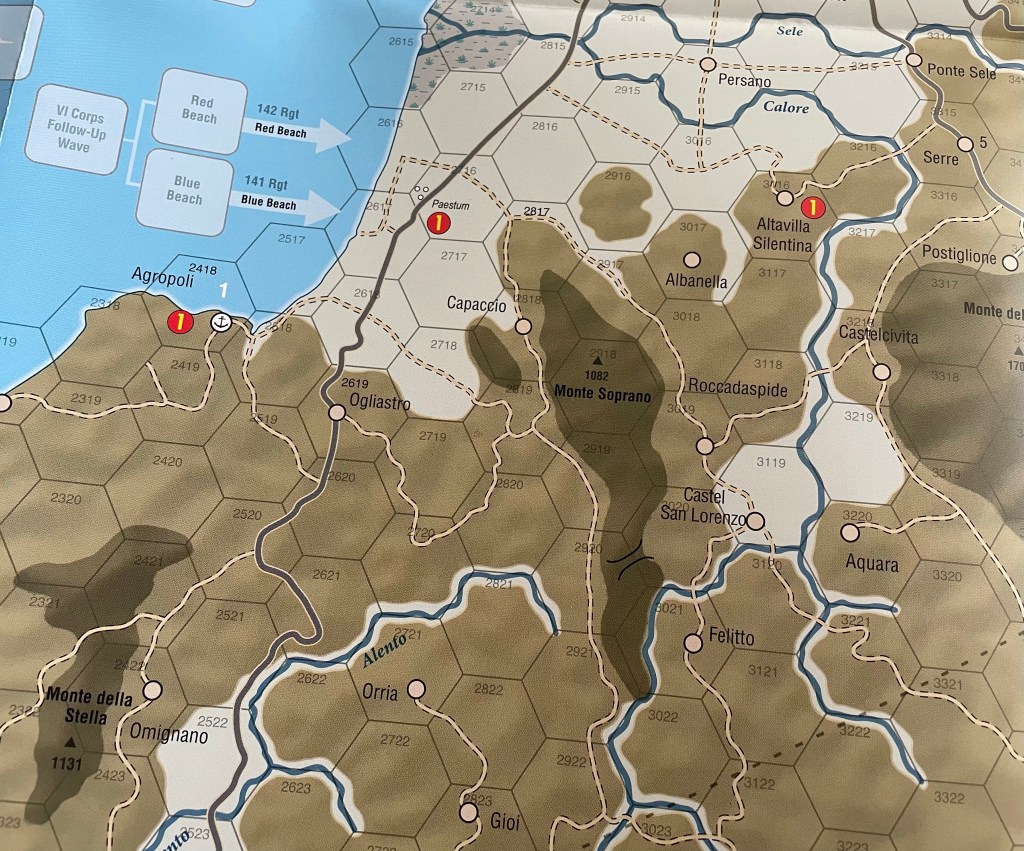
As you can see in the setup picture above, there are 9 Allied Landing Boxes in the form of beaches/ports, 5 for the Commonwealth and 4 for the Americans. These are designated from north to south as Rangers, Commandos, Uncle, Sugar, Roger and a 2nd Wave area behind them, then Red Beach, Blue Beach and a 2nd Wave area behind. The landings use a special CRT called the Invasion CRT and it has 3 columns, one for just the Rangers and Commandos, one for Uncle Beach and then one for all other beaches. There are no modifiers for this CRT and the player simply rolls for each of the invading stacks of units and the consults the appropriate table for the results.
You will notice that only 2 of the results out of 18 include any kind of step loss, and those are a 1 or 2 result on the Uncle Beach column. This takes into account the presence of a big and nasty hedgehog placed there on the beach by the German defenders. The rest of the results are all either Adv 1 (Advance 1 hex) or Adv 2 (Advance 2 hexes) after landing. These are important as good results lead to the Allies being able to get up the beach and create some space from which to receive the inevitable attacks of the Germans on their turn after the landings. This doesn’t seem like much of a difference at first though of only 1 hex but in reality it makes all the difference in the world allowing for the next waves to land and have at least 1 hex of clear beach to maneuver on and get into the effort to protect the precious Beach Heads. It also allows the front line the ability to retreat if attacked and not be jammed up with the other recently landed or future landing units.
I thought this Invasion CRT was well done. It was quick, only happening on the initial landing phase starting out the game, and simple to adjudicate as you just roll and refer to the appropriate column. I was unlucky with my rolls in the game as most of the Allied landings only advanced 1 hex and I lost a step on Uncle Beach, which was a sore that I had a hard time recovering from initially. But my 2 landings that did go well gave me a head start on securing important Victory Point hexes in Paestum located east of Blue Beach and the Montecorvino Airfield located east of Sugar, or at least putting the pressure on the German defenders, to keep me from those VP hexes.
Protect the Beachhead
After the Allies land on the 7 beaches/ports, they have got to get off of the beaches and create a shield to protect those precious Beach Head Markers. This is where the ZOC Bonds mentioned at the outset of this post came into play, but more on this later. Suffice it to say, the Allied player has got to get organized and moved off the beaches in order to create the shield needed to hold back the advancing Germans. One of the really interesting parts of the design is the terrain bonuses that are given to defending units. These include the Hills, Mountains and Minor Cities. While a defending unit is holed up in one of these 3 terrain types their defensive value is doubled with the exception of any tank silhouette units which are not doubled. If a good sized stack of German defenders can get to a few of the Minor Cities just out of the Salerno valley they can really be sticky and hold off multiple attacks from Allied units. Because of this, it somewhat becomes a bit of a race. Not necessarily a race to get there first, as the Germans are not far form them, but a race to get there and keep the pressure up with repeated attacks before fresh units can arrive to spell the beleaguered German units.
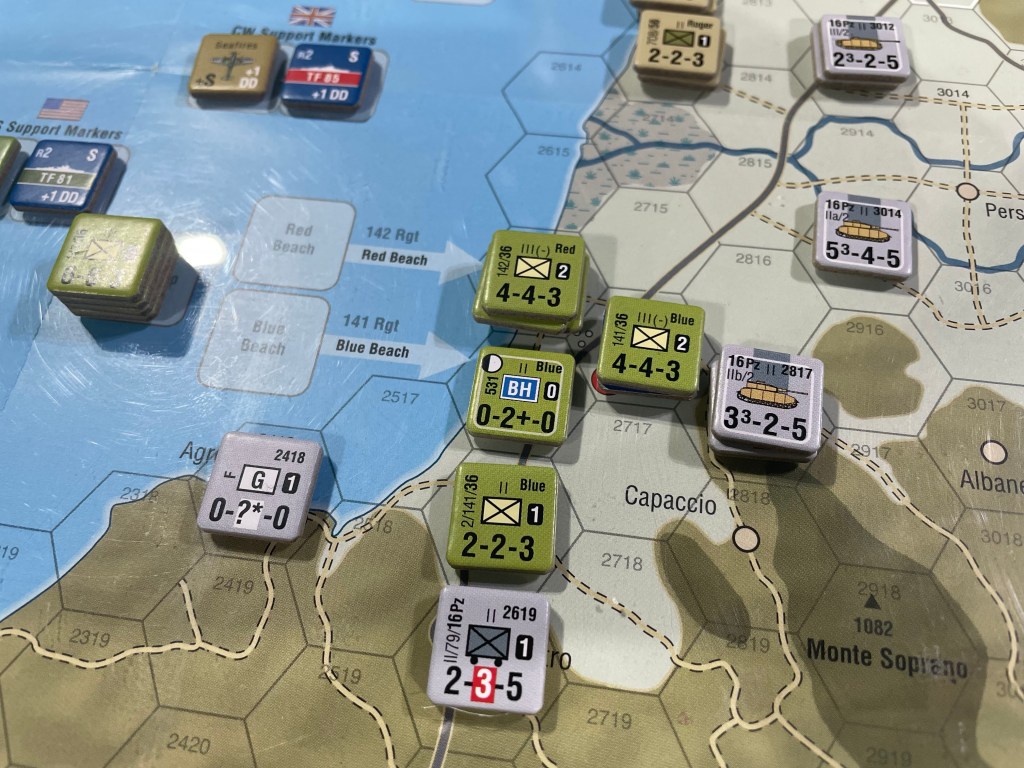
The other aspect that I thought was really interesting was the Allies angst over protecting their Beachheads as they are under pressure by very capable German units just a few hexes away. I remember talking with Mark Simonitch in an interview we did with him where he stated that some of their play-testers has lost a couple of Beachheads from German counterattacks. I actually didn’t think this was possible until we started playing and then I felt the same angst! Waiting for the Allies is the full-strength 16th Panzer Division, which is soon reinforced by elements of six others: the 3rd, 15th, and 29th Panzergrenadier Divisions, the 26th Panzer Division, the Hermann Göring Division and five battalions from the 1st Fallschirmjäger Division. As you can see in the above picture, the 16th Panzer has some good units in their Stug III’s, and mobile infantry. Their good Defense Strengths make them tough and several of the units are also elite (shown by the red box around the Defense Strength). This can lead to a column shift if the attackers don’t have an elite unit present and couple that with the doubled Defense Strength in the hills and it is a long and hard road to push them out of the hills to allow for Allied breakout.
I guess one of the real problems with the invasion was that the Allies just didn’t possess enough shipping. After they dropped off the four initial divisions it took them 6 to 8 days to return with additional divisions as well as fuel, ammunition and food. This fact lead to the Allies being stalled on the beaches for the first 3-4 days of the invasion and this is modeled pretty well as it takes at least 2-3 turns to make it off the beaches. The Allied air support and the support unit artillery make it possible for some column shifts as most of the attacks early on are on the 1/1 column of the CRT and they are not good with fully 4 of the results being bad for the Allies.
ZOC Bonds are Important Early
As I mentioned in the introduction, the ZOC Bond System is really made for these type of low counter density games where you don’t have enough units to cover the ground you need to defend and have to rely on these sticky ZOC’s and ZOC Bonds. We found in this game, that ZOC Bonds were only important in the early going though or until the Allies can break out of the Beachheads and begin making progress up the mountain roads and passes. At that point, they turn more toward effecting the supply status of defending units as an infantry unit’s ZOC can extend over a hill side or mountain hex side. This can be very important in the effort to disrupt supply and isolate German units. This doesn’t happen that often but I found that I was looking for those opportunities as an additional way to cause losses through attrition.
Weather Roll is very Key
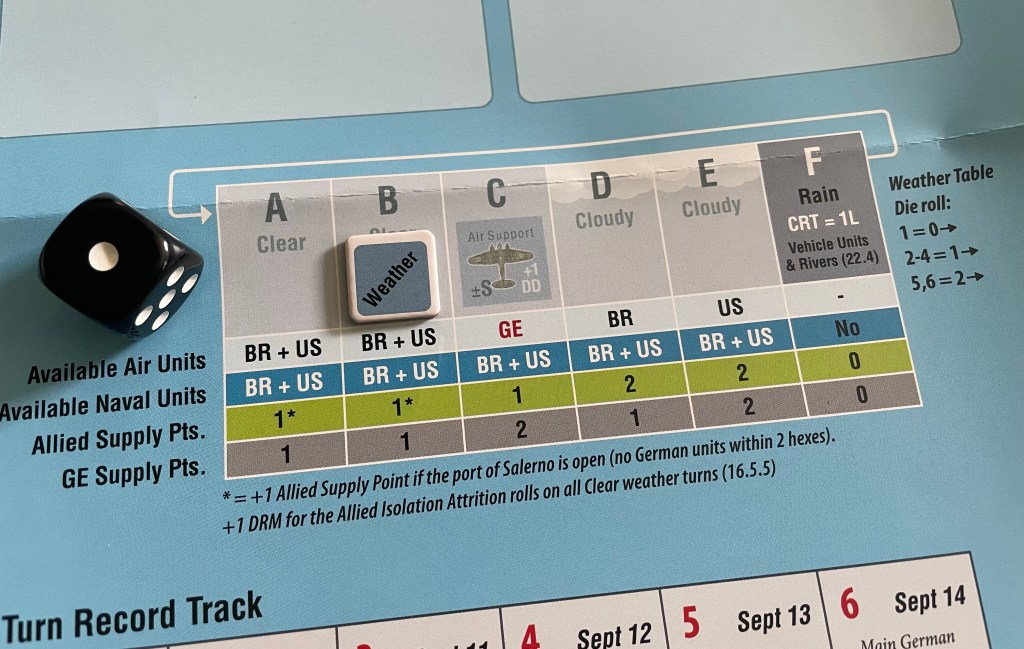
One of the more interesting aspects of the design was the Weather Roll and the Weather Table. At the outset of each turn, the players will roll a d6 to understand how the weather might change. As you look at the Weather Table below you will see that there are only 3 different types of weather, including 3 Clear boxes (A, B & C), 2 Cloudy boxes (D & E) and 1 Rain box (F). But more so than the actual weather itself, the weather actually determines whose Air Units are available for use in that turn, whether the Allied Naval Units are available and also how many Supply Points both the Allies and Germans receive for that turn.
When the die is rolled, you will refer to the right of the table for die roll results. On a roll of 1, the Weather Marker will not move at all and will remain in the box it was in last turn. On a result of 2-4, the Weather Marker will move one box to the right and on a 5-6 will move 2 boxes to the right. This means that is it possible that the German Air Unit may never be available if a 5 or 6 is rolled when the Weather Marker is in the B Box. And, we actually had that happen which was pretty unique. That one Air Unit is very important to the Germans as it can be used to give a favorable column shift which can be the difference between driving an Allied stack back or losing ground.
The Supply Points are also important as they are used to refresh a spent Support Unit artillery. The Germans definitely want the weather to hit Box C and Box F as often as possible and would prefer to see rolls of 5 or 6 each of the first two times. This Rain is very important for the German defense as it has two effects including one shift left on the CRT and vehicle units may not move across or attack across and unbridged river hexside.
Terrain as a Major Character
Terrain is the key to the Italian Peninsula. As a defender, you will have to only choose to defend a few key spots in order to box in the Allied advance. The mountains are the definite highlights, particularly those that are surrounding the Salerno Plain as they are very steep and rugged mountains. In the game, Mechanized units are not allowed to cross mountain hex sides and Non-Mechanized units will be Disrupted and likely out of supply if they do cross. The focus on the map is the Salerno Plain and the two main exits of that plain towards Naples in the north and east towards Eboli.
Units are always halved attacking across a Mountain hexside. In addition, any unit that moves or attacks across a non-road/non-pass Mountain hexside is Disrupted and can’t recover until it is back in supply. It represents them crossing but with with very little equipment. In later games in the system, Mark has let slip that he will include mule counters so players can bring supply across a Mountain hexside.
The other key piece of terrain is the type of roads that are available including Primary Roads and Secondary Roads. Primary Roads are represented by the thick black lines that look like proper roads in an atlas. While Secondary Roads are represented by a tan line that has a dashed black border. The movement costs for Non-Mechanized units is 1 per hex of either of these road types but for Mechanized units, including Tanks, Trucks and Mechanized Infantry, the movement cost for a Primary Road is 1/3 movement point and for a Secondary Road is 1/2 movement point. This is extremely important for the Germans as their reinforcements come from either the top of the map or the bottom of the map and if you don’t include the movement benefits for the roads it will take 3-4 turns to get to the front where those units are needed.

This also means though that the Allied player can plan on the German reinforcements coming from specific areas and this is a benefit as this allows for them to move their units where needed and to get them into favorable terrain for defense once contacted. I love that the terrain causes these limited axis of advance options as it makes it pretty tough on both sides. There are only a few ways to get where you need to be and you must not stray from those areas. It really reminds me a lot of Hell’s Highway in Holland ’44. The terrain in Salerno ’43 is a major character and you must figure it out in order to accomplish what you need to do and also to do it well!
Came Down to Last Roll
To me, one of the hallmarks of a good game is how competitive it is. I know that historically, sides in battles are not always even. From their starting units, to those unit’s quality and to objectives. War is a bitch and simply is not fair! But, when designing a game the designer should take various factors into consideration when creating victory conditions and ask several questions. Firstly, are the objectives for both sides attainable? Not are they easy but can they be accomplished. Have the historical goals been measured against reality? Meaning, was the original plan a total miscalculation and was there never the possibility of victory. And finally when armed with those answers, what would a victory have looked like? My guess is that most of these late WWII games give very limited forces to the Axis powers. They just didn’t necessarily have the men, machines and resources of the Allies.
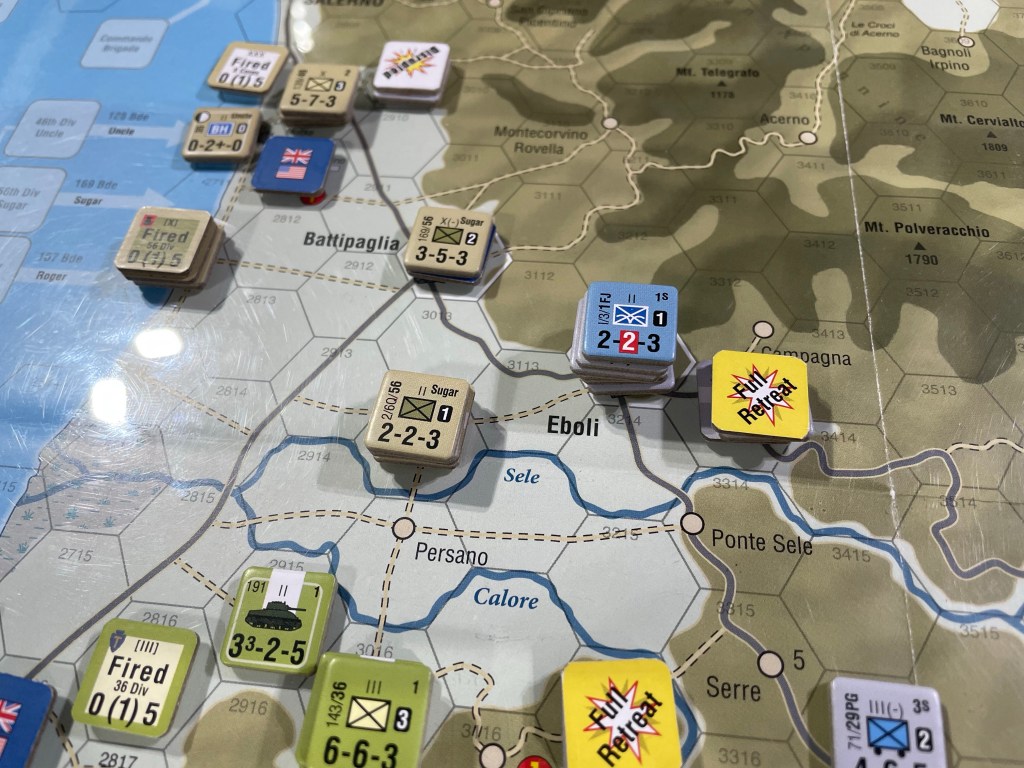
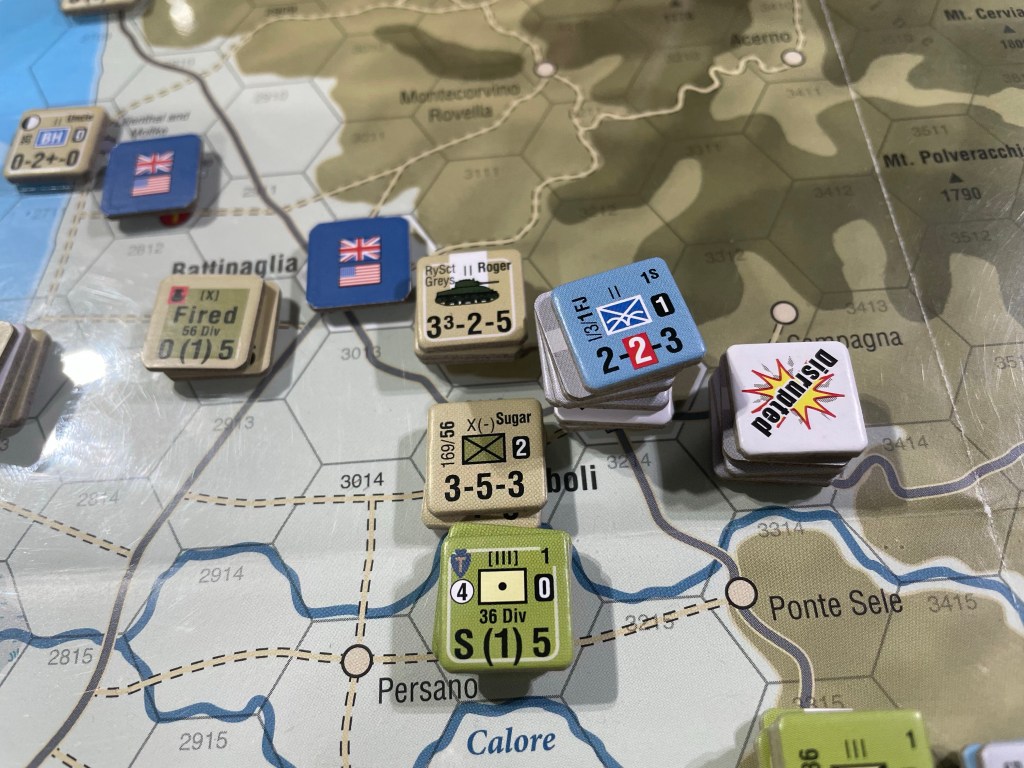
So that was a lot just to say that for our game of the 9-Turn Avalanche scenario, it came down to the final turn and even the final roll as there was a chance that the Germans could have held out. The Allies had moved off the beaches to Eboli, which is a Minor City in the eastern portion of the Salerno Plain. There, the Germans setup the best defense that they could muster and were able to hold that Minor City for the better part of 4 rounds. As you can see in the picture below, the Disrupted counter on top of the stack behind the German stack in Eboli was just hit and hit hard by the Americans outside of Persano. With several column shifts from artillery, and a good roll, the Germans were required to retreat and didn’t have enough units to mount a Determined Defense. This then setup up the final turn where the combined Commonwealth forces of Roger and Sugar were able to carry out a concerted attack with decent odds enough to it such that as long as they didn’t roll a 1 or 2, they would Disrupt the only remaining healthy unit and force a retreat from the 8th and last remaining VP hex that the Allies needed to control to win the scenario. To our delight, this roll even mattering at this point was a major victory for the design and ultimately I rolled a 5 causing the Disruption and retreat. This game is very good and after 4 hours, the combat still mattered…and it was glorious!
Fast Playing Intro to System
Finally, I wanted to give my opinion as to whether this game can serve as an introductory wargame. I wouldn’t classify it as an introductory game, it is more a smaller ZOC BOND game, which requires some understanding of the finer points of this system. Also, the important concepts to understand for the Allied player are the limits of terrain on both movement and supply and how to overcome them. The German player has got to understand ZOC Bonds and how they can use them to their advantage to plug holes and hold back the Allies while also using Determined Defense at the appropriate times. With that being said, the game is low counter density, with really well written rules and fantastic player aids. There is no reason that even a novice cant pick this game up and give it a go. The hard part to pick up will be the strategies as described above but I will state emphatically that anyone can play this game.
Conclusion
Salerno ’43 is a well designed game that has a short scenario of 8 turns and a full campaign game of 22 turns. I think that this game is very good and will be one that you can play over and over again until you get the strategies down and can really stretch its legs at that point. But the game plays fast and furiously and was frankly a very good way to spend a Friday evening for 4 hours. If you are a fan of the ZOC Bond System, then this is a no brainer for you as it carries out that system well. If you are wanting to get into that system, this is probably the very best place to start.
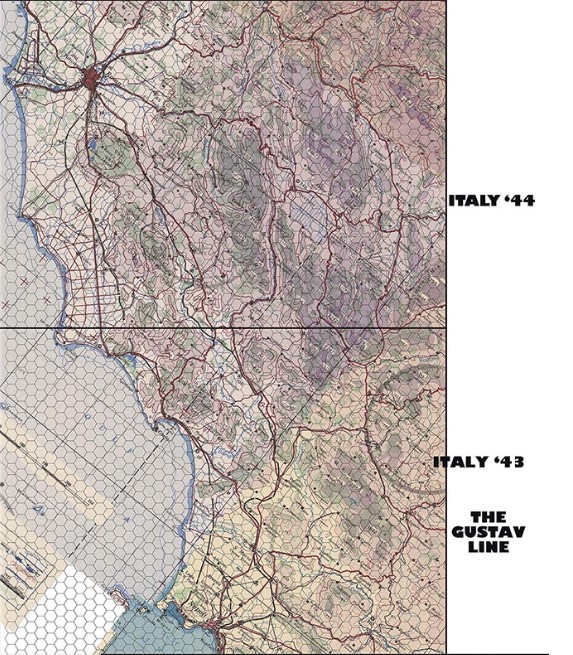
The good news is that there are two more games planned that will link with Salerno ’43. The Gustav Line (Italy 43′) will take the fighting through Naples, across the Volturno River, and up to Monte Cassino. Anzio ’44 (Italy ’44) will cover the Operation Shingle invasion and the fight at Cassino. Here is a map that can be found on the game page on the GMT Games webpage showing the general locations of the two follow-up volumes. These games are still a ways off though as Mark has been busy with a few other designs.
If you are interested in Salerno ’43, you can order a copy from the GMT Games website for $42.00 from the following link: https://www.gmtgames.com/p-868-salerno-43.aspx
-Grant

I have 29 out of 95 that are still unplayed. I told myself NO MORE GAMES until I play the ones I have already bought. You Dog! I just bought this and and am on the P500 for the mounted board.
LikeLiked by 1 person
Sorry to do that to you. It is very good though!
LikeLike
Awesome stuff as always! Gotta say that the quality of the blogging & video you and Alexander do is the standard to which I (as a new wargame blogger with a YT channel) can only hope to someday be a pale imitation.
An excellent breakdown of the game and system. I’ve been eyeing Salerno ’43 for a while, just might have to go ahead and pull the trigger!
LikeLiked by 1 person
Thanks Joe. Always great to see new content creators come on the scene. Let me know if you ever want to swap notes.
LikeLiked by 1 person
I’m a big fan of Stalingrad 42 and Mark S’ ZOC bond system. I hope to find a copy of Ukraine 43 some day. Because of the restricted terrain I wonder if that also restricts the replay somewhat for Salerno?
I guess I am more used to the free wheeling terrain of the Russian steppe . Salerno is a good looking game and I’m interested because I don’t know as much about the Italian campaigns as other theaters.
LikeLiked by 1 person
I really think you can try some different paths but the best route is clear. But frankly that is the case with all games.
LikeLike
Nice review Grant. I P500’d this game but have yet to get it on the table. Your review has motivated me! Cheers!
LikeLiked by 1 person