
Red, Orange, Yellow, Green, Blue, Indigo, Violet. I know the colours of the rainbow because of the mnemonic Richard of York Gave Battle in Vain. I had always thought this referred to the Battle of Bosworth whereat Richard the III proclaimed “A horse, a horse, my kingdom for a horse!” before falling to the armies of Henry-soon-to-be-the-VII. But it turns out I was living a lie! Richard of York, refers to another Richard, who 25 years earlier succumbed to a similar fate on the battlefield.
The Battle of Wakefield
The Battle of Wakefield is a full/stand alone game that comes included in issue #31 of C3i Magazine from RBM Studios. It comes with a full 12 page rule set and a sheet of counters and is a single pitched battle between Yorkist and Lancastrian forces in 1460 during the Wars of the Roses. Wakefield uses the Men of Iron Series rules, although they’re a little streamlined, from the point of view that this title doesn’t have any cannon, or field works, and is just a few units for both sides in an open field.
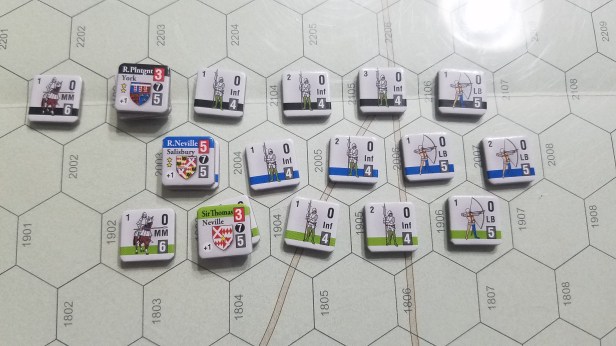
The Yorkist forces, in white, are divided into three ‘Battles’ (formations under their regional commander). The Lancastrians have four Battles but start with only two on the battle field. The reinforcements come in later in a flanking maneuver. Between the Lancastrians overwhelming numbers, and their high-ground advantage, this game is more a simulation of a crushing defeat than a competitive tactical wargame. Although, with that being said, the game has a really cool system for victory. There’s a track where you mark your losses called The Flight Track (based on the unit quality that was killed) and at certain points of the game you will have to roll a d10 and add the number of your lost units vale on the track together. If you meet or exceed a certain threshold, then you lose the game. As such it’s imperative for the Yorkists to get into combat, and start killing the leaders and Mounted men-at-arms quickly (these carry a loss track value of 5 and 3 respectively) if they are to have a chance at winning the battle.
That’s a tough ask with the literal uphill battle and the forces arrayed, but it is possible.
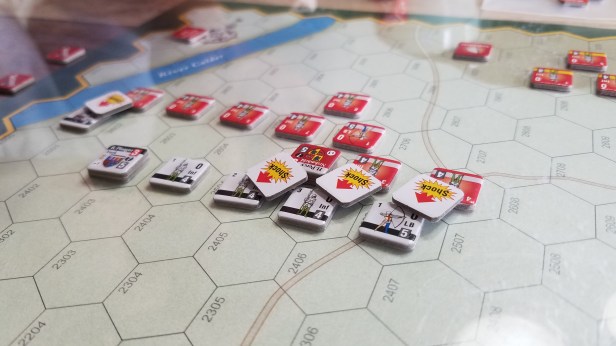
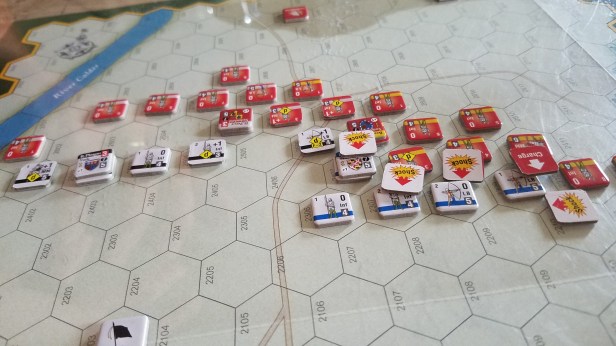
Combat is bloody and attrition rates will be high. The combat resolution system is really fun. There’s a weapon/unit type matrix you cross reference to find a die roll modifier (DRM) combined with any other DRM’s, you then roll on a combat results table to find out what happens. Now, that might not sound all that fun, but the weapon strength matrix is a fascinating thing to behold, and I’d love to see the matrices in the larger titles in the Men of Iron Series. As your mounted men-at-arms charge, for example, it’s very easy for them to charge and then overrun a unit of longbow men, as they continue their charge they might then suddenly run into a wall of halberd wielding infantry which suddenly put up a far stiffer resistance. And it’s these micro stories within the battle field that make the game really interesting.
Maintaining good battle lines is also imperative, and a small break in the line can be quickly exploited. I found myself pouring over that matrix to find the best odds to combine attacks with and punch punch through the enemy lines. Unit facing is also very important as there are positive DRM’s for flank attacks and attacks from the rear as well. Again, reinforcing the importance of straight and solid battle lines. If those lines waiver, you’ll quickly be shredded. The nice part of that is it keeps the games quick. It’s really easy to see how a battle is going after the first few engagements, but makes it that much more vindicating when you come back to snatch victory from the jaws of defeat.
There’s a lot more to discuss about this game, like the initiative/turn taking system, but it’s a little complex and I walked through it in a video which we will post to our channel soon. Suffice it to say you activate formations of your choosing and continue to do so until you “lose the initiative” and your opponent takes over. Anytime you’re finished activating a formation you have to roll to activate your next formation. That formation’s commander has a rating you need to roll under. Anywhere from a 2-5. If you fail the roll your opponent takes over. However, before you even attempt that roll your opponent has the opportunity to steal the initiative with a die roll of their own. This is based on a small set of random chits that you draw pre-game that include a range e.g. 0-5. If the opponent plays that chit and rolls in their range they take the initiative and you don’t get that continuation check to activate your next commander.
It’s a little convoluted in text form, but check out the video when it posts for a better explanation.
The system is really fun. It keeps the game feeling like a single ongoing engagement. It keeps the pressure on both sides, but you can get yourself out of a bind with a timely initiative seizing chit play!
I highly recommend C3i Magazine issue #31, not just because it comes with this fun skirmish, but also because the magazine itself is top notch as always. The Battle of Wakefield has piqued my interest in the Men of Iron Series – a series I frankly had no interest in prior to playing this, so well done! The advertising has worked!
Here you can check out our unbagging video of the magazine.
-Alexander

Who was the designer? or did I miss that. Thanks
LikeLike
Scenario from Ralph Shelton, system film Richard Berg
LikeLike
The Initiative System is the most interesting mechanic to me. Keep going as long as you can or spend a Seizure Chit to literally try and seize the initiative. Avoids the Igo-Ugo syndrome and makes this small battle very replayable since one can never be sure which Battle is really going next.
LikeLike
Is Alexander still planning to do gameplay videos for this game?
LikeLike