Continuing along in this new series devoted to the best looking boards found in the wargaming world where I will highlight the art and layout of a different board in a wargame that we have played to show you the various talents of the artists and graphic designers involved. In my humble opinion, a well designed and attractive board can make all the difference in the world to me enjoying a wargame. Don’t get me wrong, the game has to be good, but if it’s also good looking it always is a better experience. A board can draw me in. Can make me feel that I’m there. Can set the stage for the thematic immersion that we all crave. And I have found many of these type of boards and I want to make sure that I share them with you.

Lanzerath Ridge is a solitaire wargame that takes place on the first day of the Battle of the Bulge December 16, 1944 during World War II. In the game, the player takes control of a small group of American soldiers who must defend against the attacks of German paratroopers and fusiliers. The goal is simple but very difficult as the player has to attempt to do as well or better than the historic defenders by holding the attackers from taking the town of Lanzerath, Belgium to delay the advance of an entire SS Panzer Division. With limited actions each round, the player has to utilize their limited resources to attack the advancing German forces while also trying to accomplish objectives such as denying the Germans their equipment and strategically withdrawing to live to fight another day. The game lasts four rounds and each round has its own Assault Deck from which enemy counters are drawn along with nasty surprises such as mortars and MG42’s.
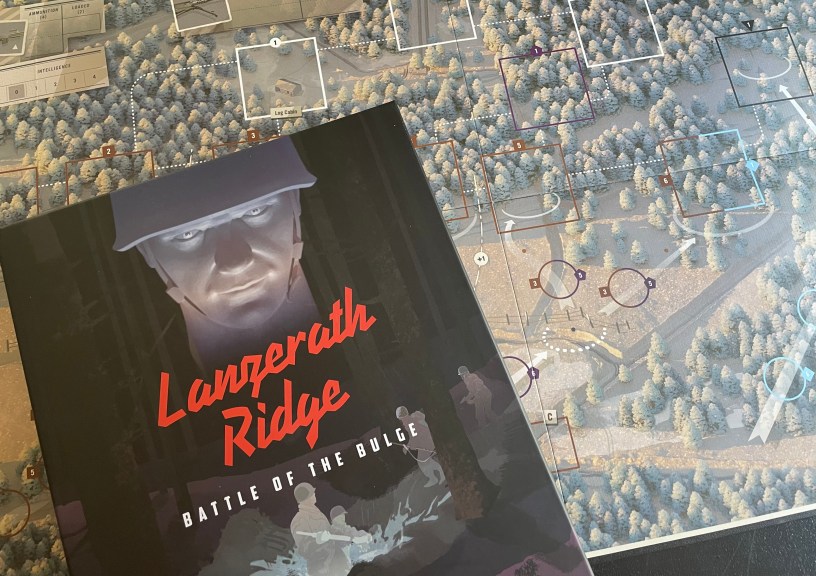
The board for Lanzerath Ridge is simply a piece of art! It deserves to be framed and placed on a wall in an art museum somewhere. It is of the highest graphical design quality and provides the player with a serious backdrop from which they can deeply immerse themselves in the thematic feeling of the battle. The board is illustrated by the very talented Nils Johansson and is a very important part of the game as it depicts the area of Lanzerath Ridge located outside of the town of Lanzerath in Belgium. The board has a collection of various shaped and colored squares and circles from which the player controls their defending forces in static positions and attempts to halt the advance of enemy units toward those positions.
This is the 3rd time that we have highlighted the work of Nils Johansson and each of these games are just stunning. Nils is a very talented and skilled professional who has done multiple games with several different companies including High Flying Dice Games such as Breaking into Valhalla (2001), City of Confusion: The Battle for Hue, Tet 1968 (2012), Dueling Eagles: Aerial Combat over Malta (2013) and Kekionga! A Dark and Bloody Battleground, 1790 (2017), for SNAFU Design Ambon: Burning Sun and Little Seagulls (2021) and now most recently for Dan Verssen Games with Lanzerath Ridge: Battle of the Bulge (2022). He has a real gift for accents to typical features of any wargame board, such as trees, rivers and other terrain, to depict them with a feeling of motion and life and appropriate appearance for the time of the battle.
The first thing that I noticed about the board was that there is an overall appearance of a frost on the entire area. The trees seem to be touched with white and the landscape itself is washed out with that frozen feeling of an early winter. This is a really nice touch to the board because this is December in Belgium and the winter has advanced on the landscape to create a very chilly feel.
During the Battle of Lanzerath Ridge, the defending American I&R Platoon took up positions on a hilltop location located just inside the edge of a forest and overlooked a pasture bisected by a 4-foot high barbed wire fence parallel to their location. Their position covered about 300 yards along a shallow ridge line, about 30 feet in enfilade position above the road and 200 yards northwest of the village of Lanzerath. Their foxholes were situated in a shallow curve along the ridge line in a northeast direction, almost to a fork in the road at their left flank. Snow had fallen on December 16th which covered their dug-in fortifications inside the woods, leaving them virtually invisible from the road below. Nils has done a fantastic job with the graphical representation of the battlefield and taken into account how the fortifications blend in with the forest itself to create a feeling of preparation and stoutness.

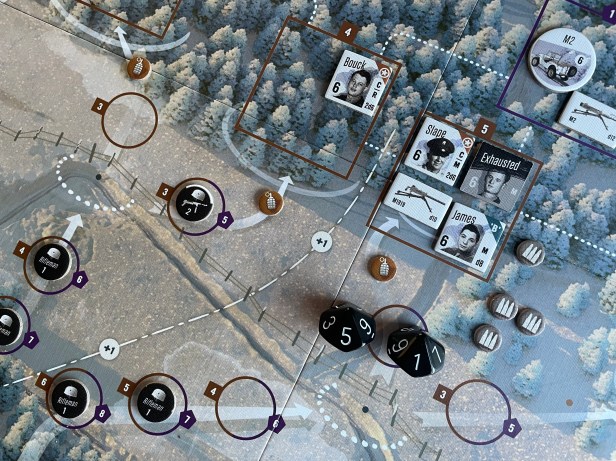
The board focuses on 5 different Assault Tracks that converge on the defenders positions and are represented by both large and small circles. I really like the choice of the use of a white arrow following along each of these Assault Tracks as it creates a living motion for the German attackers as they advance on the defenders. The smaller circles located near the bottom of the board are used in the game to track the advance of the attacking Assault Counters as they are placed and move up these tracks towards the Defender’s Positions. The small squares are used by attacker MG-42 counters, which are considered to be static units that don’t move up the Assault Tracks but will fire upon the defenders when their card is drawn from the Attackers Deck. The large squares found in the middle of the board are for the placement of the defender units and equipment and then there are various areas along the top of the board used to track the defenders’ ammunition tokens, the Morale Track, and the Intelligence Track.
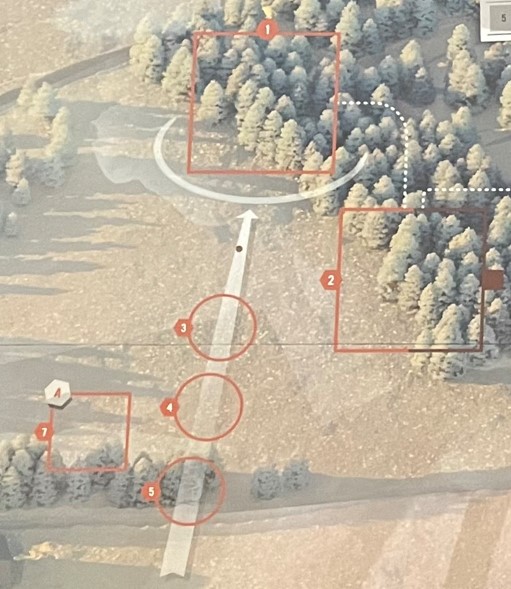
There are 5 Assault Tracks denoted on the board, with the three tracks located in the middle of the board splitting off into an additional 3 tracks as they approach the Defender Combat Positions. These Assault Tracks are identified by the number of the Defender Combat Position that they end at. For example, the furthest left track, which is colored orange and has a hexagon symbol on the smaller circles, is known as the 1 (orange hexagon) track. There is also a Defender Combat Position that has a 2 (orange hexagon) but it doesn’t have an Assault Track that leads specifically to it but it does have Line of Sight to two different colored tracks. But more on this aspect of the game later.
These Assault Tracks have between 3 and 5 circles on each and these are simply holding spots for the Assault Counters to be placed as they are placed by cards in the Assault Deck. As the counters are placed, counters already located in the circles on the tracks will advance one space closer to the Defender Combat Position on that track until they are pushed into the position. At that time time they will attack all defender units located in that position. It is important to remember though that a placement will only force other counters to advance if there are no open spaces in between. Sometimes, the player may attack an assault counter at the bottom or middle of these tracks instead of just the ones that are located in lower defense value circles.
A few other aspects of the Assault Tracks that I want to focus some attention on are the Fence Spaces and the Grenade Spaces. Remember that the fence was located in the middle of the battlefield and is really well drawn by Nils to give it a position of importance to the event. These Grenade Spaces are really unique and interesting additions to the system and mimic Pavlov’s House and its Sapper Spaces as well as Soldiers in Postmen’s Uniforms with the Barricades. On the battlefield, the fence was a clear line of delineation for the defenders and attackers as it gives a sense of perspective and location. The Fence Spaces hold a special Fence Token that is placed there at the start of each of the 4 Attack Phases and are identified by a black dot in the middle of a circular area up against the illustrated fend line. This Fence Token acts as a barricade to advancing Assault Counters and they cannot pass that space until it is removed by the placement of a Leader Counter from the Assault Deck. If Assault Counters are forced to move on that track but they are stopped by a Fence Token, those counters will simply stack in that position. If 3 of these Assault Counters pile up in this fashion, they will then break through the fence. Once a Leader Counter is placed and there is an Assault Counter adjacent to the Fence Token it will be removed from the board and placed off to the side. But at the start of each new Assault Phase, this Fence Token will be replaced in that space for that round. These simply act as a temporary speedbump and can slow down the advance of Assault Counters against the Defender Combat Positions but not permanently.

The Grenade Spaces are a bit different as they are placed only at the start of the game and if removed are never placed again. The Grenade Spaces are identified by a brown circle after the last of the Assault Track circles marked as 3. These Grenades act as “booby traps” to the advancing German Assault Counters and the first time a counter is forced to move into this space the grenade will explode and remove that one counter from the track. In doing this though, the Grenade Token will also be removed from the game and will not reappear for the remaining Attack Periods. These Grenade Spaces are very important to the defense and players will need to do everything within their power to preserve them for as long as possible because they typically help in the worst of times and can be the difference in being overrun or standing your ground. I really like how the Grenades are brown and they really stand out against the gray/brown/whitish background. These little touches make a huge difference in the playability of the game but also in how it feels.
The Defender Positions are denoted on the board with brown squares and numbers at the edge of the trees. What I really like graphically about these positions is that they have a white half circle drawn on their front sides. What this looks like to me is the fortifications that the defenders would have put into place before the assault began. The I&R platoon took over positions on the ridge top immediately northwest of Lanzerath that were formerly occupied by part of the 2nd Infantry Division which had vacated the day before. They were ordered to improve their foxhole positions and they dug them deeper so that two or three men could stand in them and fire from the concealed edges. They covered each hole with pine logs and they would have made perfect fortifications from which to defend. These white half circles represent these improved fortifications and really convey that feeling and give a sense of permanency on the ridge. A perfect choice by Nils here.
The board is absolutely stunningly beautiful! The artist, Nils Johansson is really talented and I have found that his graphic style really increases the immersion and playability of the games. This game board is very well done and provides clear understanding to the player about how the game functions and how it interacts with the play experience to create the feeling of the desperate defense of Lanzerath Ridge.
I posted a full 4-part playthrough video on the channel. Keep in mind, this was a video shot early on after receiving the game and I think that I made 2 mistakes at different times throughout the video. Those mistakes are as follows:
- During Adjust Fire Actions, where I would discard a loaded ammunition token for an MG and take shots at Enemy Counters, I failed to add the cumulative +1 to the targets Defense Value for each shot after the first.
- I took an Attack Action from a few positions that didn’t have Line of Sight to the targets position on the Assault Track. I think that I did this 3-4 times.
Other than that, the game was played correctly and I had a good time. I have since played the game another 15 times and really enjoy it and I hope you do as well.
Part 1 – Attack Period 1 and Intro (58:32)
Part 2 – Attack Period 2 (36:28)
Part 3 – Attack Period 3 (33:20)
Part 4 – Attack Period 4 and Final Comments (33:16)
I also have written an in-depth series of Action Point posts that cover various aspects of the game and you can read those at the following links:
Action Point 1 – look at the game board focusing on the Defender Combat Positions and Assault Tracks for the enemy Assault Counters.
Action Point 2 – Defender Counters and their Special Attributes and Action Designators.
Action Point 3 – makeup of the Enemy Attack Deck and discuss how the cards drive the assault and work against the player.
Action Point 4 – the interesting new Vehicle Counters and their uses.
Action Point 5 – Examples of player actions including Attack, Adjust Fire, Close Combat, Assist, Command and Recover.
Action Point 6 – strategy points and suggestions for a better outcome.
The next board that we will take a look at in the series is Salerno ’43: The Allied Invasion of Italy, September 1943 from GMT Games designed and illustrated by Mark Simonitch.
Here are links to the previous entries in the series:
Kekionga!: A Dark and Bloody Battleground, 1790 from High Flying Dice Games
Campaigns of 1777 in Strategy & Tactics Magazine #316 from Decision Games
Battle Hymn Volume 1: Gettysburg and Pea Ridge from Compass Games
From Salerno to Rome: World War II – The Italian Campaign, 1943-1944 from Dissimula Edizioni
This War Without an Enemy: The English Civil War 1642-1646 from Nuts! Publishing
Holland ‘44: Operation Market-Garden, September 1944 from GMT Games
Maori Wars: The New Zealand Land Wars, 1845-1872 from Legion Wargames
Imperial Struggle: The Global Rivalry – Britain & France 1697-1789 from GMT Games
Stilicho: Last of the Romans from Hollandspiele
Nevsky: Teutons and Rus in Collision, 1240-1242 from GMT Games
A Most Fearful Sacrifice: The Three Days of Gettysburg from Flying Pig Games
Donnerschlag: Escape from Stalingrad from VUCA Simulations
Keep Up the Fire!: The Boxer Rebellion Deluxe Edition from Worthington Publishing
Liberty or Death: The American Insurrection from GMT Games
-Grant

Easily my favorite of the Valiant Defense series.
LikeLiked by 1 person
argh. can’t believe I’m starting to spell like a Brit
LikeLiked by 1 person
My personal favorite for 35 years is still Raid on St Nazaire from Avalon Hill. The map is a 100% copy of the operations conducted in the historical Raid.
Incredible for its time.
LikeLiked by 1 person
I have seen that game but haven’t played it yet.
LikeLike
It is quite unique with several phases.
First, the ships assaults with heavy harbour fire.
The landing phases with all boats and the main Campbelton ship.
The land raiding fights with different objectives to eliminate with mine charges and assault teams to protect these mining teams.
The AI reacts towards the assault teams and are activated differently with each simulation.
Finally the struggle to find exit ways or return with some ships back to the North Sea.
The game is NOT a Tower Defense game which frankly I am tired of. That system reached its peak with the excellent Pavlov’s House game and its 3 levels of board play.
No, RoSNazaire is quite unique and while it is not exactly John Butterfield solo Bot quality – like “DDay at” or “Enemy Action”, it was about the best you could get besides Ambush at the time.
Its board’s realism is superb. You could read the book by its side and follow all events. That’s why I played wargames for 45 years now.
LikeLiked by 1 person
Grant,
I completely agree with your review of the map and the game. I too have Lanzerath Ridge and have played it several times.
However, my very small quibble about the map is that I feel it is upside down: that is, the solo player should be behind the US position observing the Germans attack toward him. Lanzerath’s board places the player behind the German position pushing the attackers forward as the German officers would observe the action.
I have played a few turns sitting behind the US position and it does give a different perspective to the game.
LikeLiked by 1 person
That’s a good point. I think from a playability perspective reaching across is hard to place the German assault counters on the tracks
LikeLike
I hate “State of Siege” games, but the production value of these games are exceptional. Usually I think DVG misses the mark, too, over producing things. This series though? Hits the right spot for me. I’ve got most of them, I think. I never buy the add-ons though.
LikeLiked by 1 person