
Continuing along in this new series devoted to the best looking boards found in the wargaming world where every other Friday, I will highlight the art and layout of a different board in a wargame that we have played to show you the various talents of the artists and graphic designers involved. In my humble opinion, a well designed and attractive board can make all the difference in the world to me enjoying a wargame. Don’t get me wrong, the game has to be good, but if it’s also good looking it always is a better experience. A board can draw me in. Can make me feel that I’m there. Can set the stage for the thematic immersion that we all crave. And I have found many of these type of boards and I want to make sure that I share them with you.
A few years ago, I discovered a great solitaire game called The Wars of Marcus Aurelius from Hollandspiele that dealt with the Romans attempting to pacify Barbarian hordes from the north in the Danube provinces during the Marcomannic Wars in 170-180 AD. Now the designer has taken that system and applied it to another period in Roman history when the Goths and Vandals, as well as a pretender named Constantine, were assaulting Rome itself and one man was asked to defend her from her enemies. Flavius Stilicho was a high-ranking general who rose from humble beginnings to become one of the most powerful men in the Western Roman Empire. After many years of victories against a number of enemies, both barbarian and Roman, a series of political and military disasters finally allowed his enemies in the court of Honorius to remove him from power, culminating in his arrest and subsequent execution in 408. In Stilicho: Last of the Romans the player must survive these various attacks from enemies both external and internal and quell all three enemies who are advancing on the gates of the empire.
The board is illustrated by Mark Mahaffey who is a very accomplished full time artist who has done art for nearly 200 games including Celles: The Ardennes, December 23-27, 1944 (2012) from Revolution Games, The Dark Valley (2013) from GMT Games and Almost a Miracle!: The Revolutionary War in the North (2020) from Against the Odds to name just a few. I think that Mark has a real talent for making a board coherent, easy to reference upon first glance and pleasing to look at during play, but I would not say that a lot of his boards are over the top beautiful but that is definitely the case with his effort for Stilicho: Last of the Romans. It would have been easy for Mark to simply create 3 intersecting tracks that all converged on Rome and Hispania but Mark took great effort to make these static lines feel alive and to give the impression of motion with his use of smaller arrows to show direction. Hollandspiele really picked up their game in the graphics department for this game as the board is simply a work of art worthy of being framed and hung on my gaming room wall! When compared to the map for the aforementioned The Wars of Marcus Aurelius, this one is a step up in the use of colors, the integration of graphical elements like the symbols around the edge of the map and the crispness and clarity of the type and the addition of relief elements such as the Alps mountains. Let’s take a look at the board in a bit more detail.

The board represents the European territories that were controlled by the Western Roman Empire during the early 5th century. The board is further divided into seven different dioceses (a governmental area in the Roman Empire that was governed by an imperial vicar) including Hispania to the west, Septum Provinciae south of Gallia, Gallia proper, Britannia to the far north, Italia Annonaria in the center, Italia Suburbicaria located on the Italian peninsula and Illyricum to the east. Germania Magna is also shown on the board to the northeast but is not under Roman control.
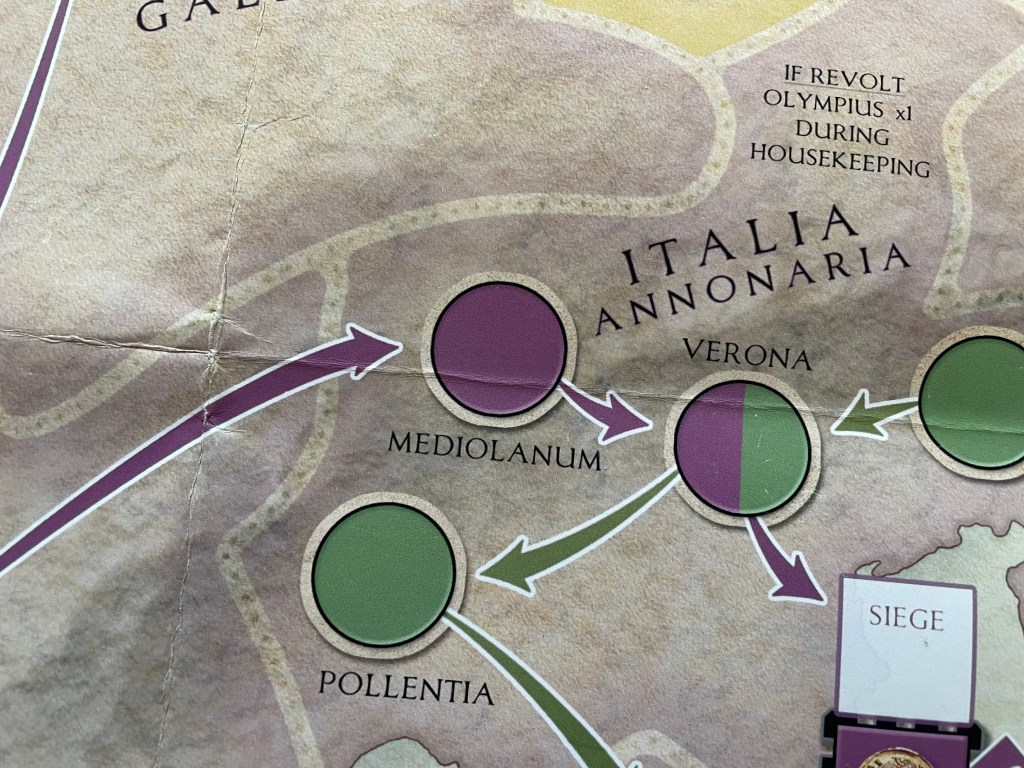
One of the focus points of the board are the three different Fronts that originate in the Home Spaces of the Barbarian tribes or, in the case of Constantine III, in Britannia with his Legions. The three enemies include the Vandals on the yellow Front, the Goths on the green Front and Constantine III on the purple Front. These Fronts are represented by a series of colored spaces, both squares and circles, connected by sweeping arrows. The use of the arrows here was a nice tough to give the stagnant line of spaces some feeling of motion. I have seen lots of these type of “States of Siege” style boards and they usually just use connecting lines. But not here. Mark really changes the feel of the game with these additions. It is funny how such a simple thing can make a big difference in the graphical appearance of a track like this. I also really enjoy the colors that were chosen, as they stand out nicely against the backdrop of the terrain but also are pleasant to look at.
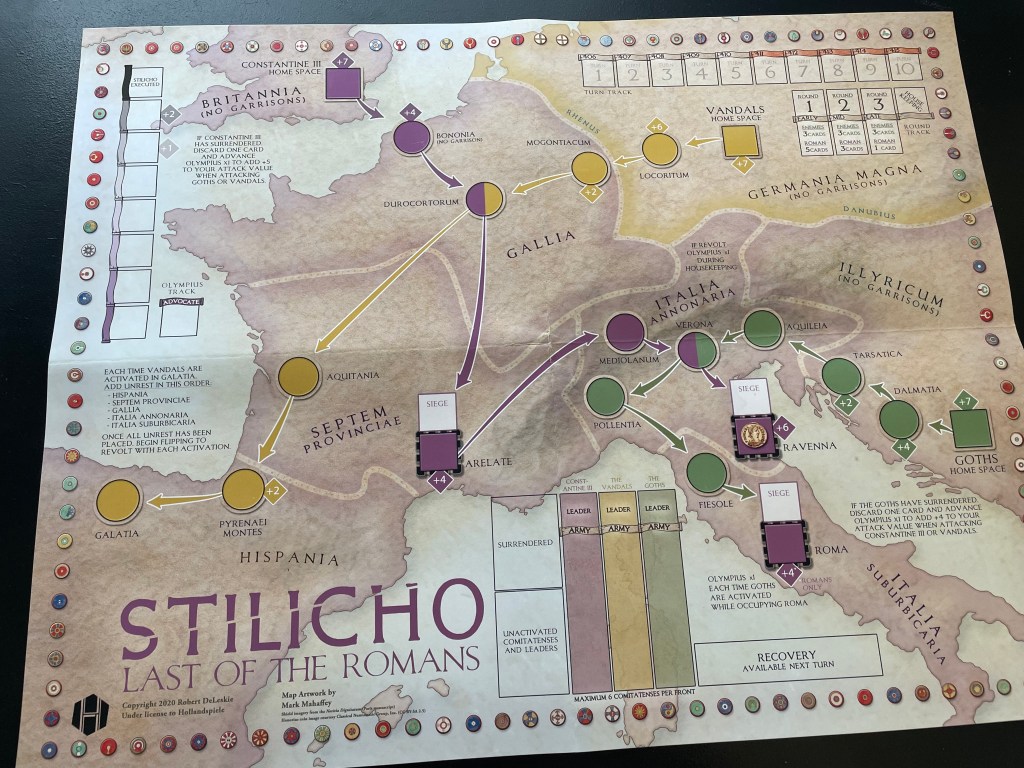
You will also notice that as the different Fronts cross, they have both colors noted in the space denoting that this is an area where the two enemies can come in contact with each other as they advance or retreat. These are referred to as Collisions. There are two of these crossings of Fronts; one in Gallia at Durocortorum where the Vandals and Constantine III can come in contact and the other in Italia Annonaria at Verona where the Goths and Constantine III can intersect. When a Collision occurs, and if one Front advances and the other Front is resting there in that crossover space, a battle between your enemies can happen where they each roll a D6 and add their Attack Value. The higher total result will force the other to retreat one space back toward their Home Space on their Front and this can be very beneficial for the player. But, don’t get your hopes up as these Collisions really only happen about 1 time per play, maybe twice if you get lucky. Take it as a nice bonus if it ever does happen!

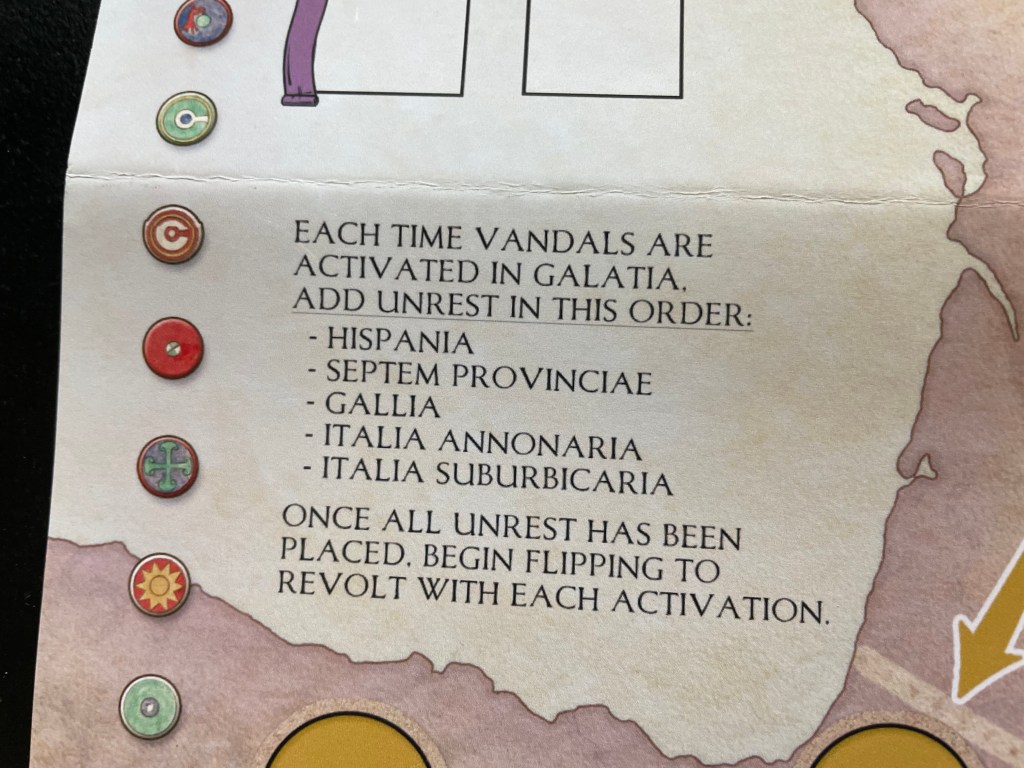
Each of the Fronts has an ultimate end goal for the Barbarian Horde or Usurper and they terminate in these spots. The Vandals Front will end in Galatia and there are a set of special circumstances associated with that space. When the Vandals have reached Galatia, and each time that they activate from the play of an Enemy Card, the player will have to add an Unrest Counter per activation on the board which represents the growing loss of Roman control over the Dioceses as well as the fear of locals about the incursions of Barbarians into their homelands. Unrest Counters triggered by Vandal activations are placed in a specific order and if there is already an Unrest or Revolt Counter in the Diocese, the player will simply place the Unrest Counter in the next Diocese without Unrest or Revolt. This order is as follows: Hispania, Septum Provinciae, Gallia, Italia Annonaria and Italia Suburbicaria. If all of the Dioceses already have an Unrest Counter when the Vandals activate, flip one Unrest Counter to its Revolt side following the same order. If in the event that all Dioceses have Revolt Counters then no further action is required. The board has this information printed right on it and makes this process much simpler than diving back and forth into the rules. In fact, they print these type of directions directly on the board in several places to aid in the play of the game. These type of play aids really help with a solitaire game as the player is the only one reading and interpreting the rules and these type of on board aids really do make the games that much more playable.
I want to now take a look at where these Fronts terminate and show you how these areas are spiced up a bit with their graphical artistry. The Goths Front will end at Roma and similar to Galatia there are special circumstances that occur. If the Goths are activated while occupying the Walled City space of Roma, Olympius advances up his track one space per activation, which represents political pressure to recapture the Eternal City. We will cover the Olympius Track later in this post but him advancing is a bad thing and you don’t want that to happen or you will lose your head and the game as you will be executed. In the following picture, you will see both the end of the Goth Front in Roma and the end of the Constantine III Front in Ravenna. You will notice that these spaces are square and actually have 2 spaces in the same spot but each with different purpose.

The top white square box that has the word Siege printed in the middle is a landing space where the advancing Barbarian Tribe or Constantine III will have to stop and wait until a later activation to attack. This Siege Box is pretty plain but stands out remarkably well to remind the player what occurs here. Below it, you will see a 2nd box that has a name printed to the right, either Arelate, Roma or Ravenna, but also has blocky black colored battlement looking shapes adorning the space. These represent the Walled City Space there and reminds the player that once the Barbarian tribe lands in that space upon their next activation there will be a fight as they must siege the city for control. The purple color used in these boxes, which in my mind is reminding the player of the relative importance of these spaces by the use of royal purple, also reminds the player that these can have Garrison units placed here at the beginning of the game or as part of a later action. These Garrison units are simply Legions that will be taken from the limited supply available to the player and will make fielding a serviceable army that much more difficult as you just don’t have enough Legions to go around. There also is a Defense Value shown in a diamond shaped figure with a value ranging from +4 to +6. The Siege of the Walled City process is very simple as the player will simply roll a D6 and add to it the Garrison’s Attack Value, which is only 1, as well as the Defense Value of the space it occupies. The attacking Barbarian tribe or Constantine III will also roll their D6 and add their Attack Value.
The Constantine III Front maneuvers first through Arelate and then will terminate in Ravenna, which was the capital city of the Western Roman Empire. If Constantine III enters the Walled City space of Ravenna, the game ends immediately in defeat by Usurpation. This is bad so you want to make sure to stop Constantine III first as he can make you have a really bad day!
I really appreciate Mark’s choices with these Fronts and how he used various elements, such as the black battlements and royal purple color to emphasize importance of the various capitals. These artistic choices really remind the player that they must defend these spaces, or at least use as a speed bump in the case of Arelate, as these 2 tracks are the easiest to lose. There are also lots of other artistic choices used on the board and we will cover a few more of these at this point.
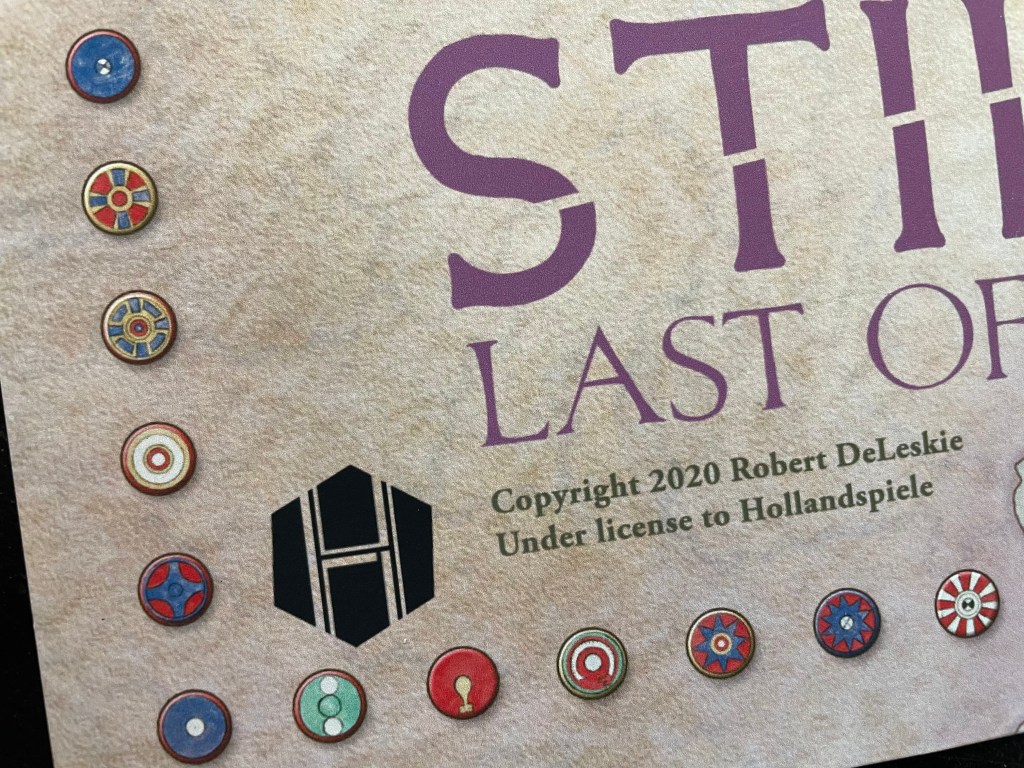
One aspect that I really think is well done is the border of the board, which highlights the symbol or shield art of one of the many and varied tribes that were assaulting Rome on the frontiers of Gaul, Hispania and Britannia. As you look around the edge of the board, it is outlined with these shields. I actually counted them and there are 124 shields shown on the border (36 each along the top and bottom of the board and 26 along the left and right sides of the board). The colors used on these shields is also really stunning and each of them is unique in their own way. Some use the same or similar symbology but a different color scheme. I have looked but it appears that no two are exactly alike. There are a few that appear very close, but there is just a bit of difference with the colors to make them unique. This small and really inconsequential aspect to the game accent makes a world of difference to me with the thematic immersion and feel of the game. This board is really good and helps me to get into the core message and style of the game.
Throughout this series, I have spent a lot of time in these pieces talking about the terrain accents used to highlight various changes in elevation, areas of rough terrain or transitions from one terrain type to another but that is not necessarily the case in this game as terrain doesn’t really matter all that much. I say that understanding that the Defense Values shown on some of the circles along the Fronts are abstractions of terrain, including their difficulty in maintaining supply, to perform proper maneuvers or as a more abstracted fervor in defense of the Barbarian tribes as the player nears their Home Space. But that doesn’t mean that Mark didn’t add some elements to help us understand the geography of the areas depicted. Probably the most different area is that found in the Dicoese of Italia Annonaria. Here is the location of the Italian Alps, which acts as a natural barrier and border to Gaul to the north (modern day France) as well Helvetia (Switzerland) and Vindobona (Austria). Here you will see an ever so slight difference in the shades of gray used to denote these mountains. There are no peaks shown but you can definitely make out a faint texture for the hills leading up to the mountain as you can see in southern Gallia.
Associated with each of the Fronts is a corresponding Army Box and Leader Box located at the bottom of the board that is the home for Roman Comitatenses (troops) and the individual Leader assigned to that Front. At the start of each round, the player has the option of moving around their Comitatenses and Leaders to be used against certain Fronts. At the start of the game, the player will only have limited access to their available troops and Leaders. To start, the player will have only 12 Comitatenses to deploy in the Army Boxes and can only assign a maximum of 6 per Army Box. The player also can assign Comitatenses as Garrisons in map spaces to a maximum of 1 per Diocese. Also at start, the player will only have two of their Leaders available, including Stilicho and Sarus. Constantius is located in the Unactivated Comitantenses and Leaders Box to start the game and will only appear when a certain card is played. The player will assign Stilicho to command one of the armies by placing him in a Leader Box, and Sarus to a different army’s Leader Box. In both cases, those armies must have at least 1 Comitatenses.
I really like the way that these type of boxes were designed as you have space for the counters and the Leader at the very top of the boxes while any reinforcements are held conveniently in the boxes to the left. The Surrendered Box is where you will place tribes once they are driven back to their Home Spaces and defeated there. I don’t know if it is immediately evident but there is a really nice graphic design touch in the Army Boxes as you can see through the colors there to see the outline of the islands of Corsica and Sardinia. And no those aren’t coffee stains! This was purposeful by Mark and is a really nice element to include the islands but not emphasize them while simultaneously using the space for these important boxes.

On the map you will also find the Olympius Track, which represents the devious Olympius’s attempts to undermine Stilicho in the Imperial Court of Emperor Honorius. Olympius can be moved up and down the track through the play of cards. Enemy Cards will always move him up the Track toward the untimely execution of Stilicho while the play of Roman Cards will keep Olympius in check and move him downward. An Advocate Box is located to the right of the Track and holds a Leader named Symmachus who is assigned to oppose these machinations.
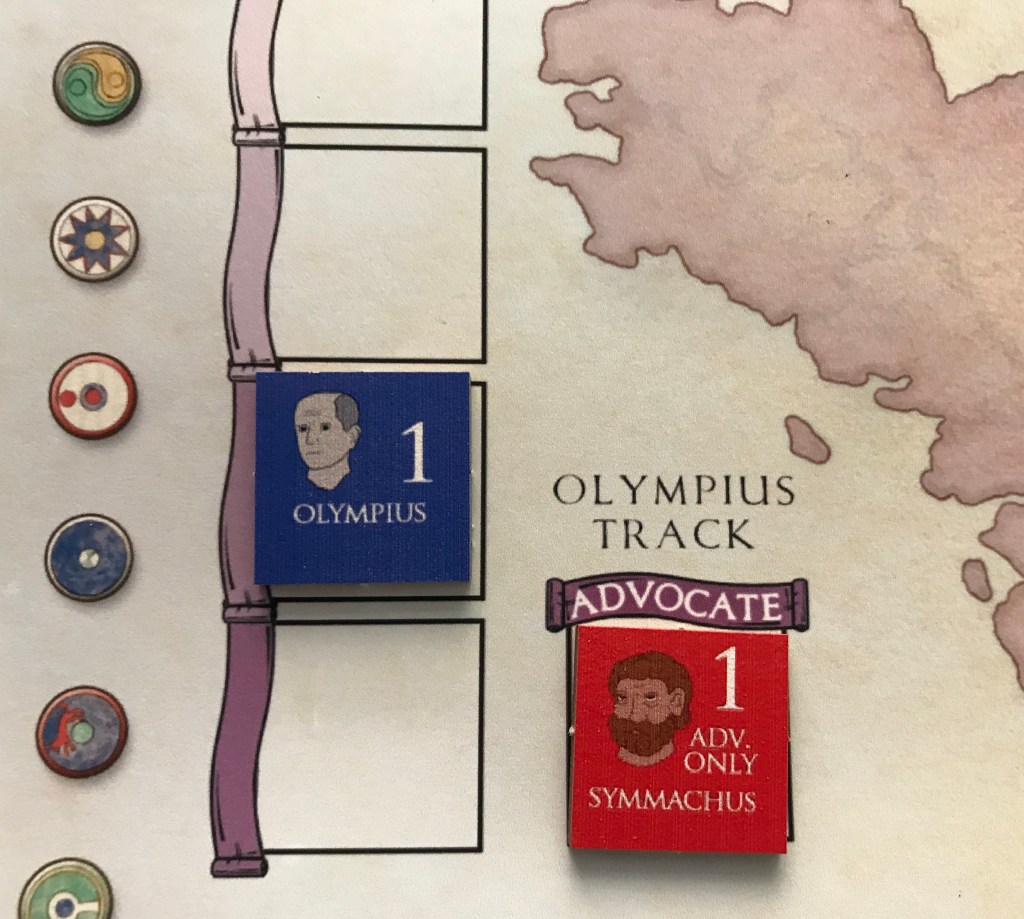
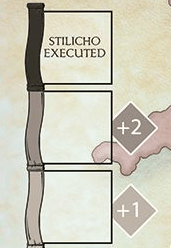
Near the top of the Olympius Track you will notice that there appear a few numbers in diamonds to the right attached to certain boxes. This is a Difficulty Value that is added to Olympius’s printed value when the player attempts to counter his influence in the court. This is another really nice and connected aspect of the board. There are lots of reminders and aids to actually play the game located all over the board. These type of decisions always make a game easier to play and enjoy as you won’t experience the rule fatigue from flipping back and forth the the rules every move or action.
Keeping Olympius under control is hard to do but he process is uncomplicated. It requires the player to roll a D6 and add it to the Attack Value of the Leader in the Advocate Box. If this total is greater than the sum of Olympius’s printed value (either a 1 or 2) plus the Difficulty Value of the space he occupies on the Olympius Track, Olympius will retreat one space. Any ties on this roll will be rerolled and the player may also take Reserve Actions to modify the total as they could in Battles
What board would be complete without a Game Turn Track and a Round Track to keep track of where you are at in the game and the process of a turn. Printed at the top right side of the board is found these items. You will notice that the game has 10 turns, in which the player must pacify all three Enemies in order to win while keeping Olympius under control as well. The Round Track also reminds the player how many cards they will draw each round. Each Round will always see the Enemy draw three cards from the Enemy Deck and fully execute the activations found there. Then the player will get to draw 5 cards during Round 1, 3 cards during Round 2 and only 1 card during Round 3. Cards can be carried over from Round to Round and then also from Turn to Turn with some limitations depending on what Event Cards have been played by the player to that point.
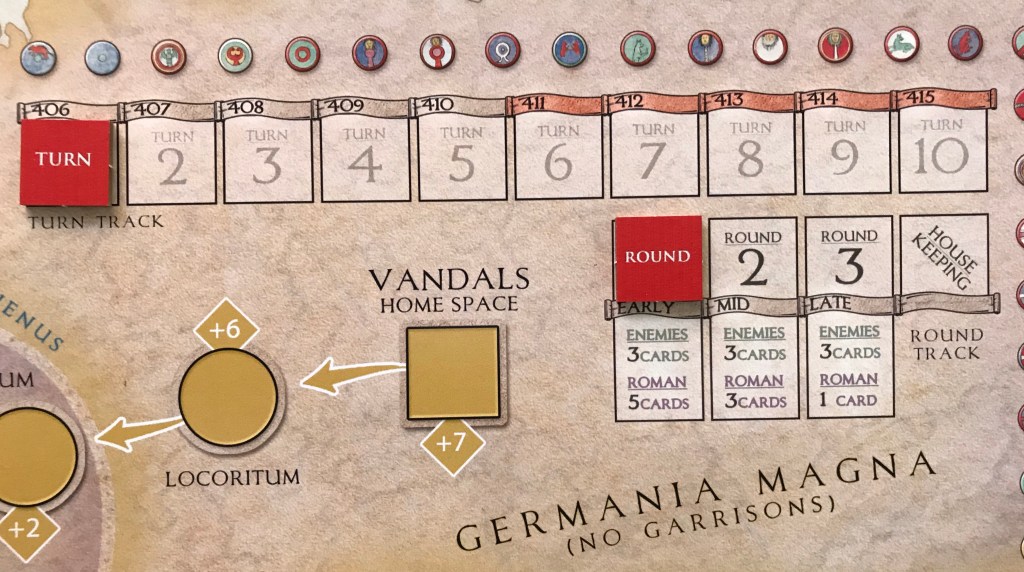
The use of different colors for each of the periods of the game is a good idea here as the player will mix in late game cards to the deck once the 410 turn has been completed. The change in color of the banner above the Turn Track goes from silver to red to highlight this transition and is a good use of color.
Stilicho is a very well designed and interesting solo experience that plays in 60-90 minutes. But, due to the unforgiving nature of the random card draws and its reliance on dice luck, that admittedly can be mitigated through cagey card play and proper decisions, the game can be over very quickly. In fact, my first play lasted only 2 rounds and was over in about 10 minutes. Remember that the historical Stilicho only made it to Round 3! I really enjoyed playing this game, partly due to the well presented and thought out board. It is nice to look at, but is very functional as it provides all the information needed to quickly and correctly play the game. I think that Mark Mahaffey is an underrated talent and really look forward to highlighting a few of his other boards in the future.
Here is a look at our unboxing video for Stilicho: Last of the Romans:
Here also is a video review:
The next board that we will take a look at in the series is Nevsky: Teutons and Rus in Collision, 1240-1242 from GMT Games designed by Volko Ruhnke and illustrated by Chechu Nieto.
Here are links to the previous entries in the series:
Kekionga!: A Dark and Bloody Battleground, 1790 from High Flying Dice Games
Campaigns of 1777 in Strategy & Tactics Magazine #316 from Decision Games
Battle Hymn Volume 1: Gettysburg and Pea Ridge from Compass Games
From Salerno to Rome: World War II – The Italian Campaign, 1943-1944 from Dissimula Edizioni
This War Without an Enemy: The English Civil War 1642-1646 from Nuts! Publishing
Holland ‘44: Operation Market-Garden, September 1944 from GMT Games
Maori Wars: The New Zealand Land Wars, 1845-1872 from Legion Wargames
Imperial Struggle: The Global Rivalry – Britain & France 1697-1789 from GMT Games
-Grant

Almost a game teach all included by looking at the map! Really a remarkable piece of visual information conveyance on Mark’s part – and a great post on yours!
LikeLiked by 1 person