Continuing along in this new series devoted to the best looking boards found in the wargaming world where every other Friday, I will highlight the art and layout of a different board in a wargame that we have played to show you the various talents of the artists and graphic designers involved. In my humble opinion, a well designed and attractive board can make all the difference in the world to me enjoying a wargame. Don’t get me wrong, the game has to be good, but if it’s also good looking it always is a better experience. A board can draw me in. Can make me feel that I’m there. Can set the stage for the thematic immersion that we all crave. And I have found many of these type of boards and I want to make sure that I share them with you.
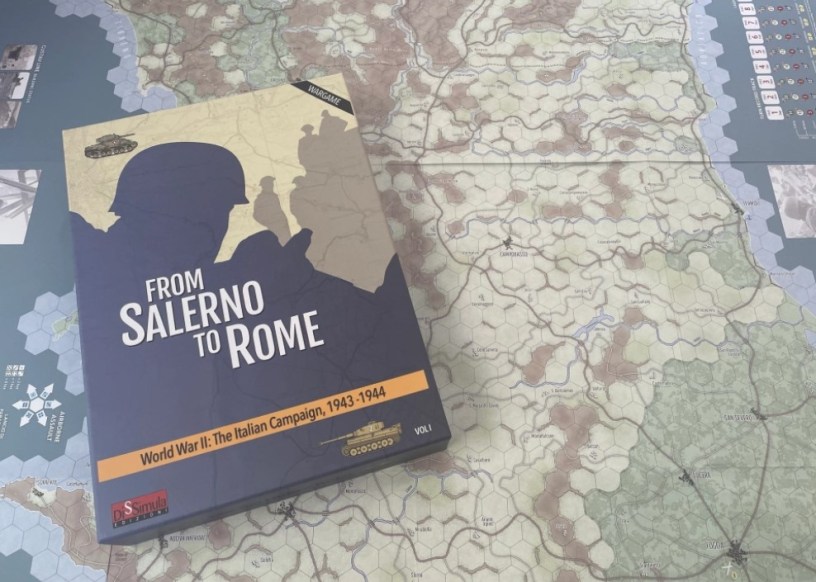
From Salerno to Rome: World War II – The Italian Campaign, 1943-1944 is a 2-player hex and counter wargame that covers the first ten months of the Allied campaign in Italy during WWII, from the landing in Salerno in September 1943 to the liberation of Rome in June 1944. The operation included General Mark W. Clark’s American Fifth Army and General Bernard Montgomery’s British Eighth Army and followed up on the successful Allied Invasion of Sicily. The main invasion force landed around Salerno on September 9th on the western coast in Operation Avalanche, while two supporting operations took place in Calabria (Operation Baytown) and Taranto (Operation Slapstick). The action in the game starts with the American Fifth Army that has just landed in Salerno and the British Eighth army advancing toward the heel in the boot of Italy called the Apulia Region, while the Axis powers gather their forces to strike back with a powerful counter-offensive on the two allied armies.
The artist for the game is also the designer Sergio Schiavi and he is a multi-talented guy who owns his own small publishing company and has now worked on and published 3 games including Radetzky’s March: The Hundred Hours Campaign (2018), From Salerno to Rome (2020) and recently Give Us Victories: The Chancellorsville Campaign (2022). He does all of the graphic design work, counter art and map graphics and is very skilled at what he does.
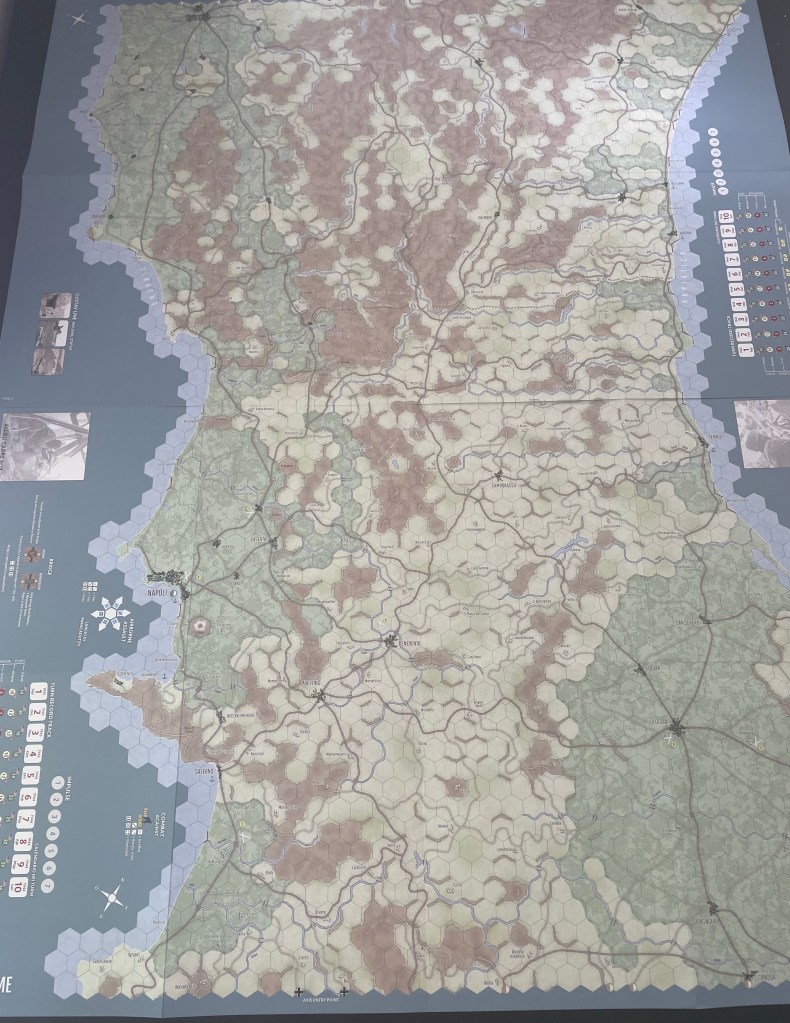
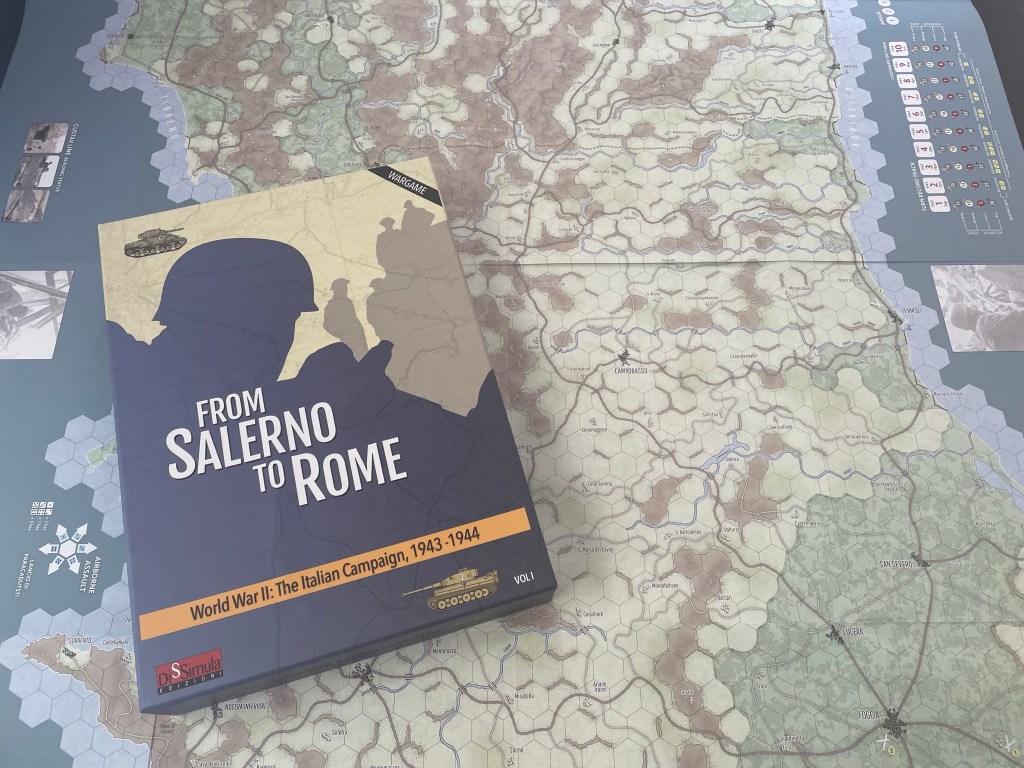
The board consists of 2 very large 22″ x 34″ thick paper maps and when I first laid eyes on the board, the first thing that I noticed was the focus on the rugged Italian terrain. The brown areas of the map represent the imposing mountains and if you look closely at them you will notice that nearly all of the roads through the peninsula go around, not through, these mountains. The terrain in this campaign played a key role and must be properly highlighted to make the game feel correct. This is the case with the game and the terrain plays a major role in the game, hindering the Allies as they move off of the beaches and aiding the defending Axis armies as they clog up key crossroads and pinch points on the board.
The Allied forces land on the beaches of Salerno and immediately are faced with several key mountains in their exits off of the beaches. There are roads that lead to the north to Napoli and to the northeast to Avellino but this can cause some traffic jams here and make moving out of the beach hexes a slog at best. This is the best opportunity for the Axis player to counterattack in force as they Allied units are gathering themselves after landing and here again the mountains play a role as the Allied player will be unable to get at defending German infantry units easily.
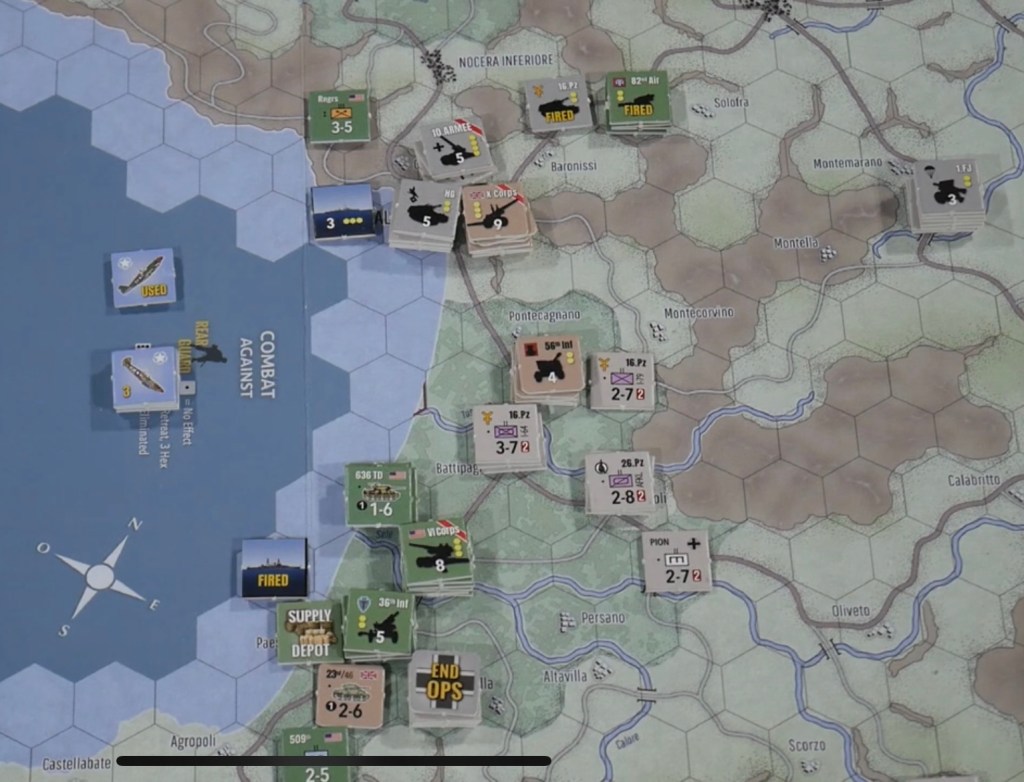
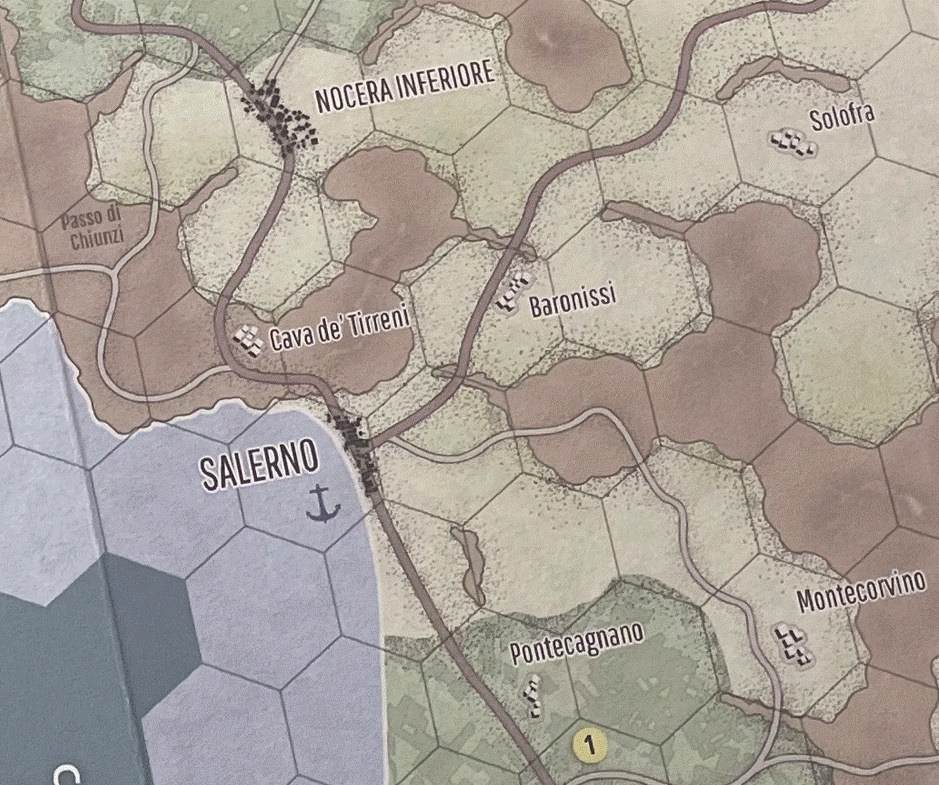
An example of what I am saying is found in the small town of Baronissi that is located on the road to Avellino. Allied Armored cannot get to Baronissi except for using the road as the rules are clear that armor cannot enter or attack into a mountain hex without a road. This means that the Germans can put up a nice road block and keep the Allies at bay here or at a minimum slow their advance down. They can also do some damage to the north by setting up infantry defenders in the mountains north and east of Cava de’ Terreni as the mountains give some good defensive column shifts on the Combat Results Table and make the defenders here count for more than their printed combat values.
I also want to point out the stylized use of stippling here by Sergio as he wants to differentiate the open terrain (colored tan) from the mountains (brown) and uses the technique to great effect to create that distinct border. I also like that he didn’t do it in the entirety of the open hexes, keeping it to a minimum of coverage, as it comes off better with only a smattering being used.
Another nice touch is the differentiation on the mountains as he adds in feint ridge lines at the tops to denote higher terrain than the foothills of those mountains. Not a huge deal but a very nice and artistic touch that stands out and makes the mountains seem a bit more imposing than just lines on a map.
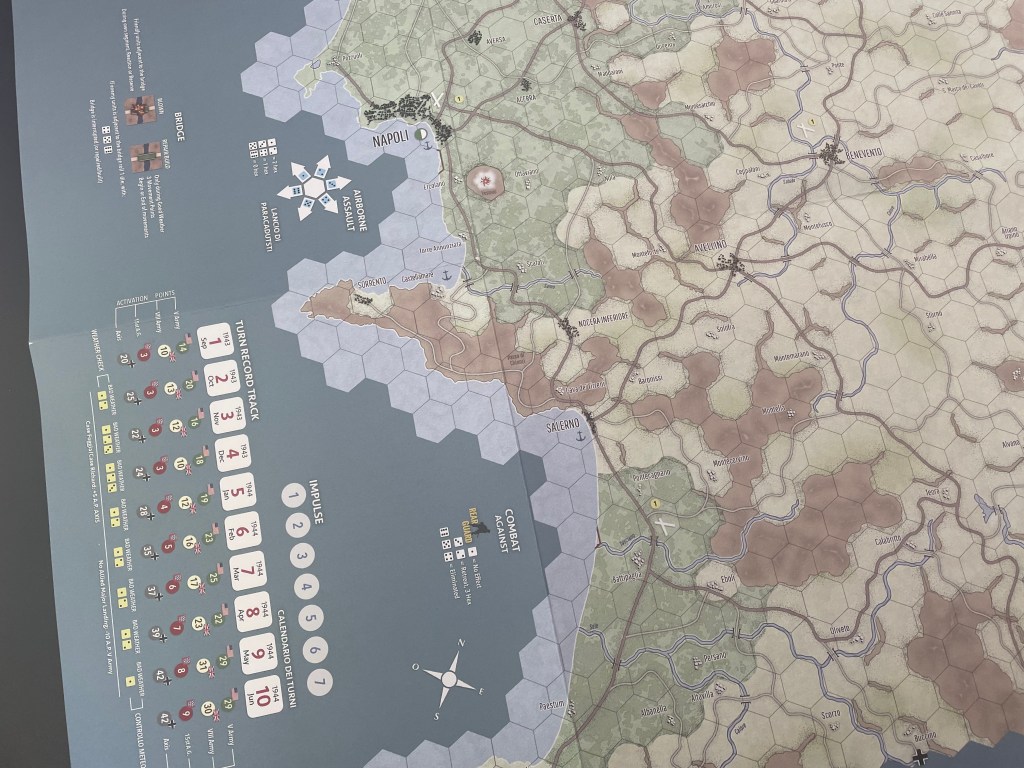
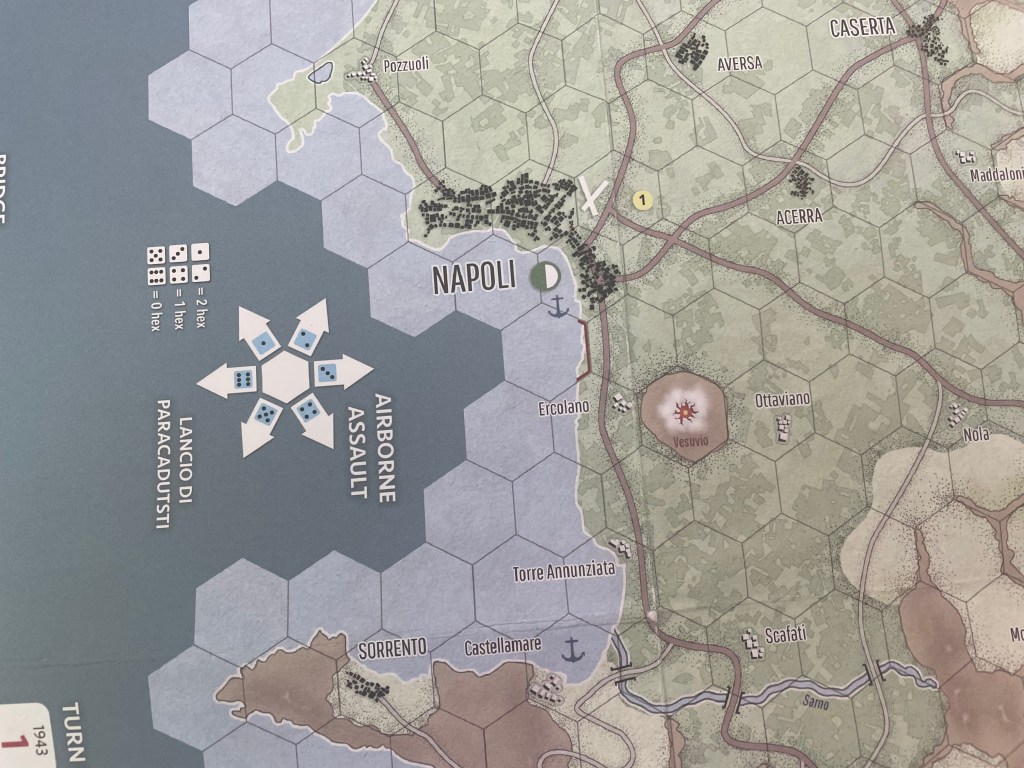
As we move north on the board, we come to the seaside city of Napoli. But before we get there, we pass by the imposing Mount Vesuvius, which erupted in 79 AD leading to the total destruction of the cities of Pompeii and Herculean. The volcano is still active, although it hasn’t erupted in over 80 years, but Sergio makes a point of giving it the appearance of life by adding in some fiery magma at the top of the mount. Napoli is a very strategically important port in the area and the Allies will have to capture it quickly to draw supply from and to land additional later round forces there to move north toward Rome. I love the way that Sergio drew these cities and towns by drawing lots of little squares and rectangles representing buildings. It is a nice touch as most maps just name the city or town and place a star of some other elements to identify it as a type on the Terrain Effects Chart. I also really like the addition of the air strip here to the east as it is very important to allow for Allied air operations to reach further inland as the invasion progresses.
South of Salerno is located one of my favorite types of terrain called Cultivated. The terrain doesn’t offer much cover and is the same as open but I love the way it looks on the board. You can see the shapes of fields and even some vineyards as you approach the foothills of the mountains. I really like the decision to use two different types of green, one darker to make the fields more prominent and the other lighter to serve as a back drop to enhance the cultivated nature of the terrain.
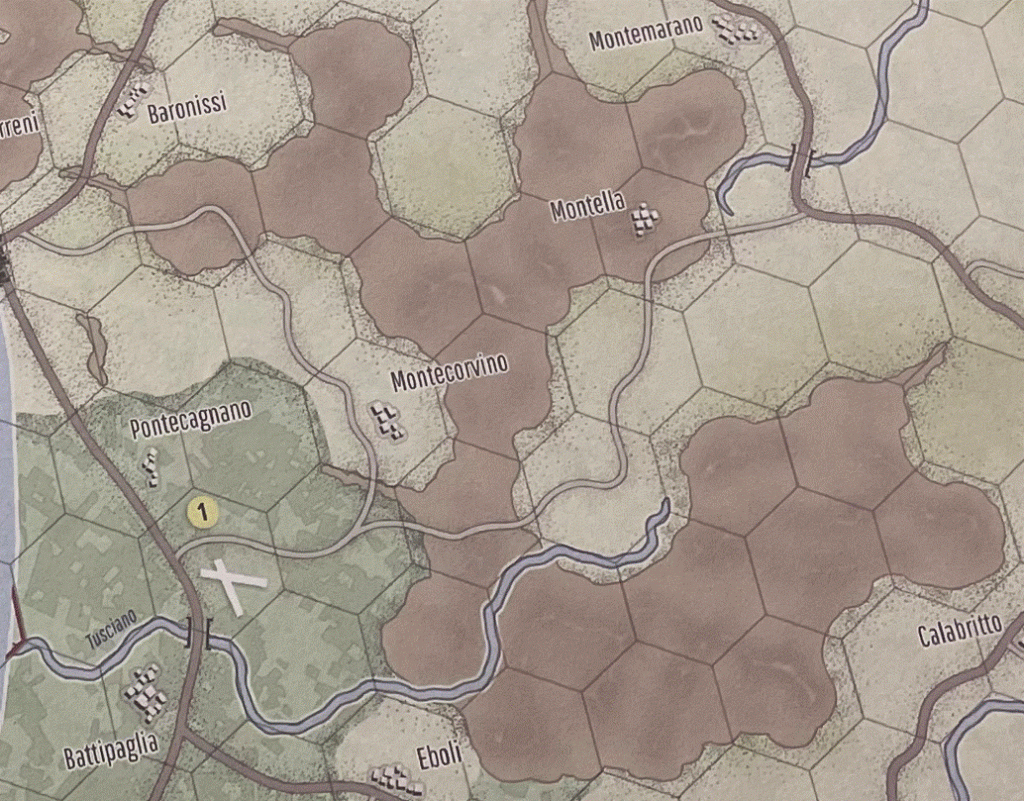
I really like the shapes that Sergio was able to highlight with the mountains as they snake around the terrain, twisting and turning to and fro. The picture below is a prime example of the mountains forcing the movement of troops through certain pinch points and gives key suggestions, without saying a word, to the German player about how they should go about defending against the Allied invasion. A cagey German player can use the terrain to make the cost of each hex expensive as they Allies will have to attack with full force to knock the defenders out of their mountain spaces. Rivers are also a key geographic feature that is a natural benefit to the German player as attacking across a river is not wise and there are only a few bridges spaced out as shown here. But, while there is good weather during a turn, the Allies can attempt to build bridges on any river hex side, and not just the ones with printed bridges. This means that units can get next to a river, build a bridge and get into the action so you cannot always just rely on rivers to slow or stop the advance.
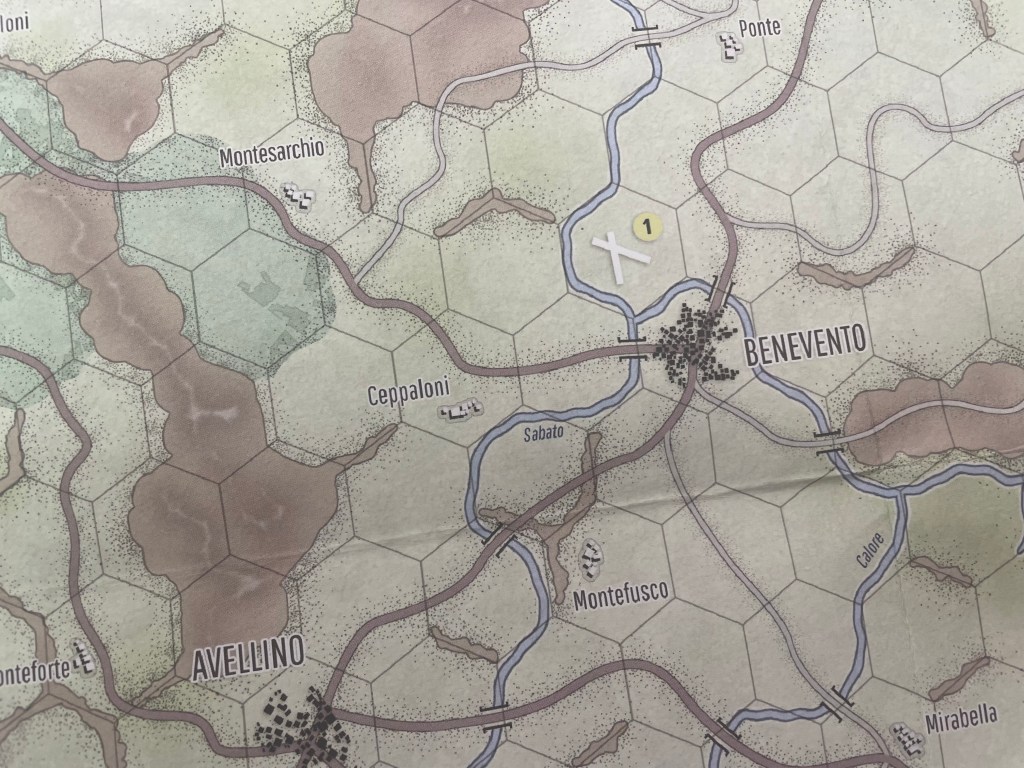
Back to the north lies the city of Benevento. This city is very interesting as it is situated at the crossing of several major roads but is protected by the Sabato river as it snakes its way through the terrain. Another key point on this axis of advance for the defenders is the small town of Montesfusco which sits across the Sabato river but also the hex it inhabits contains mountains so it offers lots of defensive possibilities.
I really like this sliver of mountains here and really like the placement of the hex overlay over the terrain itself. I looked online to see about this area and it appears Sergio really tried to stay true to the terrain and its layout and not take artistic liberty with it to create a difficult section. Very well done!
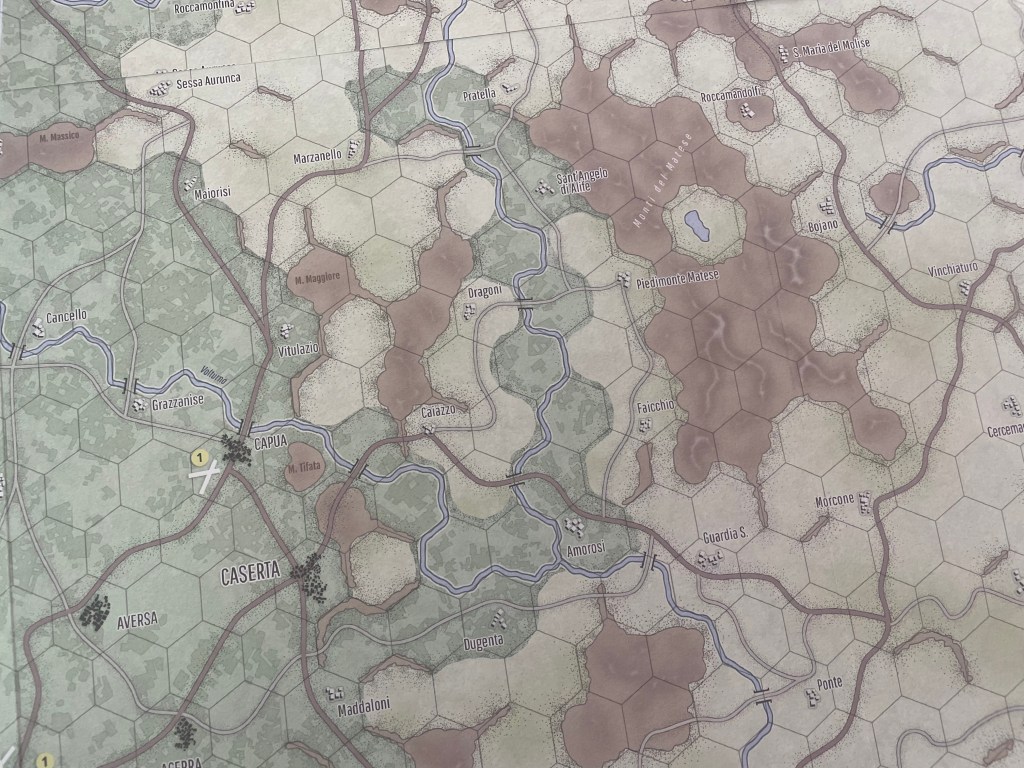
In the center of the map is an opportunity to highlight the impact of a river on the land itself. As the Volturno River moves through the valley gap in the mountainous terrain here, it waters the land and creates a long line of single hex cultivated areas. I think this is an excellent representation of these fertile river valleys and appreciate the attention to detail in the use of the different sized and shaped fields as mentioned previously. As you zoom in on these hexes, you will see lots of different shapes and once you zoom back out the effect is a very interesting feeling of texture and differentiation of the terrain. A really nice touch for this map!
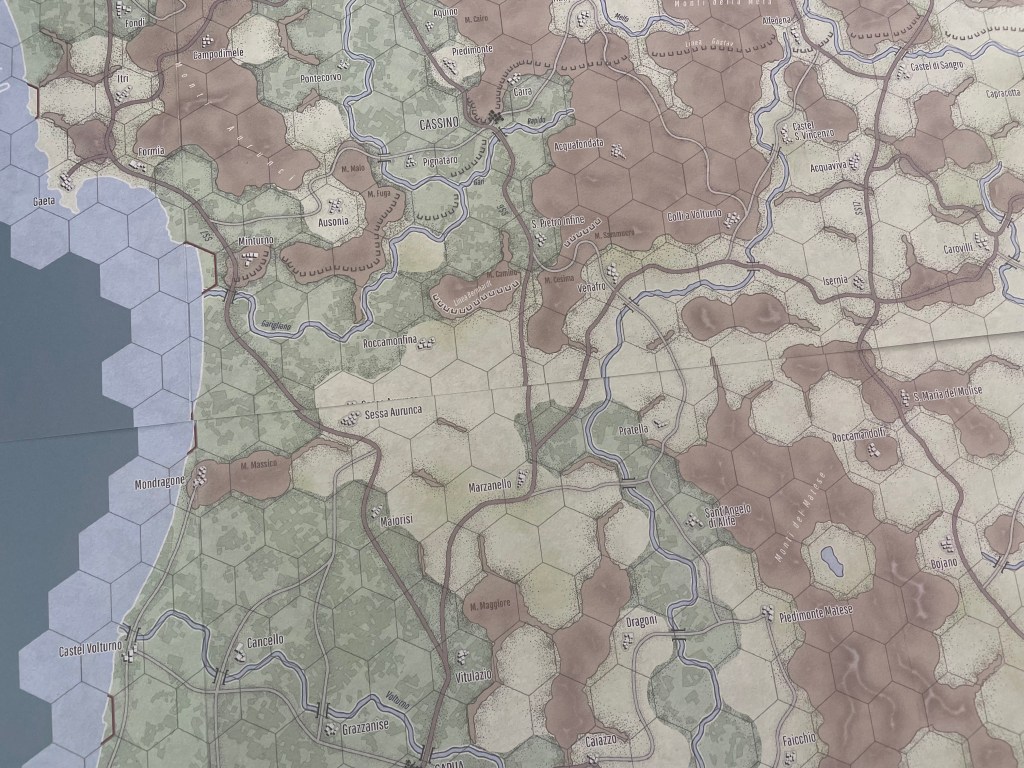
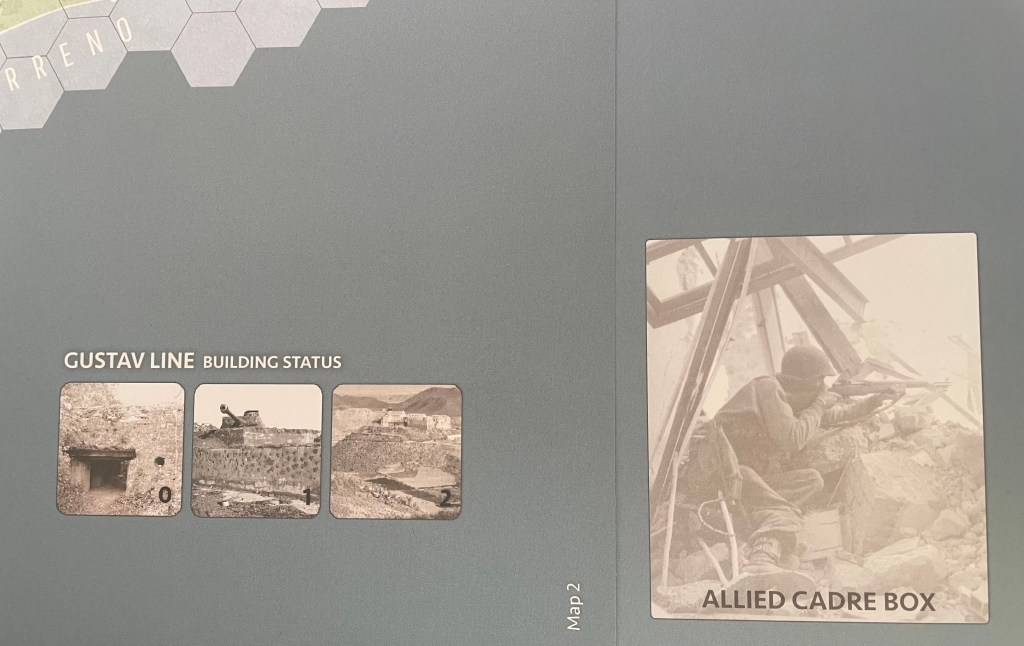
But what map of Italy during World War II would be complete without a significant focus on the Gustav Line. The Gustav Line was the main German defensive line that crossed the Italian peninsula from the Tyrrhenian Sea to the Adriatic Sea. The Gustav Line ran along the Garigiliano and Rapido Rivers in the west and on the Sangro River on the east side of the peninsula. The line was defended by 15 German divisions fortified with small arms, artillery, pill boxes, machine gun emplacements, minefields and barbed wire. The German divisions had retreated to and fortified this line after the Italians surrendered to the Allies on 8th September 1943. In order to reach Rome, the Allies would have to break this line and that would be a daunting task.
The lynchpin of the Gustav Line was Monte Cassino identified by the Germans and Allies as key terrain because of the outstanding observation it provided over the entrance to the Liri Valley. From Monte Cassino, one can see every road and river crossing at the mouth of the Liri Valley. Increasing the complexity of the Monte Cassino terrain was the Benedictine monastery built on top of it. The Rapido River formed part of the Gustav Line, acting as a natural moat, protecting Monte Cassino. You can see the Gustav Line represented on the map as it extends from sea to sea with a series of black half box shapes that appear as they are pillboxes or other fortifications. It is not a straight line but just like the rivers in the area follows the mountainous terrain as it moves across the area. And in the very center is found Monte Cassino.
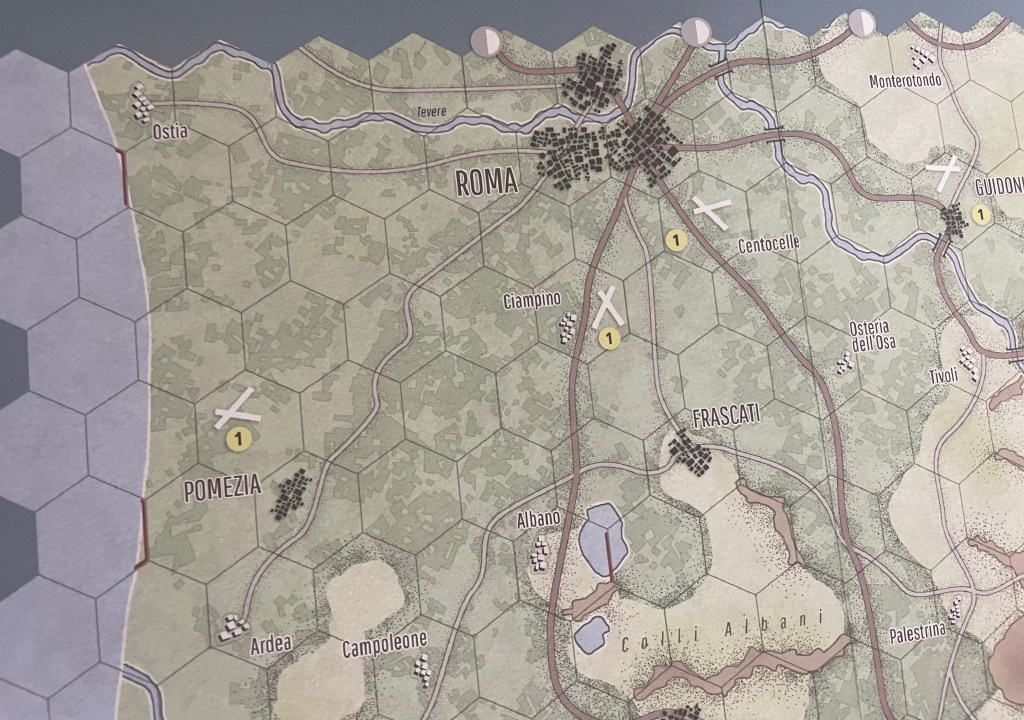
The final part of the map that I want to highlight is the area around Roma. The Allied objective was to take Rome and force the Italians to surrender so that they could drive out the Axis forces here and use Italy as a model for how to break the defenses in Western Europe. All roads lead to Rome is in great practice here with the map as they re are multiple roads emanating out from the capital city. The German defenders will have to skillfully use these roads to push the advancing Allies back and they cannot rely on the defensive benefit of the mountains as they did in the south. They can however use the Tevere River to force the Allies have to attack across the river making their attacks less effective. You will notice all of the airfields shown in this part of the map. With 4 different airfields appearing within 5 hexes of Roma, there are plenty of opportunities for air operations.
The Turn Record Track is a bit small in my opinion and was the only thing that I wish was better done with the board. It is functional, but very small and there is surplus real estate in this area of the map, as the ocean hexes don’t really come into gameplay and I wish that Sergio would have made that larger.
One of the other things that I want to point out about the game is that the Allies have to reach certain objectives by a stated turn. An example of this is having to take Napoli by Turn 4. This is a very tough thing to accomplish and in our first play we simply had no idea how to accomplish this and struggled mightily to move the columns up quickly while taking out the defenders along the way. Being able to meet these objectives is going to take some practice and multiple plays will unlock the secrets to the most effective strategies.
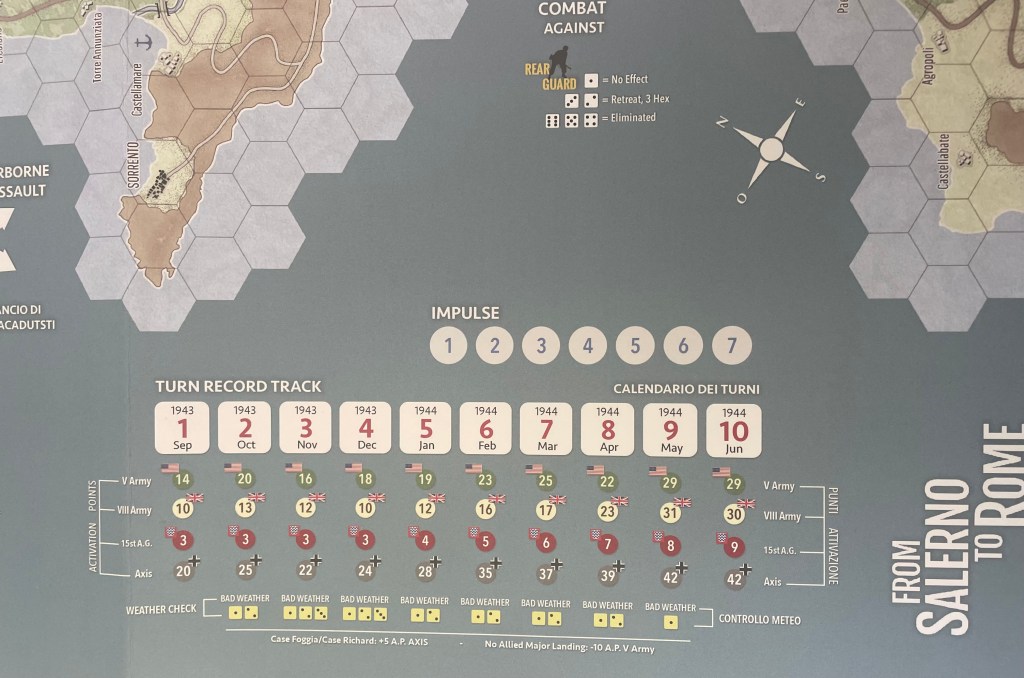
One final example of the play elements of the map is the Allied Cadre Box and the Gustav Line Building Status. These are well placed, once again in the ocean as this area is not used in the game and easy to see and to reach. This board is highly functional and also beautiful and makes the play experience a great experience.
We really enjoyed our play experience with the game and enjoyed the system and its intricacies that mimic this theater of World War II very well. The map really creates a great canvas to tell the story of this critical campaign for control of Italy in 1943 and Sergio is a master at not only design but has some real skill in the area of graphic design.
Here is a look at our unboxing video for From Salerno to Rome illustrated by Sergio Schiavi:
We also shot a video review and you can check that out at the following link:
Finally, if you are interested in From Salerno to Rome: World War II – The Italian Campaign, 1943-1944, you can order a copy for 73€ ($71.00) from the Dissimula Edizioni website at the following link: https://www.dsimula.com/fstreng
The next board that we will take a look at in the series is from This War Without an Enemy: The English Civil War 1642-1646 from Nuts! Publishing designed by Scott Moore and illustrated by Nicolas Roblin.
Here are links to the previous entries in the series:
Kekionga!: A Dark and Bloody Battleground, 1790 from High Flying Dice Games
Campaigns of 1777 in Strategy & Tactics Magazine #316 from Decision Games
Battle Hymn Volume 1: Gettysburg and Pea Ridge from Compass Games
-Grant

Grant,
Thanks for this excellent series! I completely agree with you that a well designed and attractive board can make all the difference in enjoying a wargame. Certainly, the game has to be good, but if it’s also good looking it always is a better experience. A gameboard should draw me in making me feel that I’m there and set the stage for the thematic immersion that the game offers. I too have several favorites (and a few thumbs down). Perhaps the hardest game map to evaluate is one for a nautical themed game. I’d suggest Captain’s Sea (Legion Games) as a fine example combining ocean with supportive information.
Rich J.
LikeLiked by 1 person
Thanks Rich. We have played Captain’s Sea and that is a well done board. I have a list as long as my arm to do posts on. Hope this series lasts for a while and has some staying power.
LikeLike
That is indeed a gorgeous map.
LikeLiked by 1 person
I realize that this article was more about the maps, but how would you assess the game play value of this game compared to GMT’s Salerno ’43? Scale may be a bit different, but how did you assess the ‘feel’ of the conflicts as rendered in both games (noting that GMT will be publishing – eventually – sequels to Simonitch’s original S’43 game)?
LikeLiked by 1 person
To answer your question I’m going to direct you to our videos on both games on YouTube and my First Impression post on the blog for Salerno 43. Both are excellent although different takes on the situation.
LikeLike
Hey Grant, I agree with you about the beauty of FStR’s map, it is really special. I bought this game purely on your and Alexander’s recommendation and I am happy to have done so. Unfortunately I have only played it solo, which is not great for this game, but I still enjoyed it. That map is one of the best in my collection I reckon.
LikeLiked by 1 person
Sensational map & a really good simulation. I believe that Sergio is actually a Map Archivist!
LikeLiked by 1 person
Very kool series Grant. And exceptionally well done too. Cheers – Neil in Denver.
LikeLiked by 1 person