
Continuing along in this new series devoted to the best looking boards found in the wargaming world where every other Friday, I will highlight the art and layout of a different board in a wargame that we have played to show you the various talents of the artists and graphic designers involved. In my humble opinion, a well designed and attractive board can make all the difference in the world to me enjoying a wargame. Don’t get me wrong, the game has to be good, but if it’s also good looking it always is a better experience. A board can draw me in. Can make me feel that I’m there. Can set the stage for the thematic immersion that we all crave. And I have found many of these type of boards and I want to make sure that I share them with you.
This is the first post in this series where we have highlighted the board skills of an artist for the second time and it couldn’t be with a better guy and a better artist than Nils Johansson. Nils is a very talented and skilled professional who has done multiple games with several different companies including High Flying Dice Games such as Breaking into Valhalla (2001), City of Confusion: The Battle for Hue, Tet 1968 (2012), Dueling Eagles: Aerial Combat over Malta (2013) and Kekionga! A Dark and Bloody Battleground, 1790 (2017), for SNAFU Design Ambon: Burning Sun and Little Seagulls (2021) and most recently for Dan Verssen Games with Lanzerath Ridge: Battle of the Bulge (2022). He has a real gift for accents to typical features of any wargame board, such as trees, rivers and other terrain, to depict them with a feeling of motion and life and appropriate appearance for the time of the battle.

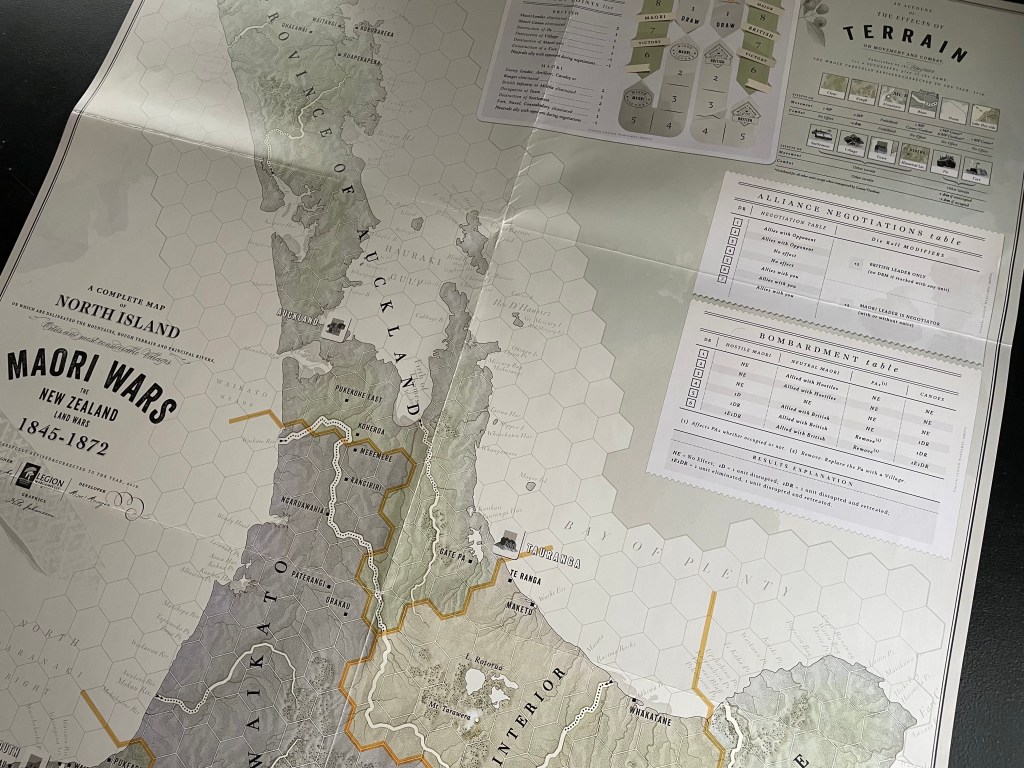
Maori Wars: The New Zealand Land Wars, 1845-1872 from Legion Wargames is a game that uses as a background the uprisings that took place between 1845 and 1872 due to British colonial incursions into native Maori lands on the North Island of New Zealand. The ensuing conflict over a period covering nearly 30 years involved the destruction of a number of Maori villages, pas, which are fortified villages that featured intricate trench-works and some colonial settlements. The war introduced the British to a very skilled and strategic combatant who used a strategy of ambushes and bush raiding to catch off guard and frustrate the professional British ranks. The hallmark of the game is that it is highly playable by featuring low counter density, a play time of under two hours for most of the scenarios and easy to understand rules. Playing as the British, players will have to deal with swinging tribal loyalty and will need to master the rivers and seas to move their more powerful troops and gunboats around while the Maori player will be focused on bush-raiding, which allows the Maori to move units temporarily off the board and out of harms way, but then to later bring them back in a more favorable strategic location of their choosing.

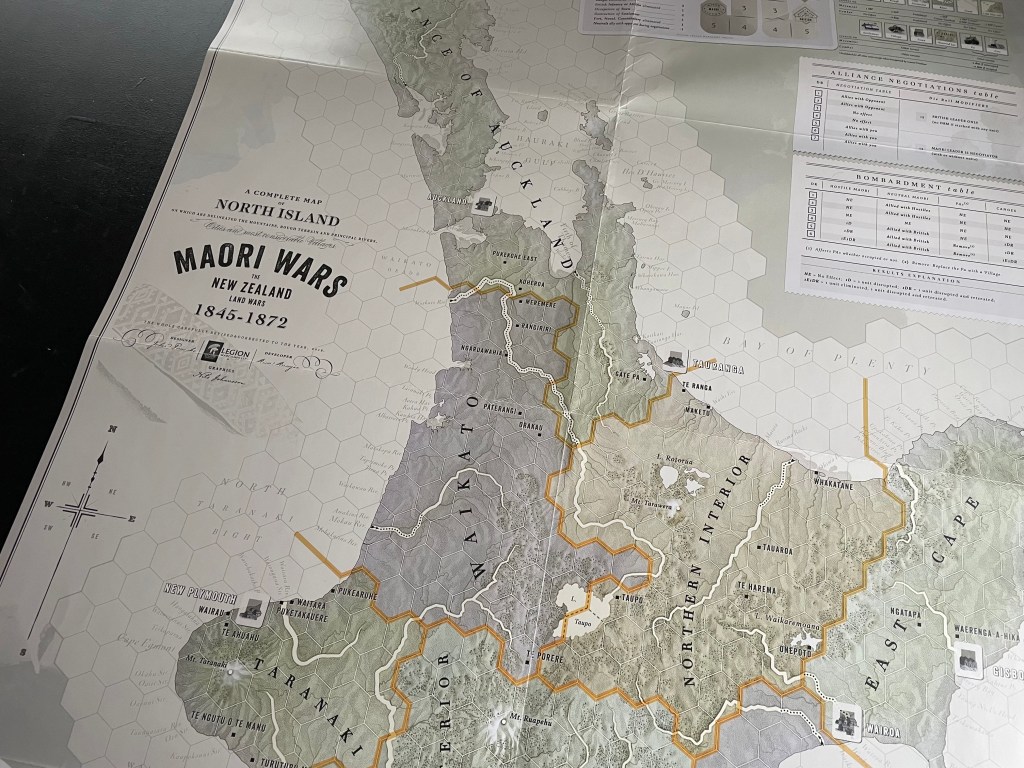
The board for Maori Wars is a single full map sheet that measures in at 22″ x 34″ and shows the North Island of New Zealand, which is officially named Te Ika-a-Māui. When I look at the picture of the board, it reminds me of a survey map or something similar with the muted tans, browns, grays and green colors of the different territories and the terrain. I like the contrast of the colored territories on the map being delineated with different colors as well and the thick yellow-orange border lines. The black text of the game title on the drab tan color really helps the text to pop off the paper as well and creates a real polarizing effect between the player aids on the board and the playing surface itself.
There are 8 distinct named territories shown on the board. Starting from the south and moving north, we have Wellington, Central Interior, Hawke’s Bay, Taranaki, Waikato, Northern Interior, East Cape and Province of Auckland.

Here is a focused picture on the Wellington territory, which is located on the southern most tip of the North Island. There are several elements about the art here that I would like to discuss and highlight for its gloriousness. First off is the detailed reflection of the terrain on the board. As you look closely at the picture, you will see the large river running through the center of the territory as well as the smaller lines coming off of or running into the larger river. These fan out like the rivers really do to water the surrounding terrain and there representation here is fairly easy to overlook because they have been drawn faintly to denote their minor effect on the hex they appear in and the game in general. But, notice the care and detail that Nils includes with regards to the rivers as the name of each of these minor tributaries is included on the map itself? Can you see them? They are somewhat hidden in the open ocean hexes with small lettering but you will notice dozens of these names carefully scrawled here. What a nice touch to the game that doesn’t really effect gameplay, but adds some interest and detail to the board itself and creates more appeal for the setting. The black dotted lines with the arrow found in the large river shows that these rivers are navigable by the British Gunboats and the Maori War Canoes and you will notice they reach two hexes inland to allow access for naval units. Also, you will notice the large body of water or lake (Lake Wairarapa) to the west and the lake hexside that is shown as a dotted line on the western edge of the water. Seamlessly done and integrated into the board with subtlety.
The terrain is highlighted with the stippling effect we have described in other posts in this series and really gives the land a feeling of depth and uniqueness. Added to this is the scrub brush and trees which makeup rough terrain in the game that have been carefully included in the hexes to show there is vegetation in the area. This board art has multiple layers of interest and as I look at it more closely continue to find additional details that have previously escaped my notice.
The Town of Wellington is shown on the coast with a special hand drawn symbol showing a collection of 3 buildings and a small house in the foreground. The other interesting thing about the Town is the bold capital white colored letters used with black outlines to make this populous area stand out from the other smaller living areas on the board including Settlements (which are typically cities), Villages, Historical Locations, Pa and Forts. The Historical Locations are a very interesting addition to the board as well that have no impact on the game play but once again are included to broaden the scope of the board to include the overall history and geography of the conflict and the North Island. The Historical Locations are shown with a small black square and an all caps name in black letters. Here we see Upper Hutt, Porirua and Paekakariki which are 3 cities included in the Wellington metropolitan area.

Here is a picture focused on the 3 central territories of the North Island in the Taranaki territory, the Central Interior territory and the Hawke’s Bay territory. As you may know, the New Zealand islands are volcanic and have remnants of this activity in several areas on the North Island. In this territory, the two most obvious remnants are Mount Taranaki located in the Taranaki territory, which hasn’t seen activity since 1854, and Mount Ruapehu located in the Central Interior territory which has volcanic activity today. I just love the look of these territories as Nils carries the effects onto this area with the stippling, major rivers with many branching tributaries and offshoot rivers and the addition of lots of scrub and trees dotting the landscape. The rivers in Taranaki are not navigable but several are in the Central Interior and Hawke’s Bay. Once again, they allow access up to two hexes inland and provide opportunities for the Gunboats to offer fire support during combats. There are only two Settlements in these 3 territories including New Plymouth in Taranaki and Napier in Hawke’s Bay. The remaining Historical Locations represent smaller towns and cities that feed into those larger areas.
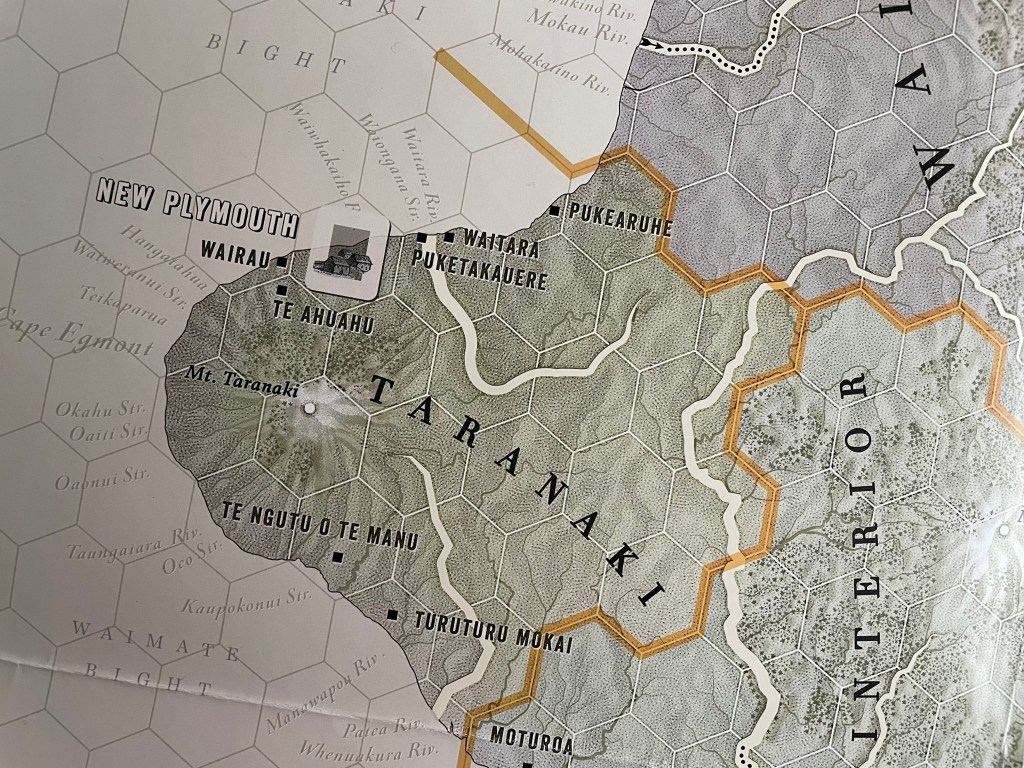
As we zoom in for a closeup look at Mount Taranaki and its surrounding mountainous terrain, the first thing to take notice of is the eroded sides of the extinct volcano, which shows millennia of water runoff. The area around the summit of the volcano is white, with a slight misty overlay as well. This denotes the higher altitude of the peak and the fact that snow accumulates on top throughout the year. This is an example of Nils attention to detail in representing the geologic features of the terrain but also a nice touch with the addition of the snow. It looks really stunning and pops right off of the board! You can see a similar treatment on Mount Ruapehu located in the Central Interior territory to the east shown on the edge of the picture.
Here is a picture focused on the 2 east central territories of the North Island in the Northern Interior territory and the East Cape territory. This area is a bit more remote and less populous but there are still several Historical Locations as well as a Village in Wairoa and a Settlement Gisborne located in the East Cape territory. This territory has a volcano as well called Mount Tarawera and a few large bodies of water in Lake Rotorua and Lake Wikaremoana and portions of Lake Taupo.

One other really interesting feature that caught my eye in this area was what I am assuming is coastal marshland of a sort in the Northern Interior around Whakatane. You can clearly see where the shore is outlined in those two hexes and yet there is a lighter colored area of stippling with a grey texture that extends out into the ocean hexes nearby. I thought this was a really interesting addition to the landscape and once again gives some depth to the general detail and quality of the board. It also gives me the feeling of a flotilla of lily pads or kelp or possibly sandbars as well which is what it could be trying to depict. Whatever the intent here was, it is fantastic and I really like to see it on the board.
Also found in this north central area is the Waikato territory, which is located along the western edge of the North Island in the North Taranaki Bight. While this area is the most sparsely populated on the island, it is the home to the longest navigable river which runs from its northernmost border with the Province of Auckland all the way to the border with the Northern Interior territory. That navigable river consists of 9 full hexes of distance, although some of it doubles back over territory it already covered as it meanders to the east.
If you look closely at the Kawhia Harbor located just to the left of the “T” in Waikato you will see the same floating cloud of gray plant matter as was found in the Central Interior territory. This bay is pretty interesting as well as it is very craggy and has lots of little inlets going in an out of the land. This really has little effect on the game but definitely is a nice graphic touch.
The final territory we will take a closer look at is the Province of Auckland territory, which represents the northernmost tip of the North Island and consists of a long thin stretch of land that has several small offshore islands shown on the board. There was a lot of action in this area of the board during our play and it is very interesting to see the counters stacked in this area.
One key point of interest here is the Firth of Thames which is a small strait that leads into a larger bay at the base of the Auckland territory as it moves to the north. At the head of this bay, there is a navigable river that leads to the south and is navigable for 3 hexes inland, really just 2 1/2 hexes. I also love looking at the closeup of this section of the board. There are so many different names printed here on the board that represent rivers, points, small islands, harbors, straits and other features. I just love this area of the map as it is so interesting and congested with information. I also really like the the name of the territory, Province of Auckland is written north to south following the course of the land. I think that this is a really subtle and nice aesthetic touch to the overall look and appearance of the board and how it effects the gameplay.

Here is a look at a game in progress with counters deployed on the board in the Province of Auckland. As much as a I love the look and feel of the board, the counters are also really well done and look great on the board with several different colors including black, gray, red, tan and blue. The full picture of the game is a well coordinated and complementary effort that provides some great immersion potential for players.

Maori Wars is a great game with some really beautiful art, not only on the board but also on the counters. The game is a slugfest between the mighty British and their Queenite allies against the inhabitants of the island in the various Maori tribes that resisted their colonial oppressors. The tribes have lots of tricks up their sleeves and use the land and their knowledge of it to great advantage as they conduct bush raids regularly and are very difficult to bring to decisive battle. Their mighty Pas also are hearty and can withstand enemy assaults. Nils did a fantastic job of accentuating and highlighting the land and terrain to make a very enjoyable visual experience for the players.
Here is a look at our unboxing video for Maori Wars: The New Zealand Land Wars, 1845-1872 :
We also did a video review and you can watch that at the following link:
The next board that we will take a look at in the series is Imperial Struggle: The Global Rivalry – Britain and France 1697-1789 from GMT Games designed by Jason Matthews and Ananda Gupta and illustrated by Terry Leeds.
Here are links to the previous entries in the series:
Kekionga!: A Dark and Bloody Battleground, 1790 from High Flying Dice Games
Campaigns of 1777 in Strategy & Tactics Magazine #316 from Decision Games
Battle Hymn Volume 1: Gettysburg and Pea Ridge from Compass Games
From Salerno to Rome: World War II – The Italian Campaign, 1943-1944 from Dissimula Edizioni
This War Without an Enemy: The English Civil War 1642-1646 from Nuts! Publishing
Holland ’44: Operation Market-Garden, September 1944 from GMT Games
-Grant

It’s a great map, and talking as an Archivist, it really lives up to the late 19th Century feel. I have some reservations about the scale for the game itself, but the map is wonderful!
LikeLiked by 1 person
Thanks for this series Grant. I find an attractive box and board will draw me in regardless of genre. This will be a big help.
LikeLiked by 1 person