Lanzerath Ridge is a solitaire wargame that takes place on the first day of the Battle of the Bulge December 16, 1944 during World War II. In the game, the player takes control of a small group of American soldiers who must defend against the attacks of German paratroopers and fusiliers. The goal is simple but very difficult as the player has to attempt to do as well or better than the historic defenders by holding the attackers from taking the town of Lanzerath, Belgium to delay the advance of an entire SS Panzer Division. With limited actions each round, the player has to utilize their limited resources to attack the advancing German forces while also trying to accomplish objectives such as denying the Germans their equipment and strategically withdrawing to live to fight another day. The game lasts four rounds and each round has its own Assault Deck from which enemy counters are drawn along with nasty surprises such as mortars and MG42’s.

In Action Point 1, we took a look at the game board focusing on the Defender Combat Positions and Assault Tracks for the enemy Assault Counters. In Action Point 2, we examined the various Defender Counters and their Special Attributes and Action Designators. In Action Point 3, we dove into the makeup of the Enemy Attack Deck and discussed how the cards drive the assault and work against the player. In Action Point 4, we examined the interesting new Vehicle Counters and their uses. In Action Point 5, we reviewed a few examples of player actions including Attack, Adjust Fire, Close Combat, Assist, Command and Recover. In this Action Point, which is the conclusion to this series, we will discuss some strategy points and suggestions for a better outcome.
Putting the Correct People in the Most Appropriate Places – Moving Units Around the Game Board
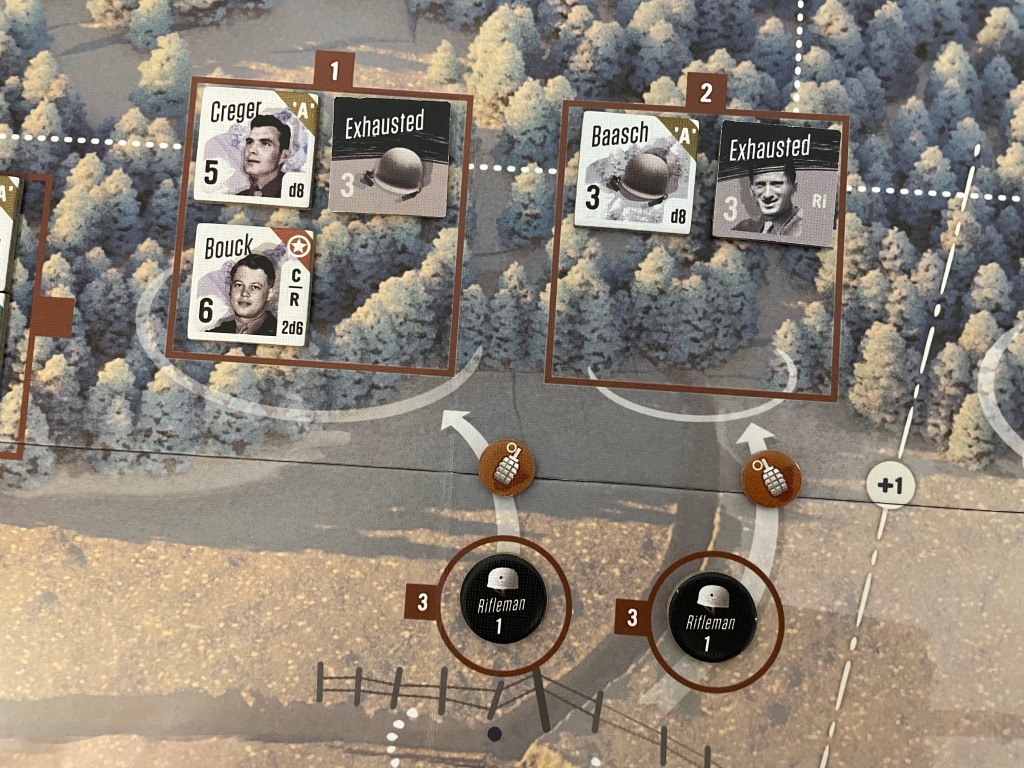
One of the most important aspects of the game is Defender Counter placement. In order to do well at the game, you will have to make sure you have the correct people in the most appropriate Combat Positions in order to get the maximum utility out of their Attributes and Action Designators. At the start of the game, the Defender Counters are placed according to the setup positions shown in the rules. Players have to place the specific Defender Counters where shown and have no discretion at the beginning. But, as the game moves along from Attack Period 1 to Attack Period 2 and beyond the player can redistribute their units amongst any of the Combat Positions.

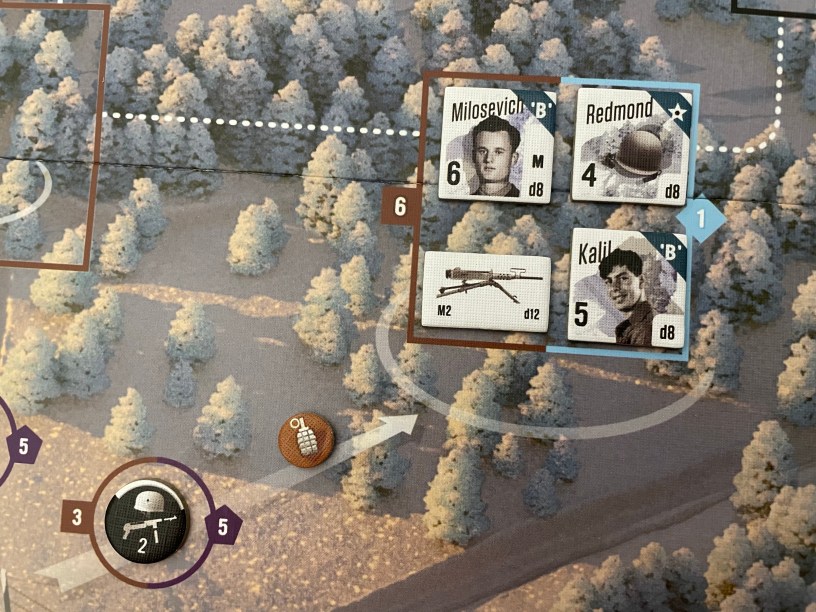
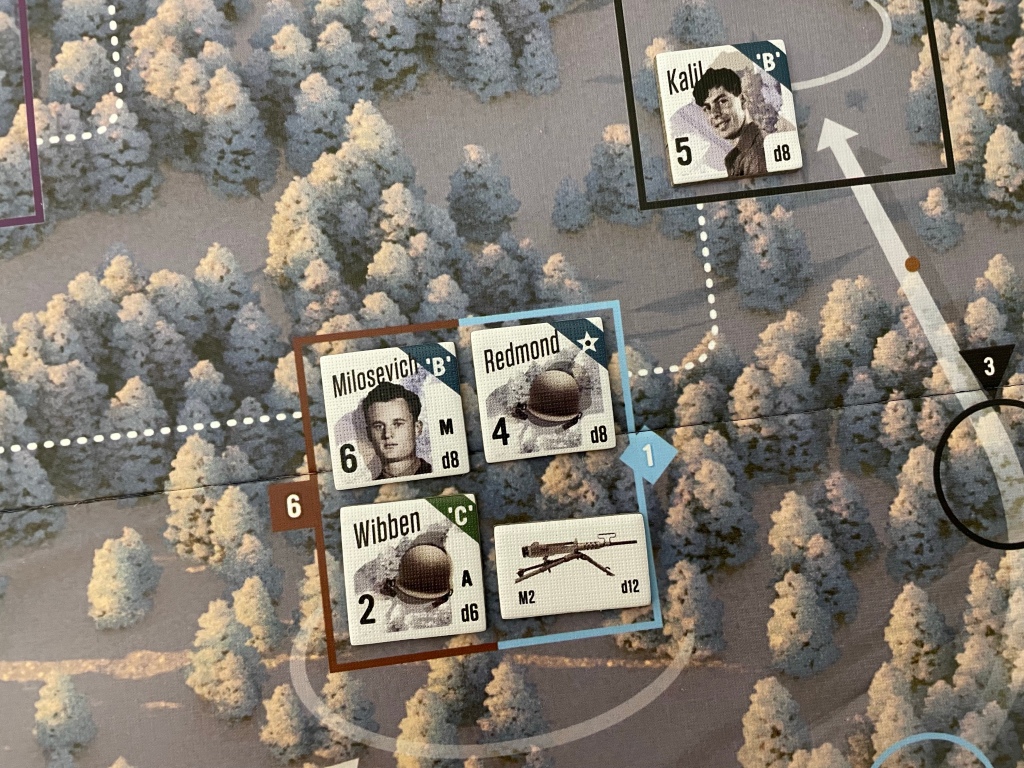
You must remember that at the top right corner of each Defender Counter is their squad designation being either Squad A, B or C and each squad is identified with their own color. Squad A is brown, Squad B is blue and Squad C is green. There are two other counters who have no specific squad designations but have a star shown with a red banner, which denotes that they are your “wild” counters and can use their Attribute on any counter belonging to any of the various squads. The only true purpose of the Squad designation is for the use of the Inspire Attribute, which is important in Attacks as it will give additional dice to roll for that Defender Counter while an unexhausted/undisrupted Defender Counter with an Inspire Attribute is collocated in the same Defender Position. Rolling more dice is key as this will give you better odds in making successful Attacks and removing those pesky Assault Counters before they get into your positions and finish you off.
Another really important actions that a player needs to take is the Command Action. In order to take that action, there needs to be a Defender Counter with the Command Action Designator in the same Defense Combat Position or adjacent to Defense Combat Positions where exhausted Defender Counters are located.
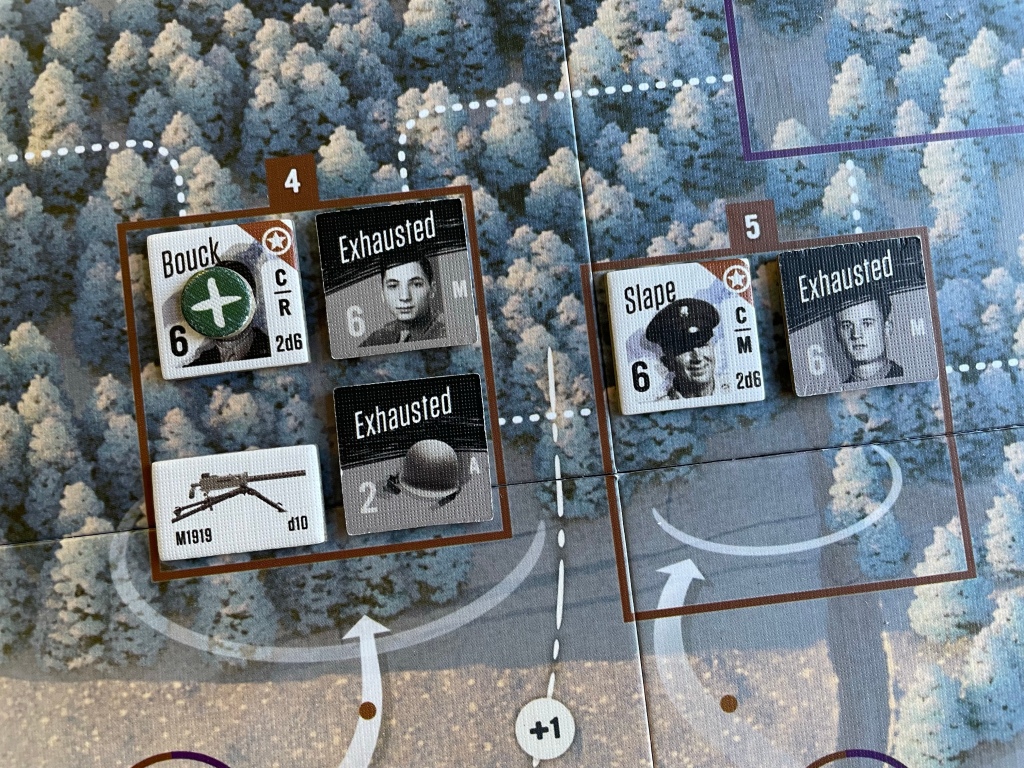
The Counter with the Command Action Designator will exhaust to unexhaust up to 3 counters. This is life or death. Units cannot Attack or take any action when they are exhausted and the only way to get them unexhausted is to use the Command Action. This is a great part of the game and players will have to smartly place their limited number of these counters, with only 2 available, so that they can use this key ability to its maximum effect. I like to make sure there are at least a few of the Assist Counters nearby so they can also maximize your limited actions through smart use. I like to place Slape in the area of 4, 5 or 6 (brown square) to unexhaust Machine Gunners and Assist Action Designator Counters to keep up the heat on Attacks. I will then try to place Bouck in 2 (orange hexagon) to provide relief there for the left flank. The placement of these two Command Action Designators is one of the most important decision you will make.

One final comment. If your Defender Counters are located in the same Combat Positions at the end of the game as they started at you will not succeed. It is important to move your men around to combat the tracks that are active and being pressed by Assault Counters but also in grouping these Defender Counters appropriately to take advantage of their Attributes and being efficient with their limited actions.
Placement of Machine Guns is Key
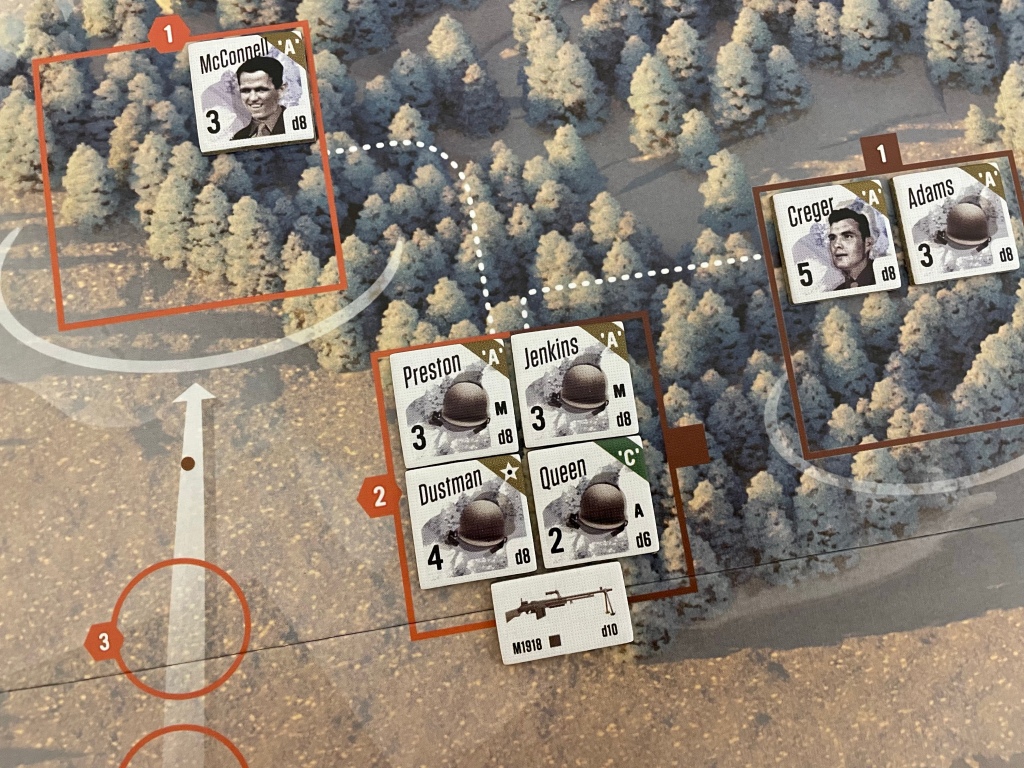
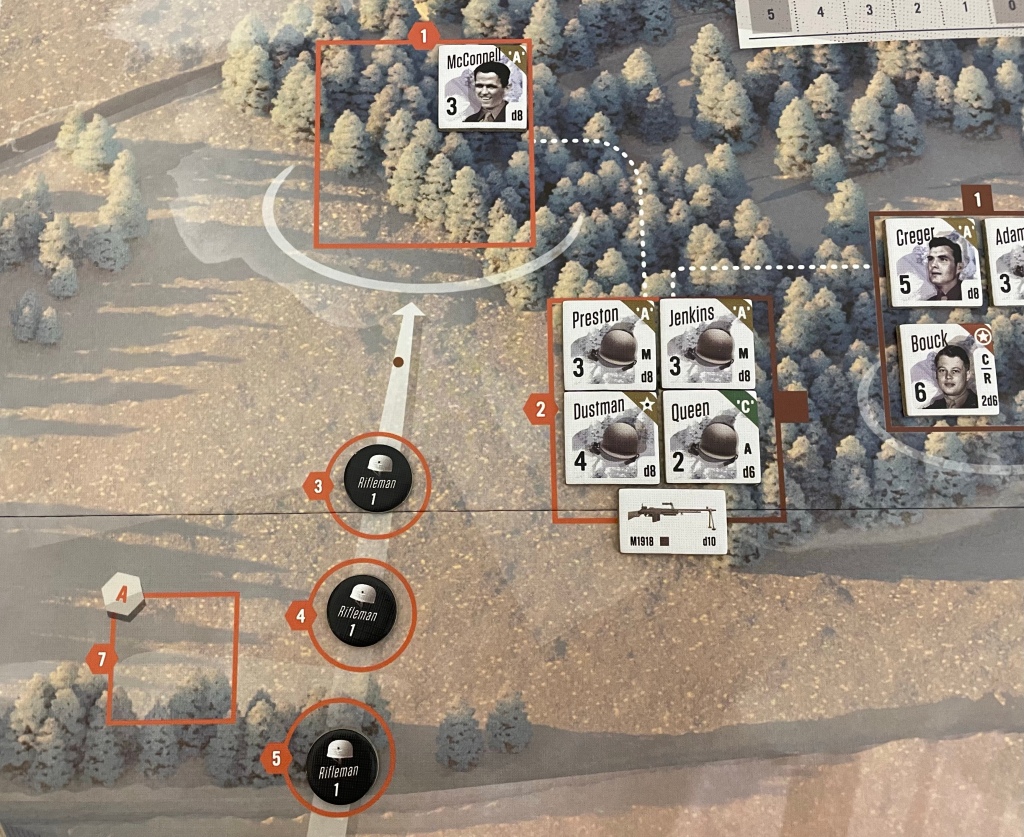
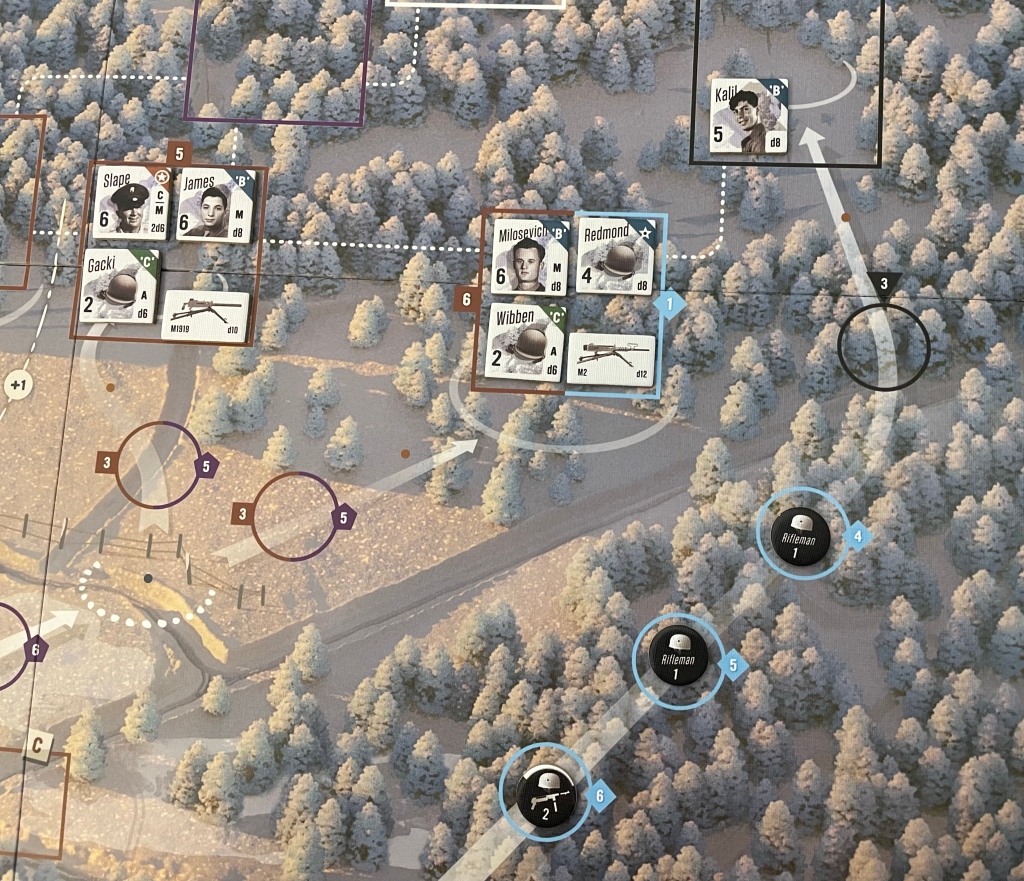
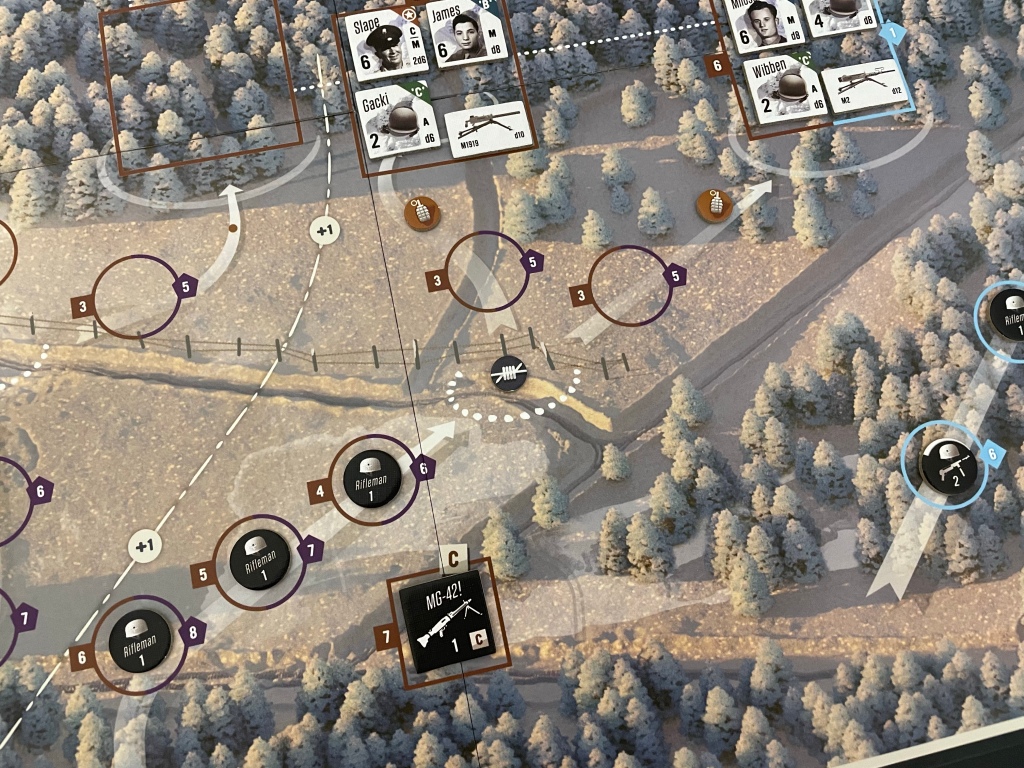
Along the same line of thought as the previous point, where your Machine Guns are placed is probably your most important decision. The player has 3 different Machine Guns at their disposal including the M1918, M1919 and M2, or possibly 4 if playing with some of the alternate setups. These Machine Guns are your most important defensive asset. They have the ability to fire multiple times with the expense of a single action and can eliminate multiple threats to your Defender Units located in Combat Positions. At the start of the game, they will be located in specific Combat Positions. The M1918 is located in 1 (orange hexagon) with 2 Defender Counters with the M Action Designator, the M1919 is located in 5 (brown square) with 2 Defender Counters, one with the M Action Designator and a dual counter (Slape) with a C and M Action Designator as well as an Inspire Attribute and the M2 is located in 1 (purple pentagon). Each of these locations has Line of Sight to several Assault Tracks and Circles but need to be moved in order to give the best field of fire coverage.
The M1918 Machine Gun counter should be relocated to the 2 (orange hexagon) Combat Position as it also has a brown square which gives it Line of Sight to both the orange hexagon Assault Track and brown square Assault Track. This will allow the player to cover both of these tracks and take out threats on either as the game progresses. Along with this move, I would move both Jenkins and Preston from A Squad with the Machine Gun as they both have the M Action Designator and can fire the MG. I would leave Dustman in 2 (orange hexagon) and move McConnel to 1 (orange hexagon) or even better to the right into 1 (brown square). This move allows the player to fire that MG at least 3 times during each Attack Phase as Queen who has the A Action Designator can refresh one of those two counters to fire a 2nd time.
The M1919 Machine Gun counter can be left where it starts. It is in a good position to cover all of the brown square Assault Tracks but will have to cross over a Range Line which will make Attacks to 2, 3 or 4 (brown square) a bit more difficult once that +1 Range Defense Bonus Modifier is added into the equation. If you have the Actions and want to set up more efficiently, you could move it to the 4 (brown square) Combat Position to eliminate the Range Defense Bonus Modifier and just focus on 2, 3 and 4 (brown square) and leave 5 and 6 (brown square) to the M2 after it is moved. I recommend that Slape and Milosevich be left in this location and one of the other A Action Designator Counters (possibly Wibben or Gacki from C Squad who start the game in the Log Cabin space) be moved in as well to provide additional refreshes and more attacks.
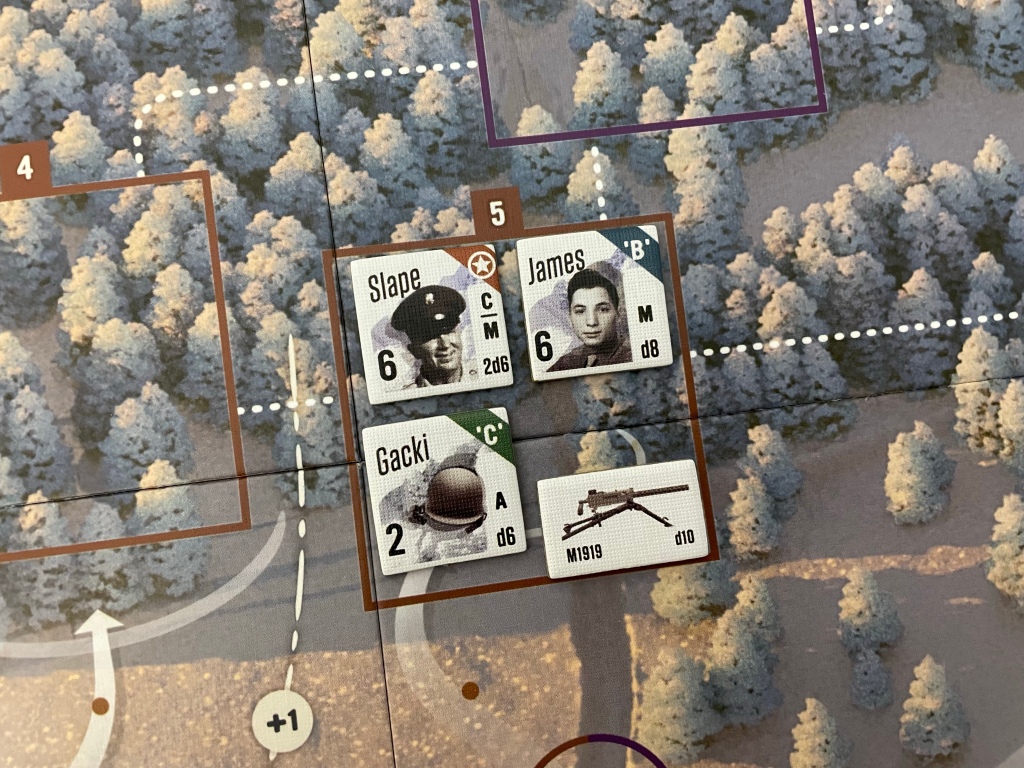
The M2 Machine Gun must be moved as it is really not in a great position to offer much help. If it is left in 1 (purple pentagon) its to hit numbers are very high (5 in Assault Circle 3 on multiple Assault Tracks with it growing to as high as 8 as you move further away) and its Line of Sight is limited to only the 3 branching Assault Tracks that connect to 4, 5 and 6 (brown square). I would encourage players to relocate this MG to the dual 6 (brown square)/1 (blue diamond) Combat Position as it allows for coverage of the brown square and blue diamond Assault Tracks. The best choice for personnel in this position now would then be James from B Squad who is a Machine Gunner with the M Action Designator and moving Redmond into this same position to take advantage of his Inspire Attribute to increase the number of dice rolled with each Attack.
If these Machine Gun counters are moved around in this manner and redistributed throughout the game, I would guesstimate that this increases your chances of victory by at least 30%. Maybe even more.
Learn the Different Attack Phases
As with any game, understanding where your enemies are coming from will help you in making the correct decisions about the distribution of personnel and assets discussed above but will also provide you with a better change of withstanding the attacks of the Germans. Now some might say that playing in this manner is gaming the system and gives the player an unfair advantage. And I understand why most gamers would think that. But remember one historical fact about this battle. This was an Intelligence and Recon (I&R) Platoon and there job was to know what the enemy was doing before it happened. They had the ability to see the German movements from their positions and could maneuver and reallocate their resources throughout the battle. This is just good leadership and preparation and will help the player be more effective.
Lanzerath Ridge is divided into four distinct Attack Periods, each of which is represented by a separate deck of Attacker Cards. These four Attack Periods are based on how the battle unfolded historically as the German attackers probed the defensive line time and time again looking for a weakness to exploit.
Attack Period 1 began at approximately 10:30am and was the 9th Fallschirmjäger Regiment’s initial assault consisting of two platoons from the regiment’s 2nd Company charging straight up the hill at the defenders with no attempt at subtlety.
Attack Period 2 began around 11:00am and the attack also consisted of a straight-forward charge up the hill, though limited efforts were made to attempt to attack the defenders’ flanks.
Attack Period 3 began around 2:00pm and was supported by extensive machine gun and mortar fire, but again not much effort was made to attempt to flank the defenders.
Finally, Attack Period 4 began at dusk with the 9th Fallschirmjäger Regiment being joined by men from the 27th Fusilier Regiment. Together they launched coordinated attacks against the defenders’ right and left flanks, which eventually penetrated the lines, overrunning and capturing the defending American forces.
Now that you know the history that the game is based on, and the basis for the four separate Attack Periods in the game, I want to point out the way the Enemy Attack Deck is handled here and the disposition of Enemy Assault Counters at the end of each deck is very different from the previous 3 volumes in the Valiant Defense Series. In Lanzerath Ridge, at the conclusion of each Attack Period when that period’s deck is exhausted, the player grabs the next Attack Period Attack Deck and then removes all Enemy Assault Counters from the board and sets up the board state the same at the outset of each new Attack Period. I remember during my first play at the end of Attack Period 1, I thought to myself that this game was going to be very difficult as I had lots of Assault Counters left on Assault Tracks 1 (brown square) through 4 (brown square) and some of those Assault Counters were right on top of me in circle 3 on one of those tracks. But, when the Attack Period was over and I read the instructions for the next Attack Period they were all removed. I thought this was weird and started reading the Companion Book to see the facts about the way the German forces went about the assault.
In Action Point 3, we looked at the makeup of the Enemy Attack Deck and gave some statistics on the various cards types and what Assault Tracks they were more likely to deploy to. I won’t regurgitate that here but if you are interested you can check that post out for a lot of good information to keep in mind.
Understanding what is coming at you, and from what general direction, will give you the upper hand in the game. And it is historical as several of the defenders were trained in intel and would have been very proficient in identifying the German tactics as they were assembling and approaching the defenses.
Protect the Flanks During Attack Deck 4
As already mentioned, the heat is turned up on the Assault during Attack Deck 4 as the Germans begin focusing on the flanks. There are a total of 16 Assault! Cards (8 for each) that place units on each of the orange hexagon and black triangle tracks and this is the point that you can lose the game if you are not prepared, don’t have your units positioned to anticipate this attack as you just won’t have enough actions to hold them off. This is very problematic as the flank Assault Tracks, both the orange hexagon track and the black triangle/blue diamond track, have less Assault Circles so it takes fewer counters to reach the Defender Combat Positions there and attack the Defenders.
The orange hexagon track has just 3 Assault Circles before units will be at the Booby Trap or will push into the Defender Combat Position and the black triangle/blue diamond track has 4 Assault Diamonds. With 8 Assault! Cards per track included in Attack Deck 4, this means that both of these tracks will have more Assault Counters placed than each can hold and the player will be overrun if they are not ready to take out Assault Counters on these tracks. The orange hexagon track also starts with a Rifleman Assault Counter in Assault Circle 5 and there are 2 Rifleman that start on the black triangle/blue diamond track in Assault Diamond 5 and 6 at the beginning of Attack Phase 4. So to sum up the danger, there are really only 3 Assault! Card draws needed to push Assault Counters into Defender Combat Position 1 (orange hexagon) and Defender Combat Position 1 (black triangle).
You just have to be aware of the number of cards and when they come up so you can plan ahead to take appropriate Attack Actions or Adjust Fire Actions with the Machine Guns to keep these tracks from building up and ruining your day.
Mortars and MG Teams Can Tear You Up
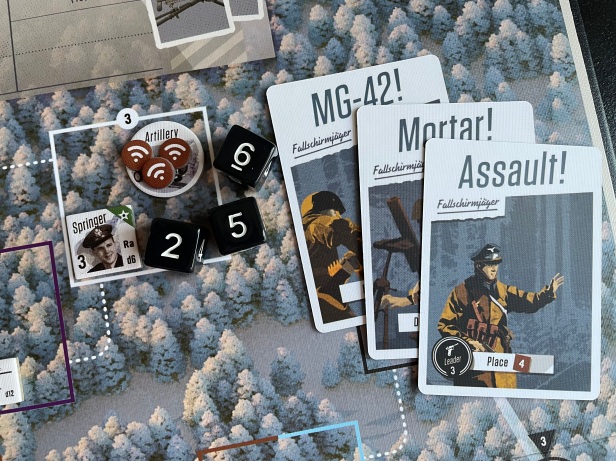
When an MG42! or Mortar! Card is drawn, these special German units will take Attack actions against all Defender Units located in a random Combat Position. If the randomly determined Combat Position is unoccupied, there is no effect but if the Combat Position is occupied, then the player will roll one six-sided die for each defender in the Combat Position and compare the result to the defender’s Valor Rating. If the result is equal to or higher than the defender’s Valor Rating, place a Disrupted Token on the defender. If a defender already has a Disrupted Token on it, then the defender becomes a casualty and will be removed from the board and will decrease the Morale Token on the Morale Track by one step. There isn’t much that the player can do about the Mortar! Cards, but the MG42! Cards have to have their counter first placed in the appropriate positions and then on a subsequent MG42! Card draw, it will fire on a random position. If you have remaining Actions at the end of any turn and generally have the Assault Tracks under control, I would always recommend using these actions to Attack the MG42 Counters. They have good Defense Values at 7, so are very hard to hit but if you have a unit that rolls at least a D8, and they are fresh and it is near the end of the turn there is no harm in taking a long odds pot shot at these counters because if you remove them, you might just be saving yourself on the next MG42! Card draw.
Understand the New Recovery Rules and Plan Accordingly
The biggest change in Lanzerath Ridge that differs from the other games in the series is the way that Recovery works. The Recover action does not allow you to use an Action to flip over defenders from their exhausted side. The only way to flip defenders over from their exhausted side is with either the Assist or the Command Actions. If you don’t have any Defender Counters with the appropriate Action Designators who are alive on the board or who are not exhausted, you will simply have to wait until the end of an Attack Phase to flip over all the exhausted defenders. This is key to this game and it makes the proper use of your limited actions and limited Defender Counters that much more important. There just isn’t any wiggle room and you must plan for how you are going to unexhaust your key defenders.
I have read where players of the other games in the Valiant Defense Series play this aspect incorrectly and quickly lose on their first plays because of it. Take my suggestions from above in the placement of your limited Assist and Command Action Designator units. Keeping them together in the same area can make a bid difference in how your defense goes.
Protect the Grenade “Booby Traps” Until the Last Minute
The Grenade Spaces are really unique and interesting additions to the system and mimic Pavlov’s House and its Sapper Spaces as well as Soldiers in Postmen’s Uniforms with the Barricades. Grenade Spaces are placed only at the start of the game and if removed are never placed again. The Grenade Spaces are identified by a brown circle after the last of the Assault Track circles marked as 3. These Grenades act as “booby traps” to the advancing German Assault Counters and the first time a counter is forced to move into this space the grenade will explode and remove that one counter from the track. In doing this though, the Grenade Token will also be removed from the game and will not reappear for the remaining Attack Periods. These Grenade Spaces are very important to your defense and you should do everything within your power to preserve them for as long as possible because they typically help you in the worst of times and can be the difference in being overrun or standing your ground. This means sometimes taking an Attack Action to take out an Assault Counter that might be sitting next to one of these Grenade Tokens. Don’t get me wrong with this suggestion though. If you have to use that action somewhere else because you are going to lose if you don’t, then by all means take that action and ignore this advice. But if you can, it is best to preserve these for as long as possible.
Radio Intelligence is Key to Ultimate Success (in the Form of a Good Score)
In Lanzerath Ridge, there are new Vehicle Counters that provide the player access to very important secondary actions that can assist in performing better in the game and obtaining a better score. These include the Radio Intelligence Jeep and Radio Artillery Jeep. I prefer to use the Radio Intelligence Jeep primarily because it may provide the player with extra Victory Points. The Radio Intelligence Action is a bit of an odd duck as this action only gets you VP for your end game score and provides no immediate benefit for the player. It is very tempting to use but can be a disaster if you fail as it is also an action sink. A counter with the Ri or R Action Designator will have to move to Vehicle Position 2 (white circle) and then take Minor Actions to place Radio Tokens on the Jeep. Once 3 Radio Tokens have accumulated, the player can take a Major Action to attempt to give intel by rolling 1d6 per token discarded needing a result of 5 or 6 to move the Intelligence Track up 1 spot. This gains 1 VP for the end game scoring. That is all that this action accomplishes but is important if you hope to get a good score at the end of the game.
This Radio Intelligence Action takes an investment of a minimum of 5 actions (1 Move Action to move from the Log Cabin to the 2 (white circle) position, 3 Minor Actions to place 3 separate Radio Tokens on the Radio Jeep and then finally a Major Action that will exhaust the defender counter to then attempt to roll 3d6 hoping to obtain at least one 5 or 6). This is a big commitment and can take away needed actions to defend against the Assault Counters moving up the Assault Tracks toward the Defender’s Combat Positions. This is an action that I would recommend caution with, especially at first until the player gets more familiar with the game. You simply cannot afford to commit resources with no return in this game and 5 Actions for no results can be deadly.

The Radio Artillery Jeep allows for just one of the Defender Counters Springer who has the Ra Action Designator to move to the Artillery Jeep located in Vehicle Position 3 (white circle) to use his ability to call in an artillery strike on the advancing Assault Counters. This is once again a multi-turn process and Springer will have to take a few Minor Actions to move to the position and then to place a Radio Token onto the Jeep and then a Major Action to discard the Radio Tokens there to roll 1d6 per discarded token to possibly remove 3 Assault Cards from the top of the Assault Deck. This is a high risk situation though as you still must roll a 5 or 6 on at least one die to be successful but can be a high reward as removing those cards means you won’t have to fight those enemies shortening the game and it might just be the breather you needed to make it through a round.
You will have to play it by ear each round and determine whether you can and should use these actions as each round will unfold somewhat differently based upon cards draws and dice rolls.
I hope you have success in using my points of strategy. I cannot say that I am an expert at the game but if you use these points in your game you will do better than if you don’t. I really have enjoyed playing Lanzerath Ridge: Battle of the Bulge, and frankly all of the Valiant Defense Series games, and have come to truly appreciate the design and its simple yet interesting mechanics.
-Grant

Even though I generally stay away from State if Siege games, I love this series from DVG. The fit and feel is just perfect, and they mix it up enough to keep each title interesting. Subject matter is top notch, of course, but I suppose thats subjective. Keep this series coming, Dan.
LikeLiked by 1 person
I really enjoy these longform posts on the details of games, particularly on those games that I don’t see myself playing any time soon. They provide such a wealth of info on design and mechanics without the reader having to play the game. It allows me to learn about different innovations in areas beyond just the handful of games I can squeeze in each year. Please keep it up!
LikeLiked by 1 person
Grant,
Thanks for an excellent wrap up to this series!
A few additional points to keep in mind:
Target German Assault counters with combat values of 2 or 3 first. Should that counter make it into the Defense position, that is the number of d6 rolled against the combat value of your defender.
While tempting to use Bouck or Slape to restore Exhausted Defenders, use cautiously as this is a Major Action and will Exhaust them until the end of this turn.
MG42 cards are indeed deadly, but keep in mind they do not appear in the 4th Attack Phase. Resist shooting at them during the 3rd Attack Phase. Save as much of your Machine Gun Ammo as you can for the infantry flank attacks in that final phase. As you exhaust your gun’s ammo, use the Deny Minor Action towards gaining a Victory Point.
Recover a Disrupted Defender as quickly as possible; a 2nd Disruption causes a Casualty dropping the Defender Morale and costing Victory Points.
I prefer using the Artillery jeep. Removing 3 cards from the Attack Deck, especially in the 3rd Attack Phase, can be a big help. Don’t forget a successful mortar attack against a jeep during the 3rd Attack Phase raises the required die roll from 5 to 6.
Enjoy the game!!
rich
LikeLiked by 1 person