Lanzerath Ridge is a solitaire wargame that takes place on the first day of the Battle of the Bulge December 16, 1944 during World War II. In the game, the player takes control of a small group of American soldiers who must defend against the attacks of German paratroopers and fusiliers. The goal is simple but very difficult as the player has to attempt to do as well or better than the historic defenders by holding the attackers from taking the town of Lanzerath, Belgium to delay the advance of an entire SS Panzer Division. With limited actions each round, the player has to utilize their limited resources to attack the advancing German forces while also trying to accomplish objectives such as denying the Germans their equipment and strategically withdrawing to live to fight another day. The game lasts four rounds and each round has its own Assault Deck from which enemy counters are drawn along with nasty surprises such as mortars and MG42’s.

In Action Point 1, we took a look at the game board focusing on the Defender Combat Positions and Assault Tracks for the enemy Assault Counters. In Action Point 2, we examined the various Defender Counters and their Special Attributes and Action Designators. In Action Point 3, we dove into the makeup of the Enemy Attack Deck and discussed how the cards drive the assault and work against the player. In Action Point 4, we examined the interesting new Vehicle Counters and their uses. In this Action Point, we will review a few examples of player actions including Attack, Adjust Fire, Close Combat, Assist, Command and Recover.
Player Actions
The meat of the game for the player takes place during the Defense Phase, which follows the Attacker Phase where the cards are drawn placing Assault Counters and advancing toward the American Defender Combat Positions. During the Defense Phase, the player can take up to five actions with the defender counters on the board. When an action is taken with a counter, a special Action Token will be placed on that counter to remind you that you cannot take another action with that counter. At the end of the Defense Phase, after all the player actions have been taken, the Action Tokens will be removed from the defenders before moving to the next turn. If at any time at the end of any Defense Phase, there is an Assault Counter found in a Defender Combat Position, the game will end immediately.
The player just has to remember that these actions have several restricting conditions. The player cannot take an action with a Defender Counter that already has an Action Token. They have already gone this turn, and cannot go again. And if a Defender Counter is either Disrupted or Exhausted, the only action they can take is Recover. You just have to remember that wounded, scared and exhausted troops, cannot activate as easily as fresh troops. These restrictions are really intuitive and make a lot of sense in the overall structure of real combat.
The final important aspect of the Defense Phase and the actions is the concept of a Major versus a Minor Action. A Major Action will Exhaust the Defender Counter taking the action, which means they will simply flip them over to their Exhausted side. A Minor Action does not cause Exhaustion. Regardless of whether the player takes a Major or Minor Action with a Defender Counter, players will still place an Action Token on the Defender Counter taking the action.
Now that you have an idea about how the Defense Phase works, and the distinction of a Major versus a Minor Action, let’s take a closer look at a handful of these actions.
Attack
What upstanding wargame doesn’t have an Attack action? The Attack Action is a Major Action and will Exhaust the Defender Counter taking the action. Attacks are used to target and remove an Assault Counter from the board. A defender must have line of sight to an Assault Counter to take the Attack Action. Line of Sight is a key consideration in Lanzerath Ridge and is abstracted down to a Defender Combat Position’s color matching an Assault Circle’s color in order to allow that position to fire on that circle while taking an Attack Action. If your Defender Combat Position color is the same as the target circle you can fire on it. If not, you cannot attack that space from the differently colored Defender Combat Position but will have to find a matching Defender Combat Position with a ready and unexhausted or undisrupted unit to take that Attack Action. So in the picture below, each of the 4 brown square Defender Combat Positions shown (including 2, 3, 4 and 5) can fire on any of the matching brown square Assault Circles or MG-42 Positions. The lone purple hexagon position shown in the upper right hand corner of the picture can also Attack all of the assault circles that have a purple hexagon symbol on the right side with a Defense Value shown in white.
The player will then identify one Defender Counter that has Line of Sight to the target that will take the Attack Action. Next the appropriate die/dice will be rolled, remembering that some units use D6’s, D8’s, D10’s and even D12’s and some units have multiple of these dice, and the result is then compared to the Defense Value of the Assault Circle the target Assault Counter is residing in. If at least one of the dice rolled is equal to or exceeds the Assault Counter’s Defense Value, the Assault Counter is summarily removed from the board and placed back into the supply. If in the case that multiple Assault Counters are stacked in an Assault Circle, the player can only target the top Assault Counter in the stack. A successful attack removes only the top Assault Counter so multiple attacks can be taken into a specific Assault Circle to remove all of those targets if successful. Attacks from any Defender Combat Positions that pass over a Range Defense Bonus Line will require the addition of a +1 Modifier to the target’s Defense Value.

In the picture above, Kalil who is a member of B Squad is located in a Combat Position that gives him Line of Sight to two different Assault Tracks in light blue diamond and 6 brown square. The player announces Kalil will Attack the Sub Machine Gunner in the Assault Circle with a 4 Defense Value and because Redmond is located in the same Combat Position and has an Inspire Attribute will provide Kalil a bonus D8. 2D8 are rolled with results of 1 and 4 needing one die to at least be a 4 and the Attack is successful and the Sub Machine Gunner Assault Counter will be removed to the supply. An Action Token is placed on Kalil and his counter is now flipped over to the Exhausted side as this was a Major Action.
Adjust Fire
The newest addition to the Valiant Defense Series is the concept of a Machine Gun allowing a player to fire multiple times with an action called Adjust Fire. Adjust Fire allows the player to make one or more attacks with a single Defender Counter, using a weapon counter. To take an Adjust Fire Action, a Defender Counter must have the Machine Gunner [M] Designator, and there must be a weapon counter in the same combat position as the defender. You can make one or more attacks with the defender by
spending one or more ammunition tokens. For each Attack, the player will choose the number of Ammunition Tokens that will
be spent from the weapon’s loaded ammunition, then roll that many of the weapon counter’s combat value dice and similar to a normal Attack will compare the result to the Assault Counter’s Defense Value. If at least one of the dice rolled is equal to or
greater than the Assault Counter’s Defense Value, the Assault Counter will be removed from the board and placed back in the supply.
A couple things that are important to remember though that come along with each shot after the first. After completing the first Attack, the player can continue to make additional attacks with the same Defender Counter and weapon counter, following the same process until the weapon counter runs out of loaded Ammunition Tokens. For each Attack after the first, the Assault Counters targeted will receive a cumulative +1 Defense Value Bonus. So this means that the 2nd target will get a +1 Defense Value Bonus and the third target will get a +2 Defense Value Bonus. So as you can see, after a few shots, it doesn’t make much sense to continue shooting although I always shoot the closest units at the end of my planned attacks. If the player uses more than three ammunition tokens during an Adjust Fire Action, the weapon might overheat. After completing the Adjust Fire Action, roll one six-sided die for each Ammunition Token used beyond the first three. If you roll a 1 on any of the dice, the weapon overheats and will be removed from the game.
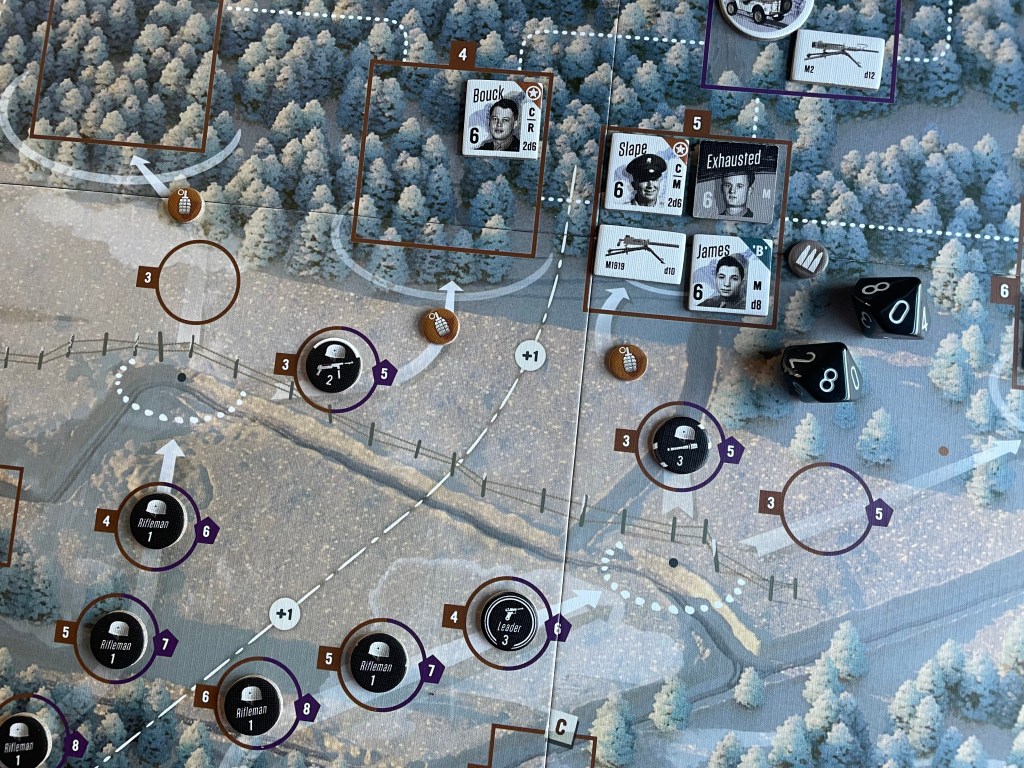
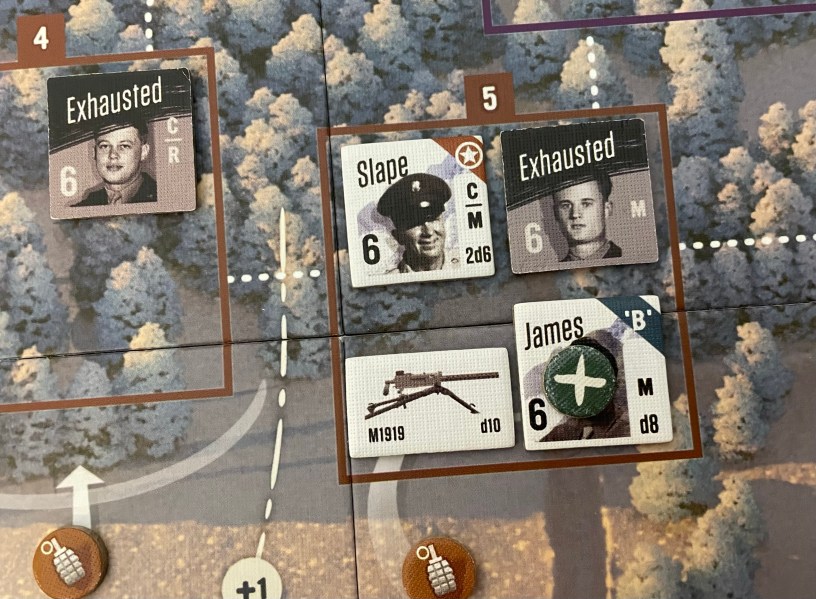
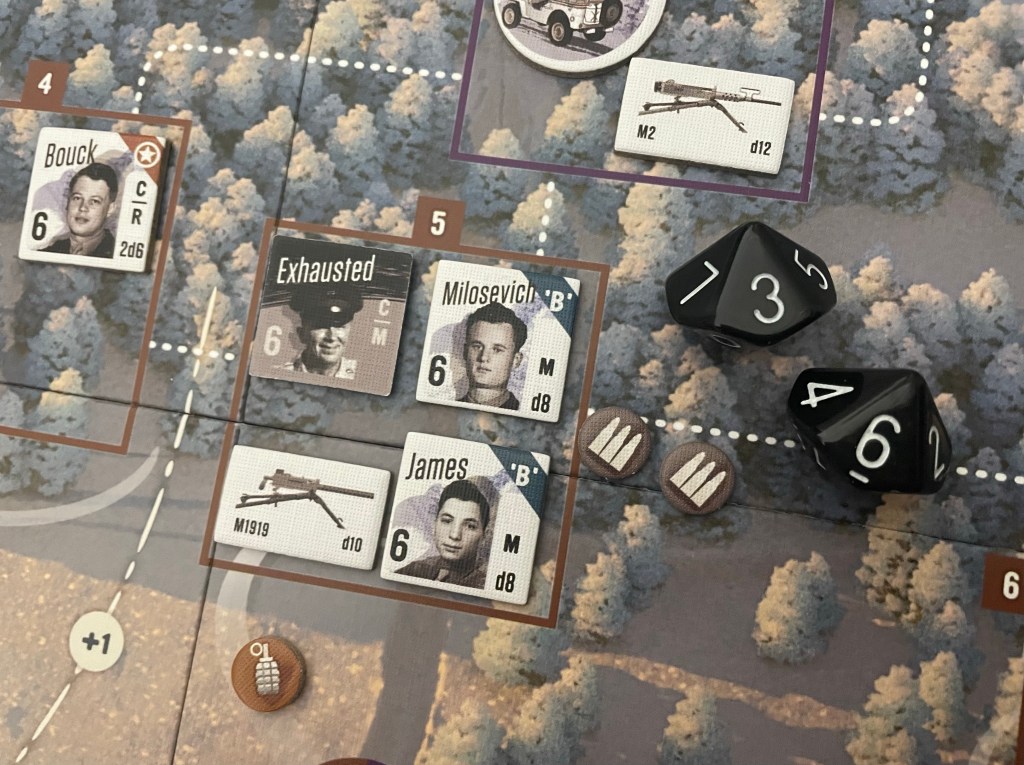
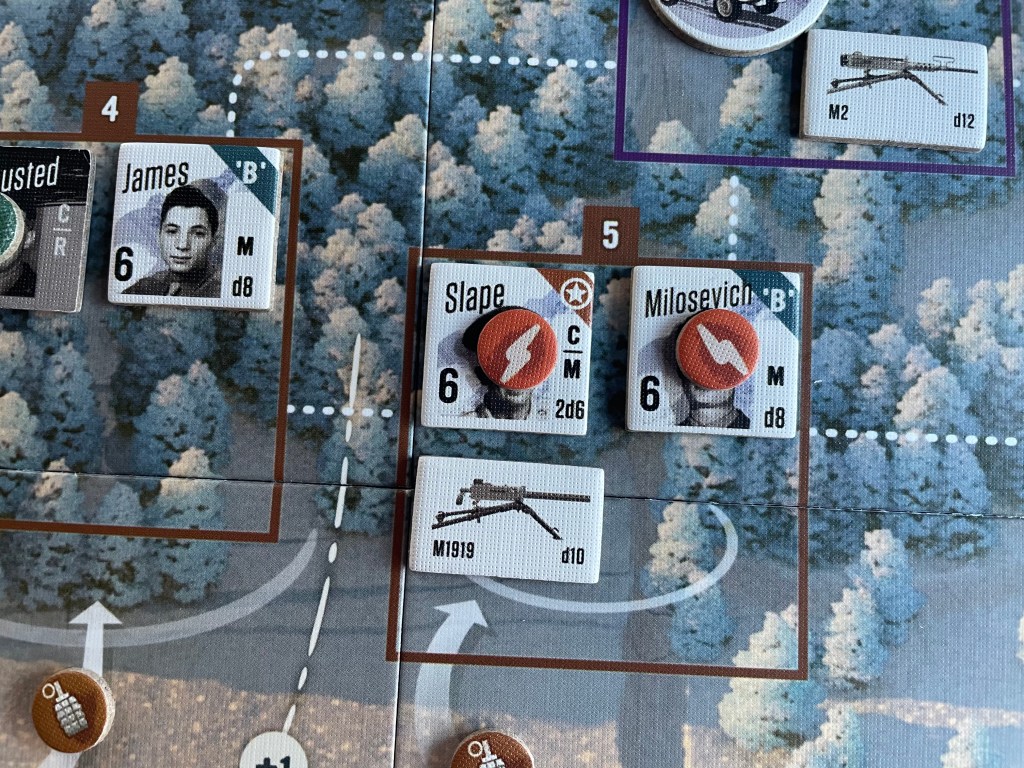
Just for a quick example, James who is located in Combat Position 5 brown square along with the M1919 Machine Gun Weapon Counter and an unexhausted Slape Defender Counter decides to take the Adjust Fire Action and identifies the Grenadier Assault Counter in Position 3 brown square as the target of the first attack. The player discards 1 Ammunition Token and gets to roll 2d10 because of Slape’s Inspire Attribute (which gives an additional die to an Attacking unit) and needs to roll a 3 or higher. The results are a 10 and an 8 which results in the Assault Counter being removed.
James then decides to attack for a 2nd time and takes a shot at the Leader Assault Counter located in 4 brown square and this time decides to discard 2 Ammunition Tokens as the Defense Value will be a 5 after adding in the cumulative +1 Defense Value Bonus for this being the 2nd shot in an attack. 3D10 are rolled with the results being a 1 (miss), 3 (miss) and a 5 which results in a hit. Thank goodness they discarded two Ammunition Tokens and were receiving the +1D10 Inspire Attribute Bonus from Slape or this could have easily been a miss. The Leader Assault Counter is removed back to the supply.

The player decides to press their luck and take another Attack Action as a part of the same Adjust Fire Action and attack the Rifleman located in 5 brown square. The Defense Value is listed as a 5 but will be increased by +2 because this is the 3rd shot of this Adjust Fire Action and the target to hit will be an 8. They choose to discard just 1 Ammunition Token and roll 2D10 but miss with a 5 and a 1. The player decides to end this Adjust Fire Action and will now have to roll 1D6 because they used 4 Ammunition Tokens (one more than the 3 maximum) and are lucky as they roll a 2 and the weapon doesn’t overheat. The player then places an Action Token on top of the James Defender Counter and flips the counter over to its Exhausted side as this is a Major Action and the action is complete.

The Adjust Fire Action is a very important one in the game and to be able to survive the player will have to use the ability wisely and also get a bit lucky with their rolls. Taking out 3-4 Assault Counters with one action is a real boon and if used properly can allow the player to take some of the other actions, such as the Radio Artillery and Radio Intelligence Actions, to try and improve the player’s end game VP score and take out some Assault Cards before they get a chance to attack.
Close Combat
The Close Combat Action is a very simple one that only comes up when an Enemy Assault Counter has entered a Defender Combat Position. During the Player Action Phase, the player can take a Close Combat Action to remove an Assault Counter from the same Combat Position as the Defender Counter. No attack roll is needed to remove an Assault Counter using a Close Combat Action but to take the action a Defender Counter cannot be Exhausted or have a Disrupted Token. When the Close Combat Action is taken, the player simply places an Action Token on the Defender Counter taking the action and removes the Assault Counter back to the supply. This is a Minor Action so the Defender Counter taking the action is not Exhausted but will receive an Action Token this round.

Assist
The Assist Action is a nice little addition to the system to provide the player with the opportunity to recover additional Defender Counters due to the way the Recover process has been changed. To take an Assist Action, a Defender Counter must have the Assist [A] Action Designator on their counter. When a Defender Counter takes an Assist Action, it can flip over an Exhausted Defender Counter located in the same combat position to its Unexhausted side making it eligible to take an action. The real key to how the Recover Action has changed is that this action allows the target Defender Counter to immediately be eligible to take an Action unless they have already taken an action this turn and already have an Action Token on them. An Assist Action may not however be performed on defenders with the Command [C] Action Designator or the Inspire Attribute.
Command
The Command Action is the most important action available to the player as without it their Defender Counters would be Exhausted and unable to take actions until the start of the next Attack Period. To take a Command Action, a defender must have the Command [C] Action Designator. When a Defender Counter takes a Command Action, it can flip over up to three Exhausted Defender Counters located either in the same or directly connected Combat Positions to their Unexhausted sides. A Command Action may not be performed on another Defender Counter with the Command [C] Action Designator.
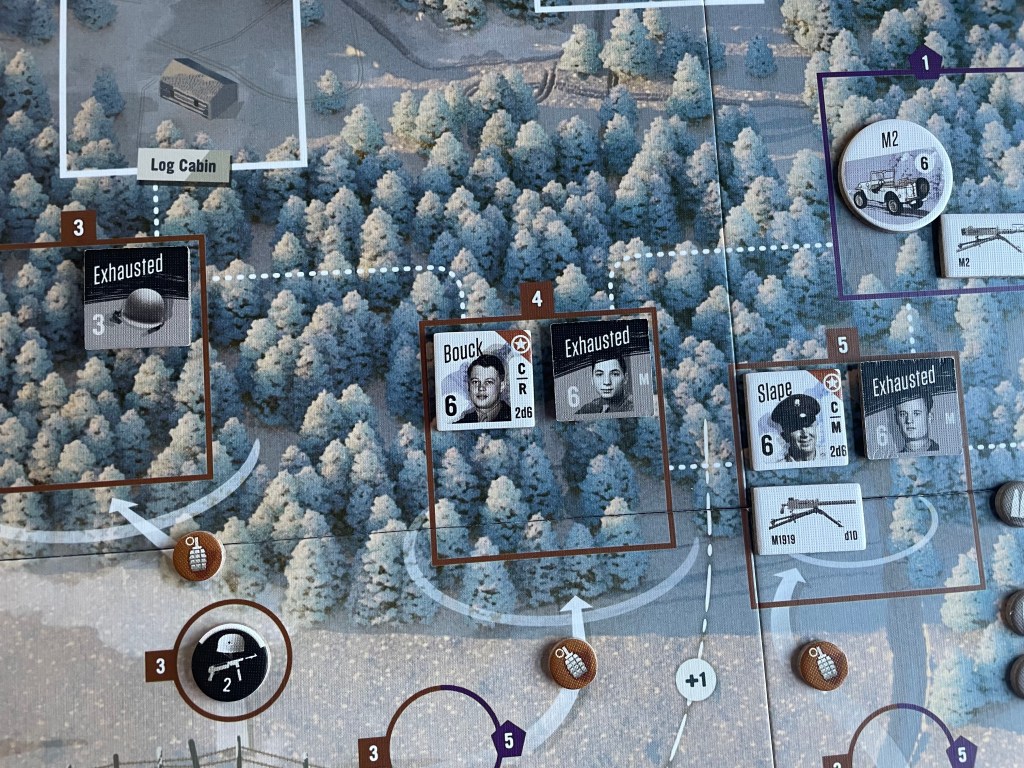
In the picture shown above, Bouck has the Command Action Designator and decides to take the Command Action to Unexhaust up to 3 Defender Counters located either in the same or directly connected Combat Positions. Bouck targets the Exhausted Defender Counter in 3 brown square, 4 brown square and 5 brown square. His counter is flipped over to its Exhausted side and those 3 Defender Counters will be flipped over to their Unexhausted sides and will be immediately available to take actions this round. No dice are rolled and the only limitation is being located in the same or directly connected Combat Positions and the fact that unit’s with the Command [C] Action Designator cannot be the benefactors of a Command Action. This action will Exhaust the Defender Counter taking it as it is a Major Action.

The really great thing about this action is that the 3 Defender Counters who were Unexhausted can immediately take actions this round. This is a huge change from the other games in this series as previously units couldn’t be used to take actions until the next turn after being Commanded. Great change that was needed for this game as it is brutal!
Recover
When a Defender Counter is either Disrupted or Disrupted and Exhausted, the only action they are able to is to Recover. When
a Defender Counter takes a Recover Action, they player will simply remove the Disrupted Token from the Defender Counter and place it back in the supply. In the previous volumes in the Valiant Defense Series, the Recover Action could be used to flip over a Defender Counter from its Exhausted side to its Unexhausted side but this is no longer allowed in Lanzerath Ridge. This is a Minor Action and the counter taking the Recover Action will not become Exhausted. I have found that the most important use of this action is to simply get a Defender Counter ready for action in the next round. Because you will place an Action Token after taking the Recover Action, this Defender Counter will be unable to act this round.
The proper and efficient use of your Actions in conjunction with their Attributes each turn is the crux of the game and you will get better with their use through trial and error. You cannot afford to waste your Actions and have to use the synergistic compliments of the different Units and their Attributes to ensure their Actions succeed. There are other actions that we didn’t cover in this piece as I chose to focus on these core actions but studying them and learning through play will help you become better at the game and lead to better end game results.
In Action Point 6, which is the conclusion to this series, we will discuss some strategy points and suggestions for a better outcome.
If you are interested, I shot a 4-part playthrough video for the game and you can view those parts at the following links:
Part 1
Part 2
Part 3
Part 4
-Grant

Tnx for doing this!
LikeLiked by 1 person
No problem. I really enjoy this system and this game and enjoy trying to help others understand so they can play and enjoy.
LikeLike
Thanks Grant, David Thompson should be paying TPA a commission as your articles have led to me ordering a copy of Lanzerath Ridge.
LikeLiked by 1 person
One can dream…
LikeLike
Grant,
A nifty tactic I have learned for the Adjust Fire Action is to reverse the order you listed:
1st Fire at Rifleman in 5 requires a dr of 5
2nd Fire at Leader in 4 requires a dr of 4+1 =5
3rd Fire at Grenadier in 3 requires a dr of 3+2 =5
Three 5s might offer better odds. Although I wouldn’t waste the last shot at the Grenadier as he will stumble onto the booby trap in his subsequent advance.
Hope that you cover the Movement Action in the last segment as this is critical to reposition the defenders and their machine guns
Rich J.
LikeLiked by 1 person
Grant,
Love this series and I ended up buying the game because of it. Haven’t gotten it on the table yet (nothing new with anyone is it) but looking forward to it soon.
Thanks
Mark Nelms
LikeLiked by 1 person
Thanks for following along Mark. I hope you enjoy the game. Wait, scratch that. The game is good so I know you will enjoy.
LikeLike
Thanks for this detailed explanation of the game and its mechanisms. A minor point, if I may: the term “fusiliers” seems inaccurate when applied to German troops. They would be “grenadiers”. I’m not sure if that’s an error in the game, and it may well be.
LikeLiked by 1 person
That was a term mentioned in the game.
LikeLike
Thanks Grant. Strange that DVG would be using a term that refers in military terms specifically to British troops from the 17th century. There are of course regimental formations in Britain that incorporate that term to distinguish their role and history, but the term is from the French to denote musket rifles. So for the game to name German troops in that fashion is awkward at best. Perhaps DVG will clarify why they appear to have done so at some point.
LikeLiked by 1 person
I found this reference on Google:
In late 1943, Wehrmacht replaced the Reconnaissance Battalions in Infantry Division with a Fusilier Battalion. This Battalion was in paper designed to serve a semi mobile divisional reserve mounted on bicycles and trucks. Fusilier Battalion is organized similar to the Infantry Battalion of that time.
LikeLike
Thanks, that is interesting. I think I see what DVG is aiming at here, though it’s a bit strange that they don’t simply apply the official term, that is, a gewehr battalion. In any event, thanks again for your patience with my comments in this thread, and for the review of the game.
LikeLiked by 1 person