Continuing along in this new series devoted to the best looking boards found in the wargaming world where I will highlight the art and layout of a different board in a wargame that we have played to show you the various talents of the artists and graphic designers involved. In my humble opinion, a well designed and attractive board can make all the difference in the world to me enjoying a wargame. Don’t get me wrong, the game has to be good, but if it’s also good looking it always is a better experience. A board can draw me in. Can make me feel that I’m there. Can set the stage for the thematic immersion that we all crave. And I have found many of these type of boards and I want to make sure that I share them with you.
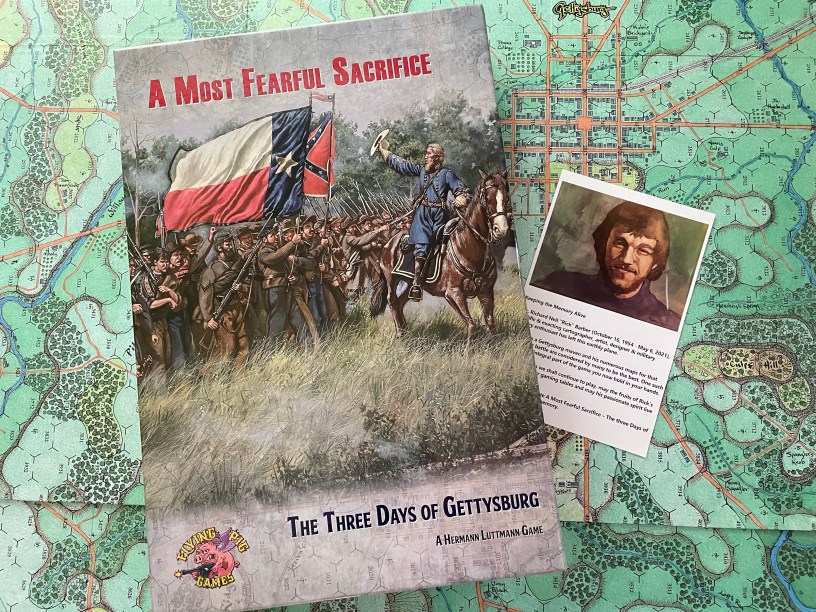
There have been many games done on the Battle of Gettysburg. Probably too many but it is a major battle of the American Civil War and has some of the most dramatic and enduring stories including events like Pickett’s Charge, Little Roundtop, the Peach Orchard and many others. Over the past few years, Hermann Luttmann has released a new series of games using a new system similar to his famous Blind Swords System to model combat in the American Civil War called the Black Swan System. The first game with this new focus was The Devil’s to Pay!: The First Day at Gettysburg from Tiny Battle Publishing. Then came along a big game, with lots of big maps, and counters called A Most Fearful Sacrifice: The Three Days of Gettysburg and it is simply glorious. The game has sold out and Flying Pig Games just completed a 2nd Edition Kickstarter campaign so it available again. A Most Fearful Sacrifice: The Three Days of Gettysburg is a 2-player wargame that covers the full three days of the battle from July 1st through July 3rd that ended in a Union victory. The loss at Gettysburg ended the Confederates ambitious second try to invade the North and bring the Civil War to an end. The loss here generally ended the hopes of the Confederate States of America to become an independent nation and is generally known as the “high water mark” of the Confederacy.
The new Black Swan System was designed to allow for larger scale games with lots of units to be more playable and to cut down on the time it takes to play. I know that some of you are groaning at this but to me this is a good innovation that will get larger games back to the table for additional plays. How is this shortening of the game done with out taking out units and formations? The elimination of chit pull, which is a mechanic that I really and truly love, but it has been replaced by cards in this one. Also, players will trigger activations by Corps instead of by lower-level formations so it really condenses the game but still provides the tactical decision-making choices by simply requiring the player to determine which of their Divisions will be activated. The necessary Corps Activation, Event and Fog of War cards will be seeded into a common pile and shuffled. Players will draw them just like they pulled chits before. The two keys to this change are that cards take less time to draw off of a pile than it takes to draw chits from a cup and important game information can be placed right on the cards. This saves a lot of time not having to look up information in the rules or on the tables.
A Most Fearful Sacrifice has two huge 30″ x 41″ full color mounted Game Maps. Together this creates a gargantuan 60″ x 41″ play area. While this sounds amazing, my one problem with this game and the boards themselves, is they are just TOO big for my table. I cannot possibly set both of these boards up and play on them. It just isn’t possible without an expansion to my house and at least one more table. In fact, when we played the game last year we only played a small one map scenario because that is all we had room for. Now some might say that is not a problem, and good for them, as I am sure they have several large tables setup and can accommodate this huge game. But, my guess is that the majority of people who bought this game have only ever played a one map scenario and I just think that is a shame. I love Mark Holt Walker and Flying Pig Games and his crazy focus on large counters and large playing surfaces but the boards are just too large! They are unwieldy and very difficult to open up and setup. Every time I do open them up, I am terrified that they will tear or rip. I am not a fan of that much effort…but they are gorgeous! I don’t want this statement to chase you away from this game because it really is that good but just know you will have a mountain of board on your hands.

We all know who Rick Barber is and he has earned his reputation for a beautifully illustrated board. He has done many iconic American Civil War boards that have all been absolutely fantastic. Just a few of his amazing boards can be found in The War for the Union (1992) from Compass Games, Glory: The Battles of First & Second Manassas and Chickamauga, 1861-63 (1995) from GMT Games, Twin Peaks (2014) from GMT Games, Longstreet Attacks: The Second Day at Gettysburg (2018) from Revolution Games and The Day Was Ours: First Bull Run (July 21, 1861) (2021) from Revolution Games among others. He also did other subjects as well, including one of my favorites of his in Devil Dogs: Belleau Wood 1918 (2019) from Worthington Publishing. His style is unmistakable and his use of various shades of greens and blues is absolutely eye catching. As you may know, Rick passed in May 2021 and included in A Most Fearful Sacrifice was a tribute flyer to his work and impact on the wargaming community. But more on that later.

Anytime I have read anything about the Battle of Gettysburg, I have seen where the local road network and the city’s position on the east side of the mountains were important factors in why the battle was fought there. The terrain also played a major role, which included good defensive ground such as Little Round Top, Culp’s Hill, and Cemetery Hill. These factors must always be highlighted in any game covering this seminal battle and the board for A Most Fearful Sacrifice definitely includes homage to these important features.
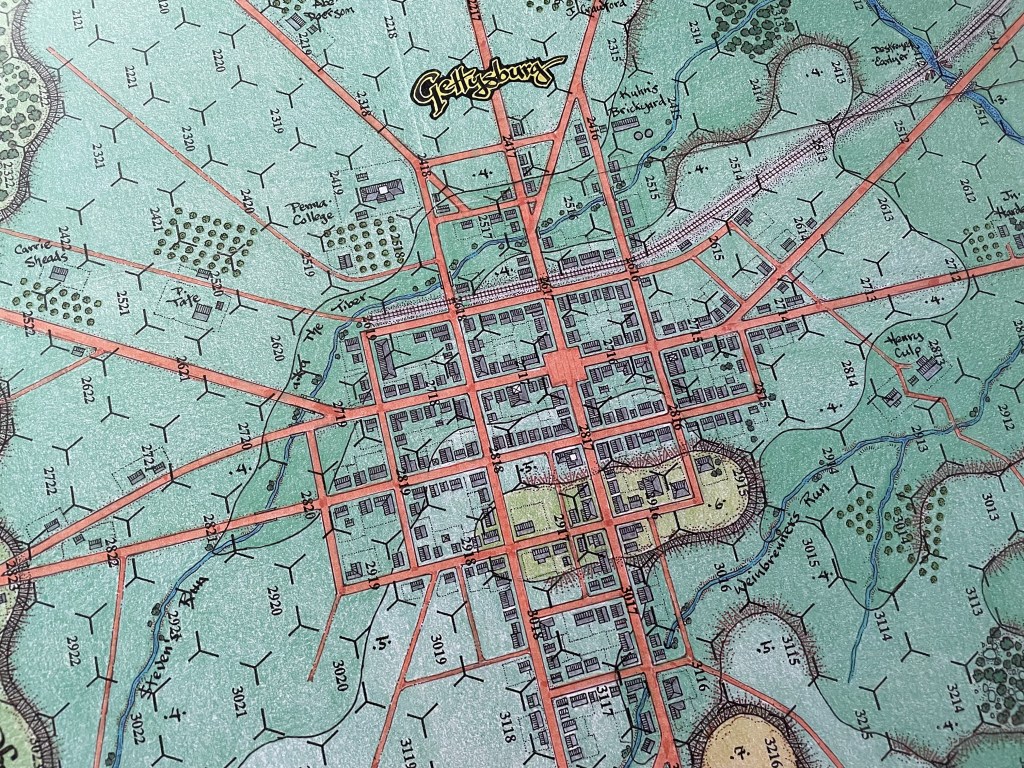
As you can see in the picture below, Gettysburg sits about smack dab in the middle of the top portion of the map and this is a good thing as it is central to the battle because of its location and connection to the greater road network in southwestern Pennsylvania and northern Maryland. Not much fighting was done inside the city limits itself, outside of the initial skirmishes between forward CSA and Union Cavalry troops moving into the area on July 1st, but Gettysburg commanded the roads in the area as they all lead to and through the city. As the bulk of both armies headed toward Gettysburg, Confederate forces led by A.P. Hill and Richard Ewell were able to drive the outnumbered Federal defenders back through town to Cemetery Hill, located a half mile to the south. The roads are clearly drawn on the map and stand out against the backdrop of the terrain itself with their brick red hue. I really like the contrast of the colors here with the roads against the different shades of green of the terrain that they move through. The darker green color denotes elevated ground while the lighter shade of green is the open lower ground. I also actually really like the look of the areas which are colored in as you can literally see the strokes as the marker would have moved along the board.
The detail of the rail spur running into town from the east is also really well done. My favorite part about this rail line is the fact that you can see the stippling effect used in the rail bed to represent the individual bits and pieces of gravel that was used as a base. I can also just see Rick drawing each of the railroad ties perpendicular to the track and their spacing apart is absolutely perfect. Just such amazing detail for a very insignificant portion of the battlefield.
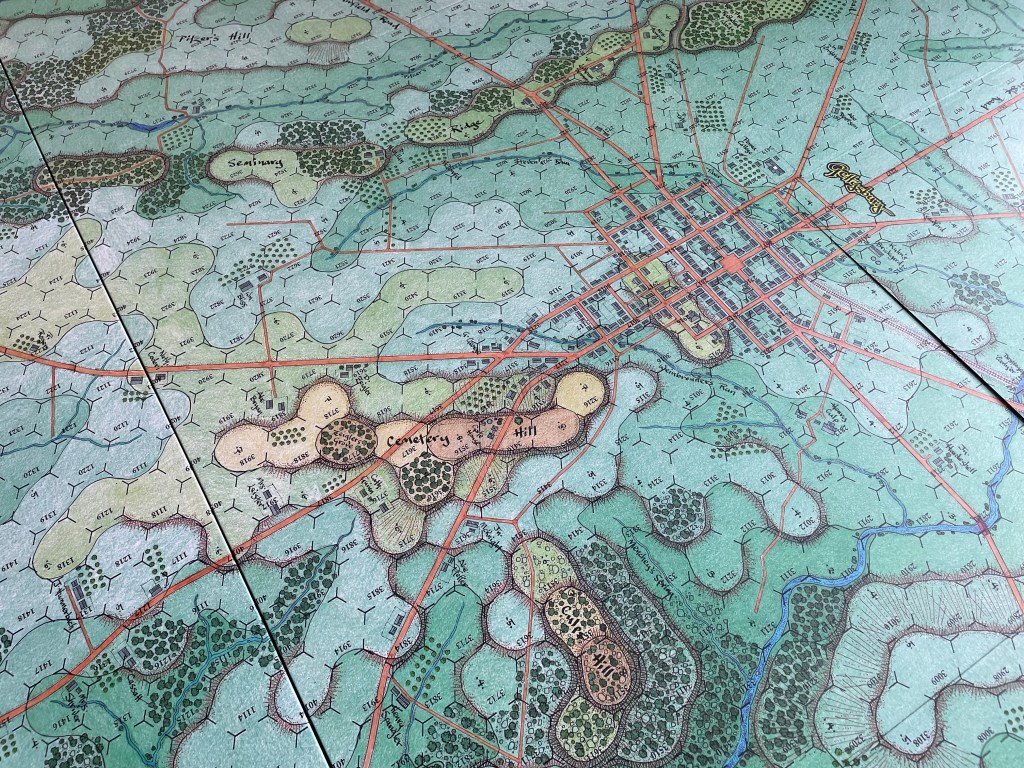
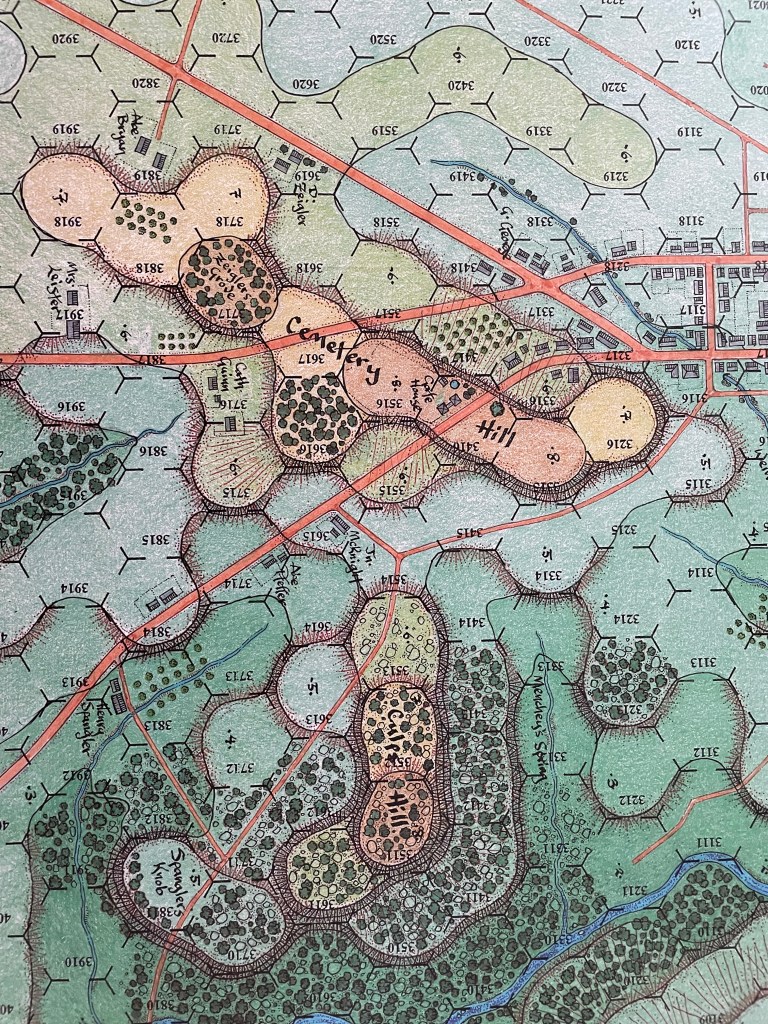
Immediately to the south of the town of Gettysburg sits one of the most important parts of the battlefield in Cemetery Ridge. It follows the Taneytown Road to the south and its elevation and preeminent position overlooking the battlefield was key to the Union as they could see enemy troop movements and position their artillery so as to pick apart the Confederate formations as they advanced. The Union troops that were chased out of Gettysburg on the first day took up positions on Cemetery Ridge and the Confederate’s reluctance to attack at that point allowed Union troops to the south to advance and take up defensive positions at Culp’s Hill, Big Roundtop and Little Roundtop.
Another often overlooked part of the area as a reason to come together for a major battle, aside from the roads, was access to the water of large creeks and streams. The two major creeks in the area of Gettysburg include Marsh Creek and Rock Creek and they were fought over tactically for the access to essential water for both fighting men and horses and for sponging artillery. Rock Creek is very prominently shown on the east side of the southern map but Marsh Creek is not specifically identified. It is probably just off of the map itself. Both of these creeks ultimately converge south of the battlefield and turn into the Monacacy River. I love the contrast of this long snaking blue ribbon of a creek on the board and I think that the greens really make it stand out. On the northern section of the creek, near its crossing of Baltimore Pike, Rick drew in lots of small boulders in the creek and this also sets off this section of the creek really well.
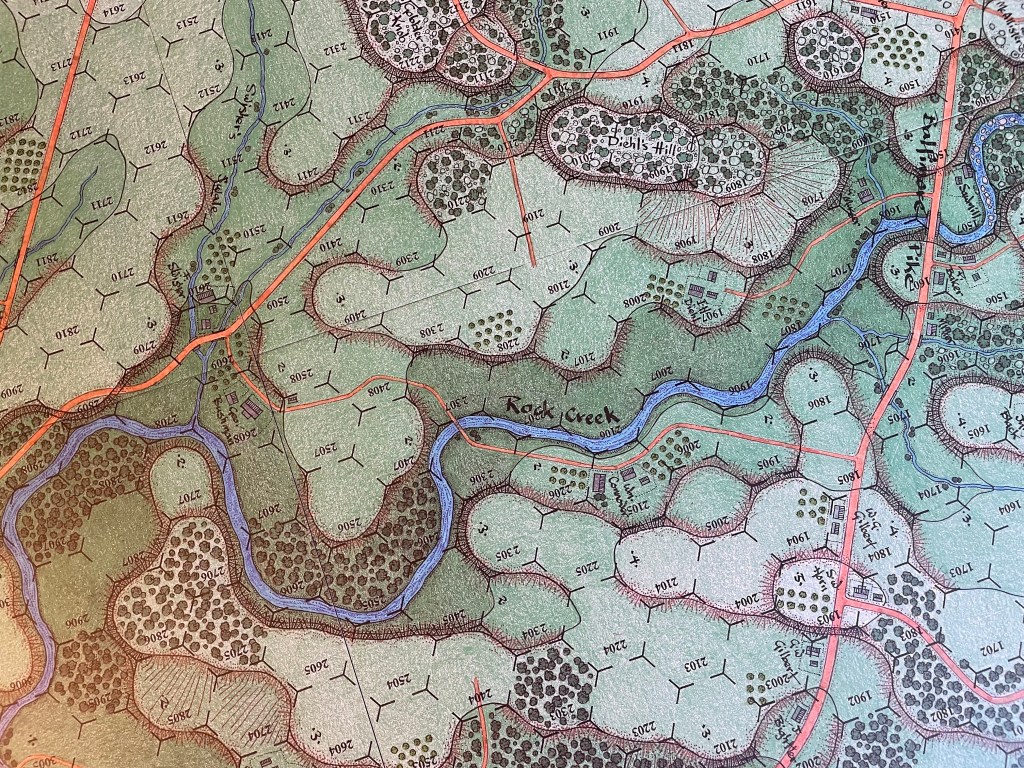
This part of the battlefield has been given special attention as it has various elevations and very steep slopes. These slopes have been identified with a brown cross hatch technique that gives the viewer a sense of upward grade. In the game, these are very difficult terrain to climb and it will cost additional movement points to do so. I also really like the inclusion of specific areas such as Zeigler’s Grove, Café House and the few named farmsteads there. Of particular note is the Lydia Leister farm, which was used as the headquarters of General George Meade, commander of the Army of the Potomac,. Today, there is a monument there that honors the Oneida Cavalry of New York which served Meade’s headquarters during the battle, providing orderlies, couriers and guards.
Also, Zeigler’s Grove is shown which was a small grove of oak, hickory and chestnut trees on the northern end of Cemetery Ridge which were held by General Alexander Hays’ Division of the Union Second Corps. Adjacent to the grove is the Brian farm and farm buildings, including the small farm house used by General Hays for his headquarters. Artillerymen had set up their guns at the edge of the woods, which also provided shade from the warm afternoon sun. The grove was the only tall stand of trees on this portion of Cemetery Ridge which turned sharply eastward at this point to join into Cemetery Hill. Hays’ men, with several regiments of the First Army Corps nearby, enjoyed a clear field of fire in three directions from this location and his skirmish line had successfully kept General Robert Rodes’ division at bay during the second day of the battle and again on the morning of the 3rd.
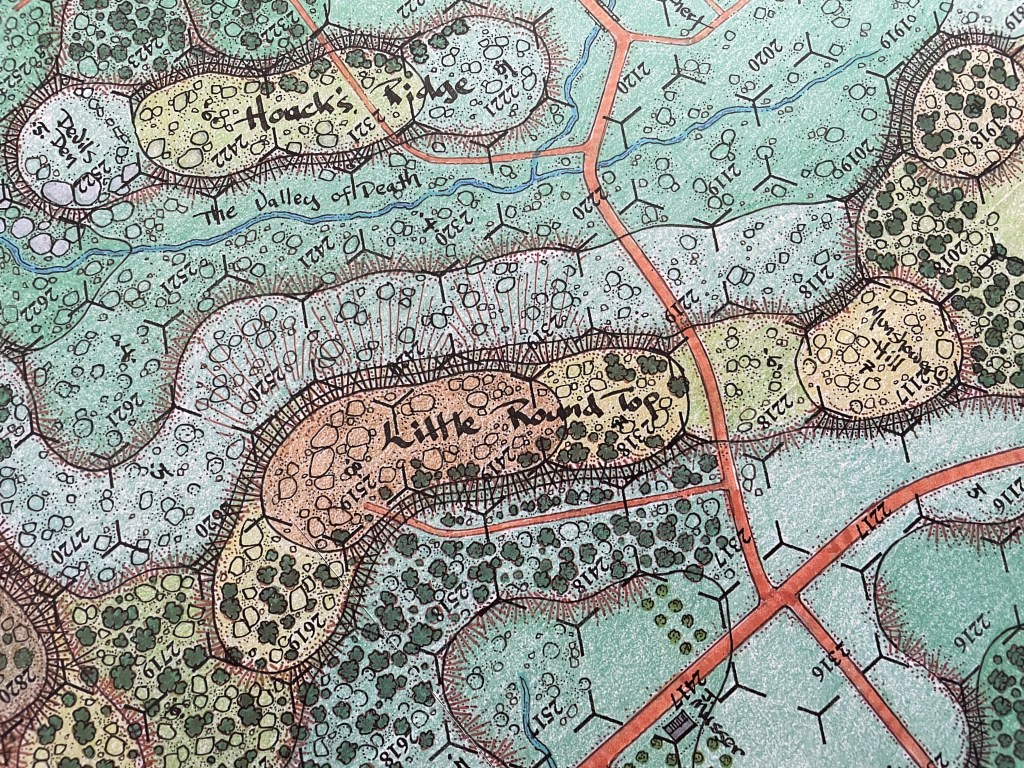
We all know the story of Little Round Top. The Union defensive line here resembled an inverted fishhook, extending from Culp’s Hill on the north, down Cemetery Ridge and southward toward Big and Little Round Tops. Although the Little Round Top was overshadowed by its larger neighbor, its position was more important because much of the hill was cleared of trees and it could better accommodate troops. Strategically, Little Round Top held the key to the developing battle. If the Southern troops could take and hold the hill, they could theoretically roll up the entire Union line. The 20th Maine lead by Joshua Chamberlain was stationed here by Colonel Strong Vincent and they repelled several major attacks from the Confederates while fighting in the heat of the day on July 3rd. When their ammunition had almost run out, Chamberlain decided to fix bayonets and charge down into the two Alabama regiments and the rest is history from the famous wagon wheel maneuver to the charge.
I am fascinated with the way Rick has illustrated Little Round Top and Big Round Top as they were key to the Union defense of the right flank. I really love the attention to detail with the many rocks drawn here as this area was littered with small boulders and gives the impression of strength in the position.
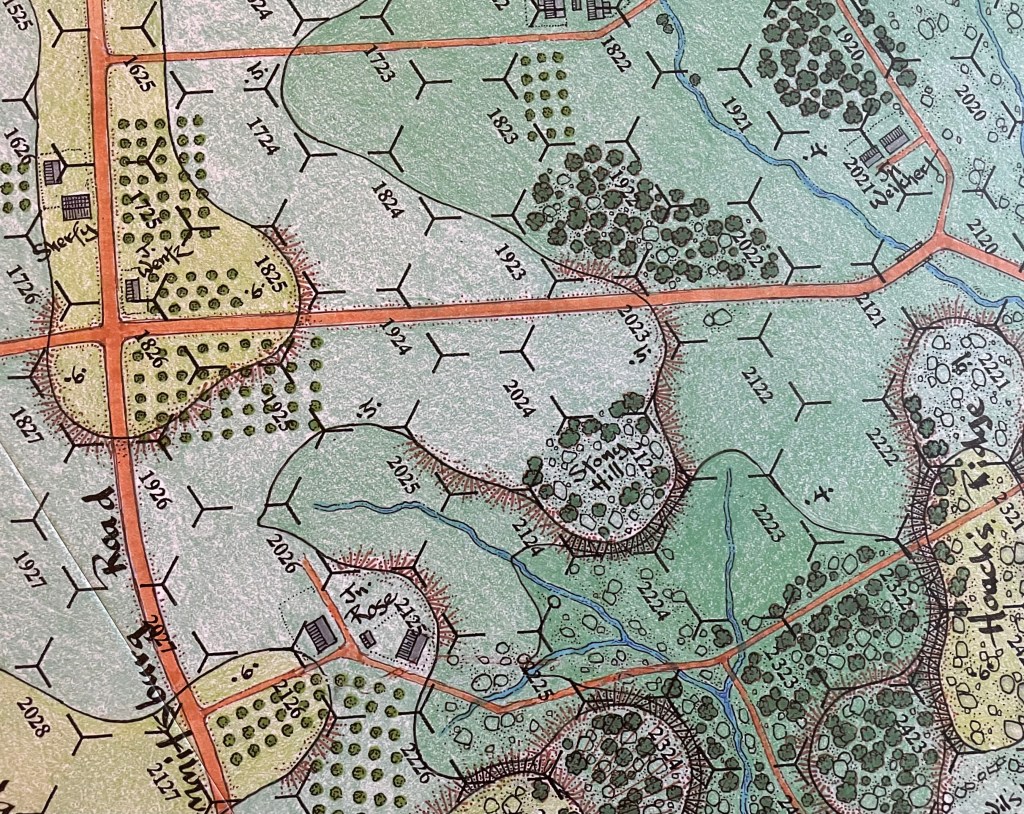
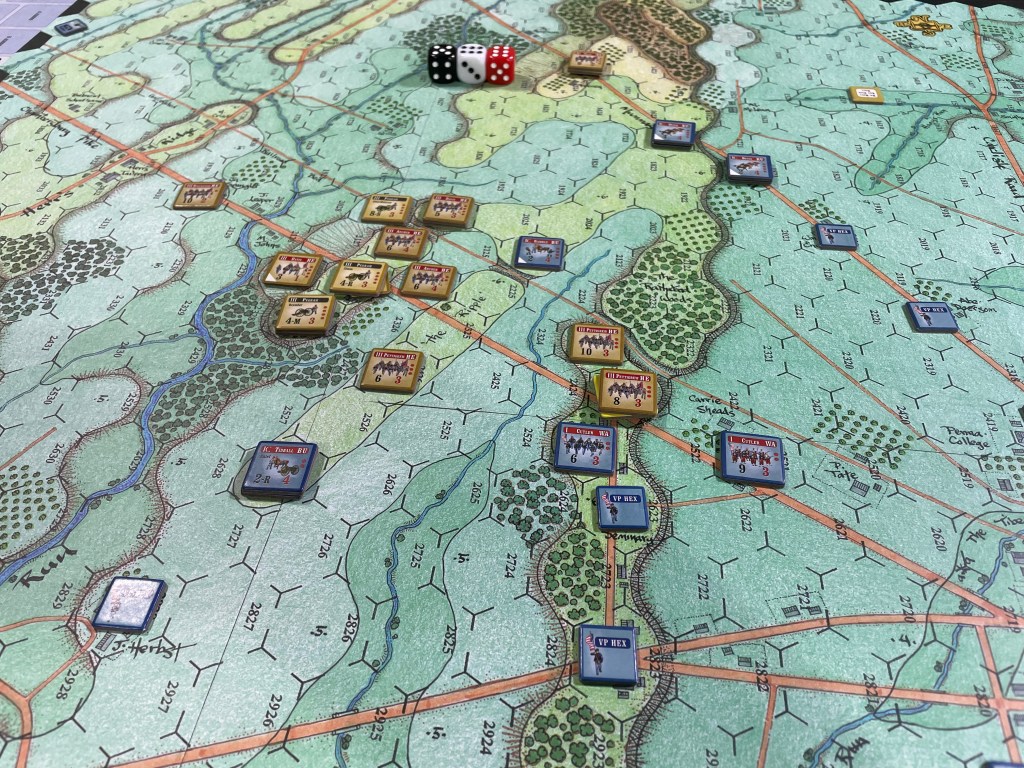
Two more specific areas that I wish to call out on the board are the Peach Orchard and the wheat field. In the picture below, you can see both of these famous landmarks in the same image. The Peach Orchard is contained in hex 1825 on the left while the triangle where the Wheat Field is located is found in hexes 2121, 2122 and 2222 on the right. Nothing necessarily special about the images of these two areas but they are Victory Point Hexes in certain scenarios and are definitely remembered in the game.
I really love the choice of colors by Rick as they make the various terrain and elevations stand out while simultaneously creating a very inviting and warm mood for the viewer. Green is a color that projects growth and gives a life to the battlefield that otherwise was a grim and deadly place. Green can also signify renewal and abundance and has many of the same calming attributes that blue has, while also incorporating some of the energy of yellow. As I look over the map and its chosen colors, I get a distinct sense of reverence for the battle that took place here. For the life and death struggle of not only the men who were engaged in the fighting but in the ideological duel between North and South for the heart and soul of the nation. Finally, I feel that I am transported to the battlefield and can feel the solemn reverence that it is owed as a deciding battle in the American Civil War.
I wanted to add a bit more of the human perspective to this masterpiece so I reached out to my good friend Hermann Luttman and asked him a few questions about the impact of Rick Barber’s work on not only his games but on the wargaming hobby as a whole:
Grant: What have Rick Barber maps done for the wargaming world?
Hermann: I think Rick’s style brings a wargame to life, evoking the period in which the battle takes place and bringing the gamer ever closer and more intimate with the game’s subject matter. His style allows the historian in you to immerse yourself in the event. Not only that, but the accuracy, detail and visuals of his maps allow gamers to see for themselves what the soldiers and generals at the battle actually saw. In that sense, Rick’s art style is informative as well as beautiful and reveals to the gamer even more about the engagement. I think his unique style allows the wargame to be a teaching tool that every designer and gamer should desire.
Grant: How do you feel his work on the board for A Most Fearful Sacrifice contributed to the overall play experience?
Hermann: Undoubtedly, Rick’s work on A Most Fearful Sacrifice brings the Gettysburg battlefield into your gaming room. In my opinion, it’s the most detailed, accurate and beautifully portrayed depiction of the battlefield ever drawn up and produced. As I mention in the previous question, his style draws you right into the American Civil War era and specifically into the Battle of Gettysburg. The larger hexes allow his artwork to “breathe” and you can spend hours just looking at the characteristics of every farm, lane, and copse of woods. When you are playing AMFS, there is absolutely no doubt that you’re in southern Pennsylvania at the beginning of July 1863. And this attention to accuracy and detail makes the simulation value of the game design so much more accurate. You as the player get to experience and therefore evaluate the martial value of every ridge, road and wood line. Why did the generals defend where they did? Why did they march and deploy to specific areas? What routes did they choose? His maps help you understand the why behind those kinds of military decisions.
Grant: What are some of the major highlights or Easter eggs you know about in the board for A Most Fearful Sacrifice?
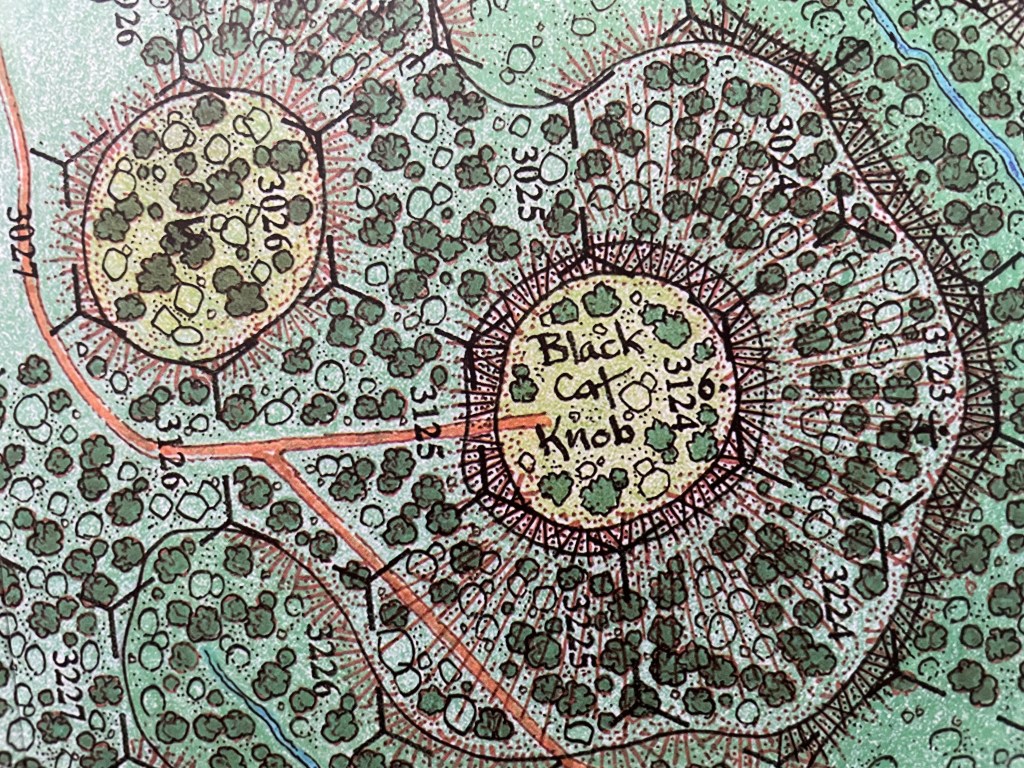
Hermann: Oh, my goodness, the amount of detail on the map is a major highlight! Just look around Little Round Top and Devil’s Den and all those rocks he drew in to represent the rocky terrain of that area. We always used to tease him that he had missed one! Every single farm is named for its actual owner. Even nicknames for certain places were included – The Devil’s Kitchen and The Valley of Death by the Round Tops, for example. And of course his ultimate Easter Egg is naming something on the map his trademark name to catch anyone who tried to copy his work and research. In the case of AMFS, it’s his inclusion of Black Cat Knob.
Grant: Who will you find to replace Rick on future projects?
Hermann: Honestly, we’re not sure just yet. Mark and I have been discussing this over the past few months. We have some candidates in mind, all talented artists, but as you know this will be a huge project and as such they will need to let us know if they are willing to put in the time and effort required. Obviously, no one can actually replace Rick and being the artist assigned to work on the next project (which is slated to be The Rock of Chickamauga) will indeed include a lot of pressure. But we are not looking for anyone to mimic Rick’s style, just someone who can demonstrate the same feel for the topography as he did and bring that to life for the game player.
One final element of the board that is absolutely fantastic is the Turn Track, which is found in the bottom right hand corner of the southern map. This is frankly the best looking turn track I have ever seen and really shows an attention to detail. The images used as a background to the time is that of the sky lightening with the rising of the sun, blazing solar orb at noon day and then the darkening and inky black skies of the evening turns.

Such a fantastic detail that really doesn’t aid that much in the playing of the game but gives it a different feel for sure. I am not sure whose idea this detail was but I am going to give the credit to the great artistic mind of Rick Barber.

We have really enjoyed playing A Most Fearful Sacrifice and I liked it so much that I made it my Wargame of the Year for 2022. We found the system to be totally engaging, very interesting with how the chit pull activation has been removed but is replaced by the cards but also beautiful to look at. The board is phenomenal and is probably the late Rick Barber’s finest work. The entire play experience was glorious. Now we just need a bigger table to be able to play the entire campaign game of the full three days of the battle. Some day. Some day soon.
We also posted an interview with the designer Hermann Luttmann at the time of the Kickstarter in 2021 and you can read that at the following link: https://theplayersaid.com/2021/04/06/interview-with-hermann-luttmann-designer-of-a-most-fearful-sacrifice-the-three-days-of-gettysburg-from-flying-pig-games-coming-to-kickstarter-today/
Here is a link to our video review:
If you are interested in A Most Fearful Sacrifice: The Three Days of Gettysburg, you can order a 2nd Edition copy for $110.00 from the Flying Pig Games website at the following link: https://flyingpiggames.com/products/a-most-fearful-sacrifice
The next board that we will take a look at in the series is Donnerschlag: Escape from Stalingrad from VUCA Simulations designed by Patrick Gebhardt and Pepito Shazzeguti and illustrated by Pablo Bazerque.
Here are links to the previous entries in the series:
Kekionga!: A Dark and Bloody Battleground, 1790 from High Flying Dice Games
Campaigns of 1777 in Strategy & Tactics Magazine #316 from Decision Games
Battle Hymn Volume 1: Gettysburg and Pea Ridge from Compass Games
From Salerno to Rome: World War II – The Italian Campaign, 1943-1944 from Dissimula Edizioni
This War Without an Enemy: The English Civil War 1642-1646 from Nuts! Publishing
Holland ‘44: Operation Market-Garden, September 1944 from GMT Games
Maori Wars: The New Zealand Land Wars, 1845-1872 from Legion Wargames
Imperial Struggle: The Global Rivalry – Britain & France 1697-1789 from GMT Games
Stilicho: Last of the Romans from Hollandspiele
Nevsky: Teutons and Rus in Collision, 1240-1242 from GMT Games
-Grant

Very nice !
LikeLiked by 1 person
Another great article. That map really is amazing and to think it was done by hand in this age of digital tools (not to mention AI-generated art) is mind-blowing.
I agree on the size issue. I don’t currently have a table that can accommodate that monster. Map size has kept me away from several games that I feel like I’d really enjoy. I’m working on solving that issue, but in the meantime, this was not a game I was going to pass up just because I don’t have a table big enough for it yet.
LikeLiked by 1 person
Don’t get me wrong. I love big boards but this one is just WAY TOO BIG! It is a chore to handle. Which is a bit of a shame.
LikeLike
Gotta admit. I bought this game just because of the board.
LikeLiked by 1 person
It is pretty great…but the game play is also very good. Even the smaller scenarios. Really enjoyed this one!
LikeLike