Continuing along in this new series devoted to the best looking boards found in the wargaming world where I will highlight the art and layout of a different board in a wargame that we have played to show you the various talents of the artists and graphic designers involved. In my humble opinion, a well designed and attractive board can make all the difference in the world to me enjoying a wargame. Don’t get me wrong, the game has to be good, but if it’s also good looking it always is a better experience. A board can draw me in. Can make me feel that I’m there. Can set the stage for the thematic immersion that we all crave. And I have found many of these type of boards and I want to make sure that I share them with you.

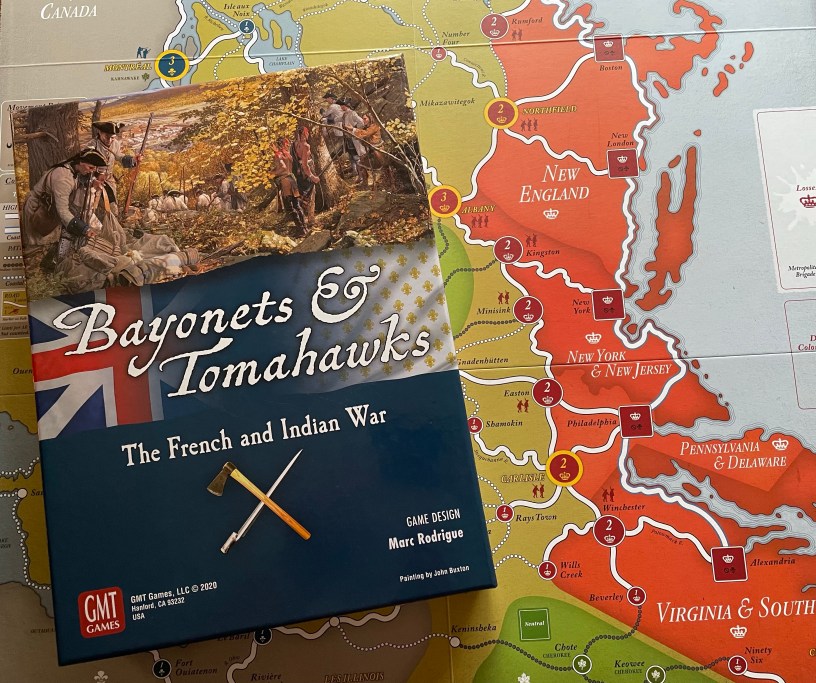
Marc Rodrigue is a relative newcomer to both the wargame design and graphics arena but he is a very talented and welcome addition to the fold. Marc is a French-Canadian game designer from Montreal and he works as a corporate graphic designer. During his career he has specialized in communicating with games and has developed promotional and training games for prominent businesses in Canada (e.g. The Weather Network, Hydro-Quebec, Abitibi Consolidated Paper Company). He has had a lifelong interest in the French & Indian War and in 2010 became a dedicated ‘Franche de Marine’ reenactor in one of the most respected groups of Quebec province: le ‘Détachement de la Colonie’. He appears regularly at Fort Ticonderoga (NY) and other historic sites in Canada and the United States. Marc began designing and developing his first game Bayonets & Tomahawks, which is a strategic game on the French & Indian War. He has a few other graphic design artist credits for games such as Prelude to Rebellion: Mobilization & Unrest in Lower Canada 1834-1837 (2018) from Compass Games, The Shores of Tripoli (2020) and Votes for Women (2022) both published by Fort Circle Games.
I would say that Marc’s style is first and foremost functional, and his ability to connect graphics to mechanics that aid in play is unprecedented. He also has a nice and easy style that just feels like it makes a game eminently playable. Such is the case for his first designed game Bayonets & Tomahawks for which he also did the graphic design and map work. He combines an overall attractive board with clear images and lines that assist the players in carrying out the titanic struggle between France and Britain for control of the North American Continent.
I will say however that this board is very different from those I have chosen to highlight in the past. This one uses no images or lines to denote geography, changes in elevation, rocky or rough terrain, no small tree images to differentiate the forests and no water lines to denote motion. It is a pretty plain board in this regard and its inclusion in the series should hammer home and reinforce to you how well the board works for the game that it made it into this series without those enhanced graphical touches.
The board covers the northeastern section of North America, an area ranging from the Upper Mississippi to the Gulf of Saint Lawrence and to South Carolina along the Atlantic Seaboard. The board is a point-to-point map with each point being its own space, which has a name and can be occupied by units. Eighteenth-century French, British, and Indian place names often differ from modern ones and therefore corresponding contemporary names are indicated in the playbook for each of these spaces. The board also contains the various tracks, boxes and placeholders that are used during play.
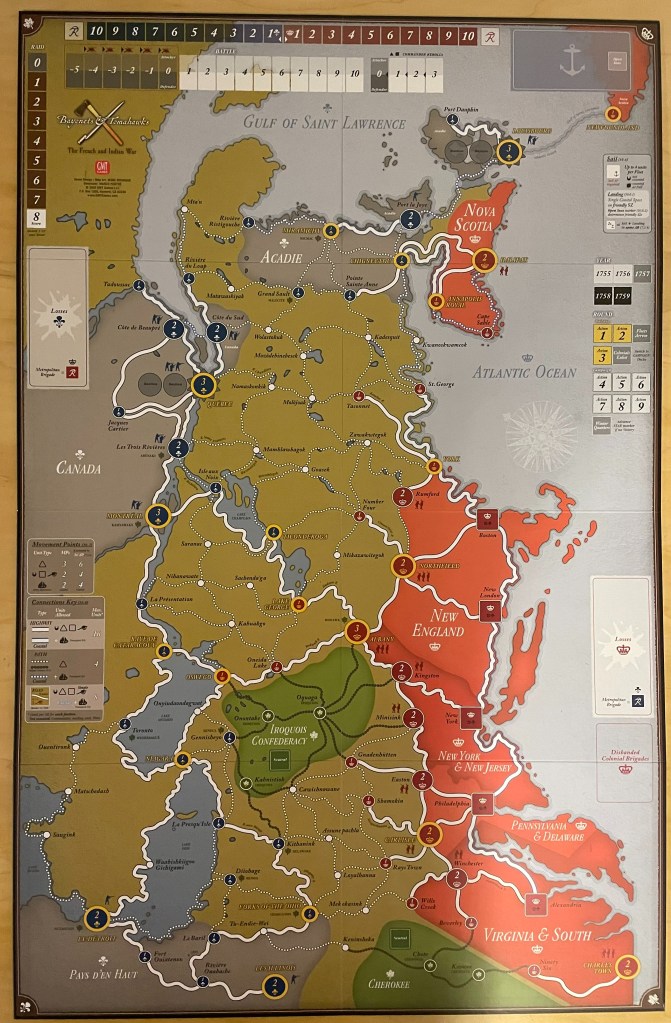
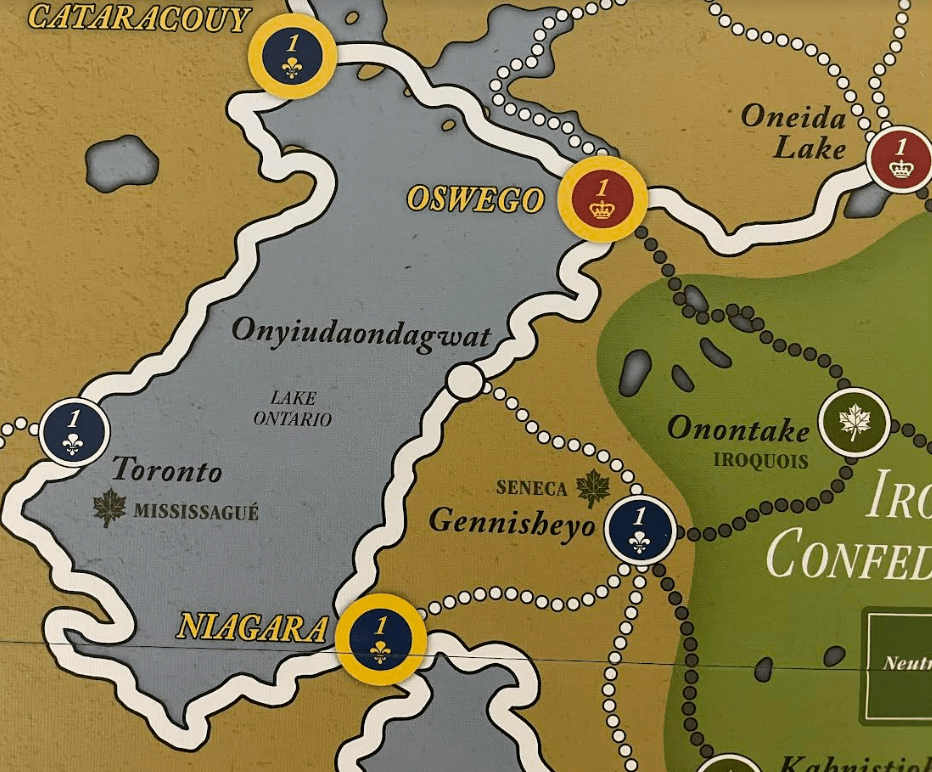
The board is a full 22” x 34” mounted map but it just seems so much bigger than that. I think that one of the reasons it feels larger is that Marc uses very distinct colors on the board to demarcate the various areas. The British controlled areas use a soft red color with large circles and squares representing outposts, settled areas, fortresses and victory point spaces. The French controlled areas are a light gray dotted with both large and small dark blue circles representing the same outposts, settlements, fortresses and victory point spaces. The golden rod colored areas in the center of the map between the French and British areas are basically the wilderness through which the combatants must maneuver to put pressure on key spaces and march through to take territory. This golden rod color is a great complement to the red and gray used and stands out prominently as the focus of the action. Found in the wilderness are the various Indian Nation Territories including the ancestral lands of the Cherokee in the south and the Iroquois Confederacy in the center. These are colored olive green and really look great against the golden rod. There are numerous other Indian settlements spread out through the wilderness and are marked by a maple leaf symbol and the name of the indigenous tribe.
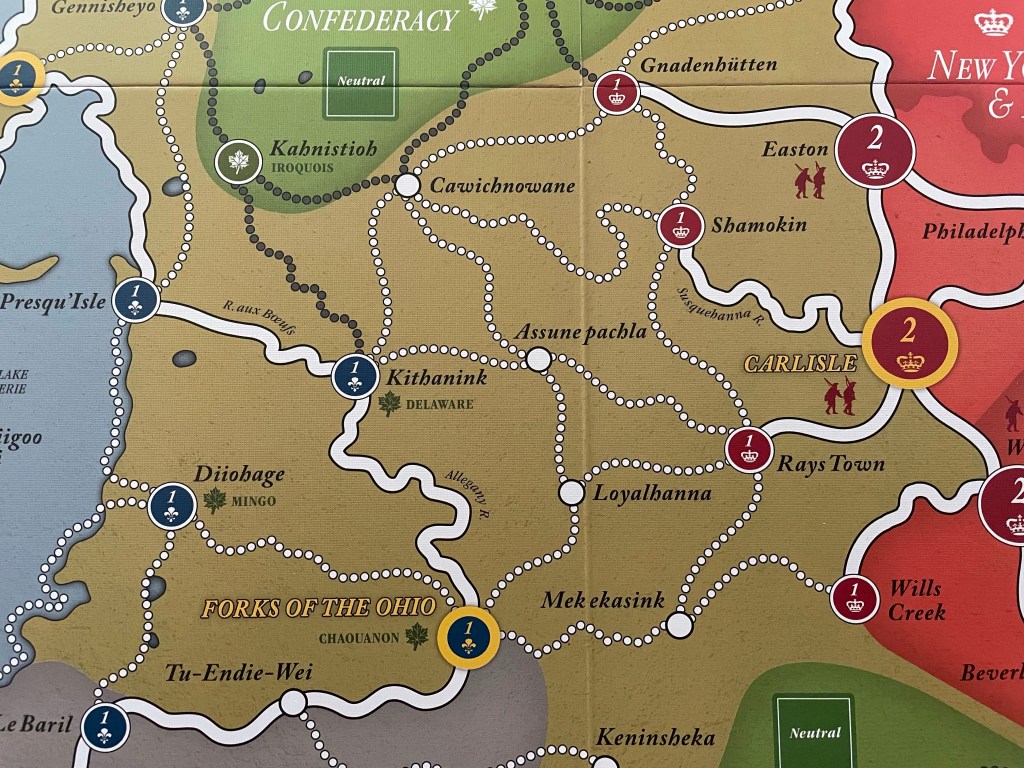
There are two types of Indian Villages found on the board including Indian Village spaces (green circular Space with a maple leaf symbol) and Indian Villages located on a faction’s Home Space (maple leaf symbol beside the space).
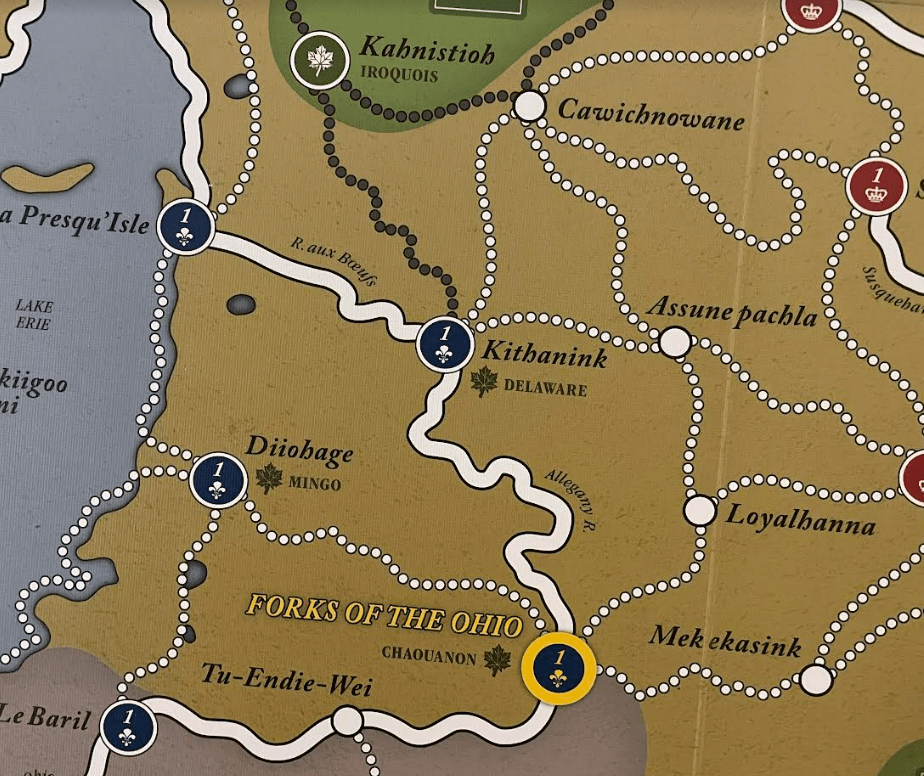
There are 16 of these two types of Indian Villages found on the board and they are named for various specific tribes including Mingo, Delaware, Chaouanon, Seneca, Iroquois, Micmac and Abenaki to name just a few. These spaces will be where the French and British player may recruit various Indian units into their armies to fight with them.
I like that Marc was very careful about where these tribes are shown on the board as they each had their own land to call home and he wanted to get it right. I find this aspect of the French & Indian War to be extremely fascinating. The willingness of these tribes to ally themselves with foreign invaders to make sure that their way of life was preserved is just amazing to me and shows how closely they held their values and customs and wanted to protect them by siding with the nation they felt would best allow them their freedom.
I also really like the symbols used to mark the settlements and outposts for both the British and French. A small circular Home Space is an Outpost and a large circular Home Space is a Settled
Space. The other cool thing here that Marc did is draw silhouettes of Militia beside the space to show the Militia friendly to that space. Also a red square space with a crown symbol in it is a British
Base.
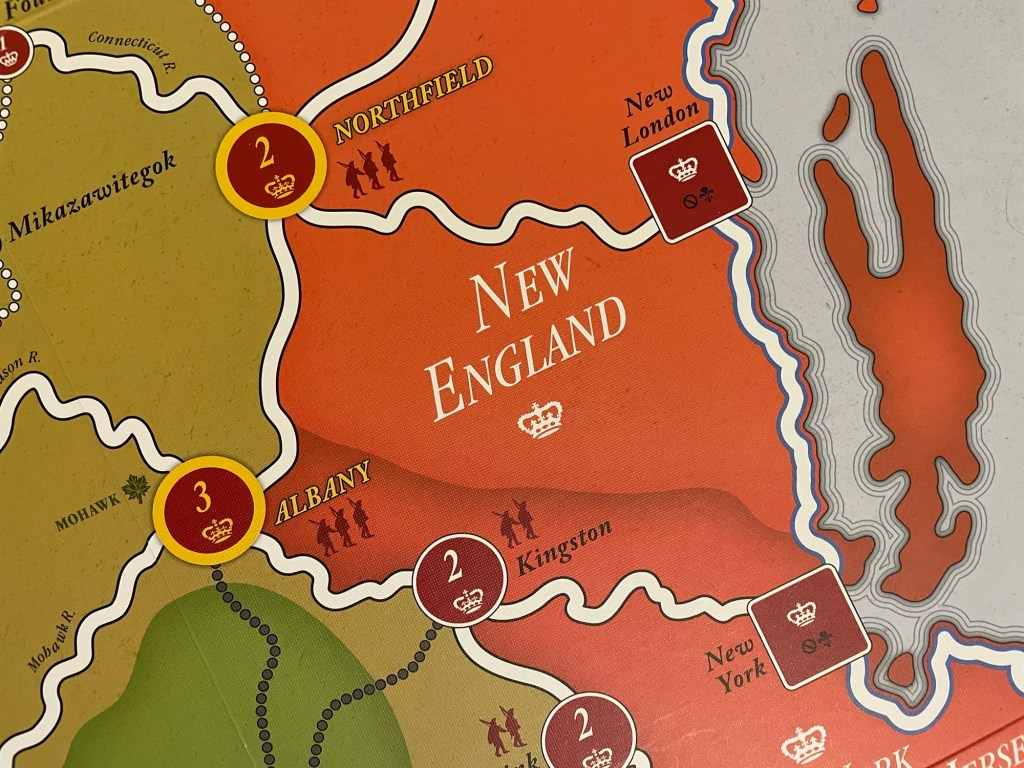
A blue circle with a Fleur-de-lis symbol in it is a French Base. These nice touches are important to the players and show off Marc’s nice use of symbiology on the board to aid in the game being played.

Let’s now take a look at what the many lines on the board are for. In the game, you can see the general impassability of the wilderness by the lack of major roads. There are three different types of connections between the various points on the map that represent Wilderness Spaces, Outposts, Settled Spaces and British and French bases and forts. These connections include Highways, Paths and Roads and each has movement restrictions on the game’s units.
Highways are the thick solid white lines and these allow for any type of units to move along them. Paths are more restrictive and are represented by dotted lines that only allow for Light units to use them; no regulars or cannon. Roads are an improvement of a path and are represented by a marker that is placed on a dotted line to upgrade it to allow for any units to move along as if the Path was a Highway. These are expensive to build and will require two activations in two consecutive activations to complete.
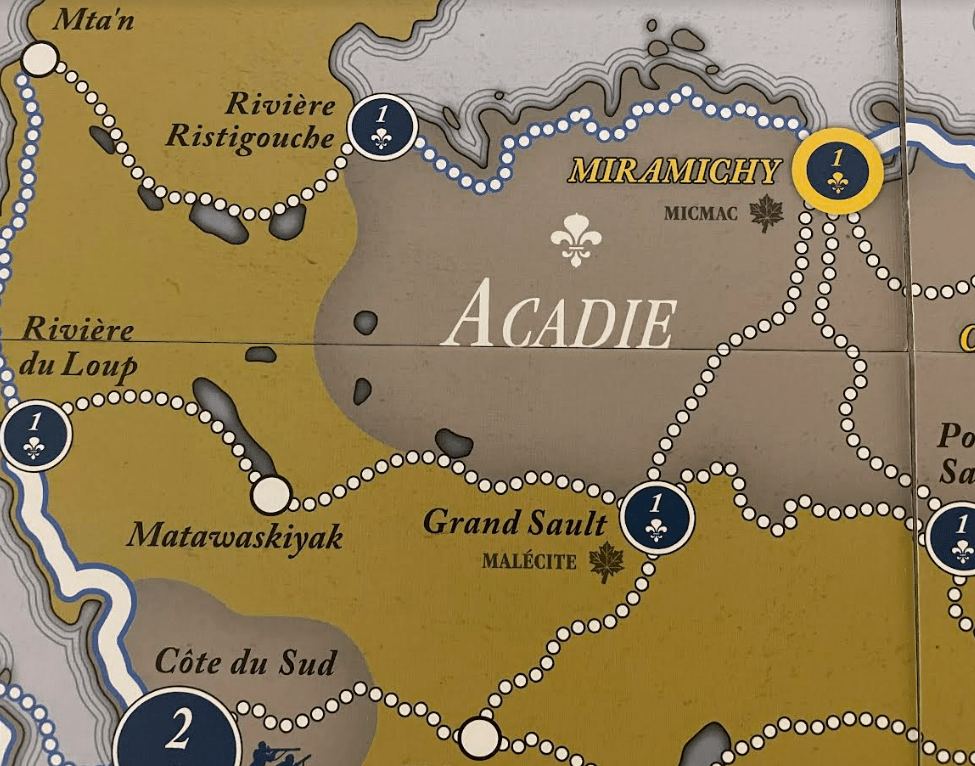
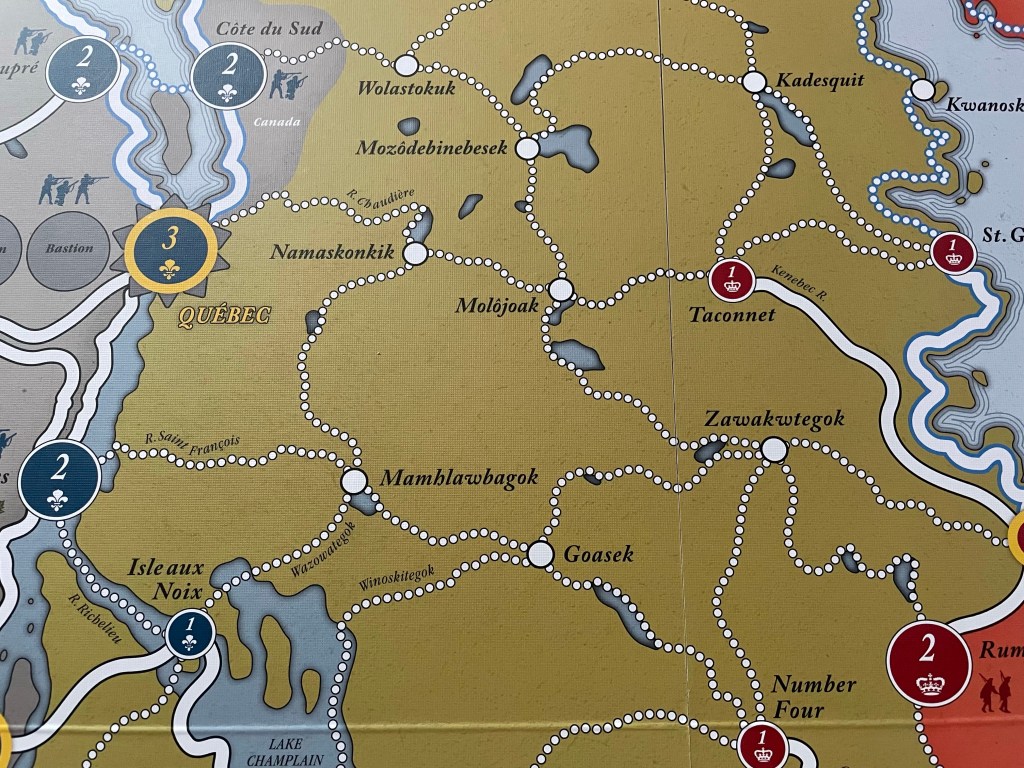
Let’s take a look at the map and identify the areas where the wilderness is well represented in this game. On the northern portion of the board, in the area south of Acadie and Nova Scotia and to the east of Québec, you will notice that there are no major Highways that cross this section of the wilderness. There is one Highway that is built from York that connects to St. George along the coast and then to Taconnet near the Kenebec River. This means that no Brigade units can reach Quebec to the west and will require the British to attempt to move only Light units through this area or get busy trying to build that Highway from Taconnet to connect to the west. This makes Québec pretty inaccessible and protects it during the first few years of the war. The British will be able to reach Québec by use of their Fleets after Louisbourg falls but not until then as it protects access to the Gulf of St. Lawrence.
In the center of the map is where most of the action will take place as their is a major Highway connecting Albany with Montreal through a few Outposts located on Lake Champlain in Lake George (British), Ticonderoga (French) and Isle aux Noix. There is a also a major north-south Highway connecting Quebec to the north with Le Detroit in the south and going through various Settled Spaces including Baye de Cataracouy, Oswego, Niagara and Toronto. This Highway allows for the quick and efficient movement of French Brigades and Artillery to stop major British advances into the area. This section of the map is the most populated area and is shown by the number of developed routes through the area. The French will want to place a fort (Fort Carillon) at Ticonderoga as quickly as possible and station at a least a few Brigades, Light units and Artillery there to hold off the advancing British. I also recommend that the French take Oswego early in the game and build a fort there as well to stem the flow of men and materiel from Albany.
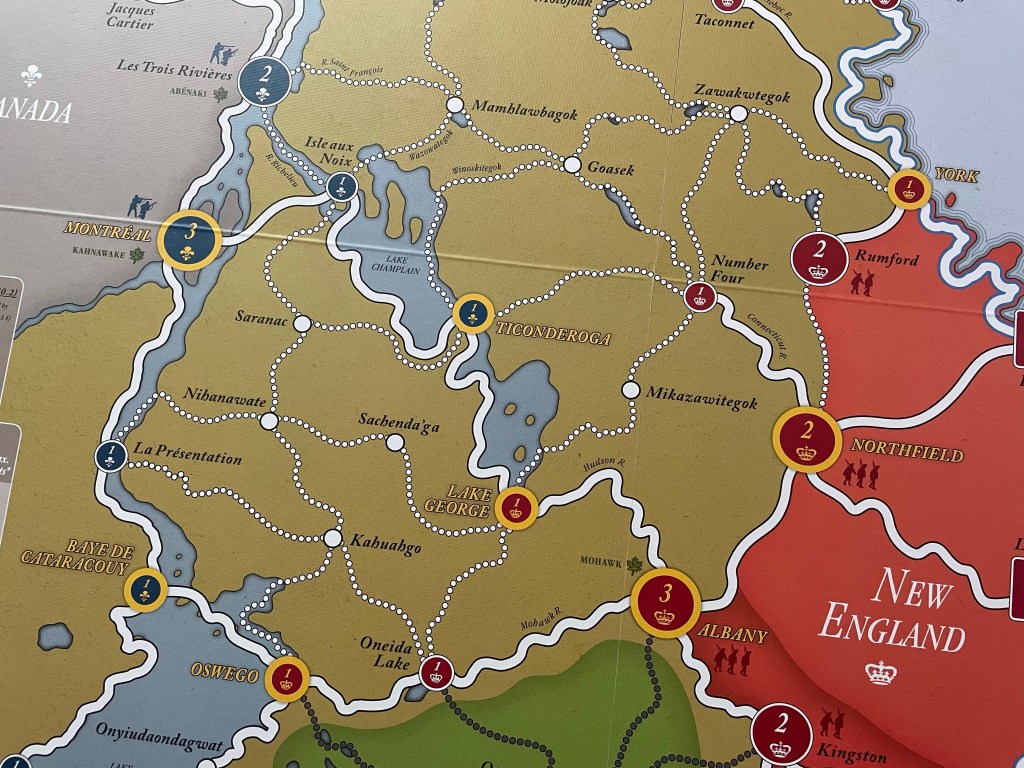
Finally in the south, we come back to generally unsettled and wild area as there is no major Highway connecting New York and Carlisle to the west. There are plenty of Paths but they all move through the Iroquois Confederacy territory and their Indian units and the fort that is placed at Forks of the Ohio. The British can tame this section of the continent by focusing on building a Road from Wills Creek in Virginia through Mekekasink and then onto Forks of the Ohio. This will allow the British to move Colonial Brigades along this Road and put pressure on the southern flank of the French Empire in North America.
As you can see, the designer really studied the area and placed the Highways and Paths of the time on the map that cause the same difficult choices for the players as were created for the commanders in the 1750’s. This is one of my most favorite parts of the game and it really creates opportunities but also provides some natural deterrents and road blocks that the French can use to hold off the British.
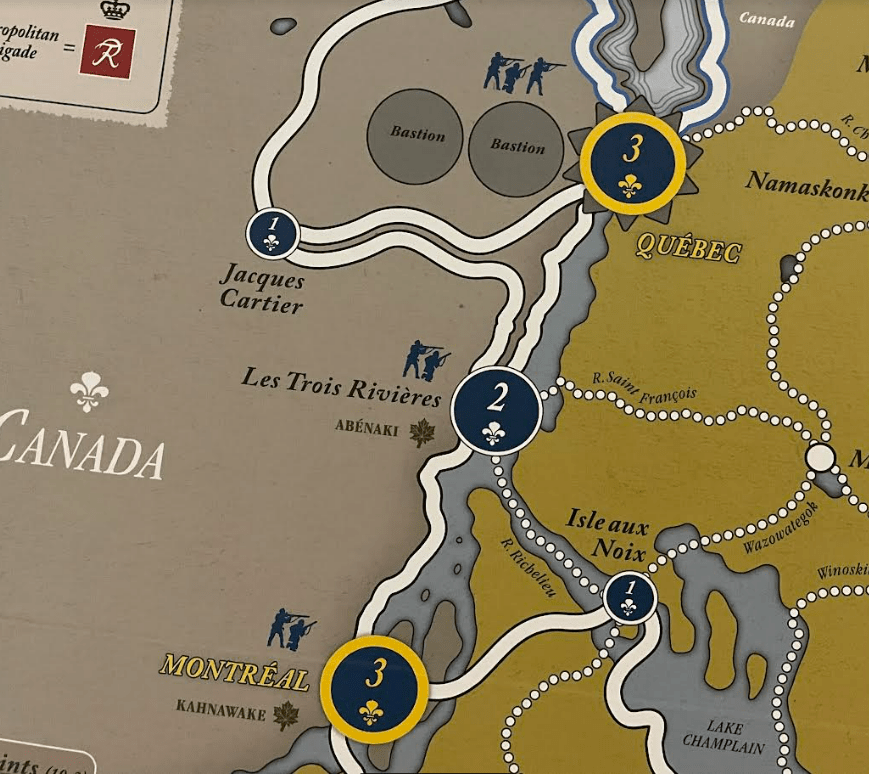
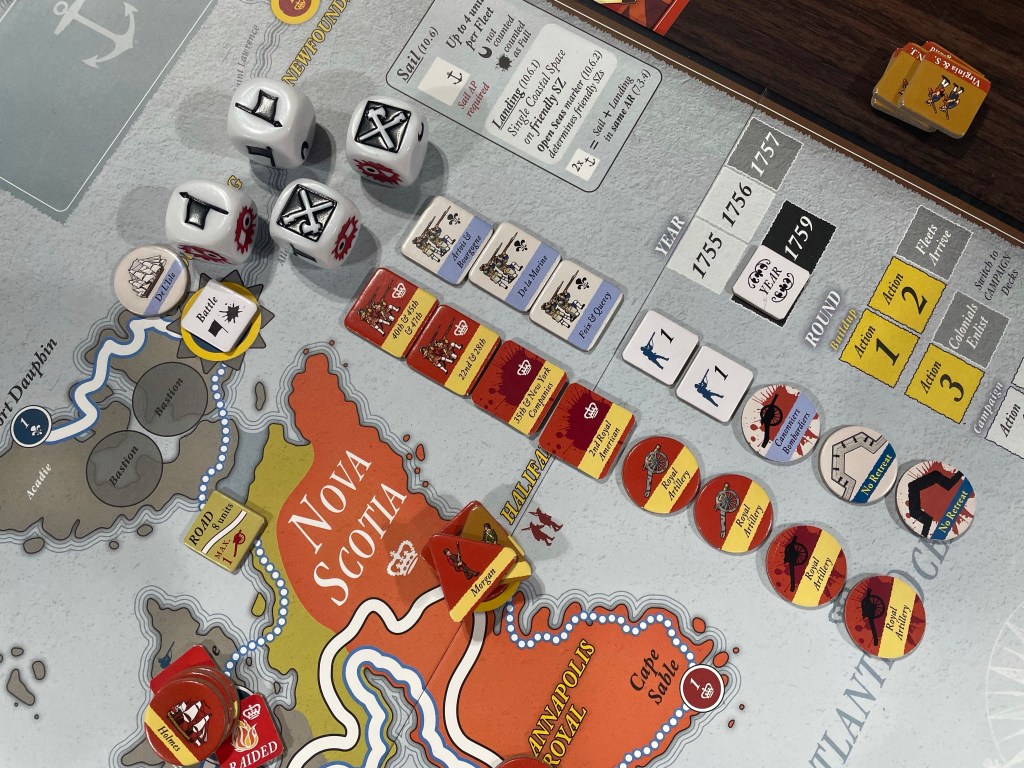
The last thing that I will take you through is the fortress that is Louisbourg. Historically, Louisbourg was the key to the British winning the battle for control over North America. It sat in a spot that commanded the view of the Atlantic Ocean as traffic would come into the Gulf of St. Lawrence. The British realized that with the Fortress of Louisbourg under French control, the Royal Navy could not sail up the St. Lawrence River for an attack on Québec. After a failed expedition against Louisbourg in 1757, the British attempted it again a year later. So we must ask how this aspect in modeled in the game? I would say that it is true to history accurate and for the British to even have a chance to win they must take Louisbourg.
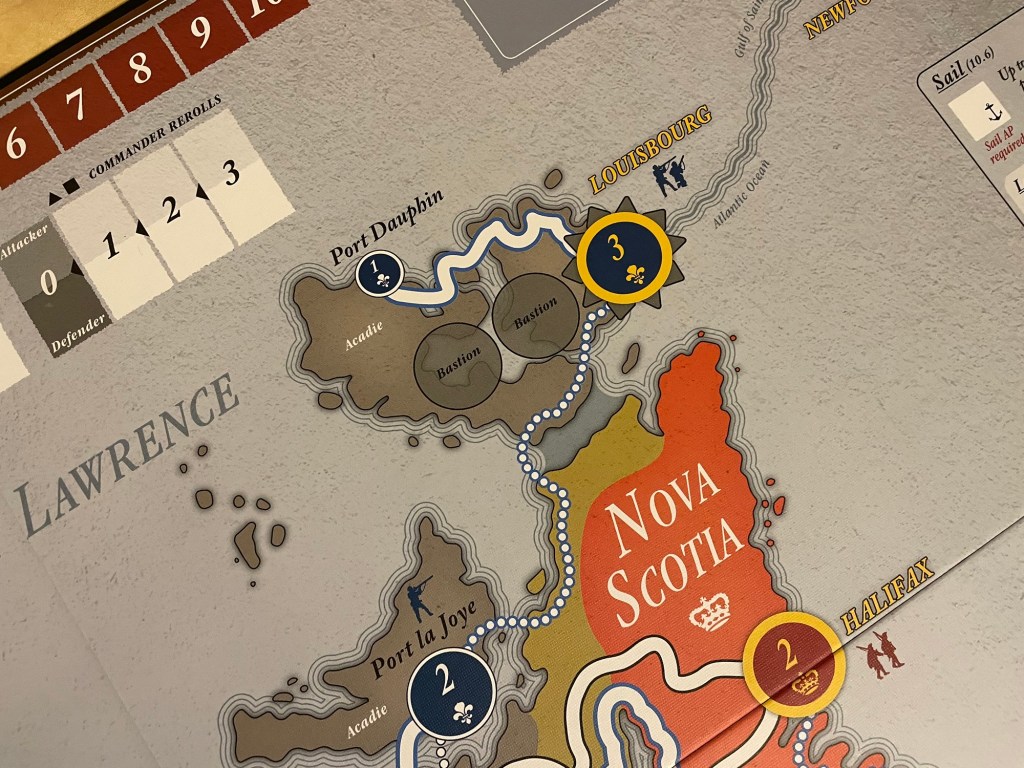
In the picture above, you will notice that the fortress has two Bastion spaces to the left that provide additional defenses to the French and also allow for them to ignore retreat results during sieges. These Bastions will take hits from the British Artillery but will take several attempts to get through and destroy. At the start of the game, the French don’t have any units stationed in Louisbourg and this is something that they must rectify as soon as possible. The problem is that they cannot gain their Fleets until the round progresses into the 4th activation. Don’t worry as this works to the French advantage as the British don’t have access to theirs either and will have to build two segments of Roads to attempt to get up the Coastal Highway to begin the siege. This just isn’t practical at the start of the game though and you will have an opportunity to get defenders stationed in the fort. But, you must do this the moment that the French have access to their Fleets. I recommend garrisoning it with 3 Brigades and at least 1 Artillery. The inherent Militia printed on the board will help the French and provide additional body bags that will regenerate each round of battle.

The British must attack Louisbourg as early as they possibly can as we have seen this take the better part of two seasons to accomplish, depending on how friendly the dice are. We have seen the French hold out and win the game at the end of 1757 but also have seen it fall and the British then quickly are able to overrun Québec. I am pleased with the way this part of the history works in the game and really want to try out some different strategies with how the British attack and how the French defend.
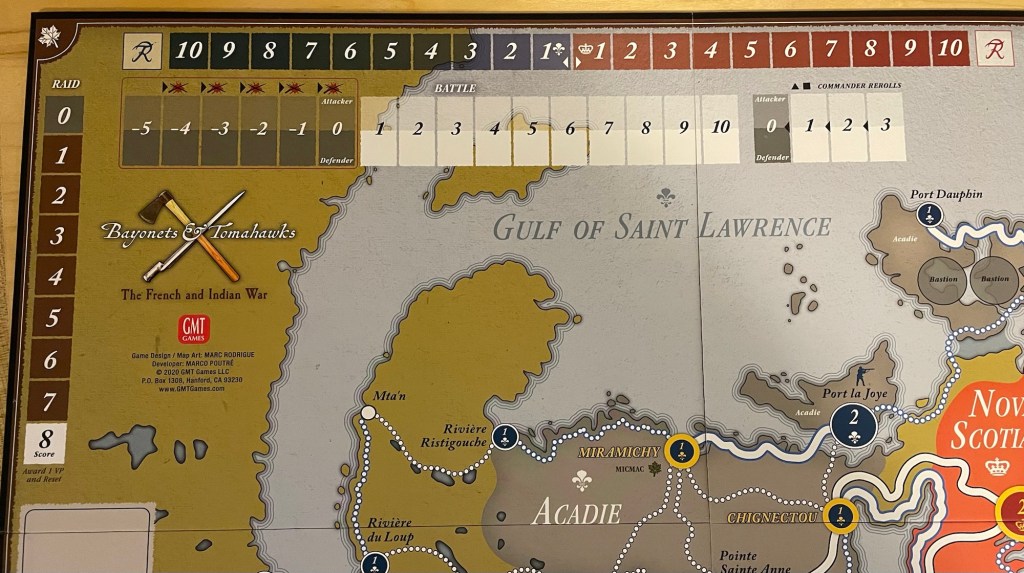
The final thing we will take a look at on the board are the various boxes and tracks used to keep track of the administrative elements of the game. At the top of the board is found the Victory Track, Battle & Commander Rerolls Track and Raid Track. These are very important to the game and will keep track of the various parts of the battle mechanic which is pretty involved and can be a bit difficult to follow at first. But, with use of the Battle Track, the game is made much simpler and we found this to be a very good addition to the board. I like how the board is designed to have the British player sitting on the right side of the board and the French player on the left and these 3 Tracks are found conveniently in the middle of the top portion of the board with easy access. The Raid Track, which is pretty much only used by the French player, is also found on the left side in easy reach.
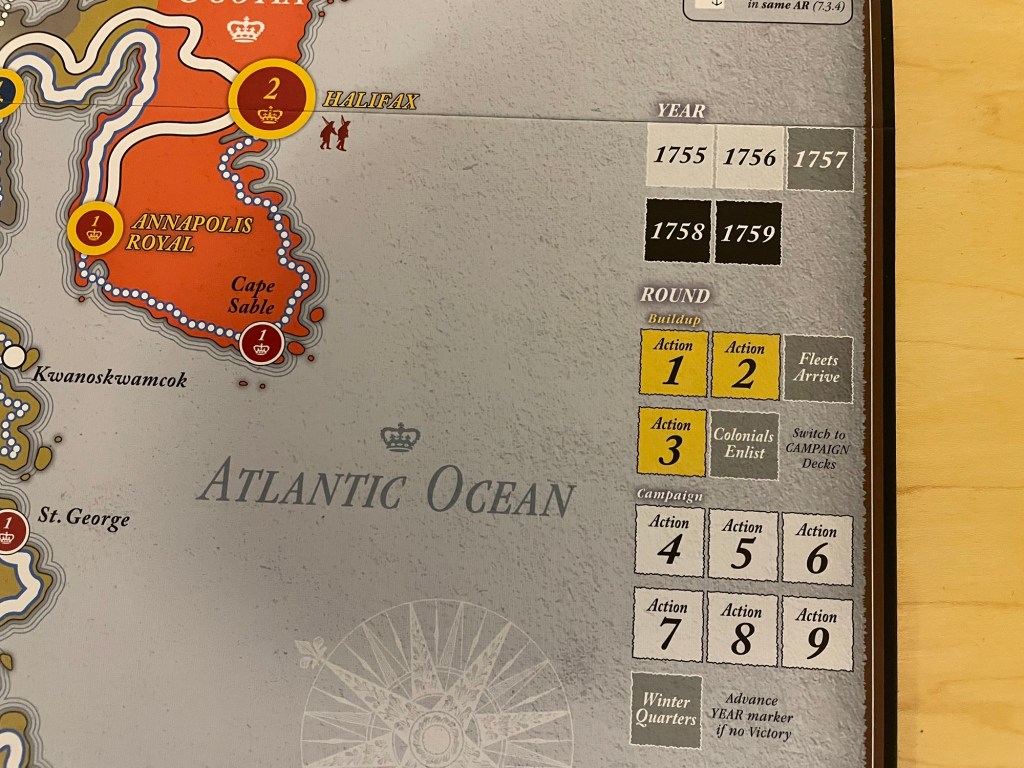
On the right side of the board in the center is the Year and Round Tracks where time is marked as the game passes. The Year Track is color coded for the various scenarios included in the game. The Round Track has handy reminders annotated on the board to inform the players when Fleets arrive, when Militia are ready to be enlisted and also when decks are switched over to the Campaign Decks.
And finally, on the left center of the board is found the key for the various Connections shown on the board (remember that Connections are Highways, Paths and Roads as well as Indian Trails. This also reminds the player how many units can be moved along each of these types of Connections.

Marc is very talented and has created a great game that also looks great on the table. The different shapes of the units assist players in remembering each of the unit abilities and also coordinate with the dice symbols for combat. I could probably write an entire post on this graphic representation and how it so very good. But may another day!
Bayonets & Tomahawks is a special game and frankly was the most enjoyable wargame that we played in 2021. What it tries to do, it does very well and creates a very engaging and interesting simulation of this titanic struggle for the future of the continent. The game’s production is also off the charts. From the beautiful board, to the very cool custom dice, to the interesting use of squares, triangles and circles to represent different unit types. It is a beautiful game! But, it is more than a pretty face and creates a very rewarding experience that is sure to be enjoyed for many, many plays and years to come because you cannot possibly get it all in just a few plays.
Here is a look at our initial thoughts video to give you an idea about how the game plays:
You can also read our interview with Marc Rodrigue at the following link: https://theplayersaid.com/2016/09/28/interview-with-marc-rodrigue-designer-of-bayonets-tomahawks-by-gmt-games/
Finally, you can read my First Impressions post on the game at the following link: https://theplayersaid.com/2021/06/22/first-impressions-bayonets-tomahawks-the-french-indian-war-from-gmt-games/
If you are interested in Bayonets & Tomahawks, you can pre-order a 2nd Printing copy from the GMT Games website for $44.00 from the following link: https://www.gmtgames.com/p-978-bayonets-tomahawks-2nd-printing.aspx
The next board that we will take a look at in the series is Undaunted: Normandy designed by David Thompson and Trevor Benjamin and illustrated by Roland MacDonald.
Here are links to the previous entries in the series:
Kekionga!: A Dark and Bloody Battleground, 1790 from High Flying Dice Games
Campaigns of 1777 in Strategy & Tactics Magazine #316 from Decision Games
Battle Hymn Volume 1: Gettysburg and Pea Ridge from Compass Games
From Salerno to Rome: World War II – The Italian Campaign, 1943-1944 from Dissimula Edizioni
This War Without an Enemy: The English Civil War 1642-1646 from Nuts! Publishing
Holland ‘44: Operation Market-Garden, September 1944 from GMT Games
Maori Wars: The New Zealand Land Wars, 1845-1872 from Legion Wargames
Imperial Struggle: The Global Rivalry – Britain & France 1697-1789 from GMT Games
Stilicho: Last of the Romans from Hollandspiele
Nevsky: Teutons and Rus in Collision, 1240-1242 from GMT Games
A Most Fearful Sacrifice: The Three Days of Gettysburg from Flying Pig Games
Donnerschlag: Escape from Stalingrad from VUCA Simulations
Keep Up the Fire!: The Boxer Rebellion Deluxe Edition from Worthington Publishing
Liberty or Death: The American Insurrection from GMT Games
Lanzerath Ridge: Battle of the Bulge from Dan Verssen Games
Salerno ’43: The Allied Invasion of Italy, September 1943 from GMT Games
-Grant

I’ve been really enjoying this series. You’ve covered a number of games that I would never see otherwise as they haven’t previously interested me due to subject/scale/# of players/etc.
And instead of just being a gallery of board art, you include a discussion of how the board serves the game, and how sometimes that is better done with more involved boards, and sometimes with simpler art.
At some point it might be interesting (if more controversial) to discuss instances where the board layout notably fails to serve the game. Might unearth a couple where the board appears confusing and clunky, but upon trying to understand what the designer had in mind, it then makes more sense.
LikeLiked by 1 person
I have thought about that but I’d prefer to spend my time on things that do it well. There are some that make it very hard to easily play because of color choices, thickness of lines, text, etc. Thanks for reading!
LikeLike
The game is very interesting and has a new and fresh approach to this war. All the components are good, the counters, the tables the rulebook, the box…but the map! The map is one of the most boring map I’ve seen on a XVIII century game. You reviewed many charming maps, from Liberty or Death (the best!) to 1777, to Maori wars…
This map it’s a sort of infographic map you may find on a NYT column in the heritage insert.
In no way you feel the wilderness, the unknown, the majesty and the powerful of an epic adventure like this war.
Sorry, just my 2 cents.
Best,
LikeLiked by 1 person
You are entitled to your opinion. I think that I built my case as to why this was included even though it doesn’t have the normal graphics that have been prevalent in the other games featured. I think this board does convey the wilderness just in a different way. With the many trails and paths, large stretches where it’s hard to do any consistent movement and the use of color is very good. Thanks for sharing and for reading.
LikeLike
I echo LLarry’s comment about enjoying this series. B&T was one of the first TPA videos I remember that got me about interested in this period. However it was out of print and eBay sales were $$$, so I backed Liberty or Death instead.
I like how you’ve noticed the symbolism used in this game and its visual cues. All those little details in the design help with learning and gameplay.
Dammit, I may have to back the new p500 for T&B now after reading your blog. Thanks Grant! 🙂
LikeLiked by 1 person
That is one pretty board! Probably my favorite of the ones you’ve featured so far
LikeLiked by 1 person