
Lanzerath Ridge is a solitaire wargame that takes place on the first day of the Battle of the Bulge December 16, 1944 during World War II. In the game, the player takes control of a small group of American soldiers who must defend against the attacks of German paratroopers and fusiliers. The goal is simple but very difficult as the player has to attempt to do as well or better than the historic defenders by holding the attackers from taking the town of Lanzerath, Belgium to delay the advance of an entire SS Panzer Division. With limited actions each round, the player has to utilize their limited resources to attack the advancing German forces while also trying to accomplish objectives such as denying the Germans their equipment and strategically withdrawing to live to fight another day. The game lasts four rounds and each round has its own Assault Deck from which enemy counters are drawn along with nasty surprises such as mortars and MG42’s.

In this series of Action Points, we will take a look at the game board focusing on the Defender Combat Positions and Assault Tracks for the enemy Assault Counters, take a look at the various Defender Counters and their Special Attributes, Action Designators and anatomy, examine the Enemy Attack Deck and how the cards drive the assault and work against the player, examine the interesting new Vehicle Counters and their uses, review a few examples of actions including Attack, Adjust Fire, Close Combat, Assist and Recover and finish the series looking at some comments about strategy and suggestions for a better outcome.
Board
The board for Lanzerath Ridge is simply a piece of art! It deserves to be framed and placed on a wall in an art museum somewhere. It is of the highest graphical design quality and provides the player with a serious backdrop from which they can deeply immerse themselves in the thematic feeling of the battle. The board is illustrated by the very talented Nils Johansson and is a very important part of the game as it depicts the area of Lanzerath Ridge located outside of the town of Lanzerath in Belgium. The board has a collection of various shaped and colored squares and circles from which the player controls their defending forces in static positions and attempts to halt the advance of enemy units toward those positions.
The smaller circles located near the bottom of the board are used in the game to track the advance of attacker Assault Counters as they are placed and move up these tracks towards the Defender’s Positions. The small squares are used by attacker MG-42 counters, which are considered to be static units that don’t move up the Assault Tracks but will fire upon the defenders when their card is drawn from the Attackers Deck. The large squares found in the middle of the board are for the placement of the defender units and equipment and then there are various areas along the top of the board used to track the defenders’ ammunition tokens, the Morale Track, and the Intelligence Track. Let’s take a look at each of these aspects a bit more closely and discuss their roles in the game.

Assault Tracks
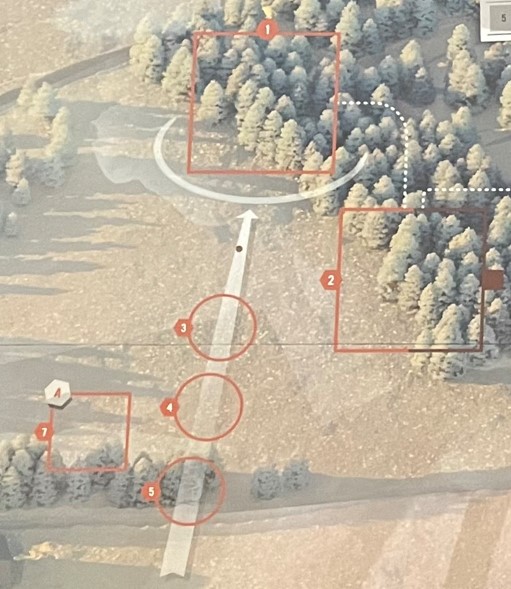
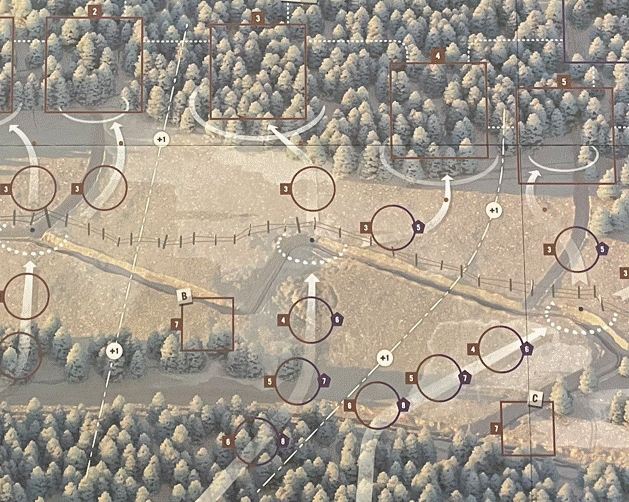
There are 5 Assault Tracks denoted on the board, with the three tracks located in the middle of the board splitting off into an additional 3 tracks as they approach the Defender Combat Positions. These Assault Tracks are identified by the number of the Defender Combat Position that they end at. For example, the furthest left track, which is colored orange and has a hexagon symbol on the smaller circles, is known as the 1 (orange hexagon) track. There is also a Defender Combat Position that has a 2 (orange hexagon) but it doesn’t have an Assault Track that leads specifically to it but it does have Line of Sight to two different colored tracks. But more on this aspect of the game later.
These Assault Tracks have between 3 and 5 circles on each and these are simply holding spots for the Assault Counters to be placed as they are placed by cards in the Assault Deck. As the counters are placed, counters already located in the circles on the tracks will advance one space closer to the Defender Combat Position on that track until they are pushed into the position. At that time time they will attack all defender units located in that position. It is important to remember though that a placement will only force other counters to advance if there are no open spaces in between. Sometimes, the player may attack an assault counter at the bottom or middle of these tracks instead of just the ones that are located in lower defense value circles. In the table below, you can see the number of circles that each Assault Track contains.
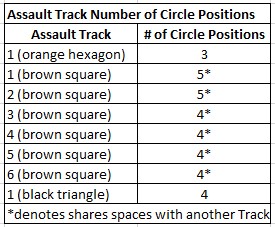
Some of these Assault Tracks share spaces with the adjacent track. For example, 1 (brown square) and 2 (brown square) share spaces, as do 3 and 4 (brown square) and 5 and 6 (brown square). These shared spaces only hold one Assault Counter at a time but when a new Assault Counter is to be placed on a track, once it is placed at the bottom of the shared track, if it would push a counter ahead of it forward, it will move in the direction of the Track identified on the Assault Card.
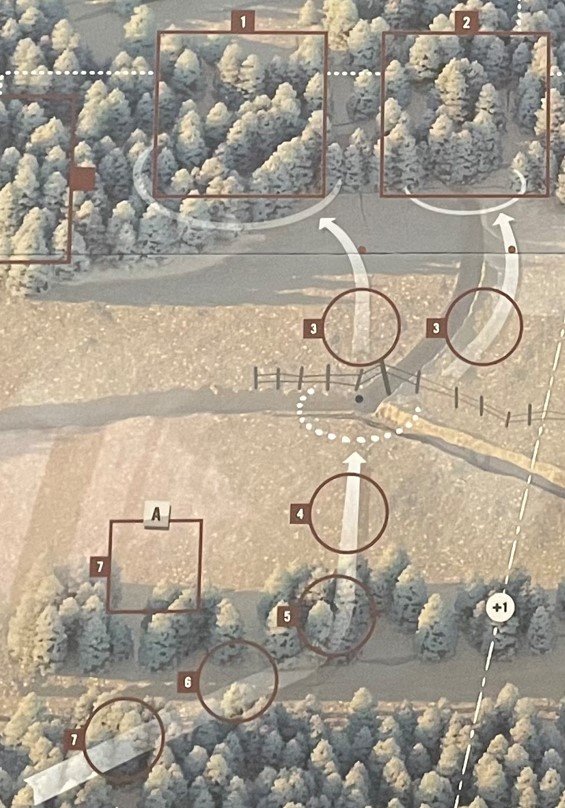
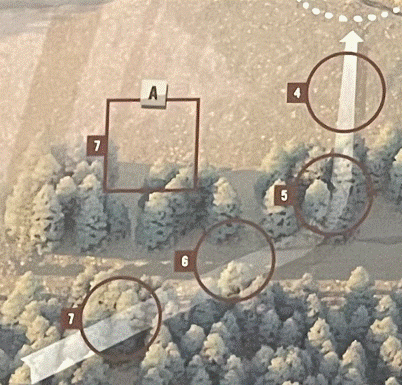
To further explain this, in the picture to the right, imagine that there are Assault Counters located in the 7, 6, 5 and 4 circles. If a counter is placed by an Assault Card draw on this track identified as 2 (brown square), the counter in the 4 space would be pushed toward Defender Combat Position 2 and would move into the 3 space.
The other important aspect about the numbers on the Assault Counter circles is the Defense Value that is listed on that space. This number is the number that the player must meet or exceed in an attack to destroy that Assault Counter. Think of this number as an amalgamation of several factors including cover of the area and distance from the Defender Combat Positions or range. These Defense Values are higher the further back on the Assault Tracks that you go with the last circle on these tracks being the highest and the nearest circles to the Defender Combat Positions being the lowest. In the example picture to the right, the last space on the Assault Track is a 7 Defense Value and the nearest is just a 3 Defense Value. Think of point blank range versus a ranged shot across an open field and through a forest. It takes a lucky roll to hit an Assault Counter in that 7 circle!
A few other aspects of the Assault Tracks that I want to focus some attention on are the Fence Spaces and the Grenade Spaces. These are really unique and interesting additions to the system and mimic Pavlov’s House and its Sapper Spaces as well as Soldiers in Postmen’s Uniforms with the Barricades. The Fence Spaces hold a special Fence Token that is placed there at the start of each of the 4 Attack Phases and are identified by a black dot in the middle of a circular area up against the illustrated fend line. This Fence Token acts as a barricade to advancing Assault Counters and they cannot pass that space until it is removed by the placement of a Leader Counter from the Assault Deck. If Assault Counters are forced to move on that track but they are stopped by a Fence Token, those counters will simply stack in that position. If 3 of these Assault Counters pile up in this fashion, they will then break through the fence. Once a Leader Counter is placed and there is an Assault Counter adjacent to the Fence Token it will be removed from the board and placed off to the side. But at the start of each new Assault Phase, this Fence Token will be replaced in that space for that round. These simply act as a temporary speedbump and can slow down the advance of Assault Counters against the Defender Combat Positions but not permanently.
The Grenade Spaces are a bit different as they are placed only at the start of the game and if removed are never placed again. The Grenade Spaces are identified by a brown circle after the last of the Assault Track circles marked as 3. These Grenades act as “booby traps” to the advancing German Assault Counters and the first time a counter is forced to move into this space the grenade will explode and remove that one counter from the track. In doing this though, the Grenade Token will also be removed from the game and will not reappear for the remaining Attack Periods. These Grenade Spaces are very important to your defense and you should do everything within your power to preserve them for as long as possible because they typically help you in the worst of times and can be the difference in being overrun or standing your ground.
MG-42 Positions
As mentioned earlier, there are special MG-42 Cards in the Assault Deck that when drawn will cause the player to have to place an MG-42 square counter into the MG-42 Positions located adjacent to the Assault Tracks or to activate that unit and fire upon the Defender Combat Positions. These spaces are square and color coded with the Assault Track. These 4 MG-42 Positions also have a Defense Value listed on them on the left side of the square and they all are a 7 as these positions are far away from the Defender Combat Positions requiring ranged fire and also are somewhat dug in and fortified in the tree line shown on the maps. Keeping these MG-42’s under control should be a key part of the player’s defense plan and if removed from the board through a successful attack, the next time their position is called for on an Assault Card it will be placed back in that position but doesn’t get an opportunity to fire on the defenders. These MG-42’s can only fire after being placed and properly setup and targeted so you have at least bit of time to take a breath, but it can always be activated on the next Assault Card draw.
Range Defense Bonus Line
Line of Sight is a key consideration in Lanzerath Ridge and is abstracted down to a Defender Combat Position’s color matching an Assault Circle’s color in order to allow that position to fire on that circle while taking an Attack Action. If your Defender Combat Position color is the same as the target circle you can fire on it. If not, you cannot attack that space from the differently colored Defender Combat Position but will have to find a matching Defender Combat Position with a ready and unexhausted or undisrupted unit to take that Attack Action. More on this in a later post but I wanted you to understand that concept so you can get the need for the Range Defense Bonus Line.
Because of this, Each of the 7 brown square Defender Combat Positions can fire on any of the matching brown square Assault Circles or MG-42 Positions. But, they will have to add this Range Defense Bonus to those Attacks as if they cross one of those +1 Lines. These lines are denoted as dashed white lines with a +1 located inside a circle on various points of this line. The line means that any shot crossing over that line will have to add a +1 Modifier to the target’s Defense Value. For example, if a unit located in Defender Combat Position 5 brown square tries to take a shot at the MG-42 Position located at B brown square, they will have to add +1 to the printed 7 Defense Value shown on the board. This means that they will have to roll an 8 or higher on their combat dice rather than 7 or higher. It’s a longer shot so it equates to being harder to hit. Typically, for shots like this, you will want to Attack with a unit that has a larger combat die, such as a D8 or a D10. Or even better, a unit that has those higher value dice but also is being supported by an Inspiring Leader Counter in their same position gaining the ability to roll multiple dice and take the highest result. You have to pay attention to both Line of Sight and this Range Defense Bonus Line when making decisions about Attacking certain positions. This was an interesting addition to the system and I feel that it is well represented on the board itself.
Defenders’ Ammunition Spaces
At the top of the board are located the Ammunition Spaces for the various heavy machine guns that player’s have access to during the battle. There are four such spaces, one each for the M1919 and M2 with two spaces for the M1918. One of these M1918 spaces is only used in one of the Variant Setups which lowers the difficulty level of the game by adding in 3 additional Unit Counters and an additional M1918 Machine Gun. If you are not playing this Variant, the 2nd M1918 Ammunition Space is left blank.

In these spaces, players will keep track of the ammunition that is loaded and the ammunition that is available to them. Each of these guns has a different number of available Ammunition Tokens and each gun also has a load out limit. These numbers are identified in the table below:

When loaded, the player can take an Attack action by expending up to 3 Ammunition Tokens and rolling a D10 or D12 (depending upon the machine gun they are firing) and taking the highest result. These guns are supremely important to the Defender and must be used appropriately to stave off the onslaught of Assault Counters up the various Assault Tracks. Because you are rolling larger dice, and sometimes multiple larger dice, these machine guns are great for attacking high Defense Value units on the board, even those that are farther away and cross one or two Range Defense Bonus Value Lines, or attempting to take out the MG-42’s.
Morale Track
Located right at the top middle of the board is the all important Morale Track. This Morale Track keeps the count on the current troop morale and represents the willingness of the defenders to continue the defense in the face of dwindling ammunition, increasing losses and overwhelming numbers of German units moving up the Assault Tracks. Morale is lost due to the presence of Disruption Tokens found on Defender Units at the end of any Attack Phase or when Defender Units are eliminated. If the Morale ever drops to 0, the game will come to an end immediately in a loss. The Defender Morale starts at 5 at the beginning of the game.
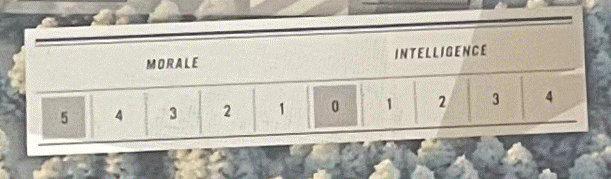
Intelligence Track
Also shown in this same area is the Intelligence Track. During the battle, the Americans were trying to gather and report information about enemy troop strength and movement back to HQ so that they knew what was coming at them. This track goes from 0-4 and the player will have to commit to moving certain intelligence units to the appropriate areas to take a Radio-Intelligence Action to place Radio Tokens. These tokens can later be discarded to attempt an Intelligence Roll to move this track up one space. These successful attempts at intelligence represent Victory Points at the end of the game but have no other game effect.
Defender Combat Positions vs. Vehicle Positions
We have already discussed a lot about Defender Combat Positions but I wanted to make sure you knew about the special 3 white colored Vehicle Positions and the lone purple colored Vehicle Position located on the right side of the board. These positions are numbered 1-3 (white circle) and 1 (purple hexagon) and are special areas that players can utilize during the game. Position 1 (white circle) is where was located a small log cabin that the leadership of the 394th Infantry Regiment’s Intelligence and Reconnaissance Platoon used as a Command Post. Each round, there are 3 units including Bouck, Springer, and Fort that must start in this space. They would meet here after each of the attack waves to report and discuss strategy. They will then need to be moved to where you need them during that turn.

The other 2 white Vehicle Positions are home to the Radio Jeep in 2 (white circle) and the Artillery Jeep 3 (white circle). The M2 Jeep is located in the 1 (purple hexagon) space and this is where the M2 machine gun starts the game. It can fire from this position as it does have Line of Sight to several of the Assault Tracks that carry the purple hexagon symbol on the right side of those circles. You will notice that the Defense Value found in those circles is a bit higher than the corresponding brown square Defense Value as, once again, the M2 1 (purple hexagon) position is further away and also has their view obscured by trees in the forest.
You will also notice that all of the Defender Combat Positions and Vehicle Positions are connected to one another by a series of dotted white lines. These white lines show the connection for movement between the various positions. This Move Action is an Action that doesn’t exhaust a counter as it is considered a Minor Action but counters can only only move from positions that are connected to other positions via these dotted white lines.
The board is absolutely stunningly beautiful! The artist, Nils Johansson is really talented and I have found that his graphic style really increases the immersion and playability of the games. This game board is very well done and provides clear understanding to the player about how the game functions and how it interacts with the play experience to create the feeling of the desperate defense of Lanzerath Ridge.
In Action Point 2, we will take take a look at the various Defender Counters, the meaning of the numbers and symbols found on their counters and their Special Attributes.
-Grant

Elaborate analysis of the game. Great work. I am not a fan of State of Siege wargaming but I will buy this one as it is man to man combat and a solo game which I will combine with my printed 28 mm miniatures. Making it in 3D and playing along with the board game gives me more fun. I did the exact same with Tank Duel solo and it was super.
LikeLiked by 1 person
I found one little error:
“When loaded, the player can take an Attack action by expending up to 3 Ammunition Tokens”
Mg fire is limited only to loaded ammunition tokens, if you spent more than 3 – there is a risk of overheating the weapon.
LikeLiked by 1 person
I will go into greater detail in a later post about the Adjust Fire action and how it works.
LikeLike
an extensive report on game thank you very much Grant
LikeLiked by 1 person
This just covered the board. There will be at least 3 more parts going into all aspects of the game. Stay tuned and thanks for reading!
LikeLike
write on!
LikeLiked by 1 person
Fascinating. I’ve been to the battle site several times, the last just a month ago, and now I want the game.
LikeLiked by 1 person