Lanzerath Ridge is a solitaire wargame that takes place on the first day of the Battle of the Bulge December 16, 1944 during World War II. In the game, the player takes control of a small group of American soldiers who must defend against the attacks of German paratroopers and fusiliers. The goal is simple but very difficult as the player has to attempt to do as well or better than the historic defenders by holding the attackers from taking the town of Lanzerath, Belgium to delay the advance of an entire SS Panzer Division. With limited actions each round, the player has to utilize their limited resources to attack the advancing German forces while also trying to accomplish objectives such as denying the Germans their equipment and strategically withdrawing to live to fight another day. The game lasts four rounds and each round has its own Assault Deck from which enemy counters are drawn along with nasty surprises such as mortars and MG42’s.

In Action Point 1, we took a look at the game board focusing on the Defender Combat Positions and Assault Tracks for the enemy Assault Counters. In this Action Point, we will take a look at the various Defender Counters and their Special Attributes and Action Designators.
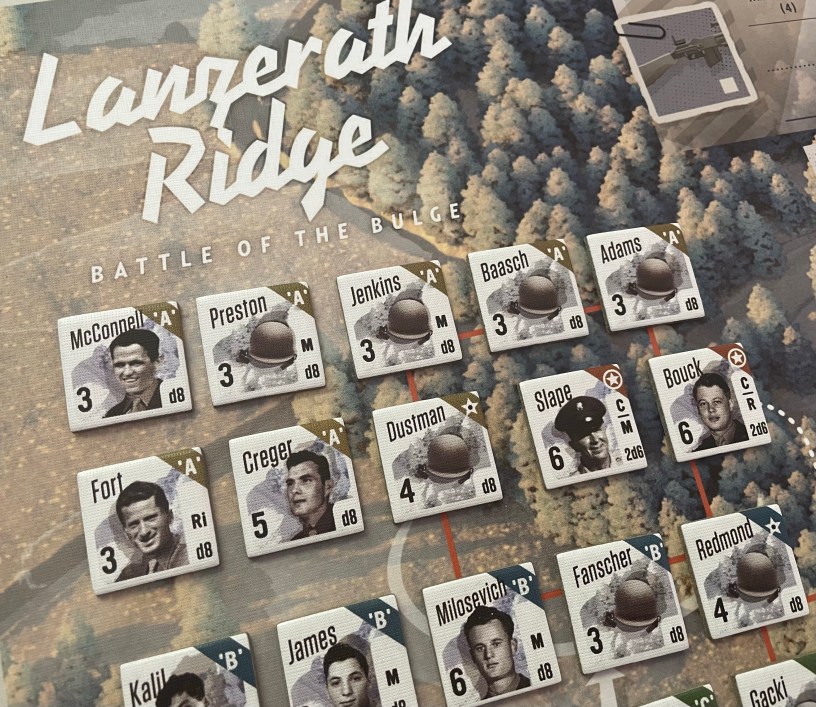
Defender Counters
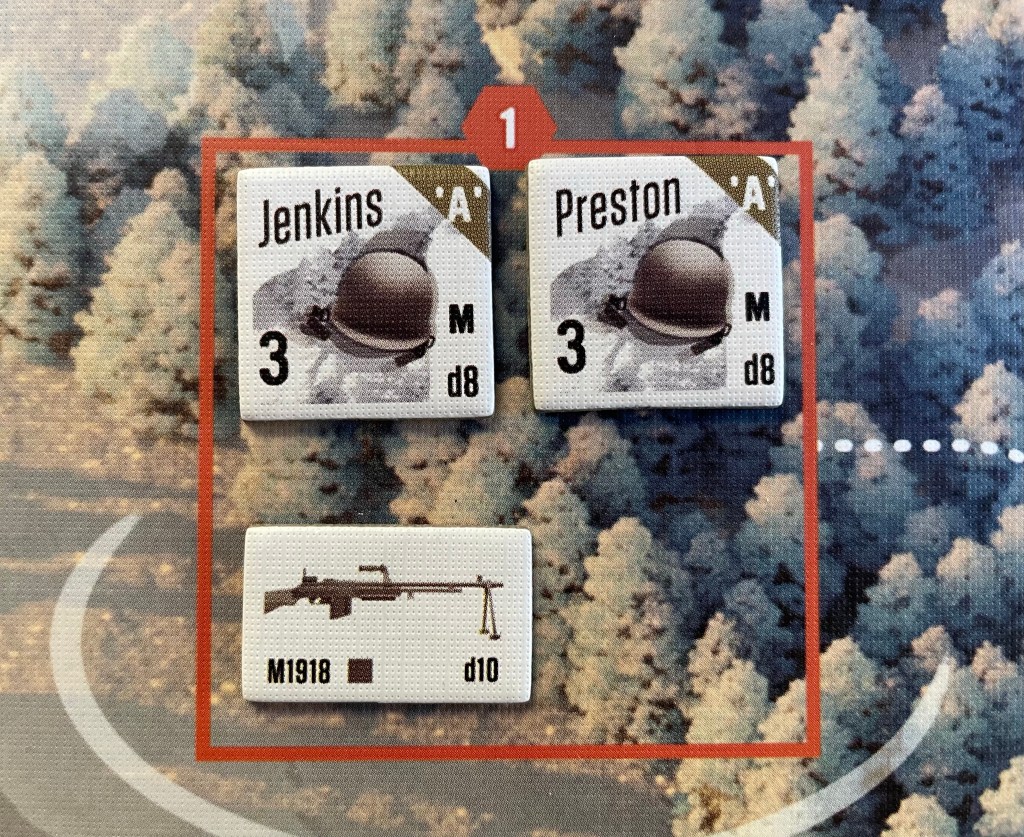
There are 22 different Defender Counters found in the game (with 3 of those 22 including McGehee, Robinson and Silvola are only used in one of the game variants) and they are divided up by squad. There are 3 squads consisting of Squad A, Squad B, and you guessed it Squad C. Squads A and B are your true defender units as these are combat ready soldiers who have the role of attacking the enemy. Squad C is a bit different as they are still soldiers but are referred to as Forward Observers. The Forward Observers can still attack as the regular soldiers do, but with less effectiveness, and their Special Attributes are more important to use than attacking. But in a pinch, they can definitely shoot at the enemy. They might not hit but they can shoot!

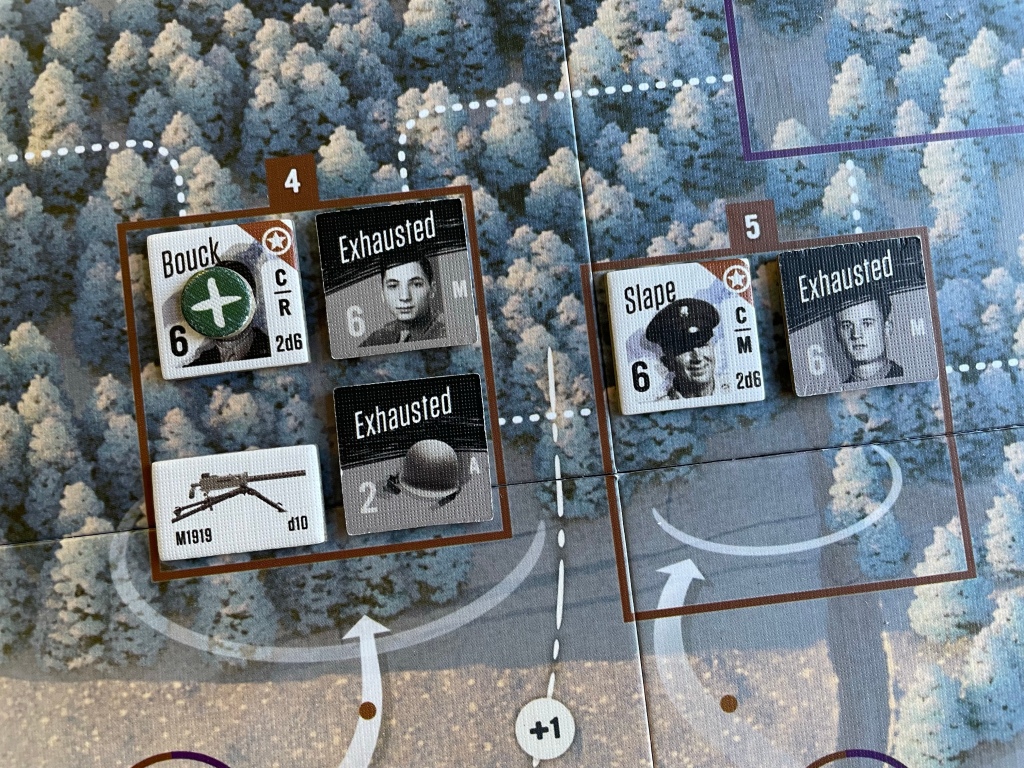
The Defender Counters anatomy is pretty simple as you can see in the picture to the right. At the top of the counter, each Defender Counter is named based on the historical soldiers participating in the defense of Lanzerath Ridge. Also at the top right is their squad designation being either Squad A, B or C and each squad is identified with their own color. Squad A is brown, Squad B is blue and Squad C is green. There are two other counters who have no specific squad designations but have a star shown with a red banner, which denotes that they are your “wild” counters and can use their Attribute on any counter belonging to any of the various squads.
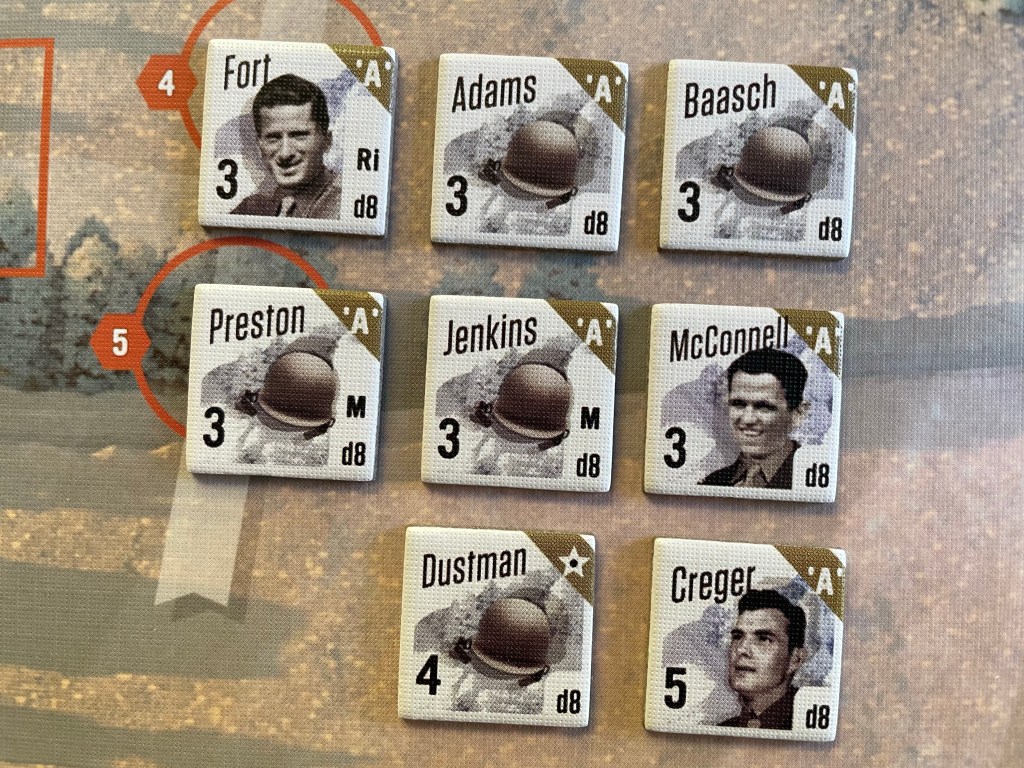
The only true purpose of the Squad designation is for the use of the Inspire Attribute, which is important in Attacks as it will give additional dice to roll for that Defender Counter while an unexhausted/undisrupted Defender Counter with an Inspire Attribute is collocated in the same Defender Position. This Inspire Attribute is the only attribute and is denoted on the counter with a star in the top right hand corner of the Defender Counter.
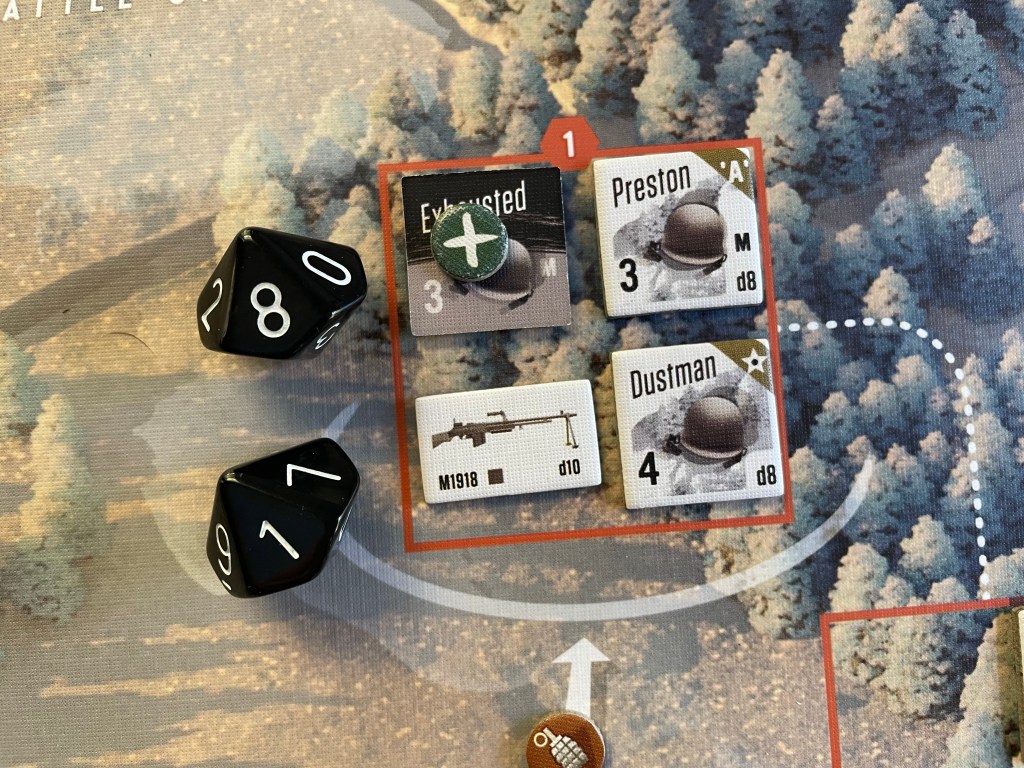
Next is the Defender Counter’s Action Designators which tells you what special actions that counter can also perform in addition to the normal duties of a soldier in attacking the enemy. There are several of these Action Designators, including C – Command, M – Machine Gunner, A – Assist, R – Radio, Ra – Radio Artillery and Ri – Radio Intelligence. We will discuss these a bit more later in this post and also when we discuss Actions in a future post.

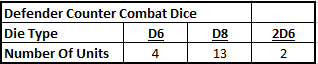
Combat Value is the part of the counter that players will use and refer to the most. Located in the bottom right of each Defender Counter is their Combat Value shown as a number of combat dice and dice type. Most units will get just one die to attack with and it will be either a d6 or a d8. When a d6 is show, that player will get to roll 1d6 when attacking an Enemy Assault Counter. In the rare case that 2d6 is shown, this means that this unit will get to roll 2d6 when attacking and will take the highest result rolled. If you remember back to our last Action Point where we discussed the layout of the board and the various elements, we talked about the Assault Track circles and how they had a Defense Value. This Defense Value is typically higher the further away from the front lines the circle is located. The Defense Values range from 3 to 7 (the 7 is for the MG-42 Positions) and a player must roll equal to or higher than the Defense Value to score a hit. When a target has a Defense Value higher than 6, such as an MG-42 Position or if an Attack is passing over multiple Range Defense Bonus Lines and adds up to higher than 6, the only way to hit that position is to roll a combat die that is larger, such as a d8, d10 or d12. So you will need to keep that in mind when you are deciding what targets to Attack and what units to use for those Attacks. The Defender Counters combat dice are broken down as follows:
The last aspect of the counter anatomy that we have to look at is the Valor Rating. Valor Rating is the defense of that unit when it is attacked and shows how hardy and steely they are. The higher the Valor Rating, the harder that unit will be to hit by enemy fire including from Mortars, MG-42’s and Close Assault. The Defender Counter’s Valor Rating breakdown is as follows:

As you can see, the Defender Counters are varied and each has their own strengths and weaknesses. Part of the game is managing those counters, using the high Combat Dice units to do your attacking and making sure that you protect your low Valor Rating units, and you will have to be good at this part of the game to see a modicum of success. But, remember that sometimes the dice are not in your favor and no matter how well you manage your units and assets, things can go to hell quickly. Now that you understand the makeup of the various Defender Counters, their anatomy and what those numbers mean, let’s take a closer look at the aforementioned Special Attributes and Action Designators.
Special Attributes and Action Designators
There are several different types of Action Designators including C – Command, M – Machine Gunner, A – Assist, R – Radio, Ra – Radio Artillery and Ri – Radio Intelligence but only one Attribute that we have already discussed in the Inspire Attribute. The Inspire Attribute requires no action being taken for the benefit to Defender Counters and is considered to be an active ability. The only caveat with Inspire is that units with the Inspire Attribute can only Inspire units matching their Squad. The only exception to this is the “wild” units mentioned before that have the red stripe in the upper right hand corner. They can Inspire units from any of the different squads. The Inspire Attribute is shown with a star in the top right corner of the Defender Counters that have the attribute. When the player takes various actions though, some of the actions will require specific Action Designators as a prerequisite to take those actions. Let’s take a look at each of these in turn. Here is a distribution of the number of the various Action Designators and Attributes on the Defender Counters. Remember that some counters have multiple Attributes and Action Designators.

C – Command
One of the most important actions that a player needs to take is the Command Action. In order to take that action, there needs to be a Defender Counter with the Command Action Designator in the same Defense Combat Position or adjacent to Defense Combat Positions where exhausted Defender Counters are located.
The Counter with the Command Action Designator will exhaust to unexhaust up to 3 counters. This is life or death. Units cannot Attack or take any action when they are exhausted and the only way to get them unexhausted is to use the Command Action. This is a great part of the game and players will have to smartly place their limited number of these counters, with only 2 available, so that they can use this key ability to its maximum effect. I like to make sure there are at least a few of the Assist Counters nearby so they can also maximize your limited actions through smart use.

M – Machine Gunner
In order for a Defender Counter to be able to operate and fire one of the various Machine Guns, they must have the Machine Gunner Action Designator. This means that those Machine Guns become useless unless you match them with the proper Defender Counters and if the Machine Gunner Designator units are killed, then you can’t fire them. Pretty simple and you must properly manage them as well managing the limited ammunition that comes with those guns as they are vitally important to any realistic attempt at defense.
A – Assist
In this volume of the Valiant Defense Series, David Thompson changed up the rules regarding Actions and exhaustion as well as whether or not counters who were just unexhausted by a Command Action can immediately take an action. This change was necessary due to the situation and the limited number of Defender Counters available. He also added in a new Action Designator called Assist that mimics the Command Action but on a lesser level. The Assist Action Designator allows the three counters that have it to exhaust to unexhaust another counter in its same Defense Combat Position. This ability doesn’t limit the action to only units of the same squad as the Assisting counter but allows for this unit to be used to improve the number of recoveries that can be done. One note though is that Assist cannot be used to recover a Defender Counter that has the Command Action Designator so be aware of that. This is a really interesting part of the game and its strategy as I like to stack one of these Assist Action Designator counters into Defense Combat Positions with Machine Gunners and a Command unit to maximize how many times I can get that MG to fire. Once the Machine Gunner fires and exhausts, I will unexhaust him with the Assist Action and then he can immediately fire again in the same round. Then later, when those two counters are exhausted the Command counter will turn them both back over and get them back into the fight to fire another two times this round. Really important to setup your Defense Combat Positions to be efficient and provide lots of firepower to take out the Assault Counters coming at you.

These next three Combat Action Designators are all associated with the Radio Action and the Jeeps that are found in the White Vehicle Positions. Let’s take a look at each one of them.
R – Radio
Radio is an Action Designator that is generic and allows, as opposed to the more specific Ra or Ri that we will cover next, the unit that carries it (Bouck) to do either of the types of jobs associated with the radio. This means he can call in an artillery strike or report intel back to command CP about enemy strength and movements. This is a very versatile ability because during the course of the game, you will most likely lose one of the other two specific radio ability counters and Bouck can fill in and do their duty in their absence.
Ra – Radio Artillery
Radio Artillery allows for Springer to move to the Radio Jeep located in Vehicle Position 3 (white circle) to use his ability to call in an artillery strike on the Assault Counters. This is a multi-turn process and Springer will have to take a few Minor Actions to place a Radio Token onto the Jeep and then a Major Action to discard the Radio Tokens there to roll 1d6 per discarded token to possibly remove 3 Assault Cards from the top of the Assault Deck. This is a high risk situation though as you still must roll a 5 or 6 on at least one die to be successful but can be a high reward as removing those cards means you won’t have to fight those enemies and it might just be the breather you needed to make it through a round.
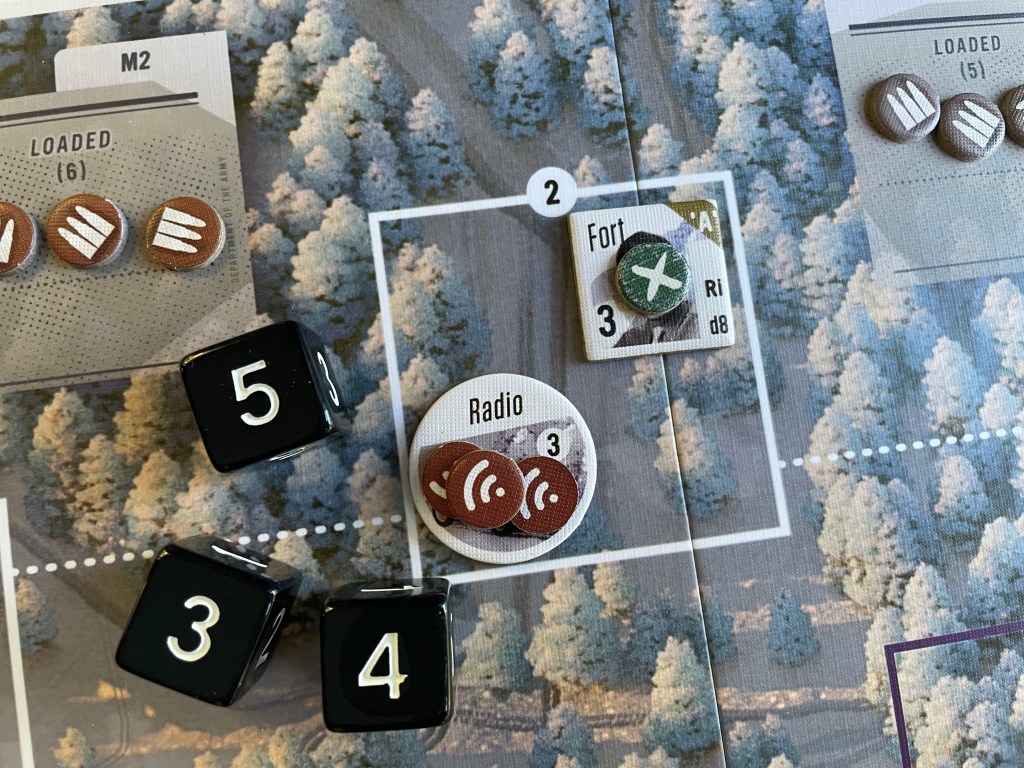
Ri – Radio Intelligence
Radio Intelligence is a bit of an odd duck as this action only gets you VP for your end game score. It is very tempting to use but can be a disaster if you fail as it is also an action sink. Similar to Ra, a counter with the Ri or R Action Designator will have to move to Vehicle Position 2 (white circle), which is closer than the other Jeep position, and then take Minor Actions to place Radio Tokens on the Jeep. Once 3 Radio Tokens have accumulated, the player can take a Major Action to attempt to give intel by rolling 1d6 per token discarded needing a result of 5 or 6 to move the Intelligence Track up 1 spot. This gains 1 VP for the end game scoring. That is all that this action accomplishes but is important if you hope to get a good score at the end of the game.
These Radio Action Designators are a trick bag! Important and can make the difference between victory and defeat but costly and you have to weigh when is the right time to use them as you simply cannot afford to throw away 3-5 actions for no results.

I hope you have enjoyed our look at the Defender Counters makeup, and their roles and duties with the various Action Designators. Lanzerath Ridge is not a new system, so most of these Action Designators have appeared in previous installments in the series, but there are enough new tricks here to explore that make this volume a very interesting and tactically rich experience. This one just might surpass Pavlov’s House as my favorite installment.
In Action Point 3, we will examine the Enemy Attack Deck and how the cards drive the assault and work against the player. Those nasty Mortar strikes make me sweat just thinking about them!
-Grant

Now this does looking interesting to me Grant thank you
LikeLiked by 1 person