
Continuing along in this new series devoted to the best looking boards found in the wargaming world where every other Friday, I will highlight the art and layout of a different board in a wargame that we have played to show you the various talents of the artists and graphic designers involved. In my humble opinion, a well designed and attractive board can make all the difference in the world to me enjoying a wargame. Don’t get me wrong, the game has to be good, but if it’s also good looking it always is a better experience. A board can draw me in. Can make me feel that I’m there. Can set the stage for the thematic immersion that we all crave. And I have found many of these type of boards and I want to make sure that I share them with you.
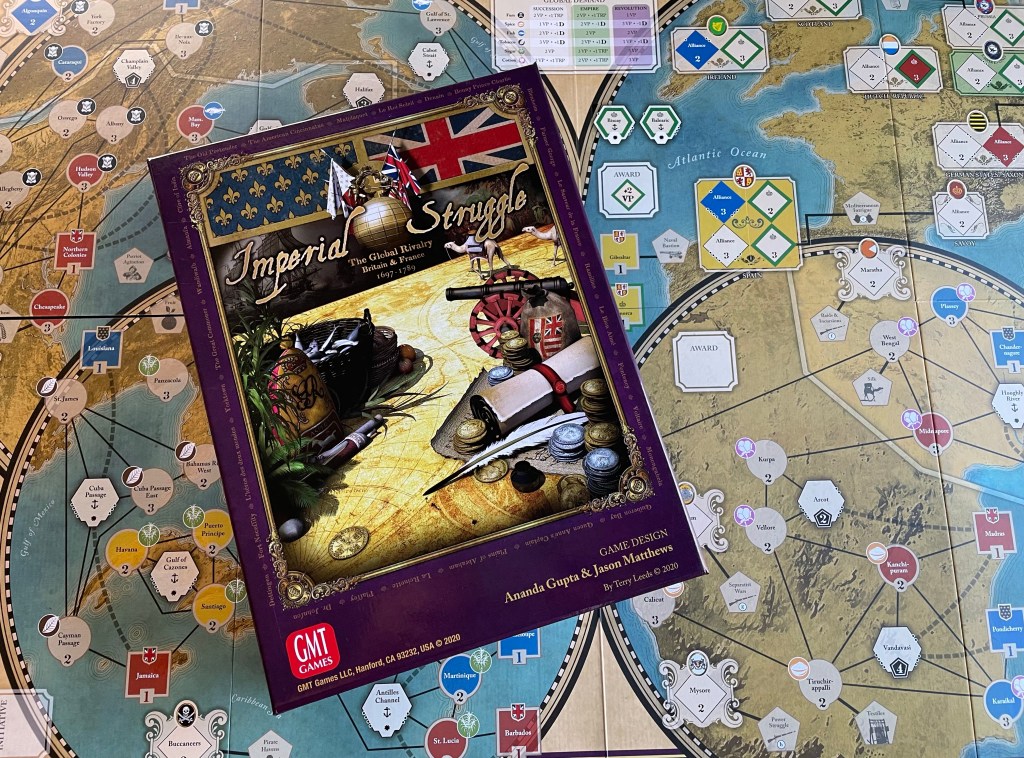
Imperial Struggle: The Global Rivalry – Britain & France 1697-1789 is another game where it will be the second game of a specific artist that we have highlighted in this series. Terry Leeds is a very talented artist and he has done boards for some of our favorite games including Paths of Glory (1999), Fields of Despair: France 1914-1918 (2017) and Liberty or Death: The American Insurrection (2016) from GMT Games, Saratoga 1777 AD (2013) from Turning Point Simulations and Campaigns of 1777 (2019) from Decision Games to name just a few. He has a very good talent for clearly representing the terrain and topography of the battlefield and always throws in interesting period appropriate choices for accents. Such is the case with his work on Imperial Struggle from GMT Games. The nonconventional approach to the board layout was not something I had expected and when I first saw the images, I was honestly a bit thrown for a loop. Imperial Struggle deals with what historians refer to as the Second Hundred Year’s War and covers the period of 1697 through 1789 stretching over four different wars. The game uses cards and Investment Tiles to allow the player to take various actions that change their fortunes across the globe with diplomacy, economic growth, and if all else fails war. Players will score Victory Points from the domination of Regions, controlling various Markets and from victory on the field of battle. There are so many options and strategies available in this game that it makes for a very deep and lasting experience that only gets better with time and more plays.
Upon my first view of the board in real life, I frankly thought it looked like a jumbled and over busy mess. It was pretty and all to look at with colors that popped and lots of symmetry in the concepts, but it just seemed really crowded and like someone had simply drawn lines and boxes all over it haphazardly. But, after playing and seeing how things tie together, the board is a stunning work of art that makes playing the game easy as it is very intuitive and clear. First off, let’s take a look at the functionality of the board and give you an understanding of what those circles, lines and boxes all combine to create.
The board for Imperial Struggle is divided into four different Regions around the globe and depicts the areas where Britain and France historically struggled for control. The Regions are presented in a circular sphere contained within thick black lines drawn around the area depicted and have a clearly marked border. It is very easy to see these different Regions and while there are no names for the different regions printed on the board, if you know geography you will have no problem identifying them. The four Regions represent only a portion of our globe and don’t have much of a connection to South America, Asia or Africa as the game focuses on the major struggles between France and England in these 4 regions and not necessarily in other parts of the world. Two of these Regions are further divided into sub-Regions.
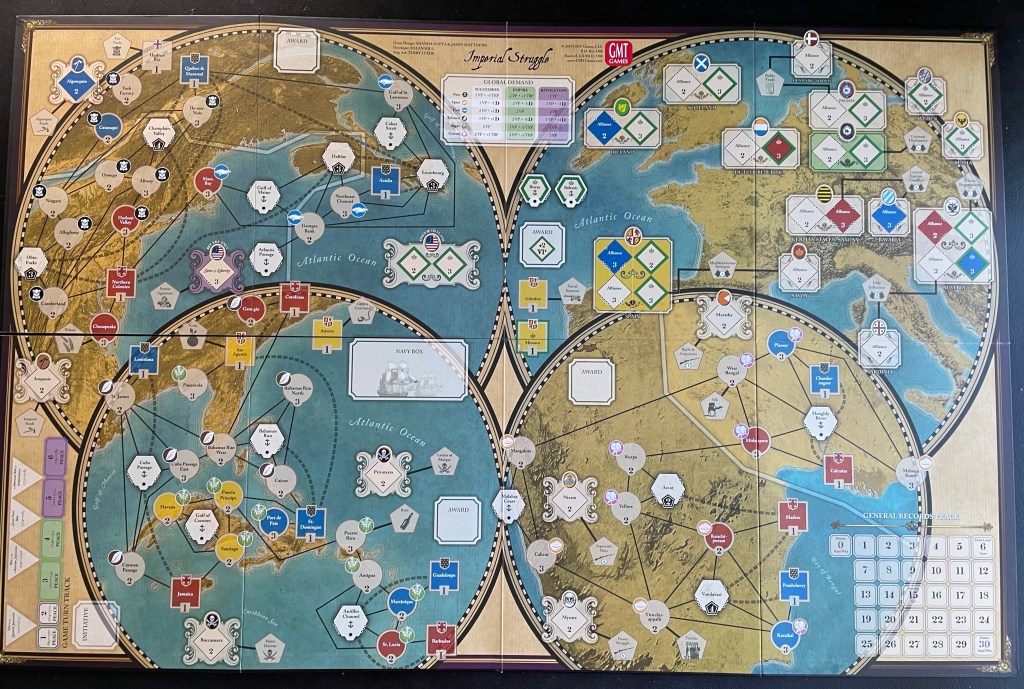
The four Regions depicted on the board are as follows:
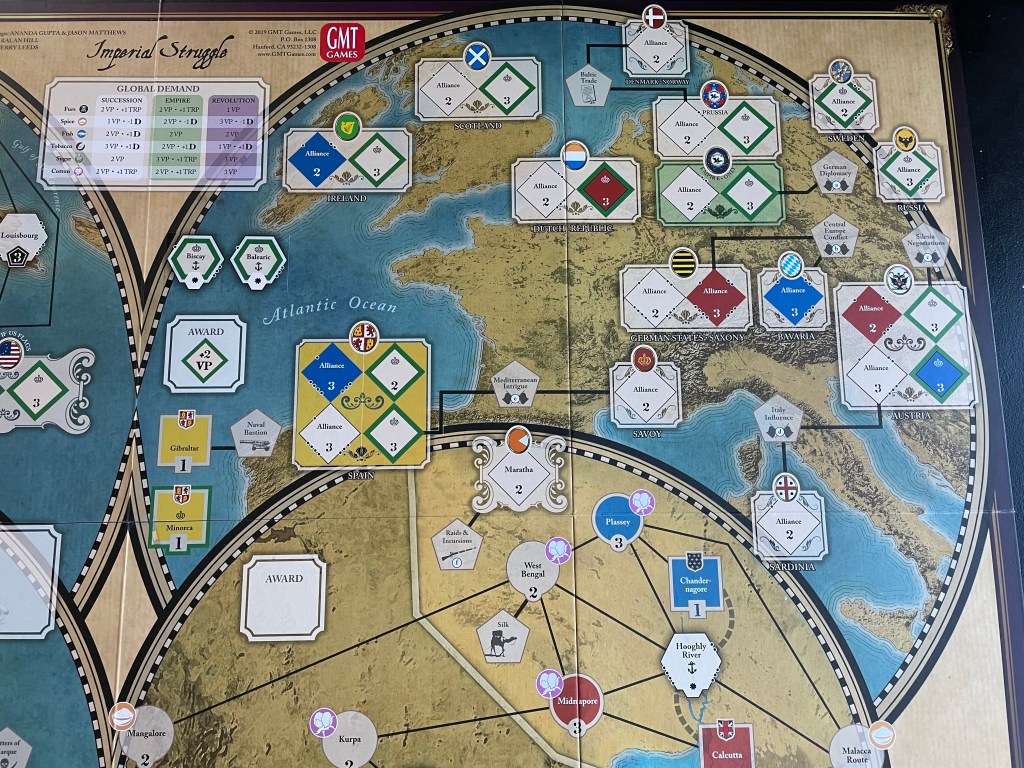
• Europe including Spain, Italy, Central Europe including the German States, Austria, Bavaria, Dutch Republic and Prussia, Ireland, Scotland and to the east Sweden and Russia. The European Region is very important as it is the source of a potential 2VP per round to the player who dominates the Prestige in the Region. There are a lot of Alliance spaces in Europe and these will grant bonus strength when resolving Wars, provided the country containing the space is on the Bonus Strength list for a given theater.
• North America includes Canada and present day Ohio east to the Eastern Seaboard. This Region is divided into sub-Regions using a white meandering line. The Region is separated into the Northern Colonies which are located to the south of the dividing line and contain Massachusetts, New York, Pennsylvania to the west as well as Maryland, Delaware, Rhode Island, New Jersey and Virginia. None of these colonies are explicitly shown or called out on the board but you can see the various areas clearly marked with circles named Chesapeake, Hudson Valley, Massachusetts Bay, etc. There are also some key forts called out in this sub-Region including Ohio Forks, Champlain Valley (Fort Ticonderoga) and Halifax. The other portion of the North America Region is Canada both north and east of the white dividing line. This sub-Region includes Quebec & Montreal and Acadia to the east. This sub-Region also includes several key ports and sea zones including the Gulf of St. Lawrence, Louisburg, Georges Bank and the Cabot Strait.

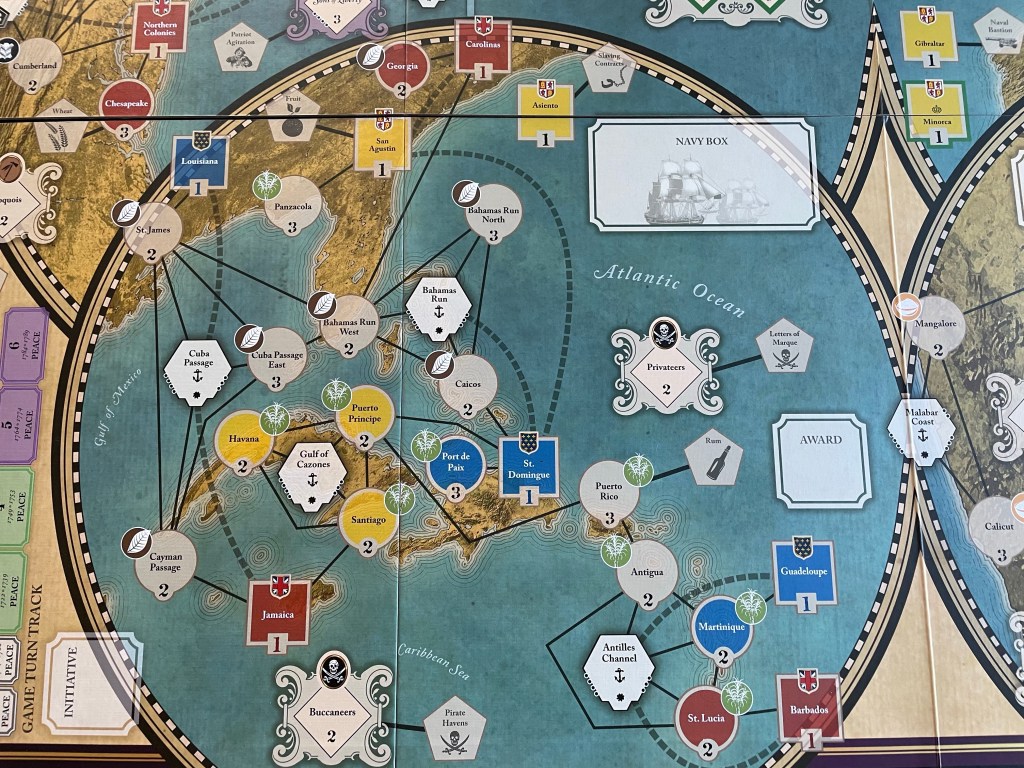
• The Caribbean includes the Southern Colonies such as Carolina’s and Georgia as well as key trading areas in the Atlantic Ocean and Caribbean Sea such as Florida, Louisiana, Cuba, the Bahamas, Jamaica and Puerto Rico. There are also two areas in the Region that allow the player to influence Buccaneers and Privateers in assisting with controlling commerce on the high seas. These areas are connected to Advantage Tiles that will grant a bonus to the player who controls them.
• The India Region is also divided into two separate sub-Regions similar to North America. The same white line meanders through the eastern portion of the Region to divide the Carnatic Coast from the Hooghly River. The Carnatic Coast sub-Region is located to the south of the dividing line and contains various key ports like Madras and Pondicherry. There are several different types of Markets here and Forts that can be built to protect them. This sub-Region also contains a few Alliance opportunities to gain access to Advantage Tiles from the Nizam and Mysore Tribes. The Hooghly River sub-Region is located to the north of the dividing line and contains several base areas including Chandernagore and Calcutta. The Hooghly River is represented on the board and serves as a Naval Port where players can locate a Squadron to protect their trade routes and Markets in the sub-Region. This sub-Region also contains one Alliance opportunity to gain access to Advantage Tiles from the Maratha Tribe.

I really like the relief elements for mountains and hills that Terry has added throughout the board. Here is a look at the way he addresses some of the grandest mountain ranges in Europe such as the Alps in France, Switzerland, Italy, Austria, Germany and Slovenia, the Pyrenees in France and Spain and the Carpathian Mountains in Ukraine, Romania, Poland, Slovakia, Hungary, Czech Republic and Serbia. They definitely stand out from the background tan color that is used to denote the land of the countries. They don’t have the detail that some of his other maps have had, such as with Campaigns of 1777, but they definitely stand out and add some flavor and depth to the board.

I also really like what Terry has done with the Seas and Oceans on the board with the wavy lines emanating out from the shore and the use of color to differentiate deeper water from the shallows. This gives the bodies of water a feeling of motion and energy as compared to just a flat blue color. They also really highlight well the shore as it comes in contact with the water and especially makes the islands stand out such as Corsica and Sardinia in the area of the Tyrrhenian Sea and the Mediterranean Sea.
As with any good wargame, there need to be the administrative aids on the board or in the player aids that assist with the game being played. There are a few different types of boxes included on the board such as the General Records Track that keeps track of Victory Points, Treaty Points and each Nation’s Debt Limit and Available Debt and the Game Turn Track that reminds the player when Wars will occur and what turn it is as well. The game consists of six Peace Turns, interrupted by four different Wars including the War of the Spanish Succession, the War of the Austrian Succession, the Seven Years’ War and the American War of Independence. If you look at the picture of the Game Turn Track below you will see that the first two Peace Turns and the War of the Spanish Succession makeup what is referred to as the Succession Era which covers from 1697-1722; the next two Peace Turns along with the War of the Austrian Succession and the Seven Years’ War are referred to as the Empire Era and covers 1722-1753 and finally the last two Peace Turns and the American War of Independence are referred to as the Revolution Era and covers 1764-1789.
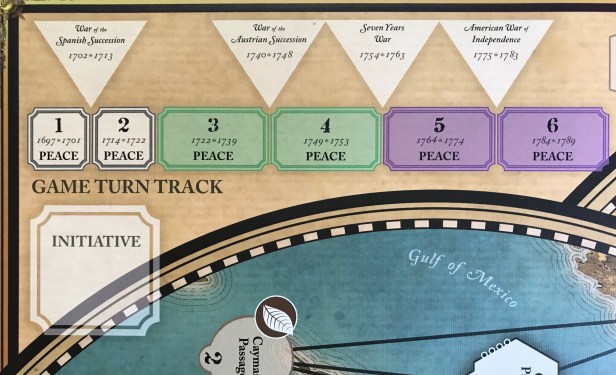
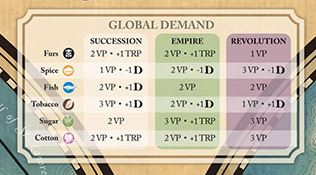
You will notice that each Era has a different color on the Game Turn Track and these colors coincide with boxes on the game board such as the Global Demand Box. Different VP’s will be scored for the same goods according to what Era it is when the scoring takes place. The colors as simply there to remind you of that fact. I like that Terry did this to really hammer home the connection. To me, it was a great graphic design choice to aid directly in the game being playable.
There is a Navy Box that appears in the middle of the game board and this is where players will place newly built Squadrons into before using Military Actions to place them on the map. At the start of the game, the British has two Squadrons in the Navy Box while the French only have one Squadron.
There also is an Award Box located in each of the four Regions. At the beginning of each turn, one Award Tile will be assigned face up in each Region. At the end of the turn the player controlling more flags and Squadrons in each Region will receive the associated Award Tile and score VP and take Treaty Points according to the tile. This tile is face up for the entire turn so that players know what it is that they are fighting for. Sometimes it might be wise not to invest so heavily into a Region that is not going to score Victory Points and place your flags and Squadrons into other higher scoring Regions. But, don’t let this be the only reason that you place your influence into specific Regions. You never want to get so far behind in a Region that you cannot possibly catch up. I like to spread my influence around the globe among the four different Regions and take a measured approach, only stacking up in a certain Region when it makes sense.

The four Regions have five different types of spaces located on the map that are used to control various goods and to dominate the Regions. These include Political Spaces, Market Spaces, Territories, Naval Spaces and Forts. Let’s take a look at these and how their graphic design fit in with the game.
Political Spaces
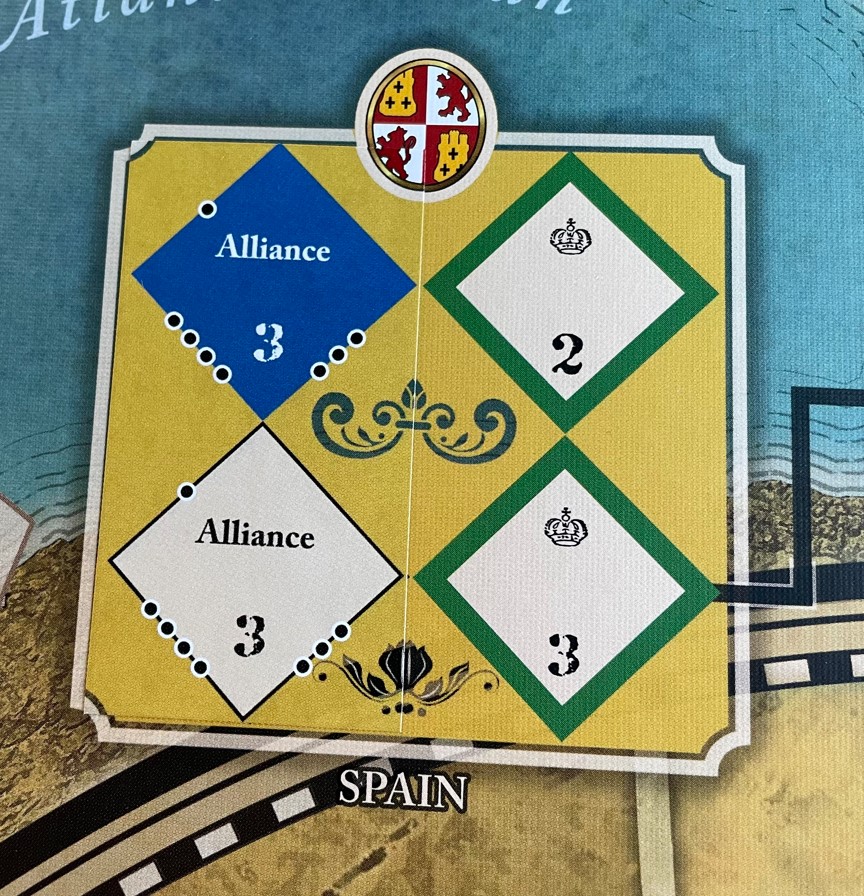
Political Spaces are diamond-shaped and represent understandings and agreements with important elements of different political entities. Each of these Political Spaces contains a number referred to as the Political Cost that represents the difficulty of obtaining these trade agreements. The game tries to model the effort involved in placing your influence into these spaces and represent your relationship with local political leaders and tribe chieftains as well as the amount of effort to reach these areas. Throughout the game, there will be game effects that can increase or reduce a Political Space’s Political Cost. This Political Cost though will never be lower than 1.
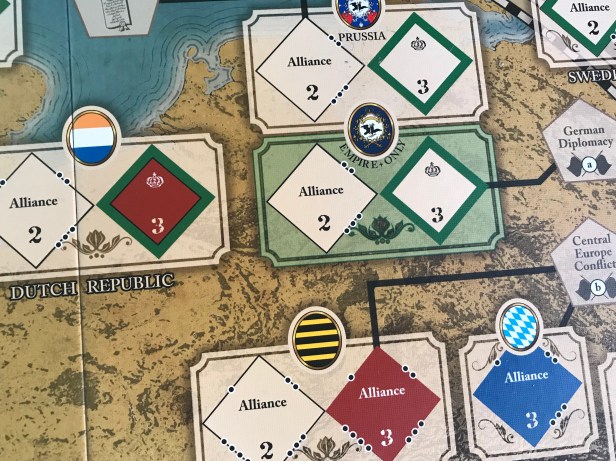
Some Political spaces are unavailable to the players at the start of the game and are color coded with the same colors appearing on the Game Turn Track that relates to the Era in which they are available. A good example of this is the Prussia Political Spaces. Here there are two spaces available at start, and two more below them that will become playable at the beginning of the Empire Era. These Political Spaces are very important and add to a players total influence in a Region when it comes time to score those Regions.

As you can see above, all the design and graphic elements come together nicely on the board to create a free flowing image that players can readily see what is going on. When markers are placed in spaces, you can still tell what the spaces are, based on color still showing, and their allegiance with symbols. It is just such a nicely coordinated effort to make sure the individual parts fit together to create the experience desired by the designer.
Market Spaces
Market Spaces are round spaces that represent the various trading infrastructure of each Empire including things such as trading posts, economic arrangements, shipping lanes, port facilities and other commercial assets. Each Market contains a number in the space that represents its Economic Cost.

This cost represents the expense and investment required to reach the good that is available in that area, collect the good and then transport it out to make use of the good in other markets or back in Europe. These Markets deal in various commodities that were demanded in the old world and include Fish, Furs, Spice, Sugar, Tobacco and Cotton. If a commodity is in Global Demand, then at the end of the turn the player controlling more Markets of that commodity will earn a reward as indicated on the Global Demand Table. I really like the choice for each of these commodities shown on the board. From the nicely laid out fur, to the sugar plants and the tobacco leaves, you can immediately connect what circles have what commodities with just a glance.

Territories
Territories are square spaces and represent physical control of the land. These Territories are different than Political Spaces and Markets though as Territories cannot change hands during Peace Turns as a result of Political Actions. They only do so as a result of Wars. Territories serve as an anchor point for expansion. The player can only expand into areas where they have influence normally but in the case of Territories they can expand into them as a result of the gaining of Conquest Points as a reward for victory in a War. If a player happens to lose Territories in a Region, their other controlled spaces are in danger of becoming isolated and can be lost.

Naval Spaces
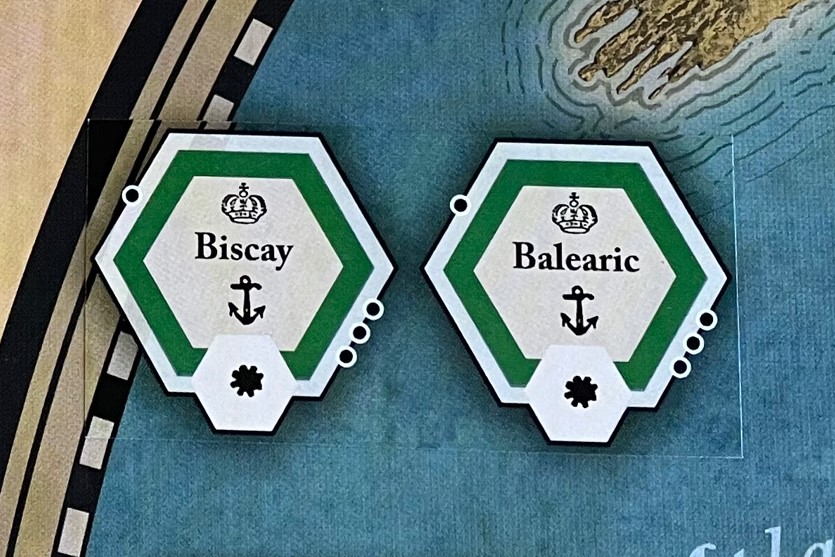
Naval Spaces are hexagonal spaces located in both oceans and on rivers or along coastlines and represent the opportunity to deploy sufficient naval strength to generate a military and economic advantage. The only way a player can take control of a Naval Space is to spend a Military Action and place a Squadron in that space.

Naval Spaces are marked with an asterisk at the bottom which means they have a variable cost. Placing a Squadron in a Naval Space normally costs 1 but if an enemy Squadron is present it will cost either 2 or 3 to displace that Squadron (depending on where the phasing player’s Squadron is. As with Political Spaces, some Naval Spaces have green borders and these are designated as Prestige Spaces, and likewise will count towards earning bonus victory points in Europe. Like Political Spaces, Naval Spaces also use dot indicators to show which Wars they will confer bonus strength in for easy reference.

Forts
Forts are hexagonal and represent well-funded military installations and logistical infrastructure for soldiers. Forts can become Damaged during Wars or due to various Events. A Damaged fort does not count towards the Forts strength bonus during war resolution, and can be Repaired by either player during a Peace Turn. Building a Fort requires Military Action and then adds to the total presence in a Region when scoring for control.

Conquest Lines
The final element we need to cover on the board is the concept of Conquest Lines. Conquest Lines represent a potential axes of advance in the Regions and are only used and relevant during a War Turn. The Conquest Lines appear on the map as dashed lines. In order to capture a Territory that has any Conquest Line connections, the player must first control at least one space connected to that Territory with a Conquest Line. Once a connection has been determined, they must then spend Conquest Points.
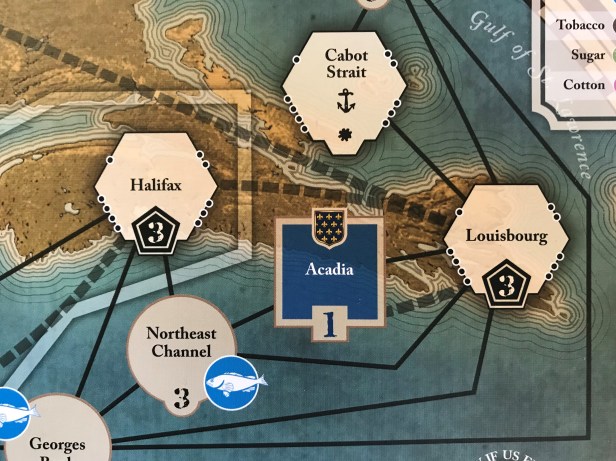
In the below picture, we will look at Louisbourg in North America as an example. Louisbourg has three Conquest Lines attached to it, including one from Acadia, one from Quebec & Montreal (not shown on map), and one from Halifax. The first two enable Louisbourg’s controller to seize the Territories they connect to in Wars as a result of Conquest Points. The third is used only when playing with optional rule 12.3 (Tougher Forts) in which case it enables the capture of Halifax. Halifax is a special area because it is really hard for anyone other than the French player to get to it as you have to control Louisbourg to get to it.
At the time of production, there were some errors found to exist on the board. GMT Games took it on the chin and vowed to make it right by sending those who bought the game an upgrade pack which includes stickers that could be affixed to the board correcting the errors. There were two such stickers included in the pack. One was a replacement for two Naval Spaces in the North Atlantic including Biscay and Balearic and then a few Political Spaces in Spain. As you can see with the sticker for the two Naval Spaces I was unable to get it to line up 100% correctly and there is a bit of obvious offset on the left side of the spaces. It also had a slightly color bleed edge on the right of the sticker which caused it to stand out against the backdrop of the ocean. But from a distance, you most likely will not even notice it unless you know what you are looking for.
As for the Political Spaces, I was able to get that sticker to line up a bit more with the border but as you can see I failed to trim off the point that now protrudes into the blue ocean. The rest of the sticker matches up pretty well but you can see the seam that it leaves against the yellow background. All in all, not a big deal but I was grateful that GMT put the effort out there to correct the issue.
If you remember at the beginning of this piece, I said that I was none too impressed with the board upon first glancing at it. Now, after playing the game and actually understanding how things work, I am really impressed with the way this board has been laid out to take advantage of some historical situations and to encourage certain strategies. The game is really designed around the board and its layout and the various graphical elements used really enhance the thematic immersion of the players in this titanic global clash between the super powers of the time. As the game unfolds over the course of 6 Turns, players will be rewarded for their understanding of how their holdings and political alliances will benefit them and how they can be effected by the outcomes of War. This game rewards long term planning, and especially planning with an eye toward connections. You can keep your opponent boxed in with the appropriate capture of a Fort, placing a Squadron in an area and utilizing alliances with tribes to perform more efficient actions.
Here is a look at our unboxing video for Imperial Struggle: The Global Rivalry – Britain & France 1697-1789:
We also did a video review and you can watch that at the following link:
The next board that we will take a look at in the series is Stilicho: Last of the Romans from Hollandspiele designed by Robert DeLeskie and illustrated by Mark Mahaffey.
Here are links to the previous entries in the series:
Kekionga!: A Dark and Bloody Battleground, 1790 from High Flying Dice Games
Campaigns of 1777 in Strategy & Tactics Magazine #316 from Decision Games
Battle Hymn Volume 1: Gettysburg and Pea Ridge from Compass Games
From Salerno to Rome: World War II – The Italian Campaign, 1943-1944 from Dissimula Edizioni
This War Without an Enemy: The English Civil War 1642-1646 from Nuts! Publishing
Holland ‘44: Operation Market-Garden, September 1944 from GMT Games
Maori Wars: The New Zealand Land Wars, 1845-1872 from Legion Wargames
-Grant

I really appreciate Imperial Struggle board; it is pretty unique, fills the whole area – almost no tables there, just playing surface.
LikeLiked by 1 person
Fine recap of the unusual utility of this ma and it made me hungry to play again. Unfortunately my box is in Georgia and I’m going to remain here on the Vietnamese coast for the next 6 weeks!
Shoulda brought along South China Sea I reckon.
LikeLiked by 1 person
Great Job! This is in my top 10 Games of all Time!
LikeLiked by 1 person
A great game; even if I can never seem to win as the British.
LikeLiked by 1 person
Your video review is fantastic (another game you caused me to buy 😉) however is there any reason your unboxing and review videos are NOT linked in BGG Videos section?
I think your review would be very helpful, and BGG is the first place I looked.
LikeLike