I enjoy wargames. I also enjoy really great thematic wargames that teach me something that I either don’t already know or don’t know much about. Comanchería: The Rise and Fall of the Comanche Empire fits into both of these categories. The game’s designer Joel Toppen is a true devotee to this game and its premise as he currently resides in Montana and lives among the Blackfeet Nation on the Reservation as he works as a pastor. I also follow him on Twitter and really enjoy his great videos summarizing his play of various wargames, most recently another GMT title that I have interest in Unconditional Surrender! I say this with the greatest level of respect, but he scores pretty high on the “geek scale”. I am also on that scale but don’t have the faculties and abilities that Joel seems to possess. Why am I even bringing this into my review? Well, I want you to know that this game is well designed and has a real basis for realism as the designer made sure to discover as much as he could about the Comanche through hundreds, if not I am sure, thousands of hours spent by Joel in researching this topic to create the playable masterpiece that it is.
What is Comanchería About?
If you didn’t know, the game was released in 2016 and is the second game in the “First Nations” series. Like its predecessor Navajo Wars, Comanchería is a solitaire only game in which the player plays from the Native American tribe’s point of view. In Comanchería, the player takes command of the Comanche nation, referred to as the Lords of the Southern Plains, as they controlled most of the area making up present day Texas, New Mexico, Oklahoma and Kansas, and must strive to fight off enemies and preserve their way of life and most importantly their Comanche culture from 1700-1865. The player must drive hostile tribes from the southern plains, establish dominance over the region, set up trade networks with both friendly tribes and colonial powers, and finally defend all of this against relentless military and cultural attack.
I have played the game 5 times now. I will admit that it took me four times to win the introductory scenario “Onto the Plains”, which covers only the period of 1700-1749. I have played the second scenario titled “Rise of Empire” once, but found it to be much more difficult than the first scenario and as such, I quickly succumbed to one of the famous Culture Attacks, but more on that later. The game is good and really was able to hold my interest as I had to work my way through the Sequence of Play to get comfortable with how it flowed. I think it is important to give you a feel in this review for how the game plays by going over some of the actions available to a player.
During a players turn in the Sequence of Play, the player can take four separate large categories of actions, including Take Actions, Culture, Planning and Passage of Time. I will say this before I go any further . This game is a little bit deceptive in its attempt to take you back into history. As I have played the game a few times, at first it is very difficult to understand how the AI is working and what it is that your enemies are trying to do. As the game is a wargame, intuitively, you are lead to believe that you’ve “got this” as you send out your small Bands of braves to attempt to eradicate every village and colonial settlement that you can see. But understand this. You will never be able to eradicate everyone through brute force. The odds are simply stacked against you. Raiding is very important and is vital to a good start toward your goals and also to withstand the amount of Culture Attacks that will come your way. We have not talked about this yet but as you Raid, you will draw chits from a cup that determine your success or failure. There are a total of at least 22 counters in the cup, along with some that are added for each scenario. Among this total, there are only 10 Success counters, so as you can see immediately, at best you only have a 45% chance of success, with a 55% chance of failure. And, when you draw a Success Counter, it will NOT be returned to the draw cup but is placed with your Mahimiana in one of your Rancheria, thereby lessening your odds of drawing another Success counter. So, as you continue to Raid, your odds of success will decrease and you can’t possibly draw enough to win all of the battles before you. So, how do you win if not through Raiding? Well, you have to Raid to keep your enemies at bay but you will truly win through making friends with the other tribes around you, by building up your Culture Points and your Military Points and through the shrewd use of Development Cards. We will discuss this a bit later but keep it in mind as we go through the actions.
Take Actions Phase
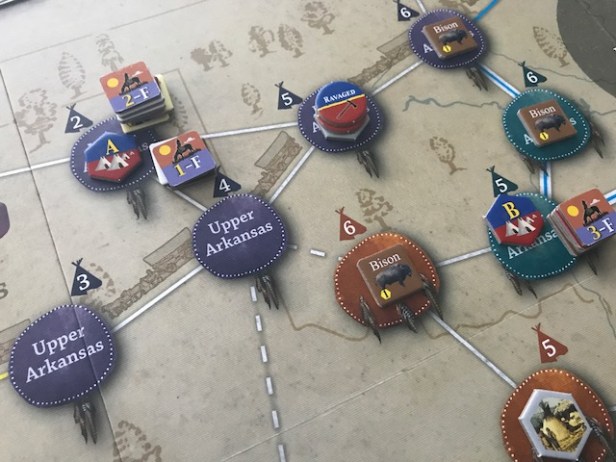
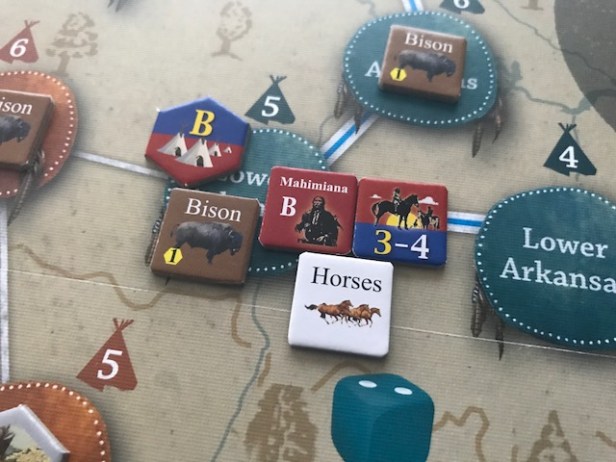
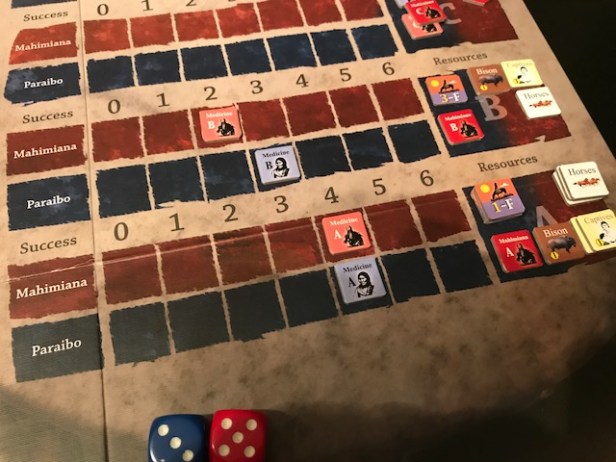
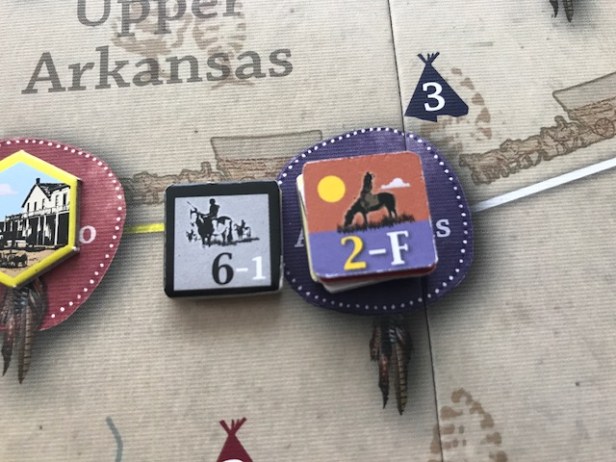
During the Take Actions phase, the player has the choice to activate their Bands located in various Ranchería and have their choice of performing the following: Hunt, Move, Raid and Trade. When a Band is activated, they gain Movement Points equal to their movement allowance listed on the counter. In the picture shown above, the 3-4 Band has 4 movement allowance. As long as the player has Movement Points remaining, they can continue to take actions. If a Band contains extra Horses counters, these counters can be sacrificed or used in order to gain one additional Movement Point per counter for that Band but this is not necessarily recommended as you are giving away your precious resources to only gain a temporary bonus.
Two of the actions that I want to highlight are Hunt and Raid. Move is pretty straight forward as mentioned above and Trade also wont necessarily happen soon into your games as you have to have resources to trade. To Hunt, a player simply equips a Band with a Horses counter (as this Horses counter makes them more movable only requiring one Movement Point to move one space versus not having a Horses counter and requiring two MPs to move one space) and has the option of also bringing along their Mahimiana or Headman as it will make their actions more efficient. The Band then must move into a space that is occupied by a Bison counter and simply spends 3 MPs to Hunt and take possession of the counter. No rolling needed which I was surprised by. If a Band has a Mahimiana, the Hunt action will cost less Movement Points to take, dropping from 3 to 2 MPs. The player then has the option of moving again to another location or using their remaining Movement Points to get back to their Ranchería. Players need to Hunt as they gain the meat and hides that can then be used to Trade for goods with other Allied tribes in order to gain higher valued commodities like Trade Goods or Food tokens, which can provide a reroll of combat dice during a battle with an opposing War Column or the ability to increase the Ranchería’s population during the use of the Passage of Time action.

In order to Raid other villages or settlements, a player must also equip a Band with Horses and can take along their Mahimiana as well as they will then get to draw additional chits from the draw cup to determine success. The target space has to be an Enemy Space or a Peace Space and the player must expend one MP to initiate a Raid, and when the player enters, they will have to then perform a Success Check by drawing chits blindly from a draw cup as mentioned earlier. The number of chits that may be drawn are determined by the active Band’s strength. In the picture above, the 2 strength Band will allow for two chits to be drawn as a base. If the Band has a Mahimiana counter with it, as the Band pictured does, it will then get an opportunity to draw additional chits, and remember, drawing more chits, can result in more successes but also will reduce your chance for later successes and can provide the AI enemy with additional Action Points. The player will roll a die and then compare the result with the medicine of his Mahimiana. In this example, the Mahimiana’s medicine is a four and I rolled a die and got a result of 1, which is then compared to the medicine and if less than the medicine, you can draw one bonus chit but if less than half, you will be granted an additional bonus chit draw. So, in this example, I was able to draw four chits from the cup for my Success Check and I got 2 Success! chits but also drew a total of 6 Enemy APs that are placed in the Available Enemy APs Box for use later by the AI opponent.


Culture
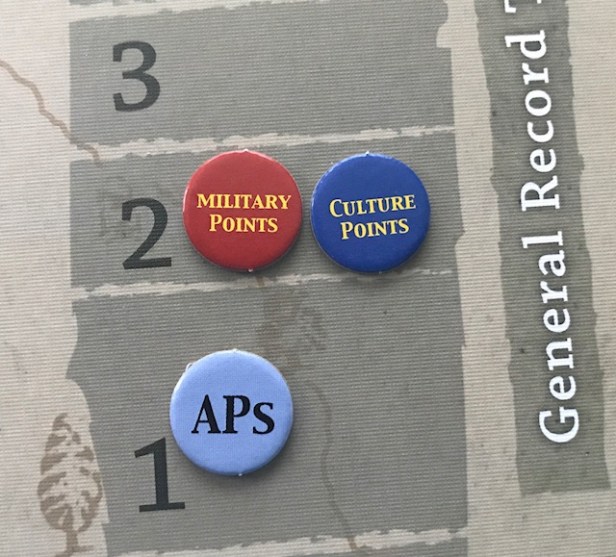
This Operation allows the player to collect Culture Points. What are Culture Points? Well, they are a theoretical and abstracted part of the game that simply represents time being spent to build and develop the Tribe’s cultural identity. As one of the elements of the game that is very key to success, and by ignoring it, can lead to a quick defeat, culture doesn’t necessarily do anything for the player. I shouldn’t say that it doesn’t do anything as it does help you to survive to fight another day and provides you currency to purchase Culture cards, but really, it doesn’t do anything for a player. In the five plays for me, I have lost the game four times because of Culture Attacks by the enemies. This is a part of the game that must be focused on but is very hard to do as it really is a waste of a turn. I can’t tell you how many times I have begrudgingly taken this action because I know that there is a chance for a Culture Attack to come soon (by simply looking at the Enemy Instruction Display) but could have done so much damage to my enemy. But that is one of the more tactical elements of the game, understanding when you can fight and when you should prepare.
When you use the Culture Operation, you simply gain 1 Culture Point for each Territory containing at least one of your Ranchería as well as an additional 1 Culture Point for each Comanche controlled Territory. Control refers to the fact that you have at least 2 Ranchería in a region (such as the Lower Arkansas) and that there are no enemy tribes or settlements. I have generally only been able to get a few Culture Points for this action but once got 6 as I had controlled 2 Regions and had 4 Territories with Ranchería.
After using the Culture phase, if the Operations counter is in a numbered space players will roll a die and if less than or equal to that number, the counter will move directly into the “Must do Passage of Time” space. If the counter is not in a numbered space yet, it will simply move one space closer. This is the game’s timer and is very important as you will need to plan properly in order to be able to force a Victory Check when needed in order to end the game.
Planning
This phase is a very important one and allows players to expand their power base and create new warrior Bands to spread their control. This action phase also allows for players to improve the medicine of their headmen and take very powerful Headman Actions, as well as move their Ranchería counters around (remember the Comanche were nomadic and could easily move their base toward the Bison herds, or other settlements or villages to more easily trade or conduct warfare). Another neat thematic element in this phase is that the player can take a gamble or press their luck. Each in-play Ranchería may either taken one Headman Action or can roll a die to attempt to take more than one. This is done by rolling a die and comparing that number to the medicine of that Ranchería’s Paraibo. If the number is less than or equal to the medicine, the player gets to take that many Headman Actions. But the risk is that if the roll is higher than the medicine, they will get to take no actions. This is an important risk though as taking 3-4 actions is way more effective than either one. But, taking zero could be really bad as well. I like to make sure my Pariabo has at least 3 or 4 medicine, as this really makes the risk worth it. If I can only for a 3 or 4, then I will get to triple or even quadruple my actions to take.
The Headman Actions are as follows:
Collect 1 AP: This is a simple one as if your Paraibo has at least 2 medicine, you reduce it by 1 and collect 1 AP or Action Point. These Action Points can be used during the Take Actions phase in order to take an additional action that round by paying for its cost with APs. This is very key to being efficient and taking as many actions as possible, to either gain ground on your enemies or to prepare for an upcoming Passage of Time Victory Check. You can also use these APs as a form of currency to purchase Development Cards.
Buy a Development Card: Spend APs to buy one of the face-up Development Cards that is eligible for purchase (some cannot be purchased until certain Events come up). These cards are important as they provide special actions or additional abilities.
Return 1 Success to Draw Cup: Sometimes your Success! counters will be moved to the Out of Play box and cannot reenter play until you take this action. You will simple spend 1 AP to place an Out of Play counter back into the draw cup. This is important because it will improve your odds of drawing Success! counters when doing a Success Check (refer to earlier discussion for more detail).
Convert Culture Points into Military Points: If you ever have more Culture Points than Military Points, you can take this action to convert 1 Culture Point into 1 Military Point. This is important because the Military Points are a back up to your Culture Points in withstanding Culture Attacks. If you ever lose all of your Culture Points as well as your Military Points, the game will end in an immediate loss.
The rest of the phase involves increasing the medicine of your Mahimiana and Paraibo with Success! counters on their tracks, reducing the strength of your Finished Bands (this is thematic as your braves age and die) and moving around your Ranchería. The Planning Phase is very important as it is how you advance your tribe and gain greater ability to spread your influence and protect your empire. This phase also will end with a die roll and the movement of the Operations counter closer to the “Must do Passage of Time” space.
Passage of Time
This Operation is very key but you don’t want it to happen until you are ready for it. During this phase you will be able to return Success! counters to the draw cup, create new Bands and add new Ranchería to the board. There is a down side though as each player must conduct a death check for their headmen.
The player may also spend his accumulated resources (see the stacks of Horses, Captives and Bison in each of the Ranchería pictured above) to create new Band counters. This action costs Population points equal to 1 + the number of new Bands already created in this Ranchería this step. These new Bands are added as 1-strength Bands in that Ranchería. The player can in addition increase the strength of existing Bands in the Ranchería by spending resources. Each Population point increases that Band by one strength. Notice in the picture that the Population points are shown in the bottom left hand corners of the resource counters.
Players can also place one new Ranchería in a space where a lone Band is located. This takes planning to complete so you need to be aware that a Passage of Time step is potentially upcoming. Adding Ranchería is good but it becomes more difficult to control your empire as you can still only activate on Ranchería to take actions. Also, the more territories that are Comanche controlled, the more options there are for enemy war columns to attack which can also cause you to lose the game.
At the end of the Passage of Time phase, settlements and villages that have Ravaged counters on them are removed from the game and placed back in the stock. This is the only realistic way that the Comanche have the ability to gain control of regions or to remove threats in colonial settlements. This must be planned for and remember to always keep the heat up on these enemies as you will eventually get rid of them in this step. The player will also return all Success! counters in the Out of Play box to the cup (this is key remember) and will have the chance to purchase one of the Culture Cards.
Enemy Instruction Display
As a solitaire only game, Comanchería has a very well designed and fairly easy to use AI control mechanic. Over the time period depicted in the game, the Comanche people were beset by various enemies from each direction. In the design, the enemies are simply identified by the cardinal direction from which they came including North, South, East and West. Typically, the North enemy represents hostile tribes toward the Comanche including Apaches, Wichitas, Tonkawas, Pawnee, Cheyenne, etc. while the South, East and West represent different Colonial Powers controlling that enemy. If the counters are marked with a Burgundy Cross flag, these are Spanish colonials. There are also Texian, United States and Mexican markers. These different enemies are controlled by the Enemy Instruction Display.

The Enemy Instruction Display has four enemy columns color-coded with each of the previously mentioned enemies as well as an Inactive Column. At the start of the game during setup, these counters will be placed on this display and will be moved around during the game as play progresses. Each of these spaces can only contain one counter as there is no stacking allowed and different colors cannot be moved or placed in other colored rows. As you can see from the picture, each of these counters has a name, an alphabetic ID (listed as A-F) and a numeric AP cost. These instructions may be executed as a part of several different actions, which include during step 3 and 4 of the Operations Cleanup Phase, during step 8 of a Planning Operation or when an instruction is drawn from the Success Check Draw Cup during a Success Check.
For simplicities sake, I am going to walk us through the process of the Enemy Instruction Display during step 3 and 4 of the Operation Cleanup Phase in order to give you a taste of how it works. If the enemy has at least 1 AP available to spend during this phase, players will roll a die and compare that result to the Enemy Action Table pictured on the History Card. In the picture below, you can see that I rolled a 3, which corresponds to the West (yellow) enemy on the table. This roll will identify which of the enemies will activate and get to use the available APs to take actions against the Comanche during this phase. Only one of the enemies will activate and that enemy will use all of the available APs to perform actions (notice that the East is not active during this time period). Remember that these APs come from the Success Draw Cup as you are performing actions such as Raid.

The next step is to roll another die and compare its result to the numbers listed as red die faces down the left edge of the Enemy Instruction Display. This roll will determine which of the counters in the active enemy’s color will be flipped to its opposite side. This action gives some variety to the various actions available and will also open up more powerful actions than ones listed at the start. In the picture used at the beginning of the paragraph above, you will notice that the roll on the red die was a 5 which equates to the Settle action in the West column (yellow).
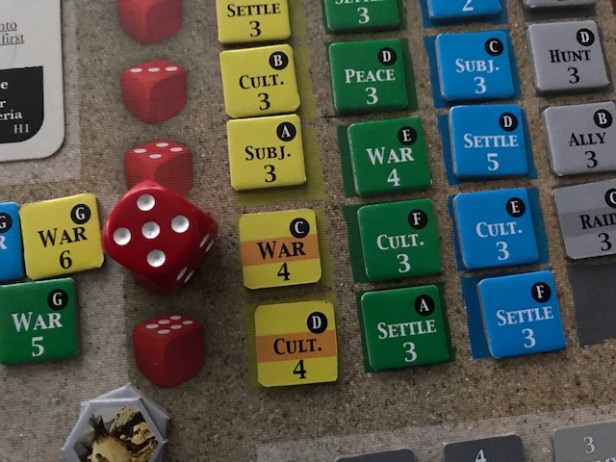
The result directs the player to flip the chosen counter in the five position from its Settle 4 action to a new War 4 action. This roll doesn’t decide what actions will be taken this turn but forces a change in the actions that may be taken during a later turn to add some variety and a little bit of uncertainty. The player then totals the number of Available Enemy APs, in this example there are 7 APs, and then simply starts at the top of the identified column (in this case the West enemy column or yellow) taking the actions that it can afford for the turn.

Once again, you will have to look at a few pictures above, but the West enemy can afford to do several actions including Peace for a cost of 3 APs (will not allow a War action to be fully executed) and Settle for 3 APs (place a Settlement counter of the enemy color in a space determined by a list of priorities) but will not be able to afford Culture for 3 APs (take away Culture Points from the player, which is really bad as it can end the game and takes your resources that could be used to purchase new Culture cards to improve your abilities) or Subjugate for 3 APs (remove a targeted Tribe counter and/or place a new Settlement of the active enemy color). At that point, there will not be enough APs to pay the minimum cost of the next available action so the turn will come to an end and the display will be reset. When actions are used, they are simply slid to the far right Inactive column and kept in the same order as they were played in. When the turn is done, the remaining unused actions in the column will simply be slid up to the top of the column in the same order they were and the inactive column counters will be used to fill in the now open spaces starting with the counter at the bottom of the Inactive Column. In this way, the available actions will change each round giving the game a sense of uncertainty for the player as it will be impossible to truly plan for the actions that will be taken against them in future rounds. I really liked this “Fog of War” aspect as it made my decision making steps very challenging. You must also keep in mind that the AI is “learning” from your play style and is gaining more and more fuel to attack you as you attack it. Each time you Raid, you invariably pull out at least 1 or 2 Enemy AP counters that are then laid on the Available Enemy APs track for them to use during their turn. If you give them too much, it will lead to them overwhelming you with War actions, Culture Attack actions as well as Subjugation of your Allies. You cannot go all out in this game as you will simply be run over by the wave of APs you have given to your enemies. Tread lightly, always with a purpose and be watchful!
A really well designed aspect of the game that keeps you guessing. Not only do you not know which column will activate (as it is determined randomly by a die roll) but those actions will change each round as die rolls will instruct you to flip a counter over to its opposite side. I have a good memory and can generally remember aspects about a game but I cannot keep track of all four of the columns so there is a really great sense of unease as you play. What will happen next? Well, you just don’t know because you will roll dice to determine that action. How will I deal with that upcoming Culture Attack? You will need to plan for it, and I would recommend planning for it each round.
What I Liked About Comanchería
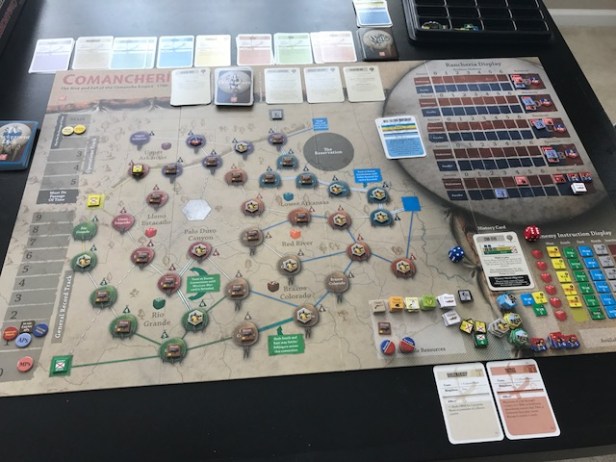
Components – As with all other GMT Games I have played, the components are top quality. The mounted map board, while it looks very busy and confusing, is really very well laid out for the function of the game. The spaces are big and there is plenty of room between the point to point movement areas. The colors used to differentiate the regions are well chosen and the thematic backdrop showing the rocks, canyons and rivers in the area is very attractive. This is actually a map that appears to approach the quality of the Liberty or Death map, but not quite. LoD’s map is just a masterpiece!
The counters are very thick and sturdy, and while simple, are very well done. With any solitaire only game, the player aid cards must be excellent and those provided are EXCELLENT! There are two cards, containing a lot of writing on them, but they are organized well and after a few turns will (almost) completely replace your need to reference the rulebook at each action. Five plays in and I have still had to reference the rules.
Thematic Feel of the Game – I loved the theme of the game. I could truly feel the theme as it is very well integrated into each aspect of the design. From the early struggle to gain resources, to the inevitable need to make the choice to begin Raiding your neighboring villages and even attack the Colonial settlements, I pained over each and every decision. After a few plays, I loved how I learned how the game either rewards or punishes you for your decisions. As was mentioned above, too much Raiding leads to low chances of Success but is important as you need to make sure you are placing Ravaged counters as they stop the enemies from executing certain instructions in place of removing a single counter. Genius! I finally learned that I needed to really work hard to get Ravaged counters on the enemy that is going to come up most often on the Enemy Instruction Display. I also loved the resource management aspect of the game as I could feel the painful need to seek out food, but also to continue gaining new resources such as Captives and Horses to be able to trade for Food to increase the size and power of my Bands.
One of the major reasons that my blog mate Alexander and I play these wargames is that we want to learn something. I was totally blown away by the experience that I had with this game from that perspective. I found myself doing research online after each play to understand better the challenges that the Comanche faced. I learned many new things through the lens of cardboard counters and plastic dice and I am looking forward to continuing that education into many games in the future.
Enemy Instruction Display – I won’t rehash this part here, as I spent considerable time above, but the Enemy Instruction Display was my favorite part as I could really see how this process worked and how it ensured that I would have a real challenge each and every time I play the game. I actually read where the designer Joel Toppen received this element as an answer to a prayer as he was stuck and I believe that this was inspiration from on high as it simply works divinely for this design.
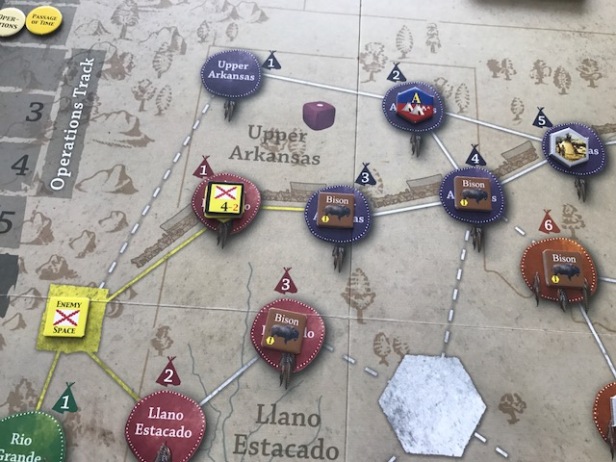
Battle Mechanic – Battles only happen in the game during the War Column Phase, which is a part of the Sequence of Play that only happens if there is a War Column out on the board. The Battle mechanic is really pretty simple and I will use the picture below to illustrate the process, which shows a Finished 2-strength Band against a 6-1 War Column from the North. First off, if a battle occurs in a space with a Ranchería, the player gets to pick which of the Bands in the Resources Box of that Ranchería will take part in the fight. If the Battle is out in the regions, the Band that the War Column encountered will have to fight. The Band can take possession of whatever Resources they have in the box including Guns, Horses or Mahimiana counters in order to make their chances of winning greater.
The player simply rolls one die (or two dice if they use a Guns counter choosing the highest number) and then modify that number by various conditions including + Band strength (in this instance a +2), +1 if the unit possesses a Mahimiana, -1 if the Band is on the Finished side and then – the Battle modifier on the War Column counter (in this case -1). So, in this case the total roll modifier is a +1 (+2 Band strength + +1 Mahimiana + -1 Finished + -1 Battle modifier of War Column). The result is then compared against the score of 6 and a winner is determined. If the modified roll is greater than 6, the Comanche win the battle and the War Column is reduced and if it’s strength is still greater than 0, the Battle continues with a new modified die roll. If the roll is less than a 6, the War Column defeats the Comanche and it is reduced to the next lowest Band type (in the picture, if there is a loss, it will be reduced to a 1-6 Band). In the picture below, I actually was able to defeat the much more powerful enemy War Band as I got lucky and as it was reduced, my bonuses increased to the point where I was rolling higher than a 3 and I would win. Really easy and simple to understand and follow. I really liked the Battle procedure very much. I actually let out a war whoop at the end of the Battle upon realizing I had defeated the invader! I am glad that the game doesn’t have a more complex Battle procedure as I don’t believe that is really what the game is about. Rather than trying to build a war machine to dominate the Southern Plains by force, the Comanche were not an all out militaristic and bloodthirsty people but simply took a more defensive posture that simply attacked when threatened and defended their families and villages to the death. This game is about surviving the experience rather than conquering it.
What I Didn’t Like About Comanchería
Difficulty – I have said this before, but the hallmark of a good solitaire game includes whether or not it is a challenge. This game IS definitely a challenge. I realized that after my very first play when I was dusted by the West enemy’s Culture Attack and I really couldn’t see it coming. I could see it was an option from the Enemy Instruction Display but I didn’t really know the power that it had. Well, I found out and still lost my next two games to this vicious attack but I finally figured it out and was able to change my tactics to beat that part of the game. I still partially believe that this game is very difficult to win and am interested in hearing your experience with it.
Not Understanding Where to Go During 1st (or even 2nd & 3rd) Play – For all of the detail offered in this game, and for the very deep and well thought out rules, I was initially really disappointed that the scenario booklet, other than the Example of Play, didn’t offer any form of suggestions or advice on how to prosecute a strategy. I was truly left on my own and had to learn as I failed. And fail I did, as I have already mentioned that I lost my first 3 games and really got lucky in winning my 4th game. I think that I initially thought this was a weakness of the game but after playing, I realize that I learned quite a lot and really was able to understand the different aspects of the game form my losses so I could eventually formulate a winning strategy. I have thought about writing one of our Strategy & Tactics posts on this game but have hesitated because I just don’t know that I really understand everything yet. Maybe in the near future.
Summary/Conclusion
As you may have been able to glean from my words, I really have enjoyed my plays of Comanchería: The Rise and Fall of the Comanche Empire from GMT Games and look forward to exploring the game over many future plays. I feel that this game is very well designed and has difficult yet balanced game play, once you are able to figure out the rules and understand the nuances of the hidden strategy. I also really enjoy the approach taken with the AI and how it is learning from your actions and is fueled by the way you play the game (remember that as you Raid more, you will be drawing more AP counters that provide the AI with additional actions). Replayability is also very high with 6 different scenarios to choose from.
One of the elements that I judge games by is the fun factor and whether or not I WANT to play the game again immediately after finishing. With Comanchería, the very moment when I have lost, I set the game right back up and simply tried again. This game is highly playable, very involved and most importantly fun. I would recommend this game to any player that enjoys deep and involved solitaire wargames, and really to anyone that enjoys historical simulations, as there is a lot of return here for your time.
If you are interested, here is a link to the Unboxing Video for a closer look at the components, as well as my recent Video Review.
-Grant

I would be very careful of drawing historical conclusions from board wargames. The best you can do is draw conclusions about the designer’s historical assumptions, which are two different things.
LikeLike
I thoroughly agree that war-games can help increase your knowledge of historical topics. Not just from the game itself, but if it is an interesting subject then I’ll follow up with reading too. Yes, the game designer may have their own viewpoint – but anything that encourages interest in these topics should be welcomed.
LikeLike