
Continuing along in this series devoted to the best looking boards found in the wargaming world where I will highlight the art and layout of a different board in a wargame that we have played to show you the various talents of the artists and graphic designers involved. In my humble opinion, a well designed and attractive board can make all the difference in the world to me enjoying a wargame. Don’t get me wrong, the game has to be good, but if it’s also good looking it always is a better experience. A board can draw me in. Can make me feel that I’m there. Can set the stage for the thematic immersion that we all crave. And I have found many of these type of boards and I want to make sure that I share them with you.
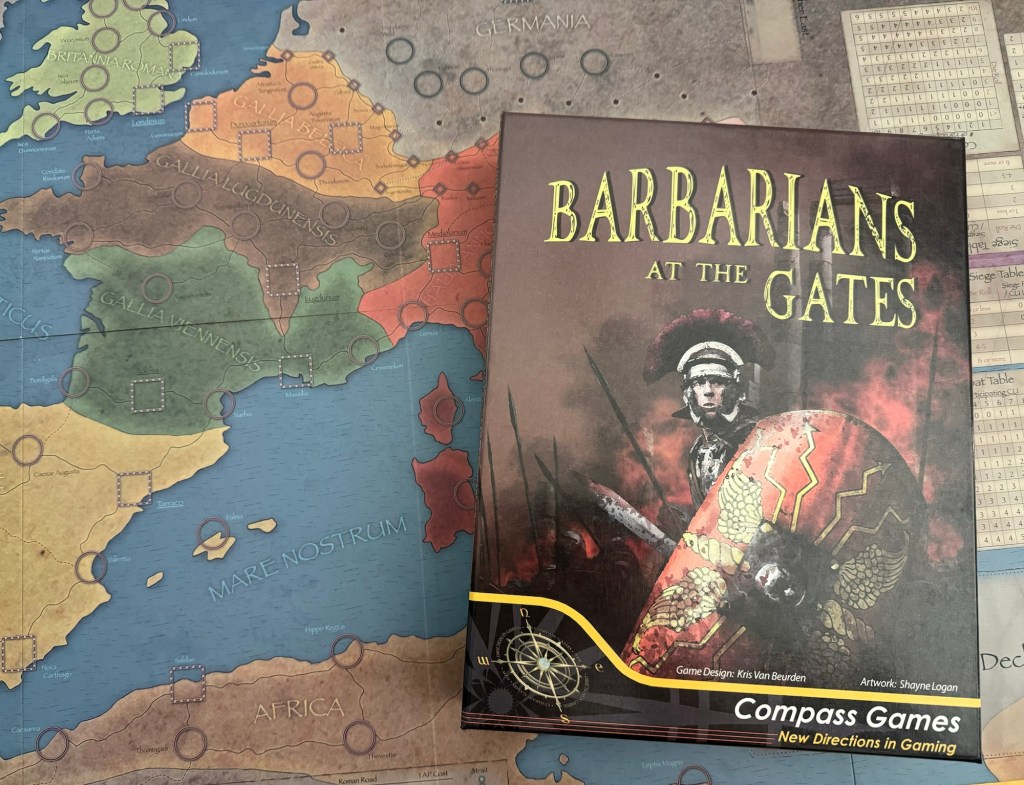
A few years ago, we played and really liked a game called Barbarians at the Gates, The Decline and Fall of the Western Roman Empire 337 – 476 from Compass Games. The game is a card-driven game for two players set during the final hundred plus years of the Western Roman Empire as the Barbarian tribes in the north, and other climes, came down with a vengeance as they clashed with civilization and carved out their place amongst it. The time period covered in the game is from the death of Constantine the Great (337 AD) to the deposition of the last Western Roman Emperor by Odoacer in 476 AD. The Roman player will command the Roman legions loyal to the failing central authority and those Germanic peoples who have settled peacefully inside the Roman Empire, while the Barbarian player leads Usurper Emperors, and controls the migrations of the savage Germanic peoples, who are the Barbarians at the Gates.
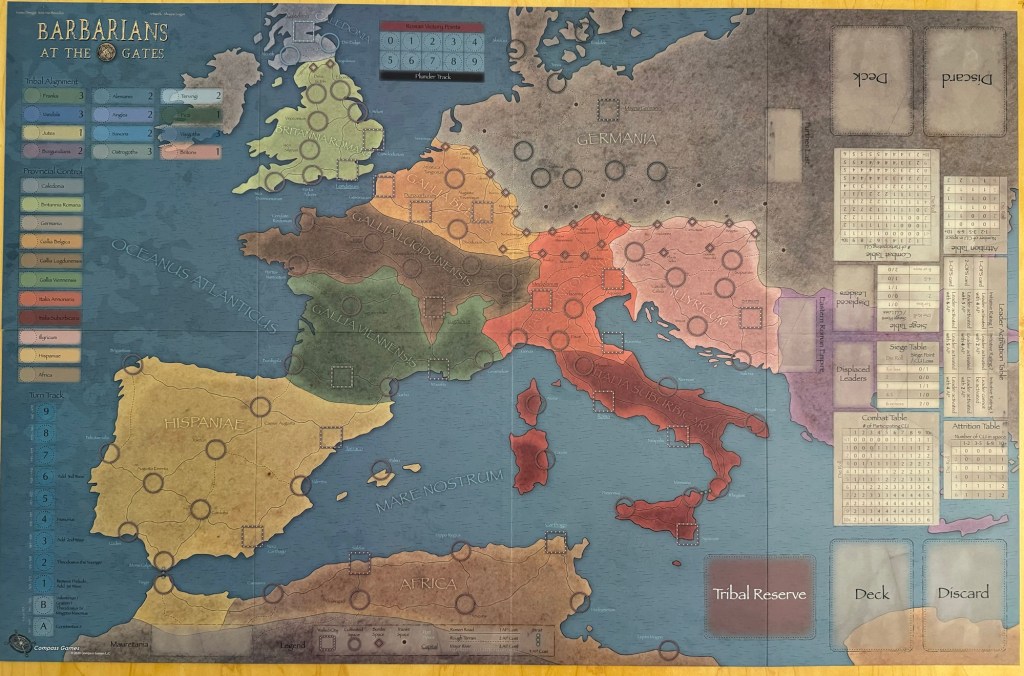
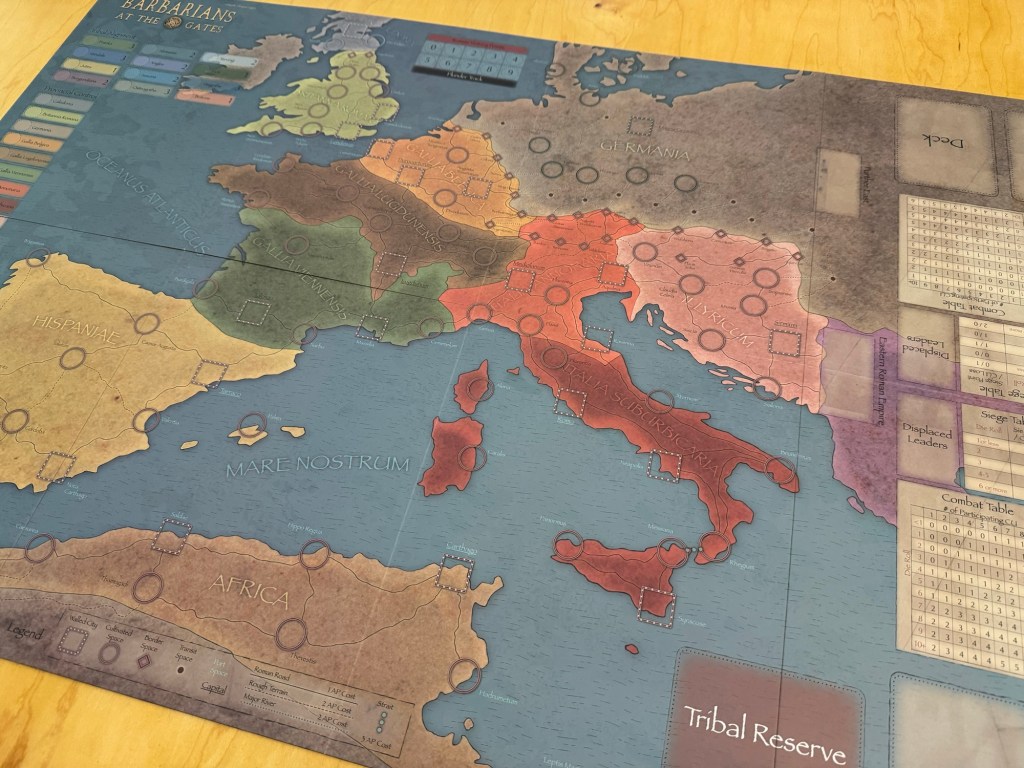
The board for this game really caught my eye when I first saw it when the game as up for pre-order. I really think that what grabbed my attention was the use of the different colors and how they seemed to blend together to create a vivid and living piece of art. These colors range from sandy brown, to deep maroon but also have many pastel greens, yellows and oranges. The rainbow of colors really make the board striking and create a very attractive surface to ultimately be soaked in the blood of Legions and Barbarian hordes. The board only gets better once units and control markers are placed out as the deep red and light blue of the counters really are accentuated by the different colors on the map. The different colored areas represent regions and are named appropriately for the historical time period. The designer stated that “during my initial research for this game, I immediately saw a Point-to-Point map there. Point-to-Point allowed me to channel the invasions into certain historical routes, while also supporting “interior lines” to allow the Roman player to quickly move reserves from one side of the Empire to the other”. It is not a traditionally beautiful board with amazing artistic touches and techniques, enhanced and highlighted terrain elements and other nice touches that we have focused on and highlighted in other entries in this series. But the board is very striking and immediately catches the eye. The artist is the talented Shayne Logan who has done a ton of great looking boards including Old School Tactical Volume 1 – Eastern Front (2016), Volume 2 – West Front (2017), Volume 3 – Pacific (2020) and the most recent addition to the OST Series Volume 4 – Italian Theater (2024). Shayne firstly makes a very playable surface and typically focuses on differentiating clearly the different terrain types in various hexes. But this is not necessarily the case with the board for Barbarians at the Gates as the focus of the playing surface is not on individual hexes but Point-to-Point movement and that is fine. His use of color is what works really well here.
The board is a 22″x34″ mounted mapboard and covers the entirety of the Western Roman Empire with each of the spaces representing one of the politically or militarily important locations. These spaces are furthered grouped into the different provinces of the Empire which were eventually
invaded by the Barbarians and include Britanniae, Gallia, Hispaniae, Illyricum, Italia, and Africa.
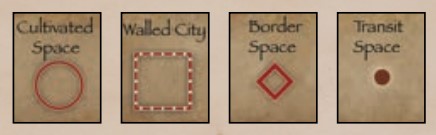
There are a lot of icons that are used on the board to identify specific types of locations including Cultivated Areas, Walled Cities, Border Spaces and Transit Spaces. These are typically fairly easy to identify on the board as the symbols are large and there really are not that many other shapes on the boards aside from borders, roads and other connections. I like the use of these symbols on the board as it does make for a quick and easy means of identifying the different types of spaces and aids in the planning for the players.
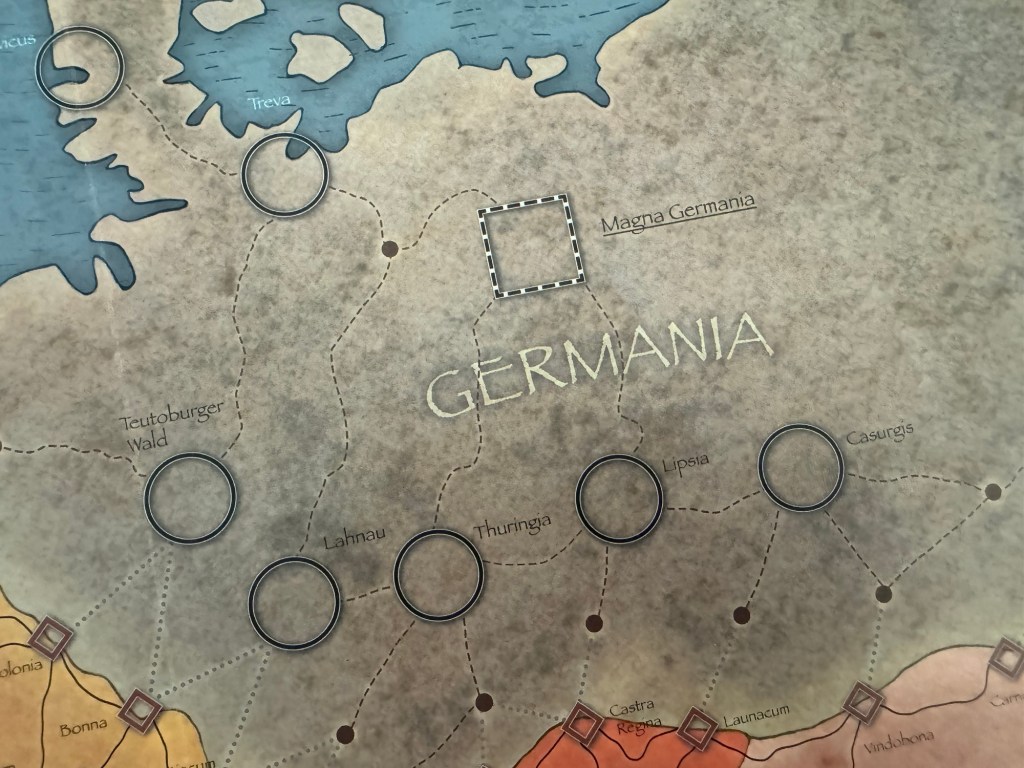
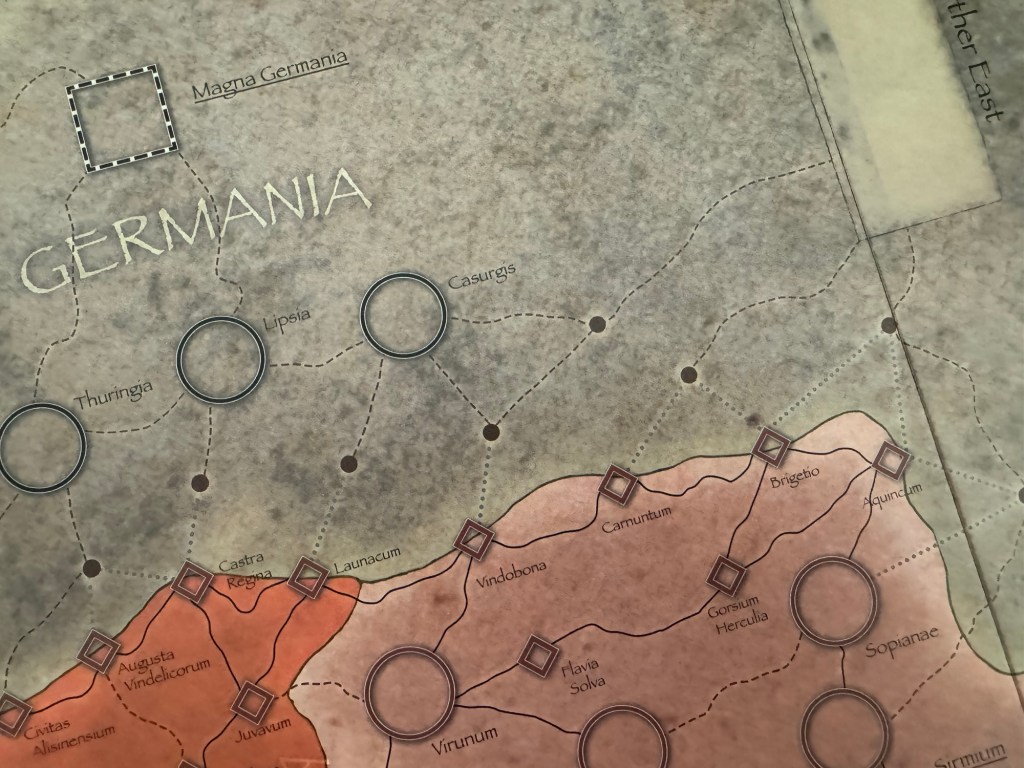
But the main focus of the board is on Germania and the innumerable number of hordes of Barbarians streaming across the Danube River to attack the fringes and outposts of the Empire. Germania is shown as a mottled gray area on the board, which stands in stark contrast to the lovely kaleidoscope of colors used on the Roman controlled provinces, and really projects a feeling of foreboding and calamity. The grey wall of Germania crashes against the banks of the Danube River like a tidal wave and the feeling of starkness is intentional with the color choice. Sitting in a prominent location is the capital of Germania Magna Germania and from it radiate several paths of invasions that are based on the historical routes used by the invaders.
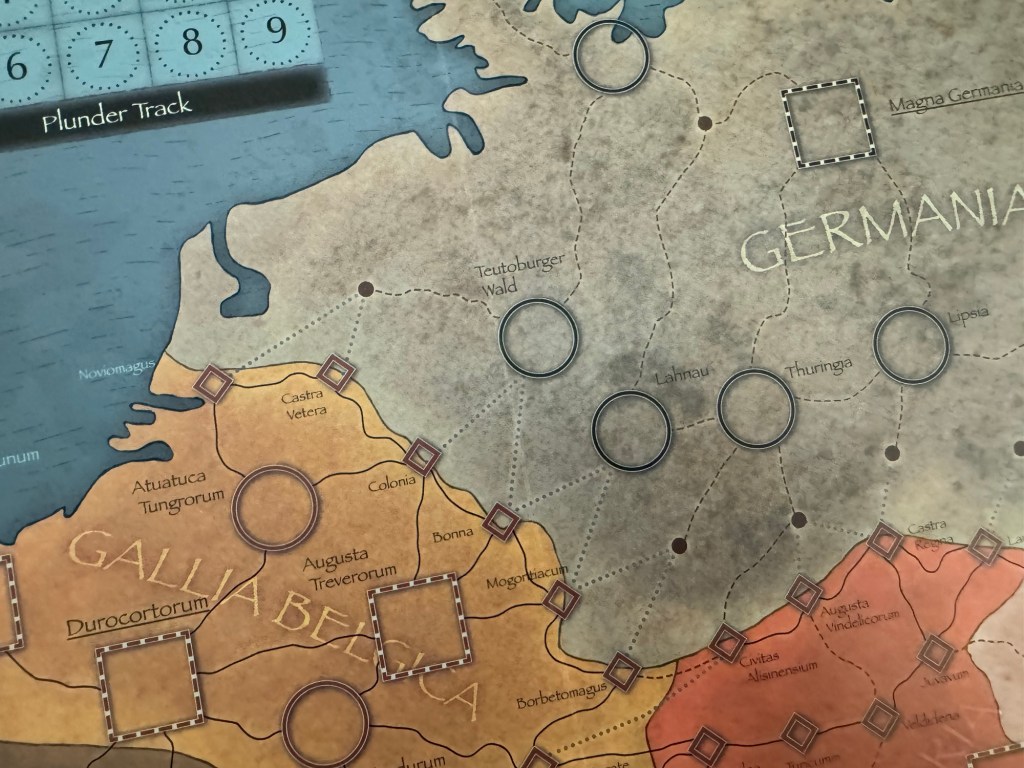
The circles that are laid out around Magna Germania are the Cultivated and civilized parts of the kingdom and the points from which the invaders will stage their various invasions. These Cultivated Spaces include such names as Treva, Teutoburger Wald, Lahnau, Thuringia, Lipsia and Casurgis. You will also notice that there are fortifications shown on the border with the diamond shapes. These are the Castra and Colonia that were built by the Romans to repel the invaders and will be a main focus of the game over the first few rounds as they Barbarians will pick and choose their routes and attack with impunity hoping to break through and cause havoc for the limited Roman defenders. Some of the spaces will have to contend with several different points of egress and these will be the hot spots including spaces such as Castra Regina, Civitas Alisinensium and Augusta Vindelicorum in the center of the border areas.
To the east toward the borders with the Byzantine Empire there are also several weaker spots that are susceptible to multiple angles of attack including Carnuntum, Brigetio and Aquincum. As the provinces change along the Danube River the colors are actually indicative of the amount of battle and bloodshed that will be experienced in these areas. Red, pink and yellow are the colors and they do somewhat portend the carnage.
As we come back toward Gallia Belgica you can see that this area of the frontier is pretty well secure and had more numerous fortifications and even a couple of Walled Cities just behind the front lines. This will be a good way for the Romans to reinforce and respond to Barbarian incursions through the wall and allow for fast response.
One note with the sort of wash that is used on the board overall. It is a somewhat grayish/blackish wash that seems to seep into the nooks and crannies of the terrain causing a faux rise and fall to the land. To me it gives a real sense of solid earth and I am glad that Shayne used this wash technique to give depth to the otherwise featureless nature of the board. I think that this gives the board a real solid feeling and should be used by more artists when specific hills, valleys, rivers and mountains are not drawn directly on the board itself.
I now want to move to the Italian peninsula and get a look at some of these same effects and how they create a feeling of strength for the capital of the Roman Empire. As you can see, from the Alps in the north to the toe of Italy there are a number of Walled Cities and their presence is just enough to keep the Barbarians at bey. While the Italian peninsula is somewhat distorted for purposes of space it is a nice representation of the area. I like how the nooks and crannies of the coastline are drawn in with great detail and that the color choice for the sea itself is very much complimentary to the royal red color of the continent. As you move down the boot, the red color darkens as you enter Italia Suburbicaria. The 3 major islands of Elba, Sardinia and Sicily are shown in the waters of the Mediterranean and will protect the peninsula from the North African hordes as they attempt to move across the sea onto the mainland.
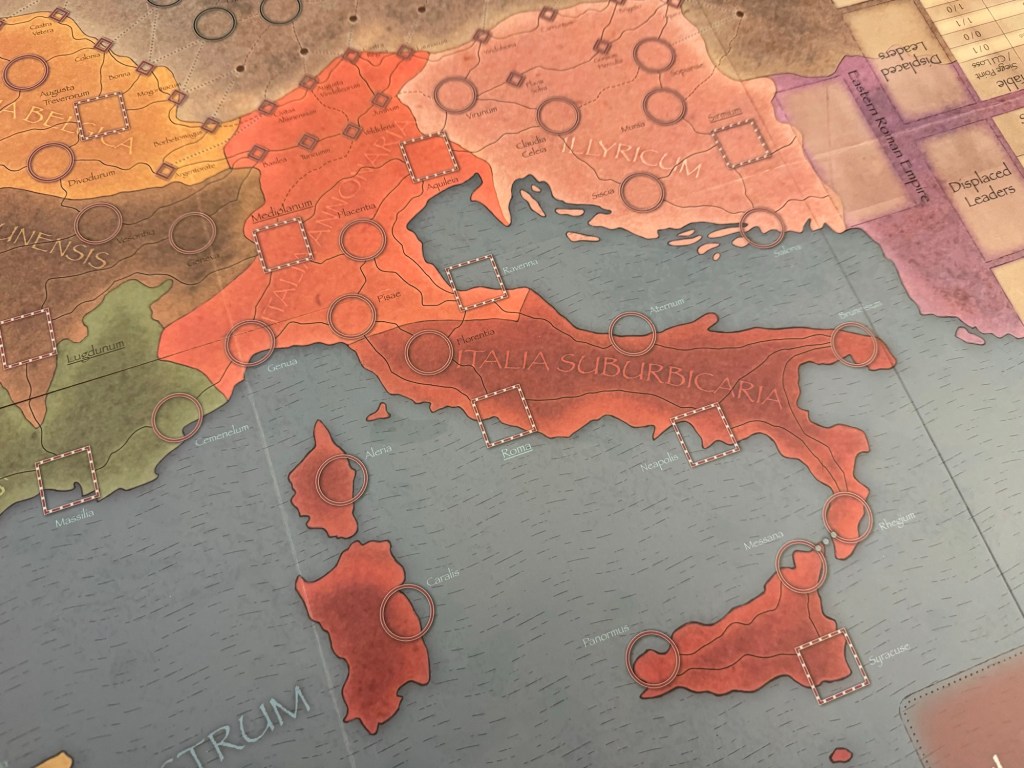
The black dashed lines that appear in the water give me the feeling of the caps of waves as they move under the force of the wind and currents. I like how they somewhat ebb and flow around the land and the islands creating a feeling of the current being drawn on the board. This is a nice little touch to give the otherwise flat color of the sea more life.
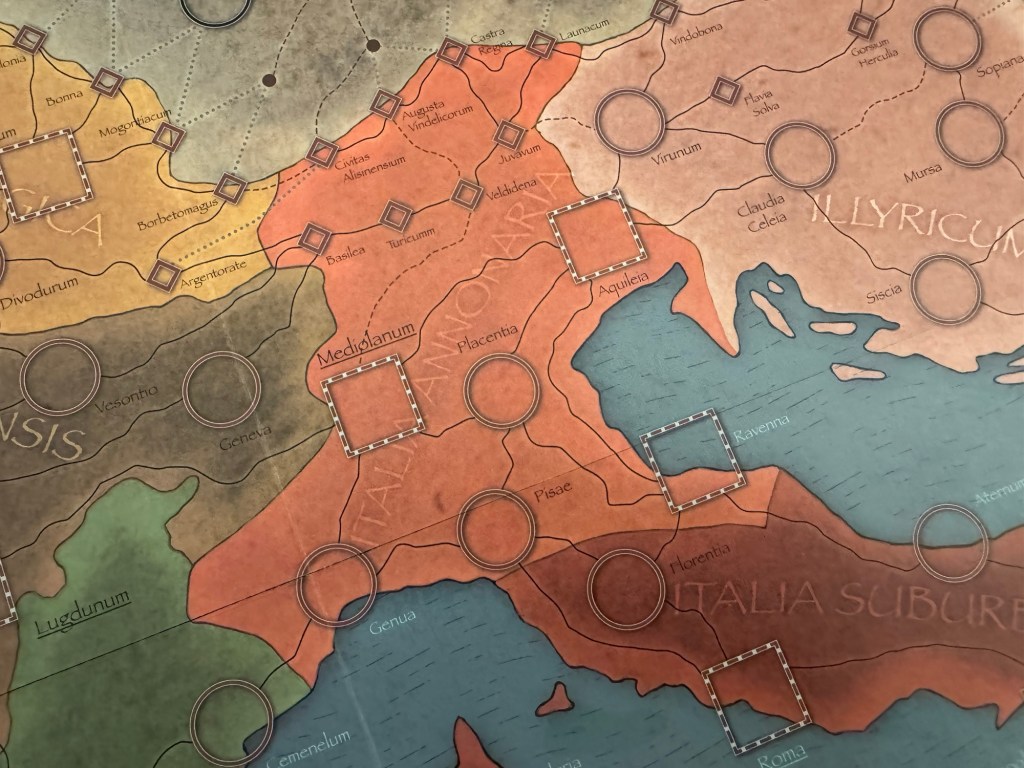
In northern Italy or Italia Annonaria are a great line of fortifications that are doubled up in depth to prevent a free pass into Italy. There are also a triangle of 3 Walled Cities in Mediularium, Aquileia and Ravenna. This spacing and layout of the north are intentional to dissuade the invaders from attempting to come into the borders of the imperial city. But, in the game there is also the real threat of pretenders who will appear based on Event Cards and can be a real menace to the Romany player.
As we move to the west, we begin to come into contact with Hispaniae and North Africa. I really like the use of the sandy brown for Africa and the yellow for the more arid parts of Hispaniae and feel that the choices here of color are very appropriate. I also like how they contrast as they near each other and really make them stand out. At the bottom of Africa on the board is the key that shows the meaning of the different lines and symbols on the board.
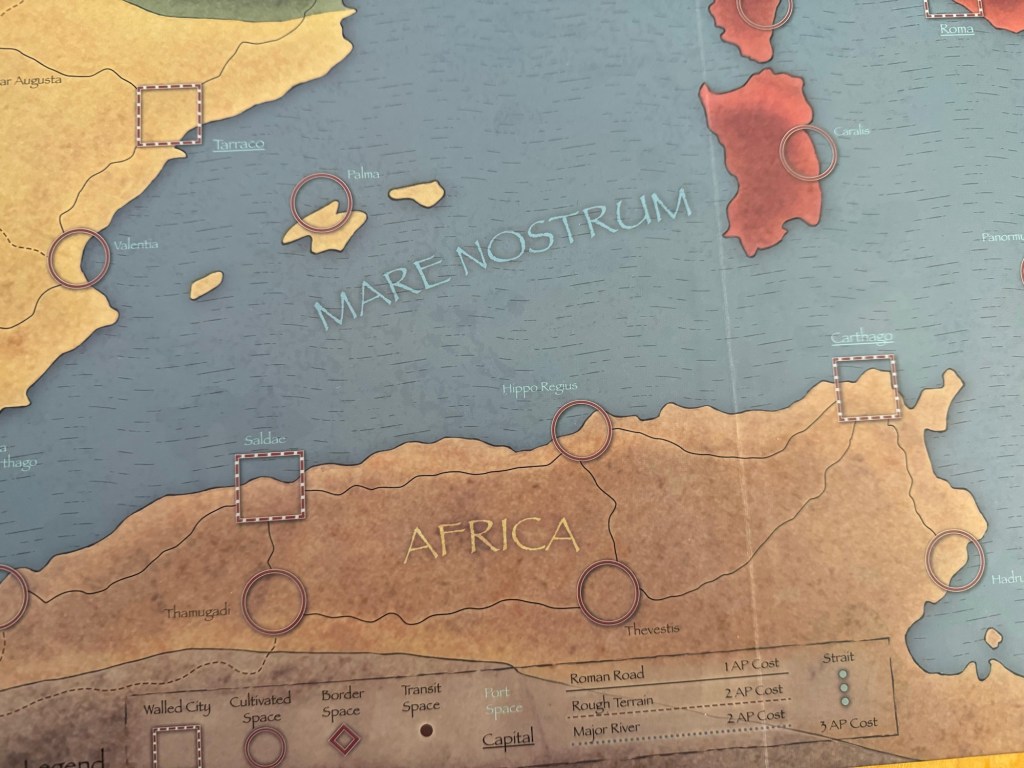
Gibraltar is shown on the board as the gateway to the Mediterranean and the presence of 2 large circular Cultivated Spaces give this area a sense of firmness and protection to those who would attempt to cross over from Africa. The already mentioned wash here really stands out and creates somewhat of a different effect against the yellow color used for Hispaniae.

As we move up the board toward the north, we run into the Oceanus Altanticus and its mottled light and dark shades of blue that create somewhat of a camouflaged look for the water. This is a massive ocean and has a greater depth and menace to it than the Mediterranean Sea. I really like this effect and enjoy how it merges with the dashed black lines drawn on the water to create a real sense of immensity.
To the west of Britannia Romana is the Tribal Alignment administrative boxes that are used to show who controls or is aligned with the various tribes. Control over the tribes is denoted by placing a Barbarian control marker on each space of the Tribal Alignment Track. Once a Barbarian tribe becomes Allied with the Romans, generally through the use of the Rome Offers Settlement Strategy Card Event, the control marker for that tribe is removed. But 5 of the tribes are always Barbarian controlled and as such are not present on the Tribal Alignment track.
There also is a Provincial Control Track located along the left edge of the board. This significantly aids in tracking who controls what spaces. This is something that is checked often and Victory Points are granted at the end of each turn for meeting control targets. These boxes are color coordinated with the various regions which makes identifying them a bit quicker and is a good example of the cohesion in the layout and art of the board.
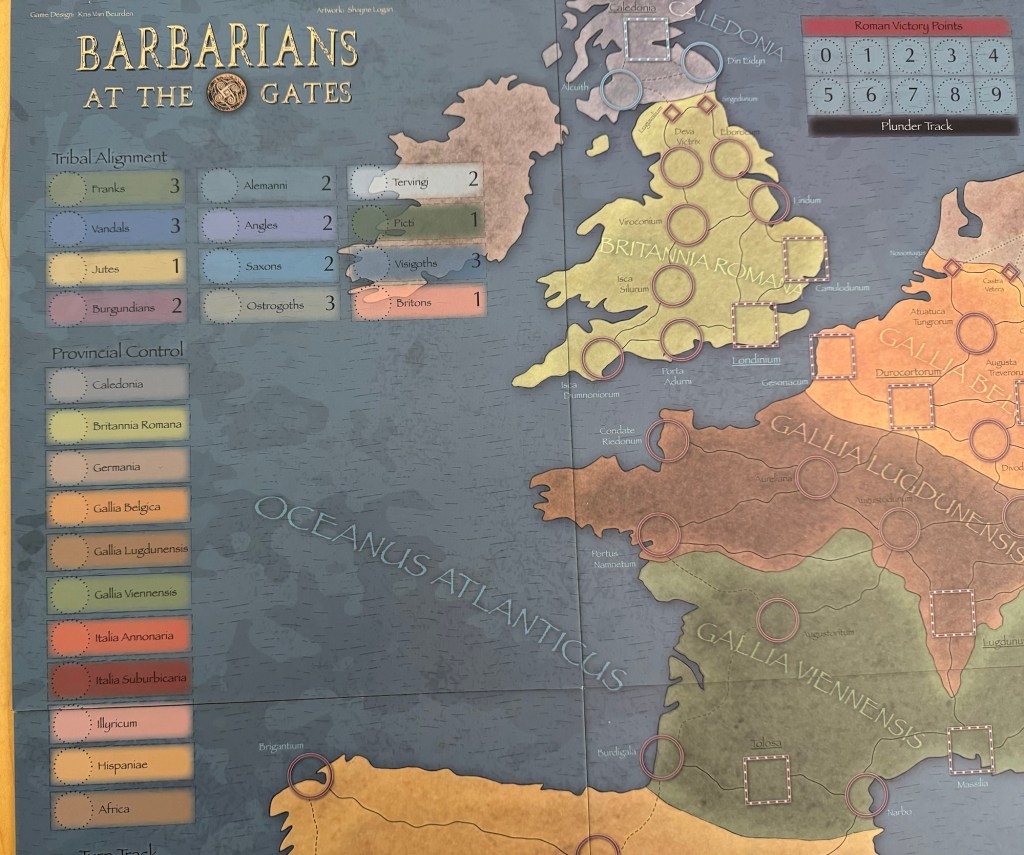
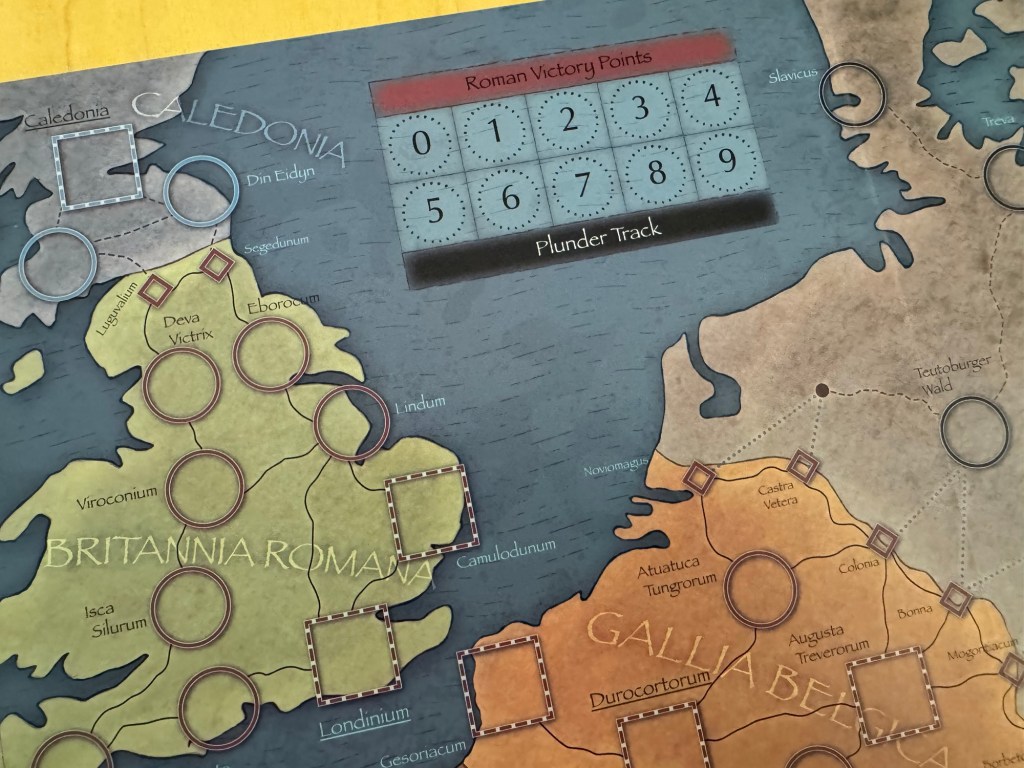
Finally, I want to take a look at Britannia Romana. The color choice here is a light greenish color that pays homage to the lushness of Britannia and its wildness. The island is not a safe place for the Roman legions and the players will see quite a lot of activity here and there are special cards that cause Pretenders to arise here more often.

Caledonia is back to the mottled gray color as this is Barbarian territory and Hadrian’s Wall acts as a border here with a few fortifications at Segedunum and Luguvalium. To the right of Caledonia is the Plunder Track and Roman Victory Points Track.
As I always say in these pieces, a good board is more than just the art and I always measure how helpful they are in actually playing the game. Barbarians at the Gates has lots of player aids printed directly on the board on the right hand side including the Combat Table, Attrition Table and Siege Table as well as the Leader Activation Table. There are also large boxes for Displaced Leaders and having this all in the same area and also having the same information on each side of the board caters to both players. There is not a bad seat in the house and both players can situate themselves to take advantage of these helpful aids.

The final comment I want to make about the game is the choice in the format of the board. The Point-to-Point map is very well done and creates some really interesting challenges and opportunities for both sides. One example of what I mean is the area of the Danube–Iller–Rhine around Civitas Alisinensium. As you will see, in this picture the Roman player has left this key point along the wall undefended. Well, that isn’t exactly a true statement as it was defended earlier in the game but took a lot of damage from continuous assaults here. This area is one of the few points along the line that the Barbarians are not required to attack across the Danube and get the negative effect. The opportunity here is for the Barbarian to use this as their axis of advance on the line and try to break through here which should theoretically be easier. The Roman player however also has a key opportunity here though as there is a Colonia and Castra fortification in the two spaces to the east and west of Civitas Alisinensium that are defended as well and there are no ways out of the spot to get further south. This funnels the Barbarians into this pinch point and can hold them here for quite some time if the Roman player is smart and moves some reinforcements in to bolster the defenses. I just think that the implementation of the Point-to-Point map was a fantastic choice as it gives many strategic points from which to attack and defend and accomplish what each side has as their objective.
I really love this board! And the game is very good as well. I know that we had a bit of trouble with the rules at first but quickly picked things up and had a blast playing this one. The great layout of the board and the use of color really creates some interest in this one for me and I ranked this one on my Top 10 Wargames of 2022! in the #4 spot.
Here is a look at our unboxing video:
We also did a video review and you can watch that at the following link:
I also wrote a First Impressions post on the game and you can read that at the following link: https://theplayersaid.com/2022/11/08/first-impressions-barbarians-at-the-gates-the-decline-and-fall-of-the-western-roman-empire-337-476-from-compass-games/
The next board that we will take a look at in the series is Iron, Blood, Snow & Mud from PHALANX designed by Guglielmo Duccoli and illustrated by Lew Sołowiej.
Here are links to the previous entries in the series:
Kekionga!: A Dark and Bloody Battleground, 1790 from High Flying Dice Games
Campaigns of 1777 in Strategy & Tactics Magazine #316 from Decision Games
Battle Hymn Volume 1: Gettysburg and Pea Ridge from Compass Games
From Salerno to Rome: World War II – The Italian Campaign, 1943-1944 from Dissimula Edizioni
This War Without an Enemy: The English Civil War 1642-1646 from Nuts! Publishing
Holland ‘44: Operation Market-Garden, September 1944 from GMT Games
Maori Wars: The New Zealand Land Wars, 1845-1872 from Legion Wargames
Imperial Struggle: The Global Rivalry – Britain & France 1697-1789 from GMT Games
Stilicho: Last of the Romans from Hollandspiele
Nevsky: Teutons and Rus in Collision, 1240-1242 from GMT Games
A Most Fearful Sacrifice: The Three Days of Gettysburg from Flying Pig Games
Donnerschlag: Escape from Stalingrad from VUCA Simulations
Keep Up the Fire!: The Boxer Rebellion Deluxe Edition from Worthington Publishing
Liberty or Death: The American Insurrection from GMT Games
Lanzerath Ridge: Battle of the Bulge from Dan Verssen Games
Salerno ’43: The Allied Invasion of Italy, September 1943 from GMT Games
Bayonets & Tomahawks: The French and Indian War from GMT Games
Undaunted: Normandy from Osprey Games
Traces of War from VUCA Simulations
SCS Ardennes II from Multi-Man Publishing
Almoravid: Reconquista and Riposte in Spain, 1085-1086 from GMT Games
Walking a Bloody Path: The Battle of Fallen Timbers, August 20, 1794 from High Flying Dice Games
All Bridges Burning: Red Revolt and White Guard in Finland, 1917-1918 from GMT Games
Storm Over Jerusalem: The Roman Siege from Multi-Man Publishing
-Grant
