I have always loved a good game focused on the Roman Empire. Whether it is the rise of the empire or its fracture and fall, the subject is just truly interesting to me and also makes for a compelling game. When Barbarians at the Gates was announced a few years ago, I knew that I would be interested. The game is a card-driven game for two players set during the final hundred plus years of the Western Roman Empire as the Barbarian tribes in the north, and other climes, came down with a vengeance as they clashed with civilization and carved out their place amongst it. The time period covered in the game is from the death of Constantine the Great (337 AD) to the deposition of the last Western Roman Emperor by Odoacer in 476 AD. The Roman player will command the Roman legions loyal to the failing central authority and those Germanic peoples who have settled peacefully inside the Roman Empire, while the Barbarian player leads Usurper Emperors, and controls the migrations of the savage Germanic peoples, who are the Barbarians at the Gates.
Initial Thought About Game – The Title of the Game Tells You What Could Happen
This game doesn’t cover a very long period of history for one of the greatest Empires of all time. The game takes a quick look into the history with a 139 year saunter through one of the Empire’s great times of strife, as pretenders to the throne decide to fight against the Emperor and try to take their soldiers who are loyal to them to carve out their personal empire within the empire but also a time of invasion as the wall of barbarians from Germania come across the Danube and attempt to settle further south. There is a lot going on here and none of it is very good for the Roman player. Plugging holes and responding to fires that pop up will be your lot for most of the 9 turns of the campaign game. You will never have a moment of respite and you must always be thinking about how you might control incursions to the south, the northwest, the north or the east but also how you will put down traitors amongst your trusted generals. As Barbarians and Usurpers are actually not aligned but still played by the same player, a good action for the Barbarian player is often to draw Usurper Romans from the border (to allow the Barbarian tribes to enter the Empire more easily). While seemingly a “gamey” action, this actually represents the Usurper drawing all his forces together to challenge the ruling Emperor!
My other comment about this situation is that the name says it all. This is the time of the Barbarians and they are literally at your gates. Their forces are mighty and plentiful and the Roman player has to understand that they are mainly going to be fighting fires and plugging holes in the line. The one advantage they have though is that the Danube River is hard to cross for the Barbarians and they will take negative DRM’s in combats across. But also keep in mind that there is a line of fortified spaces that the Romans have here including Castra and more advanced Colonia that will provide some assistance in stemming the tide. The cause is not lost but it is definitely an uphill slog for the Romans. And victory for the Romans will not be at the expense of thousands of dead Barbarians and control of the old world. They do have some good tricks in some of the cards that will pacify some of the raging Barbarian stacks taking them out of the fight in exchange for land and gold but these cards are few and far between. Just don’t expect to ravage the oncoming hordes and dominate militarily. You won’t! Your victory will be a Pyrrhic one where you will lose more than you gain but you must make every step cost the Barbarians something dear and continually whittle down their stack strength so you can finally stop them.
The Barbarians Will Keep Coming
In our play, I was simply amazed at the number of Barbarians that would come out each round. It seemed like they just kept coming and the paltry few Roman reinforcements I would receive are just not enough to really truly stop their advance. I do like this game though as the designer really set up the game historically and took great care to try and replicate the happenings in the design. At the start of the game, there will only be some Picti, Alemanni and Mauri present on the board being located respectively in Caledonia (Scotland), Germania (Germany) and Mauretania (Morocco/Algeria). These groups will be fairly large though and your primary antagonist will be from Germania. The Mauri and Picti are more controllable and you can hold out against them well if you make wise decisions but their numbers will also increase over time and become more of a threat.
During the game, more Barbarian tribes will arrive, and are presented in three distinct waves. The First Wave contains the Franks, Vandals, Jutes, Burgundians and Tervingi and really ratchets up the threat to the player. The Second Wave contains the Angles, Saxons, Ostro- and Visigoths while also allowing the Roman player to gain Briton support and for Bagaudae in the form of peasant insurgents to rise up against Rome which are represented by a Migratory Barbarian tribe in the game. The Third Wave contains the Huns, Alans and Gepids.
There is no real distinction between the various historical tribes in the game, other than where they are coming onto the board at. But they just keep coming. The only real saving grace here for the Roman player and these hordes of Barbarians is that the Barbarian player cannot activate all of those armies at once but will be limited by the cards in their hand and will have to pick and choose what they do with the hordes they have. But more on this later when we discuss the card play.
Board is Beautiful and Point-to-Point was the Correct Choice
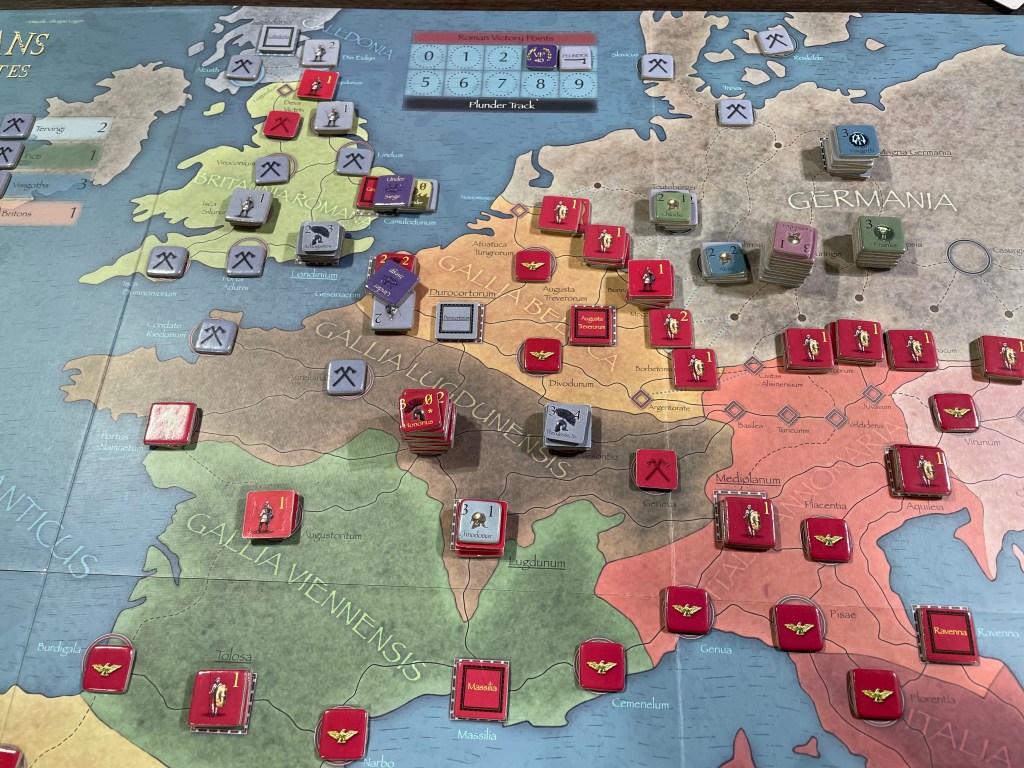
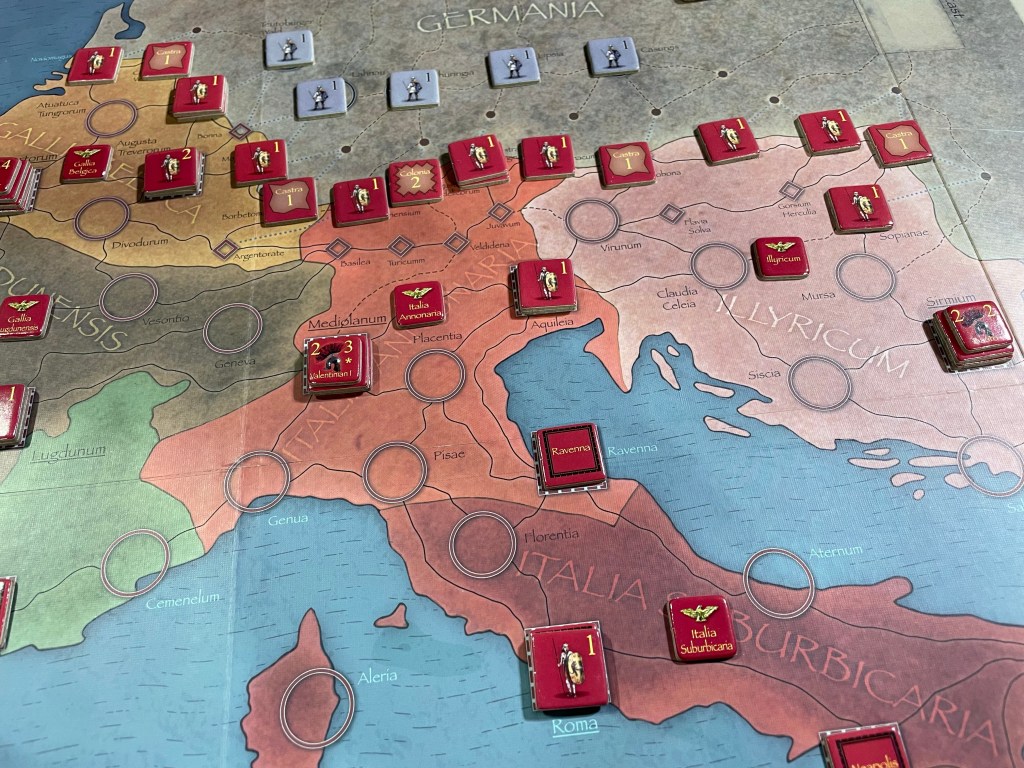
When I saw the board for the game, I immediately was struck with the beauty of the colors. These colors range from sandy brown, to deep maroon but also have many pastel greens, yellows and oranges. The rainbow of colors really make the board striking and create a very attractive surface to ultimately be soaked in the blood of Legions. The board only gets better once units and control markers are placed out as the deep red and light blue of the counters really are accentuated by the different colors on the map. The different colored areas represent regions and are named appropriately for the historical time period. The designer stated that “during my initial research for this game, I immediately saw a Point-to-Point map there. Point-to-Point allowed me to channel the invasions into certain historical routes, while also supporting “interior lines” to allow the Roman player to quickly move reserves from one side of the Empire to the other”.
The Point-to-Point map is very well done and creates some really interesting challenges and opportunities for both sides. One example of what I mean is the area of the Danube–Iller–Rhine around Civitas Alisinensium. As you will see, in this picture the Roman player has left this key point along the wall undefended. Well, that isn’t exactly a true statement as it was defended earlier in the game but took a lot of damage from continuous assaults here. This area is one of the few points along the line that the Barbarians are not required to attack across the Danube and get the negative effect. The opportunity here is for the Barbarian to use this as their axis of advance on the line and try to break through here which should theoretically be easier. The Roman player however also has a key opportunity here though as there is a Colonia and Castra fortification in the two spaces to the east and west of Civitas Alisinensium that are defended as well and there are no ways out of the spot to get further south. This funnels the Barbarians into this pinch point and can hold them here for quite some time if the Roman player is smart and moves some reinforcements in to bolster the defenses. I just think that the implementation of the Point-to-Point map was a fantastic choice as it gives many strategic points from which to attack and defend and accomplish what each side has as their objective.
Card Play is Very Interesting but Unpredictable (Mean Spirited)
The game is a Card Driven game and the use of cards is all important and very well done. Each player has their own unique deck of cards that are used and these cards are sometimes removed from those decks when played for an event and also new cards will be added to the deck after each turn. The cards played during a player’s impulse which are not used for the Event are then used for their Operation Points value. These Operation Points can be used for many purposes including Activating a leader, Forced Marches, Raiding, Reinforcement, Migration and Successful Usurpation.
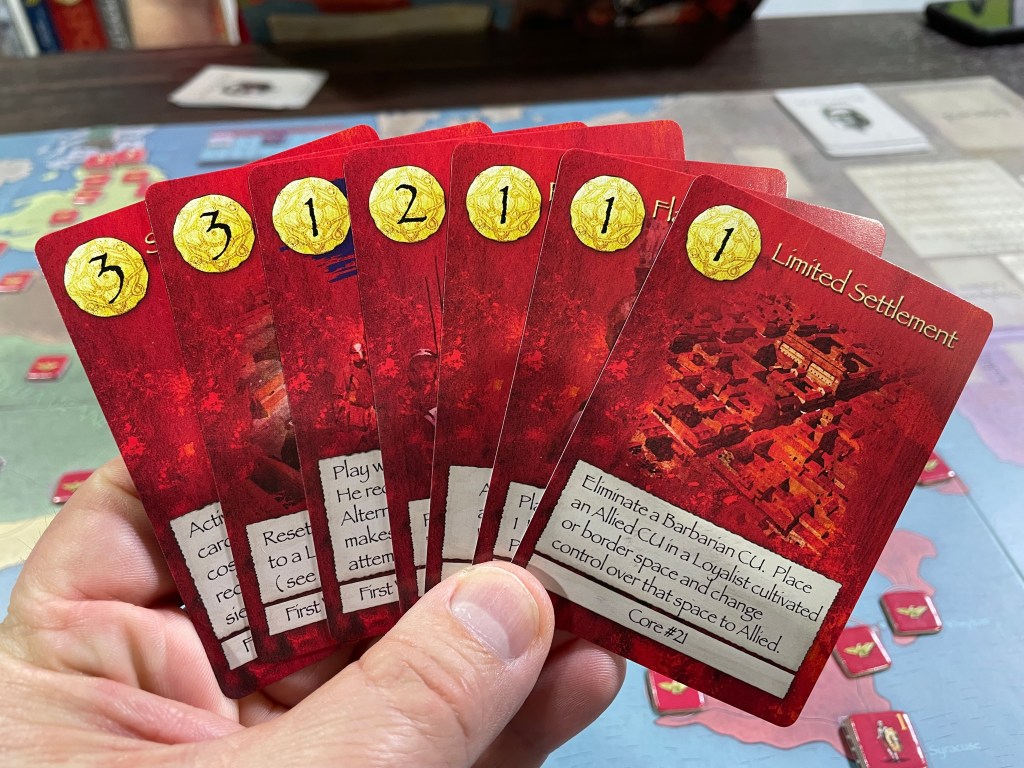
The real trick to the cards is to plan out how you are going to use them to your advantage but also how best to use them. Activating Leaders is very important as you can then move them to attack, defend, changing control of areas and other actions. Activating a leader depends on their strategy rating (the lower the strategy rating, the better). When a leader activates from a card, they receive a number of Action Points which can be used for movement (1 over highway, 2 over rough or river connections, 3 over strait or for naval movement), continuation after battle (kind of advance after combat), changing control over unfortified spaces and sieges of fortified spaces. But the cards also are very mean spirited. What do I mean by this? Well, in our first play, I was carefully using my cards to build up my armies to fend off the initial attacks of the Barbarian hordes. I also had begun to build somewhat of a super stack as well to attempt to foray into England and take on the Barbarians there. As I did this building up, I was unaware of the nasty nature of some of the cards. Some of the cards, both for the Barbarians and Romans, allow a play that will turn a single leader and their entire stack into either a Usurper or a Pacified Barbarian Settlement. Both are equally nasty and you have to keep in mind that you can have your best armies simply taken from you and turned to your enemy. Because of this, the Roman player has to decide whether they will group Combat Units under a single leader in order to face the mighty Barbarian challengers at the Gates in which case he risks that leader to Usurp, or to disperse these troops over several stacks never allowing a single leader to amass too many CU but on the other hand also never having a true striking force to attack with. There is an exception here though as an Emperor leader cannot Usurp and you don’t have to worry about that but this is also dangerous as you can lose that Emperor.
Likewise, once they have an Usurper leader on the board the Barbarian player will try to group all Usurper CU with this leader (in order to keep this force strong and in order to allow their Barbarian CU, leader and tribes to march unopposed into the Empire. This creates a very real and historical danger as the Barbarian player is incentivized to do what an Usurper would historically have done and empty the border garrisons in order to march on Rome.
These cards are extremely strong and a situation can occur in which most of the Romans still on the board are Usurper leaders and CU. But there is an action that allows for the Roman player to counter these cards and that is the Successful Usurpation action. If the Barbarian player over does it with the Usurper powers, the Roman player can simply steal these conquests by swapping the Roman power for the Usurper power. This in effect has the Usurpation process succeed and the former Usurper leader now becomes the true Emperor!
The Danube–Iller–Rhine Line is Key for the Romans
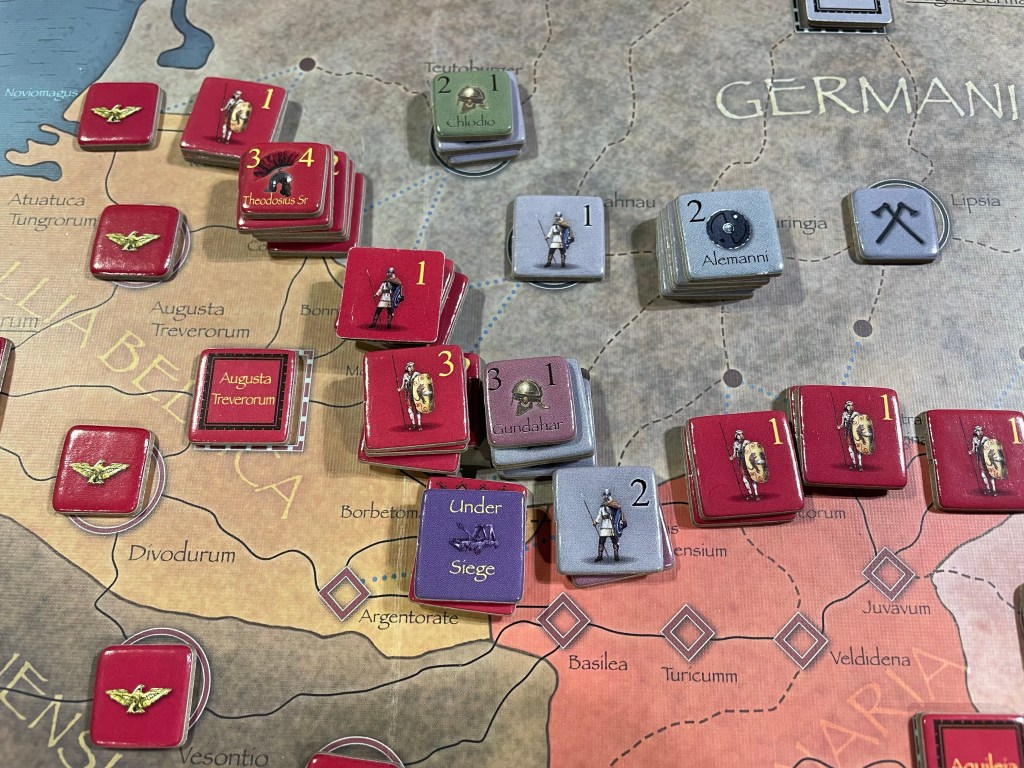
The main focus of the game, at least initially, is the Danube–Iller–Rhine front. This line of forts and encampments is the first line of defense against the incursions of the Barbarians and sees lots of probing attacks and sieges. The Barbarians have to break this line somewhere in order to force the Romans to take action. The real difficulty here for both sides is that it is a numbers game. The Romans have just enough forces to spread out and have at least 1-2 CU in each space and also have the ability to construct numerous Castra and Colonia to provide better defensive benefits in combat. There are no real weak spots along the line but the Barbarian player has to decided when and where to strike and then cannot relent. They have to have consistent pressure to make the Roman player have to commit more resources to reinforcements and moving CU up to plug holes.
It also is important to hold in reserve some better units and leaders as you can see in the picture below. The Roman player has three good sized armies ready to strike the Barbarians if they crack this line. But they also have to worry about the other two fronts in Britannia and in North Africa. They cannot simply focus all efforts here but can mirror the Barbarian player in where they act and build up forces. The Danube-Iller-Rhine line is just so fascinating and as it was very important historically so it is in the game and is very well done.
Area Control is the Focus
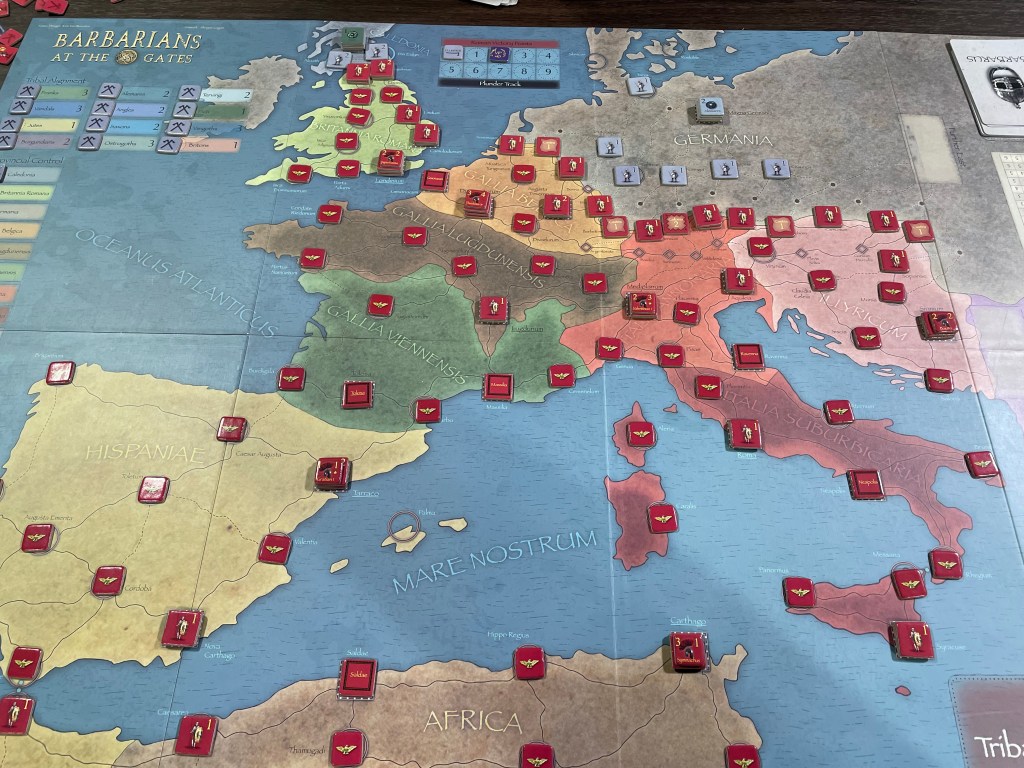
As I have already mentioned, the game is played on a Point-to-point map of the Western Roman Empire, which is divided into 11 different diocese or administrative districts such as Gallia Belgica, Caledonia or Italia Suburbicaria, each composed of spaces for major settlements and cities such as Roma, Massilia or Nova Carthago. These spaces are connected to each other through the network of Roman roads, rougher connections found mostly in uncivilized territory or river connections mostly on the Donau and the Rhine.
To control a province, a player must control the Provincial Capital AND a majority of the spaces in the province. It is important to remember that each player has multiple factions and that this rule is for each and player, and not just per power. For example, a player can control a Provincial Capital with one of their powers and the necessary spaces in the province with the other power.
While provinces can be Roman controlled, Barbarian controlled or uncontrolled, the distinction between the latter two is not very important. Provincial control is only used for Victory Point determination, where only Roman control over provinces is determined. On the map, a Provincial control chart is added where control over the provinces can be tracked and this is a very important aid to the players as they need to keep this in mind throughout the entirety of their turn due to scoring process. Each turn, the Roman player will gain 1 point for each province they control over 7, and loses 1 point for each province short of 7. If the Roman player’s VP are ever 0 or lower during a Victory phase, this will be a loss and the Barbarian player wins. This scoring process really keeps the players engaged and has them counting areas for control and strategizing where to send their armies or when to play the previously mentioned Usurper events to take control away.
As was the case historically, the Western Roman Empire will likely fall at some point during the game it just becomes a question of when and challenges each of the players to keep this area control concept in mind. At the end of each turn, players should examine the current VP situation and then plan out what they need to accomplish to get to their VP goals. I found that this caused us to have ebbs and flows of combat and simply taking back enemy controlled area by moving a leader through an occupied territory.
Combat is Simple
When an Activated leader has successfully moved to a space containing enemy CU which did not evade their advance a battle will be initiated. The process is pretty simple as first, each player starting with the Active player has the chance to play a single Battle card. These Battle Cards have all types of effects from adding CU, removing enemy CU or giving DRM’s. Making sure to use these cards wisely is one of the best parts of the combat and kept it very interesting as you never really knew what was coming. You can see the stacks before you and guess at their strength compared to yours but you don’t know what cards the players might have in their hands. Next, each player determines their DRM’s and makes a D6 roll, checking the modified roll result on the CRT, which expresses as a result of the number of enemy CU killed in battle. The higher rolled number wins the battle even if no CU are left, with ties determined first by participation of Roman CU with Romans always winning ties and then in favor of the attacker if both sides didn’t have Roman CU or the defender if both sides were composed of Roman CU. The loser has to retreat from the battle (either to their space of origin if the attacker or to any adjacent space if the defender. The winner, action points permitting, can continue movement and attack again if they choose. This is a great way to maximize the players card plays to do the most damage and make progress toward their goals. The CRT is determined with a single D6, but the results can range much higher due to various DRM’s. The results can actually range from less than 1 to 10. This means DRM’s can have a huge effect on battles and it is not unusual for a player to have a +4 DRM on their battle roll.
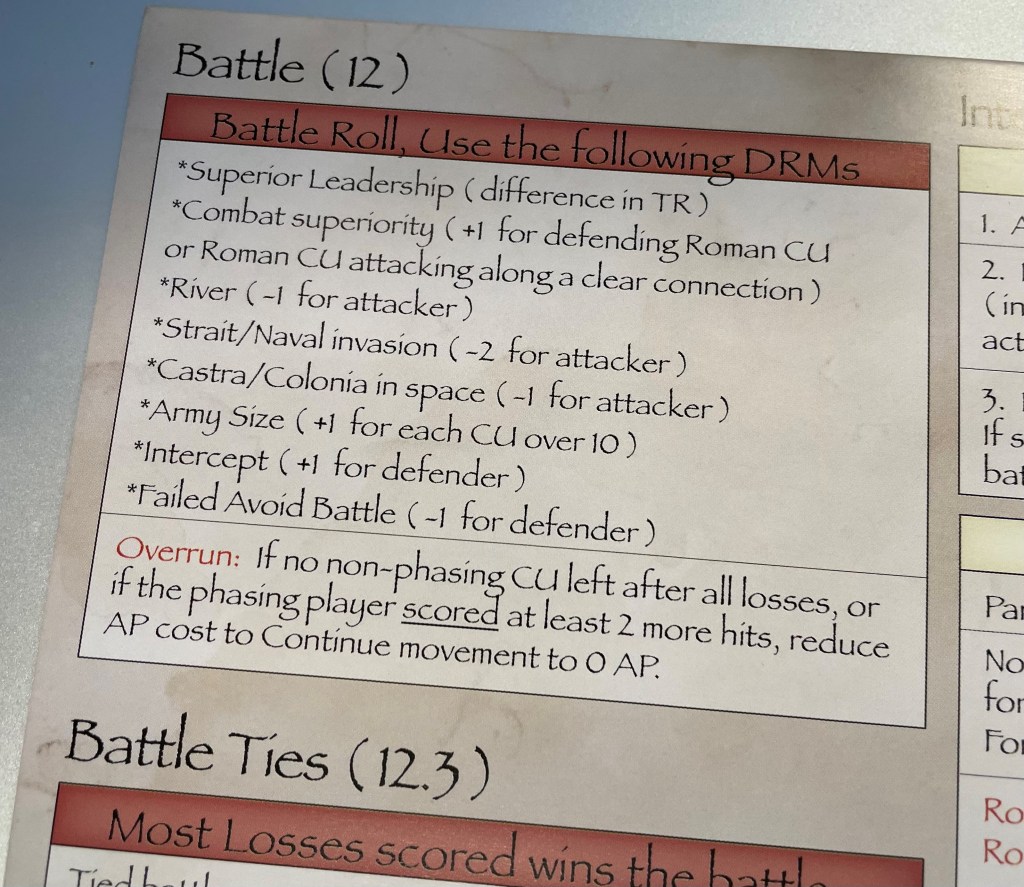
The designer has stated that his “design goal was to have the Barbarian powers “fight well” through numbers (i.e. roll on a higher column of the CRT) while the Roman powers would “fight well” thanks to higher DRM’s (through better leaders, combat superiority, etc.)”. I would say that this was definitely the case and we found that the Romans had some really great DRM’s as you can see above, but the Barbarians were simply about numbers and continual attacks causing compounding losses that over time really degrade the effectiveness of the Romans.
I really enjoyed our play of Barbarians at the Gates! Even though the game was a Card Driven Game, it really felt like a true wargame as stacks were continually fighting and coming into contact. As we played, I truly felt the angst of having to react to the fires caused by Barbarian attacks, raiding and Usurpers turning on me. They were coming from all directions. I truly never felt safe as the Romans and I loved that feeling. It also impressed me that the game seemed to be fairly balanced toward its goal of demonstrating that the Barbarians were at the gates and that the fall of the empire was imminent. But I never felt hopeless. I felt that all I needed was the next great card, or to hold out until the next round. That feeling of just one more turn is a rare thing in a one sided historical simulation but it is real here. The Romans have a chance to hold off the hordes and win, not by total domination of the invaders, but the Barbarians also have lots of tricks to use to make life difficult for the Roman player. A really great back and forth and really well produced as well. Fantastic pre-rounded counters, thick cards, great art and a fantastically multi-colored board. I would recommend this one to anyone who loves the Ancients and want to be tested.
Here is a look at our unboxing video:
We also did a video review and you can watch that at the following link:
-Grant
