
Continuing along in this series devoted to the best looking boards found in the wargaming world where I will highlight the art and layout of a different board in a wargame that we have played to show you the various talents of the artists and graphic designers involved. In my humble opinion, a well designed and attractive board can make all the difference in the world to me enjoying a wargame. Don’t get me wrong, the game has to be good, but if it’s also good looking it always is a better experience. A board can draw me in. Can make me feel that I’m there. Can set the stage for the thematic immersion that we all crave. And I have found many of these type of boards and I want to make sure that I share them with you.
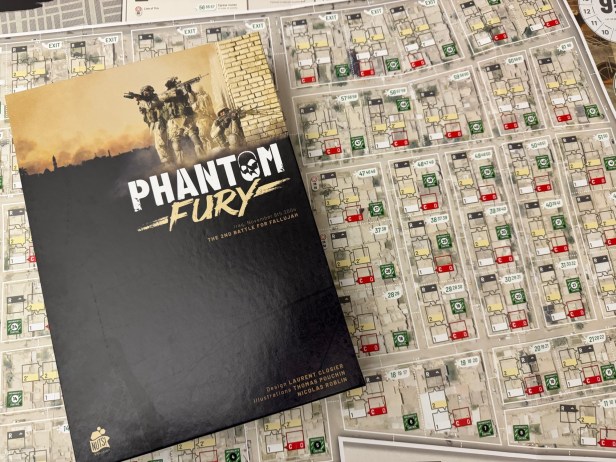
In this entry in the series, we will be taking a look at the fantastic looking board for Phantom Fury: Iraq, November 9, 2004 The Second Battle for Fallujah 2nd Edition from Nuts! Publishing. Now you might be looking at the board and thinking that is is just a jumbled mess of various colored squares and blocks but there is some hidden and obscured beauty in these squares but also a lot of great photo realistic depictions of city blocks, streets and dark alleys that were present in the city of Fallujah during this pivotal battle of the Iraq War in 2004. Nicolas Roblin is an emerging artist who has five or six game boards to his credit to date and we have played and really enjoyed then including This War Without an Enemy (2020) from Nuts! Publishing, 300: Earth and Water from Nuts! Publishing (2018), Saladin (2022) from Shakos and Border States (2022) from Shakos. But he also is starting to branch out more and has done the board for the very interesting solitaire wargame called Phantom Fury: Iraq, November 9, 2004 The Second Battle for Fallujah 2nd Edition. I would say that he has a very easy style that is focused on showing key locations in a light that emphasizes their importance to the historical story that the game designer is attempting to tell. What I mean by that will be evident as we take a look at the board for Phantom Fury, but one thing I would point out is the focus on the boundaries of the various districts inside the city. He gives these areas a very interesting treatment as well as a focus on the aesthetic elements of the setting. When you look at the board, you get the feeling that you are inside the city itself with a look at small buildings, walls, streets and even key locations such as the mosque.
Phantom Fury 2nd Edition is a solitaire wargame that simulates at a tactical level the operations carried out by United States Marines (USMC) to secure the town of Fallujah, Iraq in November 2004 and to attempt to suppress all armed resistance by the insurgents. The game focuses specifically on the fighting carried out by the 3rd Battalion, 1st Marines on the morning of the 9th of November 2004, in the district of Jolan in the north-west portion of the town. The player will control the USMC forces and the game system manages the actions of the insurgents. The Marines will have to move block by block and house by house clearing out resistance all while trying to minimize casualties and trying not to allow insurgents to infiltrate their lines and reappear in the rear to wreak havoc. This is very much easier said than done though as the first priority is to identify suspected insurgents as the Marines enter new areas that are enemy controlled.
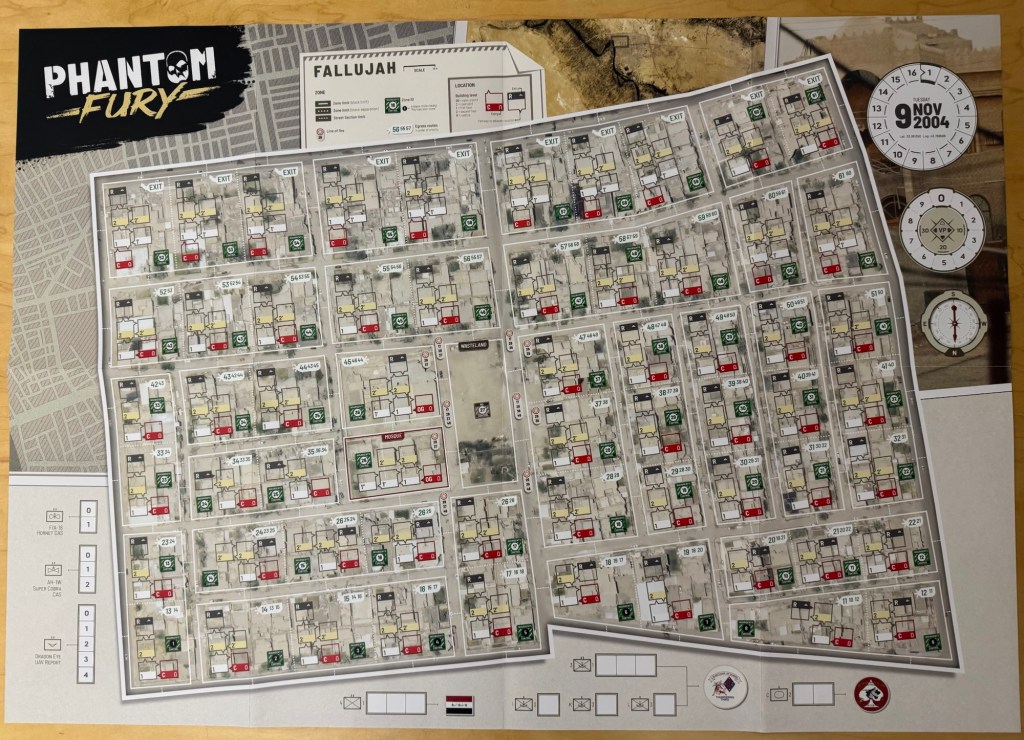
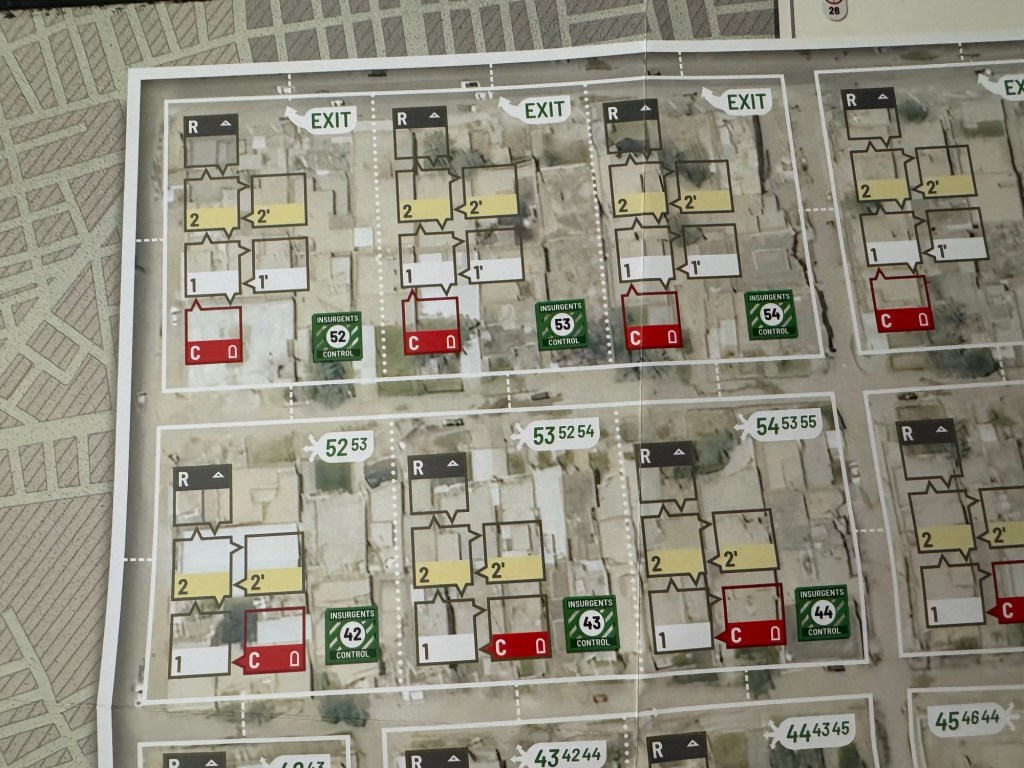
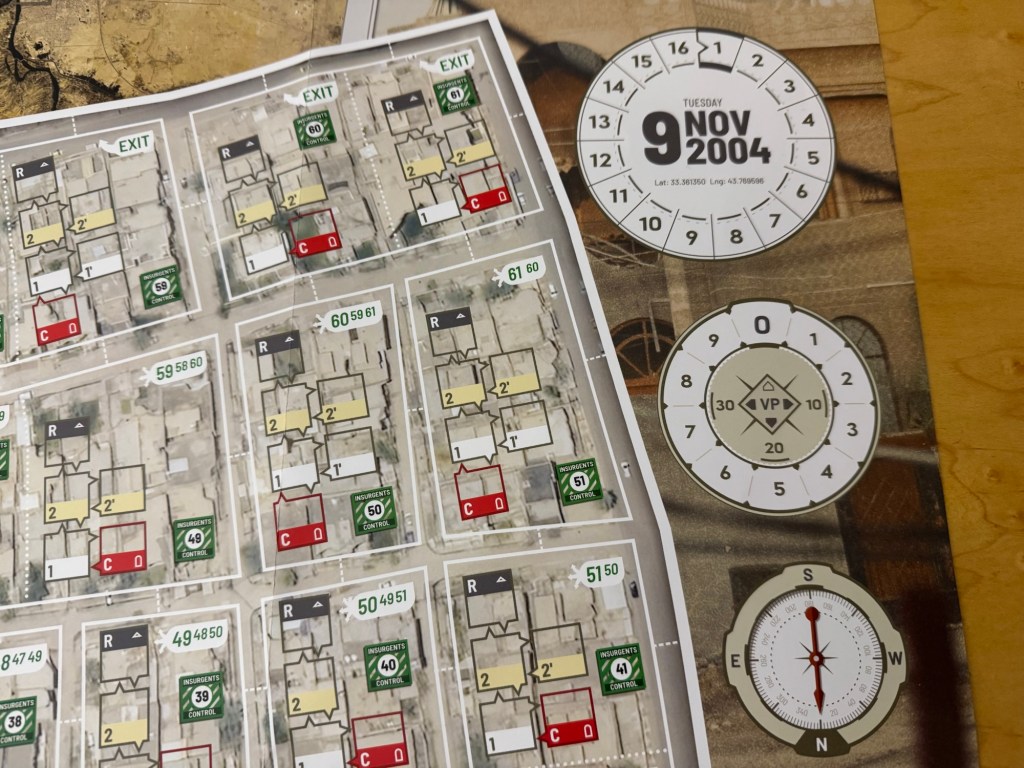
The board for the game measures 22″ x 34″ and represents a part of the Jolan District of the city of Fallujah, divided into 61 Zones of about 50 x 50 meters and into Street Sections of equivalent size. The Zones are marked on the map by dotted lines or continuous lines and are identified by a number in a black or white circle in the Control Box. A target symbol in a Zone indicates that there is a Line of Fire between that Zone and the Zones whose numbers are printed below the symbol. The Target Zones are considered to be Neighboring a particular Zone for the purpose of Fire Combat only.
As you look at the Zones shown below from the upper left hand corner of the board, you will see that various boxes are printed in each of these Zones. These represent buildings and these buildings are multi-storied so they start at the bottom with the red entry areas, that have a nice little door shaped icon in the bottom right hand corner of the box, and then you see stylistic arrows that point up and down at the bottom of each of the above stories. There are also arrows that go to the right and left which mean they enter an adjacent building. At the top of the Zones you will see a black box, that has a neat little roof peak symbol in the upper right hand corner of the box, that represents the roof of the building. These are areas of entry from one building to the next and if used by the Marines or the Insurgents, will grant them a bonus DRM in combat. I remember when I first set eyes on the board, I was a bit discombobulated and confused but once I get into the rules I quickly realized that this graphical depiction of the stories and the means of ingress/egress was a stroke of genius and worked really well to quickly be able to identify what you are entering.
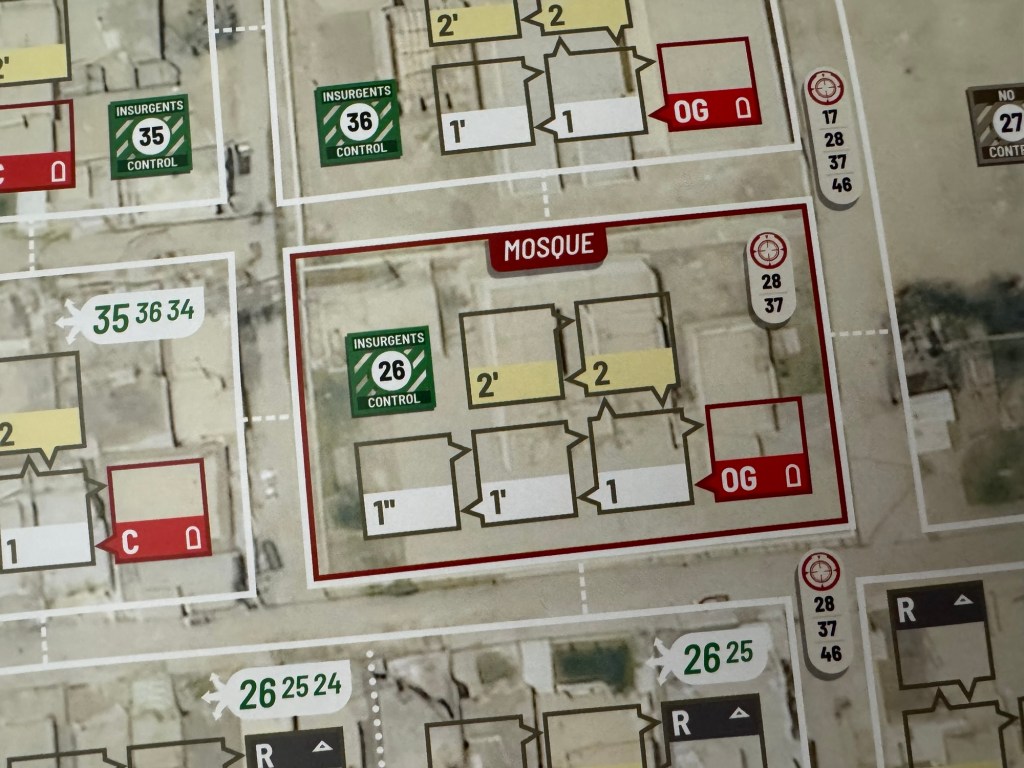
Certain Zones are considered to be Fortified and this means that they are tougher to break into. Some of the zones, such as Zone 26 (Mosque) identified by a red box around the area is a Fortified Zone by default. No unit may carry out movement called Flooding in a Fortified Zone. The Mosque area is a really interesting graphical representation as the background, as is the case with all of the areas, has the overhead satellite images of the Mosque shown on the board. In the game, this area cannot be entered by Marines but can be searched and entered by Iraqi Intervention Force (IIF) troops. I think that the red box really highlights this entry prohibition and is a key reminder to the player of the need for them to bring on the IIF troops although they might want to get more Marines on the board.

Each Zone on the board consists of several Locations in the form of boxes, which are used mostly to regulate movement. There are 5 types of Locations identified on the board including Open Ground, Courtyard, 1st Story with one of 3 notations including either l, 1′ or 1″), 2nd Story (2 and 2′) and Rooftop. Each Location is marked with one of these letters including OG, C, 1 or 2 and is a really well done part of the board which clearly identifies the type of Location. Locations are used for the placement of Suspect markers and certain Zones may have several Locations of the same type or no Locations at all of a particular type. Upon first glance, you might think that the color of the Suspect Markers, which are all tan with various shaded areas of brown and white, is a wrong choice and doesn’t necessarily work well visually with the sandy, tan colored board. But, because the Suspect Markers cover up the small boxes when placed, they still retain the thick brown outline on the outer edge of the board and these act as a visual highlighting of the unit. To me, this is a fantastic graphical design choice to highlight these important boxes and Zones as all of the action and most of the player’s focus will be on these areas as they move around the board block by block.
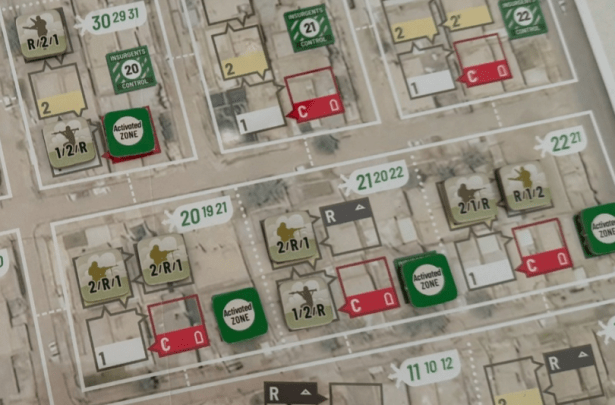
As in the case of these games, the on-board player aids and tracks need to be large, clear and have the pertinent information that the player will need to play the game. This is very well done on the board as they have created a circular Turn Track and Victory Point Track that are large and in the upper right hand corner of the board. This positioning really keeps the time deadline at the forefront of the players mind as they have to clear and control all 61 Zones for a victory. I say control but players must also eliminate resistance there as well and prevent the Suspect Markers from popping up in areas where they are adjacent to that have already been cleared and controlled.
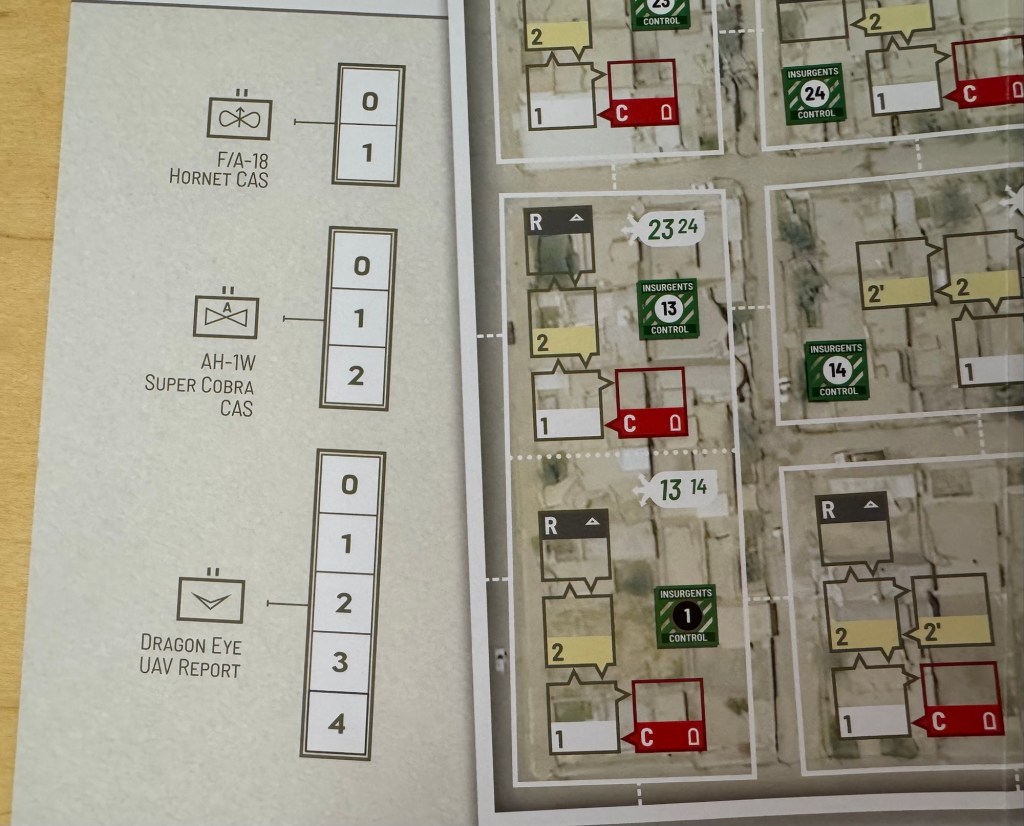
One of the other really interesting parts of the game that causes a lot of tough decisions is the use of the military assets located on the bottom left hand side of the board. Here are tracked the player’s available Hornet Strikes, Super Cobra Support and UAV’s. All of these provide various benefits including DRM’s and direct attacks against fortified blocks to try to eliminate Suspect Markers without Marines having to put their life on the line in those areas.
I think that the graphic design for this board is truly excellent. I am not sure that it is beautiful but how it was done and how it works together is a stroke of genius and really took some thought and understanding of the game and its systems to be able to put together. These choices were reinforced with the color accents, use of lines and borders as well as with color choices for the most important Zones. Just a very well done and aesthetically pleasing package put together by Nicolas Roblin.
This game is just so very good and I love the decisions that the player has to make about how they go about clearing the areas with limited resources and under a time limit. Just a very good game design that shows how difficult this task was that was asked of the Marines.
If you are interested, I shot a short RAW video on the game during my first play and you can watch that at the following link:
We also did an unboxing video showing off the components and you can watch at the following:
If you are interested in Phantom Fury: Iraq, November 9, 2004 The Second Battle for Fallujah 2nd Edition, you can order a copy for 50.00 € ($58.37 in US Dollars) from the Nuts! Publishing website at the following link: https://www.nutspublishing.com/eshop/our-games/phantom-fury-v2-en
The next board that we will take a look at in the series is Almost a Miracle!: The Revolutionary War in the North in Against the Odds Magazine #51 from LPS, Inc.
Here are links to the previous entries in the series:
Kekionga!: A Dark and Bloody Battleground, 1790 from High Flying Dice Games
Campaigns of 1777 in Strategy & Tactics Magazine #316 from Decision Games
Battle Hymn Volume 1: Gettysburg and Pea Ridge from Compass Games
From Salerno to Rome: World War II – The Italian Campaign, 1943-1944 from Dissimula Edizioni
This War Without an Enemy: The English Civil War 1642-1646 from Nuts! Publishing
Holland ‘44: Operation Market-Garden, September 1944 from GMT Games
Maori Wars: The New Zealand Land Wars, 1845-1872 from Legion Wargames
Imperial Struggle: The Global Rivalry – Britain & France 1697-1789 from GMT Games
Stilicho: Last of the Romans from Hollandspiele
Nevsky: Teutons and Rus in Collision, 1240-1242 from GMT Games
A Most Fearful Sacrifice: The Three Days of Gettysburg from Flying Pig Games
Donnerschlag: Escape from Stalingrad from VUCA Simulations
Keep Up the Fire!: The Boxer Rebellion Deluxe Edition from Worthington Publishing
Liberty or Death: The American Insurrection from GMT Games
Lanzerath Ridge: Battle of the Bulge from Dan Verssen Games
Salerno ’43: The Allied Invasion of Italy, September 1943 from GMT Games
Bayonets & Tomahawks: The French and Indian War from GMT Games
Undaunted: Normandy from Osprey Games
Traces of War from VUCA Simulations
SCS Ardennes II from Multi-Man Publishing
Almoravid: Reconquista and Riposte in Spain, 1085-1086 from GMT Games
Walking a Bloody Path: The Battle of Fallen Timbers, August 20, 1794 from High Flying Dice Games
All Bridges Burning: Red Revolt and White Guard in Finland, 1917-1918 from GMT Games
Storm Over Jerusalem: The Roman Siege from Multi-Man Publishing
Iron, Blood, Snow & Mud from PHALANX
North Africa ’41: The Western Desert, March to December, 1941 from GMT Games
Battles of the American Revolution Volume II: Brandywine from GMT Games
Ardennes ’44: The Battle of the Bulge from GMT Games
Gandhi: The Decolonization of British India, 1917-1947 from GMT Games
Battles of Napoleon: Volume I – Eylau 1807 from Sound of Drums
Tattered Flags No. 01 – Into the Whirlpool from Blue Panther
Alliance: Multiplayer Napoleonic Wargame from Columbia Games
-Grant
