
Continuing along in this new series devoted to the best looking boards found in the wargaming world where I will highlight the art and layout of a different board in a wargame that we have played to show you the various talents of the artists and graphic designers involved. In my humble opinion, a well designed and attractive board can make all the difference in the world to me enjoying a wargame. Don’t get me wrong, the game has to be good, but if it’s also good looking it always is a better experience. A board can draw me in. Can make me feel that I’m there. Can set the stage for the thematic immersion that we all crave. And I have found many of these type of boards and I want to make sure that I share them with you.
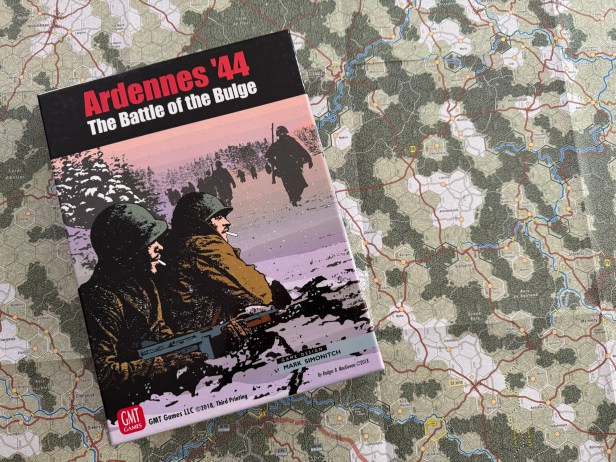
Mark Simonitch is a veteran game designer and artist as he typically does much of his own map and counter artwork and layout. This is now the 4th time we have featured one of his boards in this series and it will not be the last. He has designed some really great wargames including titles such as Ardennes ’44: The Battle of the Bulge (2003) from GMT Games, Normandy ’44: D-Day and the Battle for Normandy (2010) from GMT Games, The U.S. Civil War (2015) from GMT Games and Salerno ’43: The Allied Invasion of Italy, September 1943 (2022) from GMT Games to name just a few. I would characterize Mark’s style as clear and very functional but he always puts nice touches on terrain and important aspects such as bridges, roads and cities. His maps just seem to pop and really set a great mood for his games. Such is the case with the board for one of his classic designs in Ardennes ’44: The Battle of the Bulge from GMT Games. The game and board is just sexy! All of those colors, with a majority of them being differing shades of browns and greens, just look great and the counters really seem to pop off the board even though most of their colors are also in the browns, greens and grays scale of the color spectrum. Just a great looking game that was really fun to play and experience!
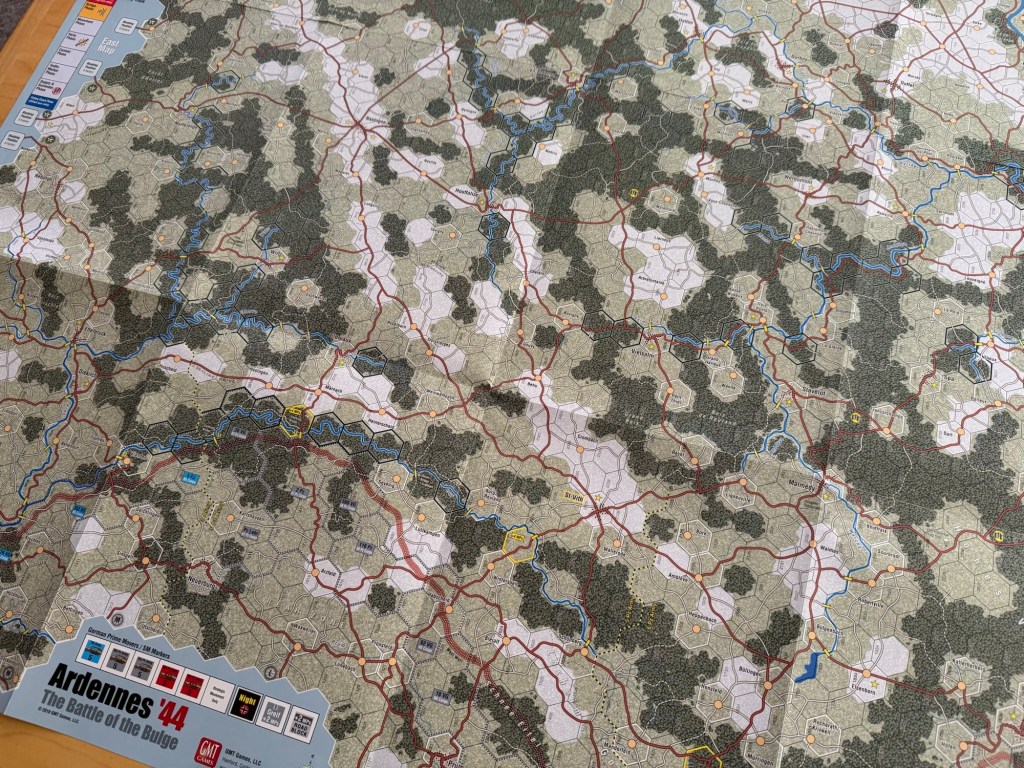
The game comes with 2 large boards for a total coverage of 30″ x 37″. That is nearly 3′ x 3′ and you can see how large this board is. These 2 boards laid out take up quite a lot of space on your gaming table and will not be easy to find plexiglass that matches the size unless you play smaller scenarios and intend on using just one of the 2. But when both are laid out, they are a breathtaking sight! I just love the initial color burst that I get when I look at the board. The other really cool thing about the 30,000 foot view is the red road lines and the blue rivers and streams. They really add a nice web of additional color to the tapestry and create something truly beautiful!
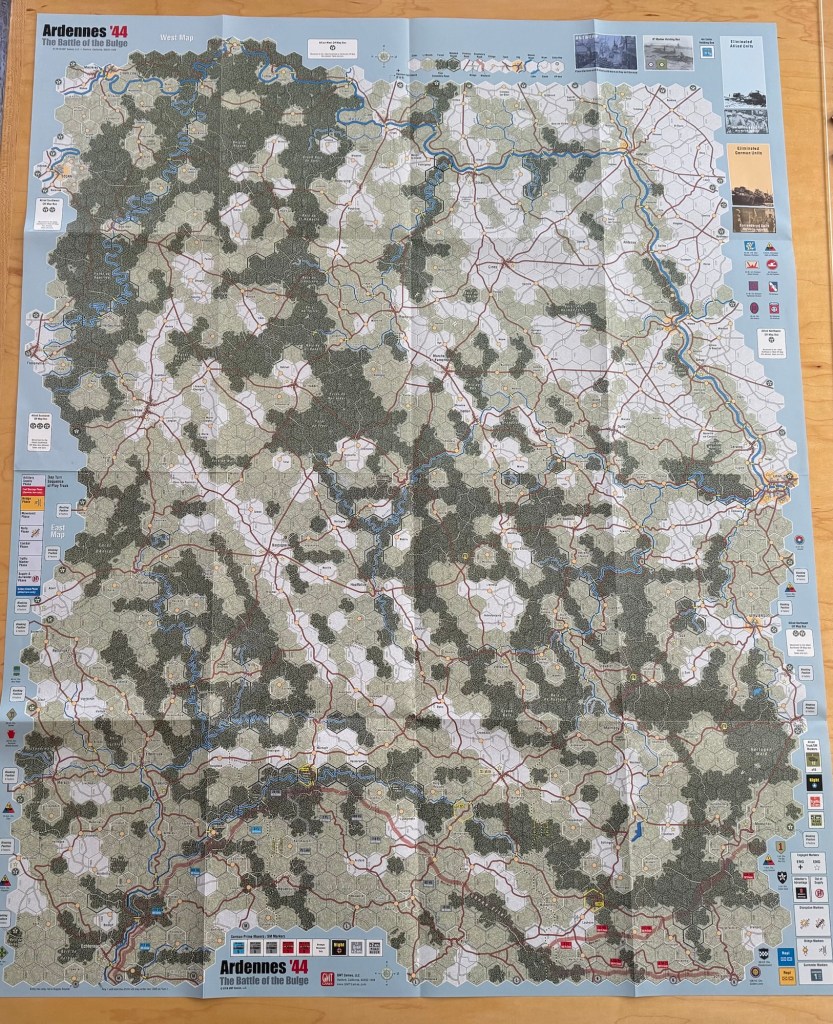
The board is broken up into a West Map and an East Map as shown in the 2 pictures below. The battlefield kind of lays out in this way and Mark chose to place north on the right side of the boards, which is a fairly uncommon way of doing that. But it works here and makes for a simple way to orient the action on the board.
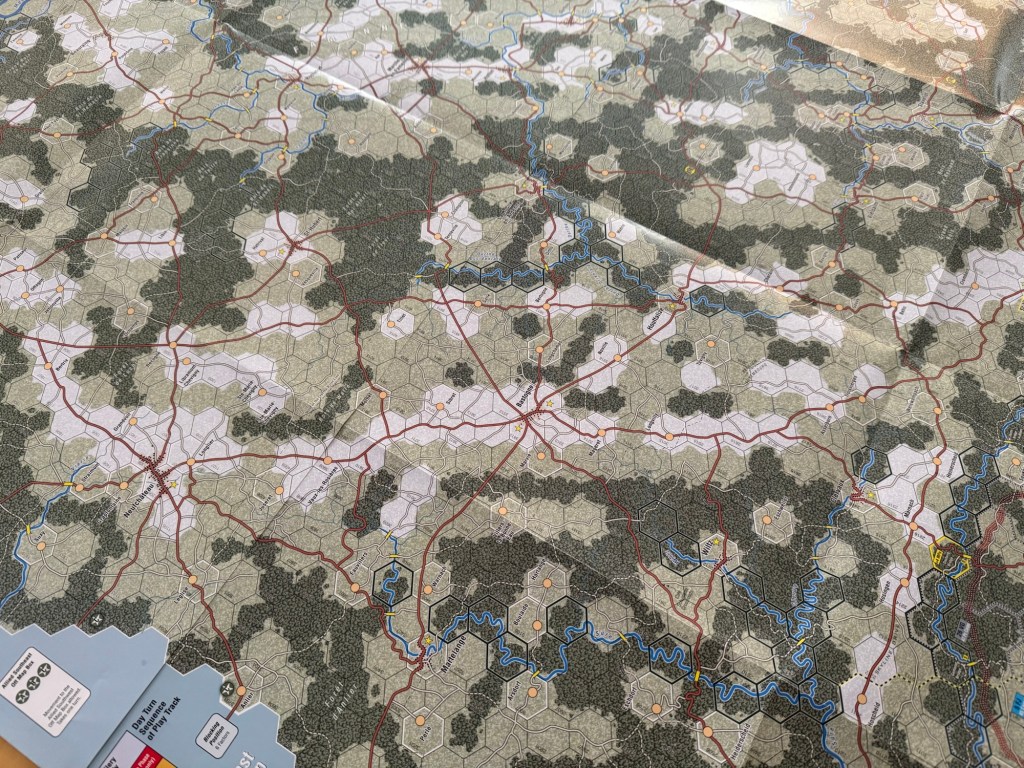
The East Map is shown below and you can see the crease where the two boards line up. In general, they line up pretty well but we have found that it is best to place a piece of tacky puddy on the underside of the board as you lay it out on the table and then cover it with a nice piece of thick plexiglass. This keeps the adjoining edges aligned properly and keeps all of the hexes from moving around as we touch the board and move our counters. I am not a huge fan of defacing my games but as you can see below we have a few spots where we put some puddy initially on top of the board and that was a mistake as this left behind some greasy residue. Oh well, live and learn I guess! At least the game has been played and shown some love and isn’t still sitting on the shelf gathering dust.

Let’s take a bit of a closer look at how the 2 boards lineup as they come together. Below, you can see the edge extending to the north from the south edge of the board to around Laroche-en-Ardennes. I feel like the edges line up nicely and really cause no aesthetic or playability issues. I made a bit of a mistake with my alignment for the picture but not too badly.

As we extend further to the north, the edge blends pretty seamlessly and looks really great.
And finally, we come to the edge of the map where we meet up with Liège in Belgium. Once again, no major issue here but I have been a bit sloppy with my alignment. But other than that, this part of the board works pretty great and when you take the proper care and use the weight of plexiglass and the possible use of tacky puddy, you can get this 100% aligned.
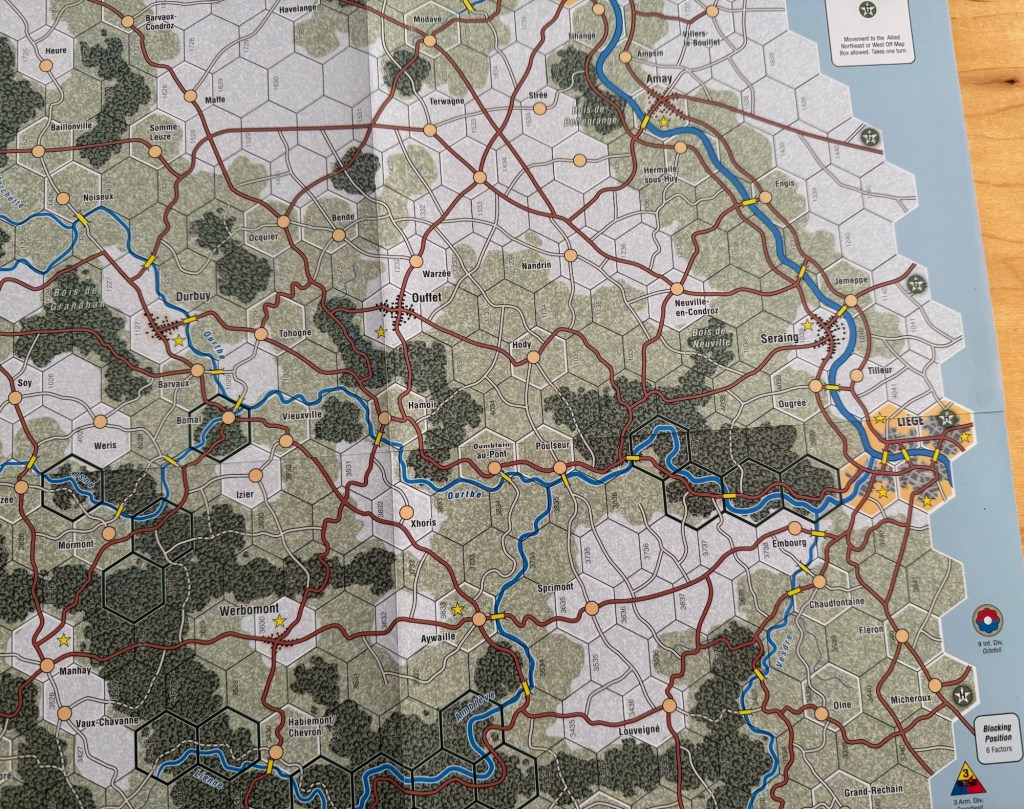
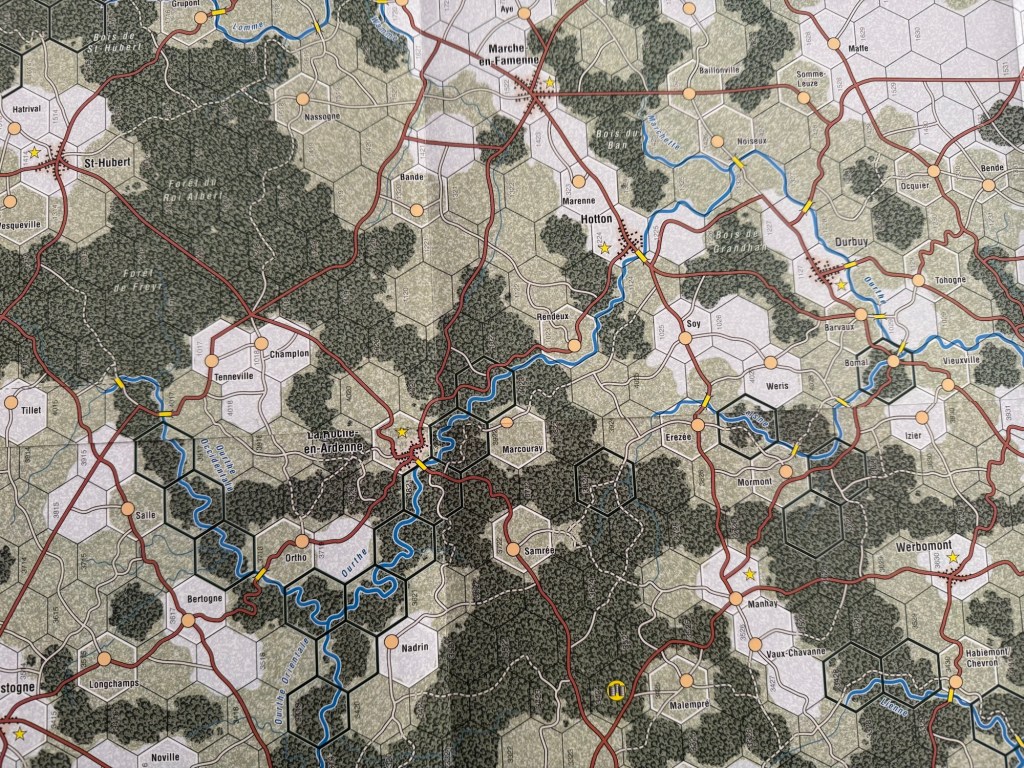
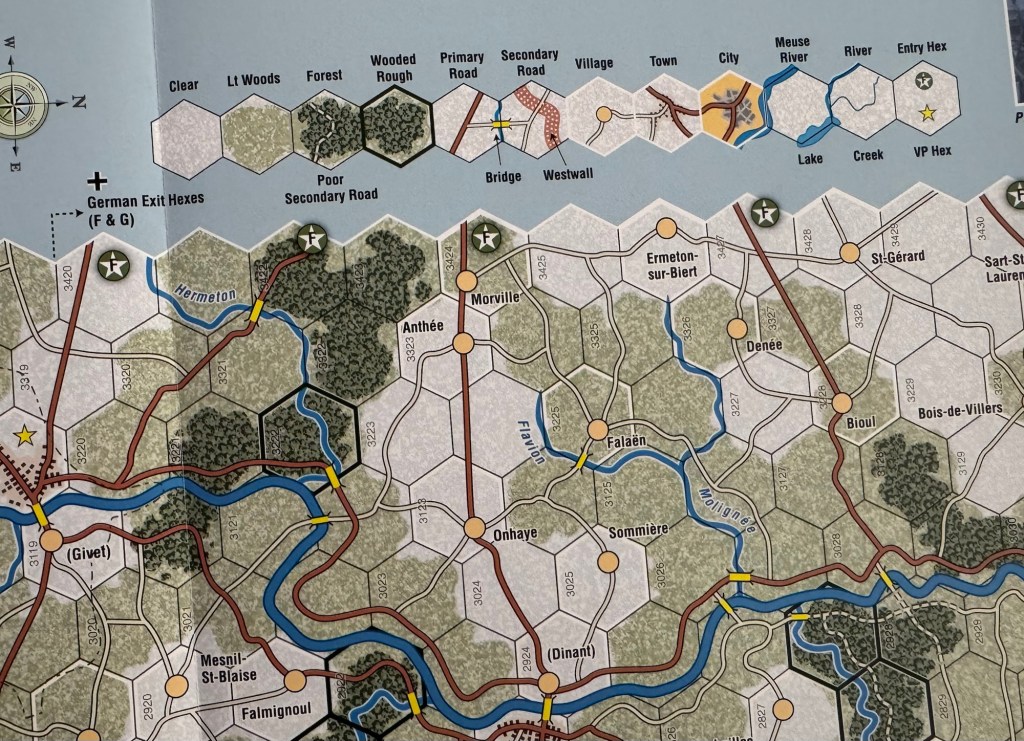
As I look at the board I notice several different very interesting graphical choices that enhance the overall aesthetic of the game and the experience of the players. First off is the color choices. I just really love the use of dark green for the Wooded Rough terrain and the lighter shade of green for Light Woods. These two colors really complement each other well and offer good contract to make it readily apparent what terrain you are in. I also really like the use of a graphics within these hexes to denote the trees as you can see the shapes of the canopy drawn out in each and every hex that contains any type of trees. Furthermore, the Wooded Rough has a distinct tree outline in each hex while the Light Wood doesn’t but has more flat and low lying scrub and brush type of trees that also give the hexes some distinct textures.
Wooded Rough represents a wooded valley with a small river running through the middle of the hex. Crossing a non-road dark green hexside is the same as crossing an unbridged river hexside and is not allowed for Vehicle units. Infantry units may only cross if they start adjacent to the Wooded Rough hexside and use Tactical Movement. Infantry units may not cross two non-road Wooded Rough hexsides in the same Movement Phase. As you can see, these Wooded Rough terrain hexes are brutal and Mark built a lot of that difficulty into the game through the punishing movement restrictions.
With a board that has about 80% tree coverage as this one does, being representative of the Ardennes Woods in the area of the Battle of the Bulge, you would expect the board to be covered in green and using these differentiations was very important to make the game playable but also to create the look and feel representative of the Ardennes Forest. The Ardennes is a region of extensive forests, filled with very rough terrain, rolling hills and ridges in Belgium and Luxembourg, but also extending at least partially into both Germany and France. The hills in the Ardennes average 1,150–1,310 feet in height but rising to over 2,277 feet in the boggy moors of the High Fens region of south-eastern Belgium. The region is typified by steep-sided valleys carved by swift-flowing rivers, the most prominent of which is the Meuse. Its most populous cities are Verviers in Belgium and Charleville-Mézières in France, both exceeding 50,000 inhabitants. The Ardennes is otherwise relatively sparsely populated, with few of the towns exceeding 10,000 inhabitants.
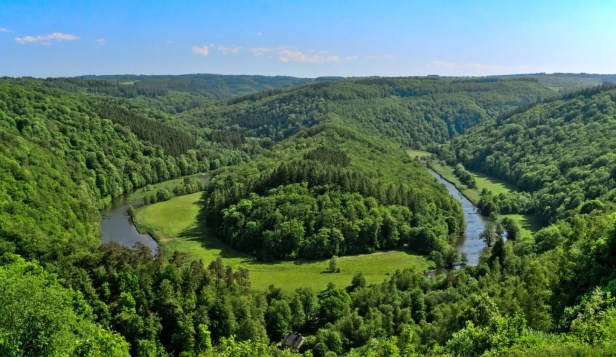
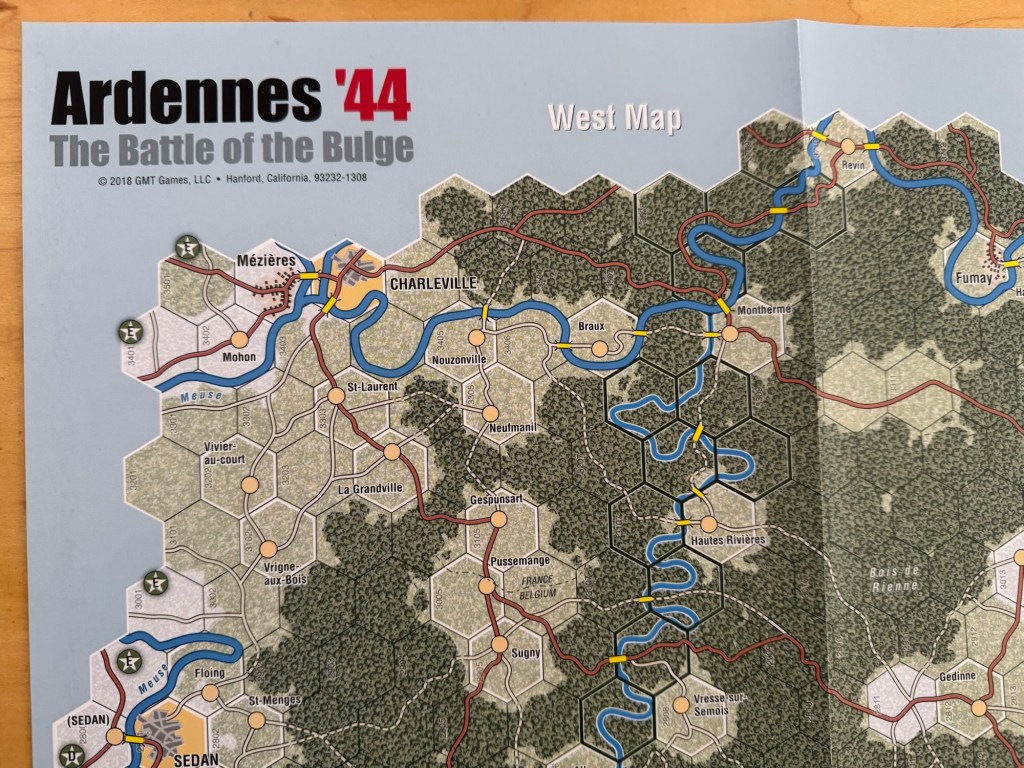
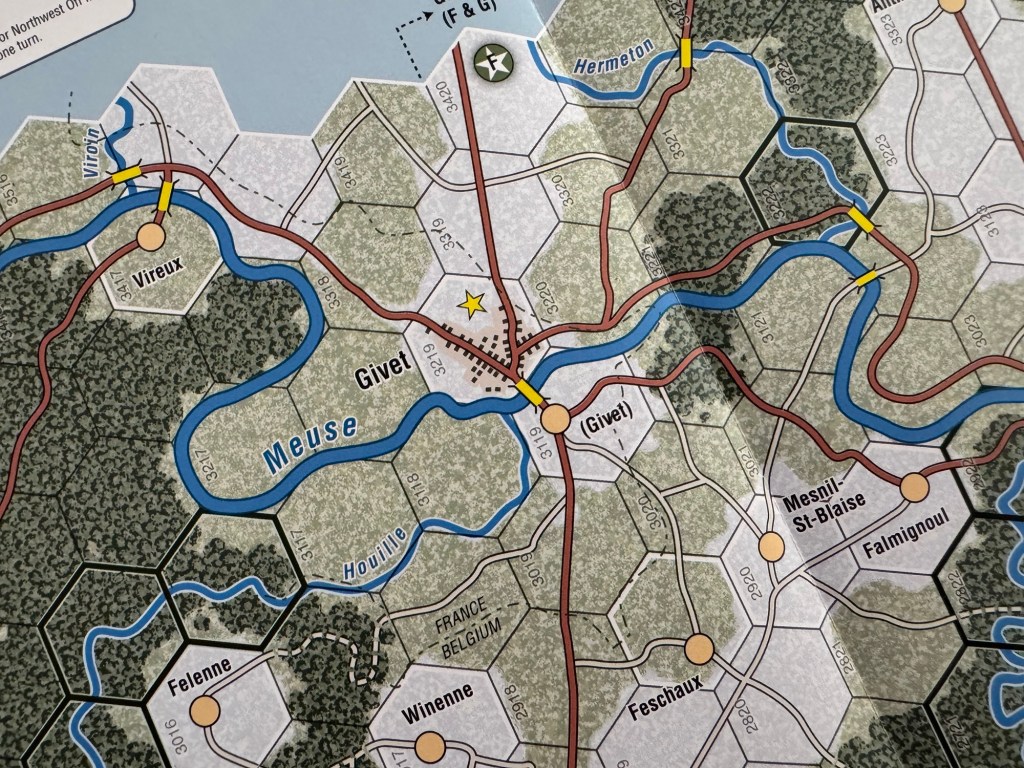
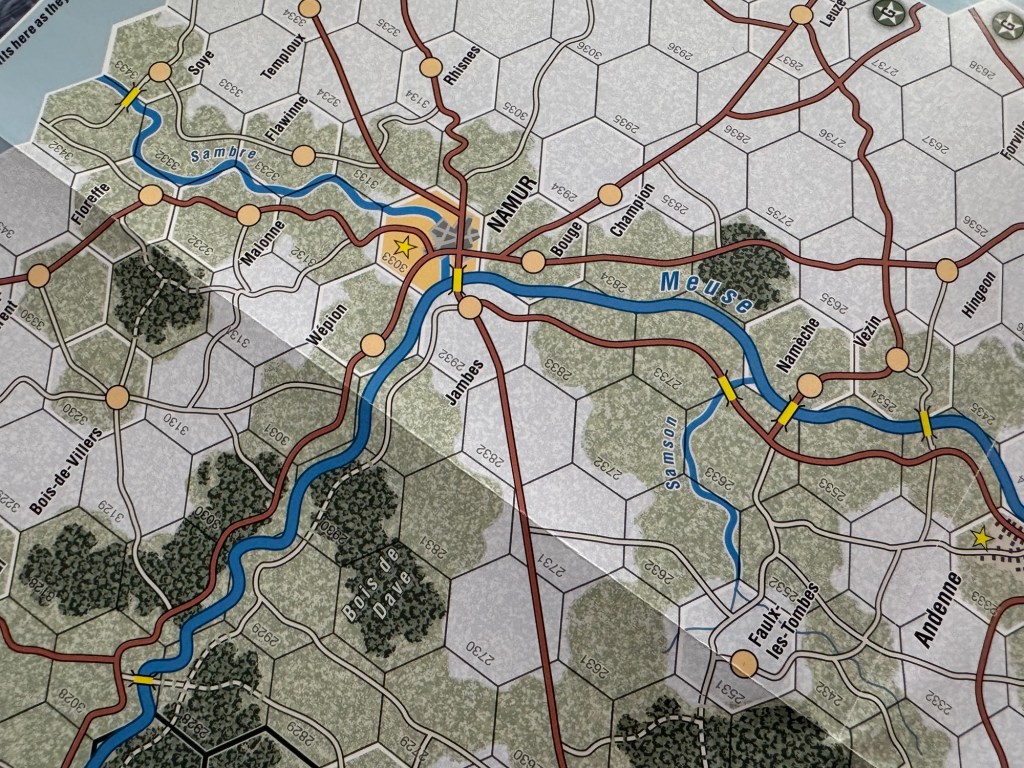
I mentioned the Meuse River above because it was seen as one of the major goals of the Nazi counter attack at the time as they tried desperately to break through to Antwerp, Belgium in order to split and cut off the British army group from American forces and separate both armies from their supplies, and then to crush the isolated British. The goal was to reach the Meuse and get across it to create this division and that was a big goal as the terrain and the land would fight them every step of the way. Shown in the picture below is the Meuse River, which is located on the West Map. The river is shown as a winding ribbon of blue as it moves through the terrain from Charleville north to Namur and then turning eastward toward Liège
It is quite imposing and stands out as compared to all of the other waterways shown on the board. This should give the player the idea and concept of its importance to the German plan for the battle but also to how difficult it can be to actually reach successfully.
The third point I want to make with the board is the highlighting of the roads. As you look at the board, you will literally see a web of criss crossing and interconnected roadways that run throughout the entire area. There are 2 different types or road including Primary Road, represented by the thicker dark red lines, and Secondary Road, which are represented by thinner white/tannish colored lines.
There are also a ton of bridges and crossings of the various rivers and streams in the area shown on the board and a big focus of the Allied strategy will be to blow many of these bridges causing movement delays and difficulties for the advancing Germans. These bridges can be repaired but it requires time and engineer units so blowing bridge will cause delay. In the picture below, you can see several examples of bridges, colored yellow, crossing the Meuse River in and around Namur. I love the use of the yellow color for the bridges as it gives a good graphical clue to where the Germans should move toward and where the Allies should defend.
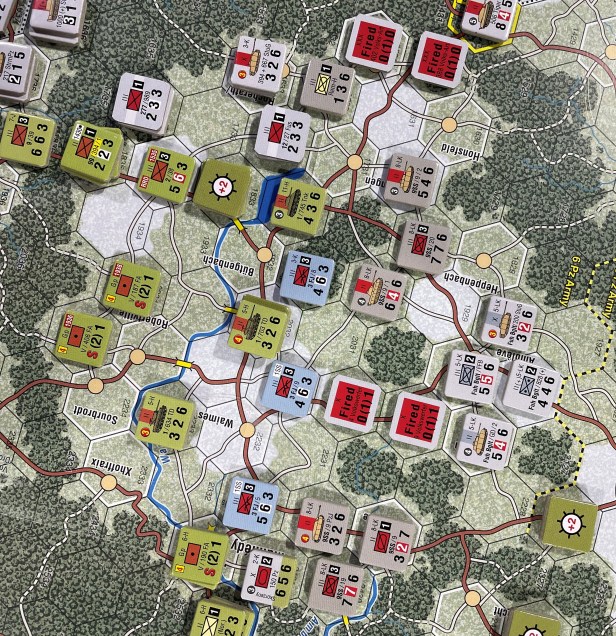
Here is a look at the area around St-Vith and you can see a large are of open terrain which uses a gray background to identify. These areas are more cultivated areas where the forest has been removed to create agricultural opportunities for the communities around. I included this picture as well to show the Army Boundaries. These are shown as dashed yellow and black lines that show where various German units may not cross before Turn 5. These Army Boundary Line restrictions are removed at the start of Turn 5. The boundary lines do not extend beyond the hexes marked on the map which means that German units that move west of the boundary lines may move in any direction. These lines represent the areas of command and control for the various participating armies and you will notice that there is text adjacent to the dashed lines identifying those commands. Below you will see the Boundary Line between the 5th Panzer Army and the 6th Panzer Army.

You may also notice the hex that is highlighted in yellow and has the note +4 MP’s on the board. These are bottleneck hexes and are marked on the map and have all of the same effects as a Traffic marker except units must pay 4 additional MP’s (+4 MPs) instead of +2. The instant the German player gains control of St-Vith the cost of these hexes is reduced to +2 MPs. If the German player loses control of St-Vith the bottleneck hexes again cost +4 MPs. St-Vith Bottleneck hexes have no effect on Allied units or Tactical Movement.
You might also notice the yellow fuel barrels shown at various places on the board. These are Fuel Dumps and at the start of the game the Allied player randomly places the three Fuel Dump markers on the map—one in each space marked with a Fuel Dump symbol. Only one of the markers contains the real fuel as the rest are dummies. The Allied player may examine the markers after they have been placed, but the markers will remain secret from the German player. The instant the German player moves a unit adjacent to one of the Fuel Dump markers, it is flipped over. If it is a dummy, it is removed and if it’s the chosen dump then the German has to fight the defensive value of 2 and if they win it is captured. The German player must hold the dump until the fuel can be removed. The German player can remove the captured dump in their next German Fuel Shortage Phase if a road-bound Supply Path can be traced from the dump to the German East map edge. If captured and the fuel can be removed, the German player skips the Fuel Shortage Phases on Turns 7 and 8. This is a very important part of the game and will be a focus of the German player. Historically, the 1st Army had a primary fuel dump located outside of Francorchamps. If captured, this was enough fuel to alleviate the German fuel shortages and Kampfgruppe Peiper came within a few miles of the dump without knowing it.

As expected, Bastogne is a big focus of the game. Located in the center of the West Map, Bastogne starts generally completely surrounded by elements of the 47th Panzer Army supported by multiple Stugs. The defending 101st Airborne are in a bad way but will construct makeshift Improved Positions (IP), which give them a +2 Defensive Combat Bonus to their Defense Factors turning these infantry into 6 Strength units. Not a huge difference, but in this situation each of those Defense factors help keep them alive. Bastogne was a vital crossroads town in Belgium and was a key objective for the Germans during the Battle of the Bulge because it controlled the main roads into the Ardennes. You will notice that it contains a few yellow stars which means these hexes are Victory Point Hexes and control will lead to additional VP’s being granted.

The board is really well done and even though there are a lot of different shades of green used and then red and blue ribbons, it is pleasing to look at and keeps the players attention during the game. It is also very functional and the Terrain Effects Key can be found on the West Map. It is important for these complex and deep hex and counter wargames to keep this type of information readily available as it will aid and speed game play.
We really enjoyed Ardennes ’44! In fact, I think that this is an understatement and I think it might be moving up the scale on my list of Bulge games but also is amongst my favorites in the ’40X Series. I hesitate to say it felt fresh, as this is one of the first few games in the series, but it definitely had some different elements than the other games in the series do that we have played. That also really excites me about the future of our plays of other games in the series such as Ukraine ’43 and France ’40. But this one is also beautiful and it was a pleasure to play on this gorgeous canvas.
Here is a look at our video review for Ardennes ’44:
The next board that we will take a look at in the series is Gandhi: The Decolonization of British India, 1917–1947 from GMT Games illustrated by Knut Grünitz and Mark Simonitch.
Here are links to the previous entries in the series:
Kekionga!: A Dark and Bloody Battleground, 1790 from High Flying Dice Games
Campaigns of 1777 in Strategy & Tactics Magazine #316 from Decision Games
Battle Hymn Volume 1: Gettysburg and Pea Ridge from Compass Games
From Salerno to Rome: World War II – The Italian Campaign, 1943-1944 from Dissimula Edizioni
This War Without an Enemy: The English Civil War 1642-1646 from Nuts! Publishing
Holland ‘44: Operation Market-Garden, September 1944 from GMT Games
Maori Wars: The New Zealand Land Wars, 1845-1872 from Legion Wargames
Imperial Struggle: The Global Rivalry – Britain & France 1697-1789 from GMT Games
Stilicho: Last of the Romans from Hollandspiele
Nevsky: Teutons and Rus in Collision, 1240-1242 from GMT Games
A Most Fearful Sacrifice: The Three Days of Gettysburg from Flying Pig Games
Donnerschlag: Escape from Stalingrad from VUCA Simulations
Keep Up the Fire!: The Boxer Rebellion Deluxe Edition from Worthington Publishing
Liberty or Death: The American Insurrection from GMT Games
Lanzerath Ridge: Battle of the Bulge from Dan Verssen Games
Salerno ’43: The Allied Invasion of Italy, September 1943 from GMT Games
Bayonets & Tomahawks: The French and Indian War from GMT Games
Undaunted: Normandy from Osprey Games
Traces of War from VUCA Simulations
SCS Ardennes II from Multi-Man Publishing
Almoravid: Reconquista and Riposte in Spain, 1085-1086 from GMT Games
Walking a Bloody Path: The Battle of Fallen Timbers, August 20, 1794 from High Flying Dice Games
All Bridges Burning: Red Revolt and White Guard in Finland, 1917-1918 from GMT Games
Storm Over Jerusalem: The Roman Siege from Multi-Man Publishing
Iron, Blood, Snow & Mud from PHALANX
North Africa ’41: The Western Desert, March to December, 1941 from GMT Games
Battles of the American Revolution Volume II: Brandywine from GMT Games
-Grant

I encountered the following post over on the X social media platform, this morning, and I am reporting in, in a bid to help stem the tide of the battle for increased views here on The Player’s Aid blog.
https://x.com/playersaidblog/status/1896019374827586002
That said, I have now read this article in its entirety. My own opinion of the map, which is based solely on different photographs of the map and map images and not from actually playing the game and having an actual copy of the board/map in front of me, is not as high as your own stated opinion of the looks of the map. Depending upon which images/photos of this game’s map that I encounter on the Internet, including those on BoardGameGeek’s entry for this game, this map’s color tends to look different, from photo to photo.
That said, there are various things about this map (and markers) that I do like.
Foremost among these is the Terrain Key (that’s what I call it, anyway), which is located at the top right of the following image:
https://s3-us-west-2.amazonaws.com/gmtwebsiteassets/nna4/2edmap.jpg
I really like that. Also, I love the bright yellow Fuel Dump markers, and the fact that some of them are dummies. That’s a really nice visual touch, in addition to being a very nice game mechanic for this game.
Another thing about this map that I like are the dashed yellow and black lines that show where various German units may not cross before Turn 5.
With regard to the yellow star Victory point Hex at Bastogne, it appears that there are two of those yellow stars there. Care to clarify about that, Grant? You mentioned one yellow star there, but what about that second yellow star just one hex away?
There are a few typos in this article which you may (or may not) care to run through a checker, to clean the article up, since your blog postings are, in essence, a permanent record. Overall, I like your site, here.
Separate from all of this, best of luck to you in getting the site’s view numbers back up.
LikeLike
I encountered the following post over on the X social media platform, this morning, and I am reporting in, in a bid to help stem the tide of the battle for increased views here on The Player’s Aid blog.
https://x.com/playersaidblog/status/1896019374827586002
That said, I have now read this article in its entirety. My own opinion of the map, which is based solely on different photographs of the map and map images and not from actually playing the game and having an actual copy of the board/map in front of me, is not as high as your own stated opinion of the looks of the map. Depending upon which images/photos of this game’s map that I encounter on the Internet, including those on BoardGameGeek’s entry for this game, this map’s color tends to look different, from photo to photo.
That said, there are various things about this map (and markers) that I do like.
Foremost among these is the Terrain Key (that’s what I call it, anyway), which is located at the top right of the following image:
I really like that. Also, I love the bright yellow Fuel Dump markers, and the fact that some of them are dummies. That’s a really nice visual touch, in addition to being a very nice game mechanic for this game.
Another thing about this map that I like are the dashed yellow and black lines that show where various German units may not cross before Turn 5.
With regard to the yellow star Victory point Hex at Bastogne, it appears that there are two of those yellow stars there. Care to clarify about that, Grant? You mentioned one yellow star there, but what about that second yellow star just one hex away?
There are a few typos in this article which you may (or may not) care to run through a checker, since your blog postings are, in essence, a permanent record. Overall, I like your site, here.
Separate from all of this, best of luck to you in getting the site’s view numbers back up.
LikeLike