Continuing along in this new series devoted to the best looking boards found in the wargaming world where I will highlight the art and layout of a different board in a wargame that we have played to show you the various talents of the artists and graphic designers involved. In my humble opinion, a well designed and attractive board can make all the difference in the world to me enjoying a wargame. Don’t get me wrong, the game has to be good, but if it’s also good looking it always is a better experience. A board can draw me in. Can make me feel that I’m there. Can set the stage for the thematic immersion that we all crave. And I have found many of these type of boards and I want to make sure that I share them with you.
The Storm Over Area Impulse Series has been around for a while and includes games such as Storm Over Arnhem (1981) from The Avalon Hill Game Company, Storm Over Stalingrad (2006) from Multi-Man Publishing and Storm Over Dien Bien Phu (2014) from Multi-Man Publishing amongst several others. The hallmark of the series is relatively low complexity for a wargame and a very simple combat system that calculates total attack versus total defense and adds a roll of 2d6. The losses from combat can be absorbed by either retreating from the attacked areas or destroying units. The game system has mostly been used to model more modern wars including the Franco-Prussian War, World War II and the French conflict at Dien Bien Phu in Vietnam.
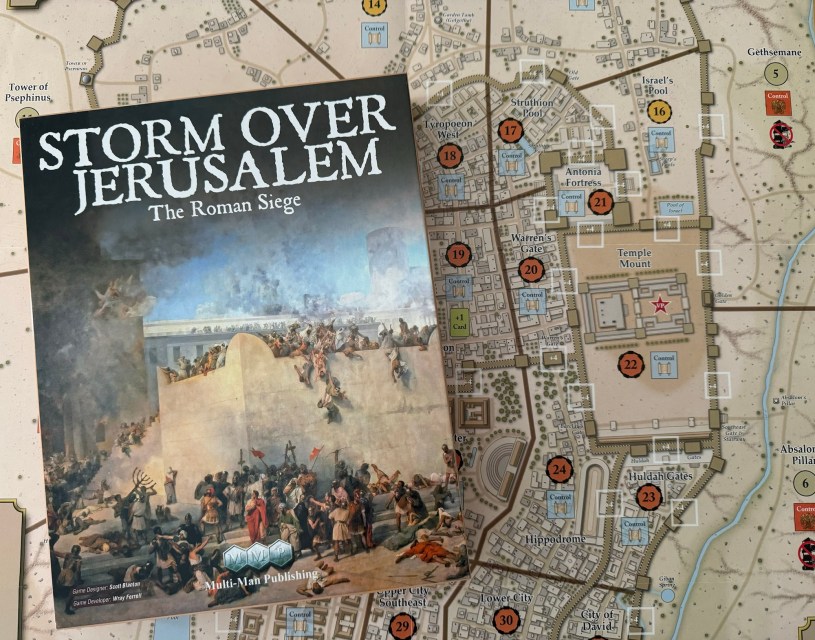
Storm Over Jerusalem: The Roman Siege is a 2-player wargame that simulates the Roman siege of Jerusalem during 70 AD. One player controls the mighty Roman forces, who are truly master of siege warfare with their siege towers, ballista, battering rams and onagers, and the other player controls the Judean forces, which are divided into 2 separate factions with different leaders. The game is 8 turns long, but can be shortened by the play of a few event cards, at the end of which time the winner is determined by calculating victory points that come from overall losses, holding of certain VP areas and keeping the Romans out of the city.
And the board is a fantastic entry into this series as it is a good mix of artistic flair, impressive small details and functionality. The artist is the talented Charles Kibler who has done a ton of great looking boards including The Battle for Normandy (2009) from GMT Games, The Day Was Ours: First Bull Run (2021) from Revolution Games, Border Reivers (2023) from GMT Games recently as well as a slew of Advanced Squad Leader boards stretching back through the years and a lot series games for GMT Games such as Great Battles of the American Civil War and Great Battles of the American Revolution. He is very effective at creating great looking terrain and weaving in very nice details to highlight the main functions of the board.
This one though is a great looking wargame and really breaks the mold of the genre. As I look at the map itself, it is really well done with the outer and inner walls of the city clearly defined, even having little battlements drawn on them, the boundaries between different Areas cleanly outlined, and great detail of the city itself with inner streets, buildings and famous locations like Temple Mount, Herod’s Palace, Gethsemane and the Pool of Siloam to name just a few. The board for Storm Over Jerusalem is a 22 x 34″ full color paper mapsheet that shows the walls of the city itself with a good portion of the surrounding terrain as well as these are used by the Roman player to approach and attack the mighty walls of the city.

The main focus of the game is the various Areas of the city which are separate spaces that each have their own number shown in a circle either colored tan, yellow or reddish orange which denotes the strength of the defenses there. The game is an Area Movement game and as such the Areas on the map are divided up to make an interesting tactical puzzle for the invading Romans as they have an easier time breaching the outer walls, because there are several adjacent Areas that provide the opportunity for multiple attacks from different armies stacked in different adjoining Areas, but have a much more difficult time of it as they approach the inner walls which squeeze the accessibility to them down to just a few spaces.
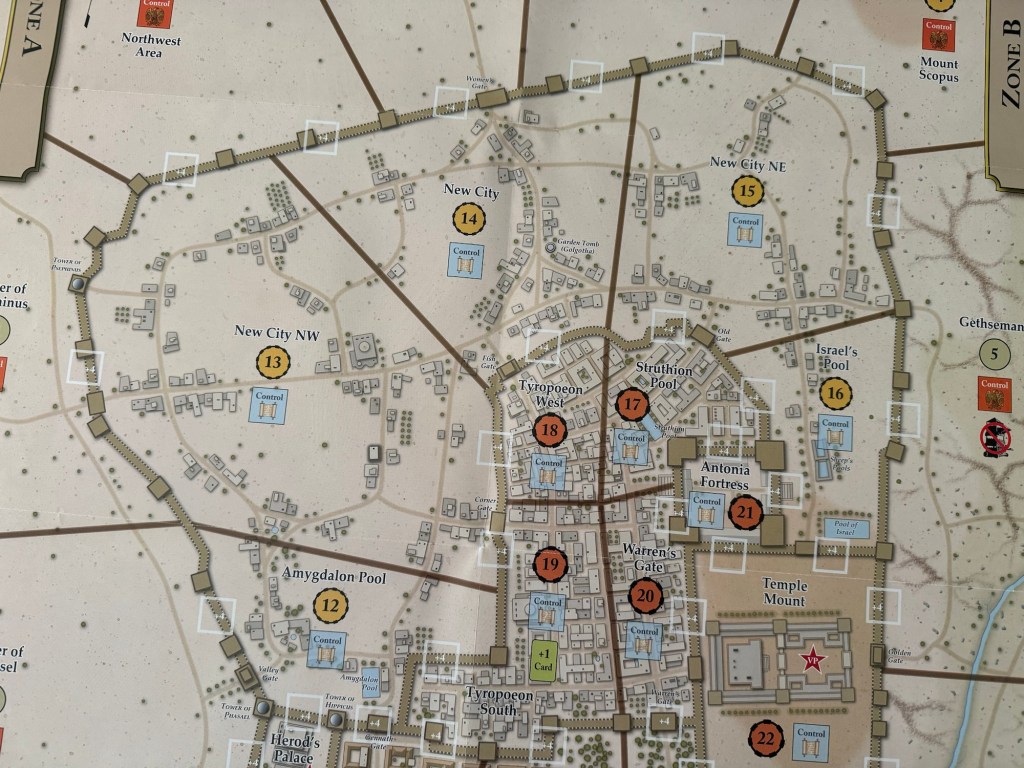
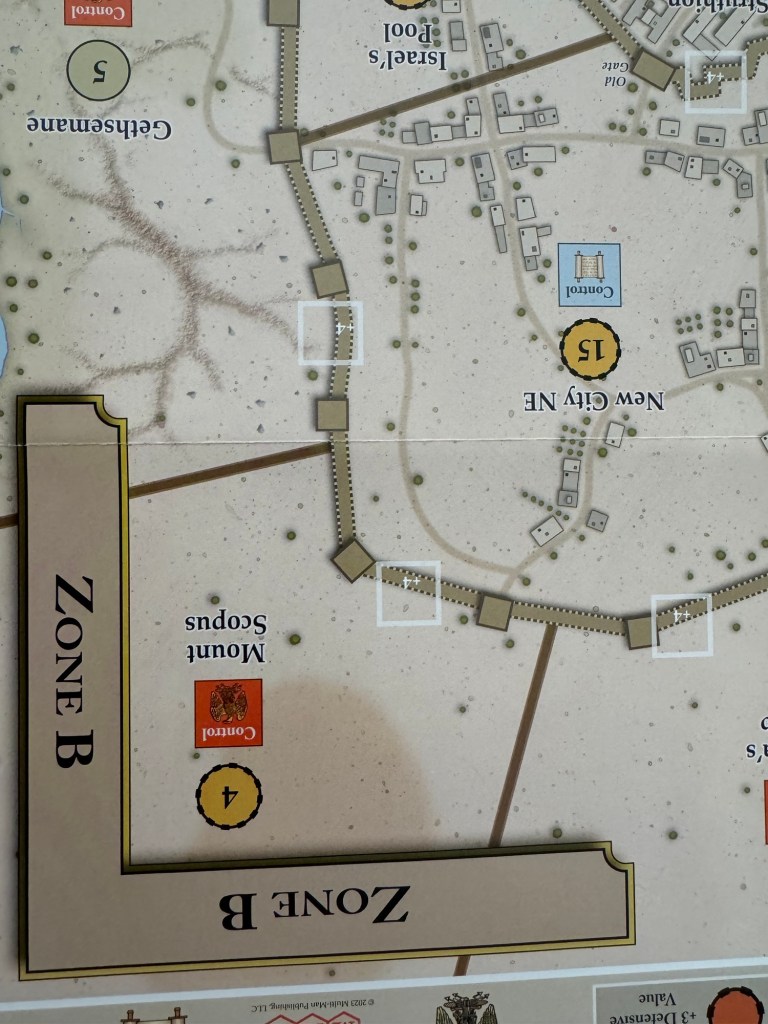
Let’s first take a look at the north side of the city itself and the Areas that are directly adjacent to the main avenues of assault by the Roman armies. If you look at the Areas numbered 13, 14 and 15, these are less dense with buildings and have more open ground around them. This causes the areas to not be quite as strong although the walls are very good here and will take a determined enemy to defeat them. The really love how Charlie drew the small detailed buildings and various structures onto the board and even connected them with the inner streets shown with great detail. It would have been very easy to simply represent these as blank and not worry about going to extra detail of the buildings themselves. Also, if you look at each individual building, you will see that no two are shaped the same and they each are unique. I very much love this detail.
Also, as you look closely at the terrain surrounding these buildings, you will notice different shrubs and trees that dot the surface. These have been drawn in in a random and disorderly manner but it ends up looking really good. I also like how Charlie grouped some of these trees/shrubs together giving the impression of a small grove, orchard or even a grouping of cultivated olive trees. Olive trees are very common in Jerusalem and the surrounding landscape and their presence here really gives a real aesthetic.

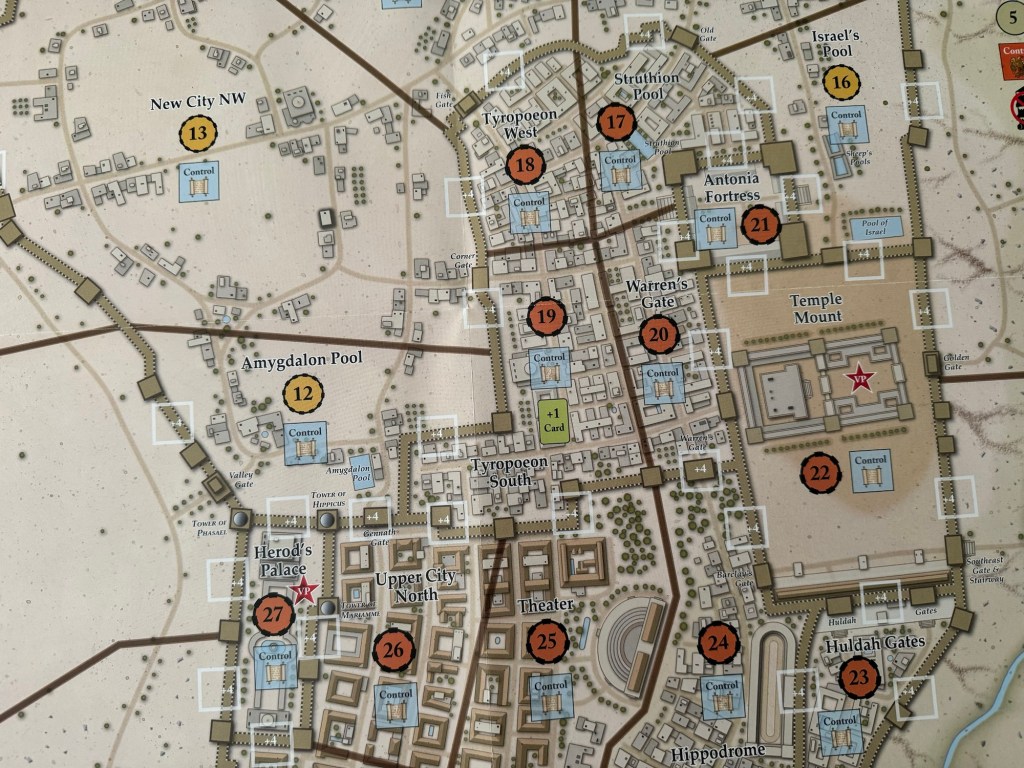
As we move to the south side of the city, you will notice that the buildings become much more dense and larger and connect to each other as if they are built off of one another. This creates the typical urban feel of a continuous wall of masonry as you would walk down these small streets that would have been crowded with merchants, shoppers, workers, city guards and other civilians busily hurrying about their day.
You will also notice that the numbered circles are all listed here as reddish orange and are much stronger as they are supported by other buildings and adjoining walls. This is the heart of the city and is the tougher part to take for the Romans. Each of the Areas are specifically given a name, some based on the historical name there or a simple generic name. You will notice names like Hippodrome, where there public gatherings for horse and chariot racing or gladiatorial fights, City of David and Herod’s Palace which is further marked with a red star that denotes this area as a significant victory hex.
One other really nice touch about the ground touching the walls on the outside of the city is the erosion marks on the landscape itself. As the dry and arid terrains receive rain fall, it will quickly run off the ground causing these gouges and scars in the landscape that are unmistakable. This was a really nice addition to the board itself and gives it the feeling of nature and her effects on the city.
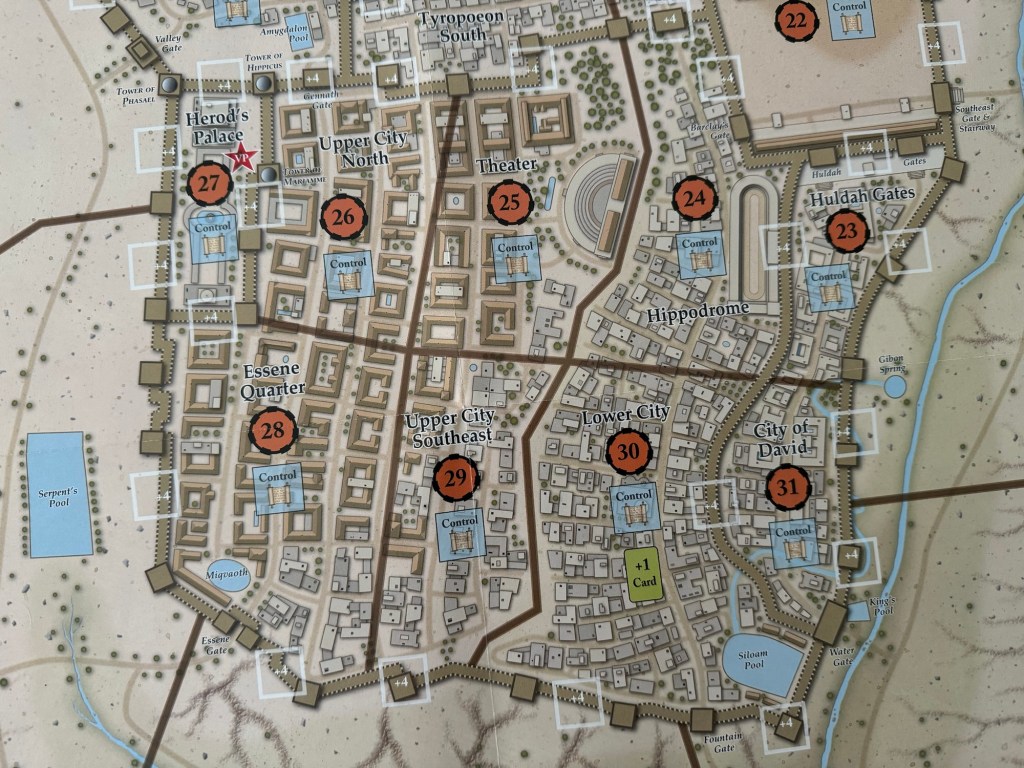
The Temple Mount is a very prominent structure in the urbanized area as would be expected as it is was a central focus of the lives of the Jews who lived there. It has its own internal walls that must also be breached by the Romans so this is a very tough nut to crack. I really enjoy the look of the Temple Mount and that it feels very substantial, even a bit moreso than the other surrounding areas. You will notice that it contains a red star with VP in the center as this is one of the several VP sites that the Romans must take in order to win the game.
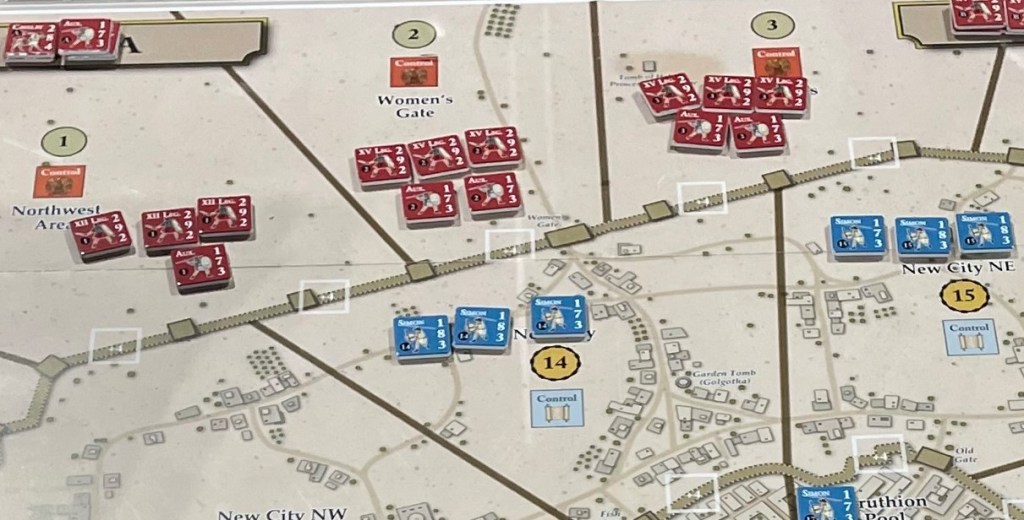
The Areas in this game are very well laid out and you can tell after playing that a lot of thought and trial and error went into the layout of the map. There are the outer walls that are accessible by at least 3 Areas around the full length of the map. This means that each of these outer wall Areas can be attacked by at least 3 separate Roman formations. These 3 separate formations can bring to bear no less than 3 attacks or assault over the walls each turn as after each attack or assault the units involved must be flipped over as spent. With the possibility of 3 different attacks each round, these outer walls are not long for the world and will ultimately fail and breach allowing the Romans access to the inner walls which is a secondary line of defense.
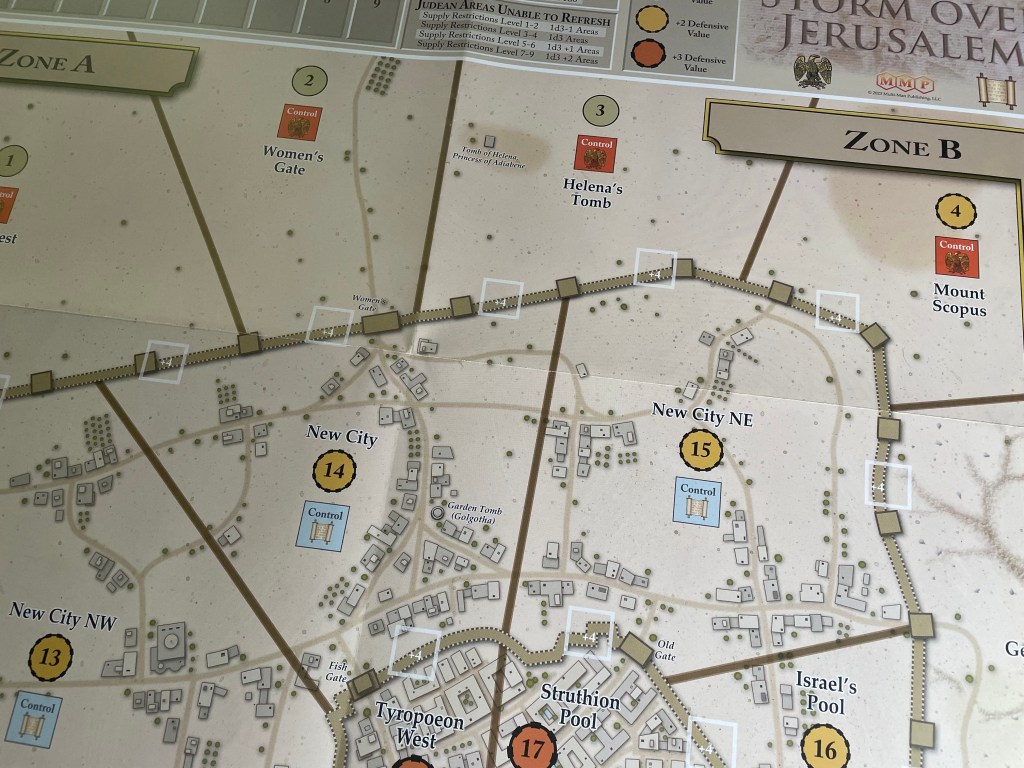
To illustrate this point focus on Area #14 New City. New City has an outer wall that is adjacent to 3 different Areas including Areas #1, #2 and #3. In each of these Areas are located 3-5 Roman units which can generate an attack power of 6-8. When adding in a few levels of Siege Towers that can be built, these attacks can be quite difficult to deal with by the Judean player who will have a defense value of 13-15 including the +4 benefit from the walls and the +2 terrain defensive benefit. If the walls are damaged or Siege Towers are at their highest level, this defense value can drop to 9-11 and is not that hard to overcome as the attacker is rolling 2d6 and adding the result to their total. This means that the Romans can bring 3 attacks with a total attack factor possibility of upwards of 15-18 (taking into account a high roll of the 2d6). This would mean the the Judean player will have to absorb 2-4 hits per attack and they normally have only 2-5 units in any given Area. These outer walls simply allow too many attacks at too high a bonus. But, once the outer walls are breached, and inevitably they will be, the Judean player has a second more defensible position they can fall back to: the inner walls.
These inner walls are a whole different nut to crack for the Roman player. As you can see in the below picture, Tyropoeon West Area #18 is adjacent to just 2 different Areas that allows attacks. These adjacent Areas are #13 (New City NW) and #14 (New City). This means that the Romans will have just one or two attacks per round rather than 3 and this difference of 1 is a big difference for the defenders as they can simply take more losses and then recover by moving new troops in or using their Leaders to activate spend units before the next turn when the Romans can attack again. You will also notice that the terrain defensive value increases in the inner walls from a +2 to a +3. This +1 can make a huge difference in the outcome of battles. This is the situation generally around the whole city where the inner walls lessen the axis of attack against them and also provide a higher defensive benefit from the city itself. This is an advantage that the Judean player has to use well and make the cost of each Area taken dear for the attacking Romans in the form of dead Legions.

These tactical decisions about holding and then falling back, utilizing your Leaders and scarce units to make each inch gained costly for the Romans was my favorite part of the design and made me see the game in a very different light after playing than before we started.
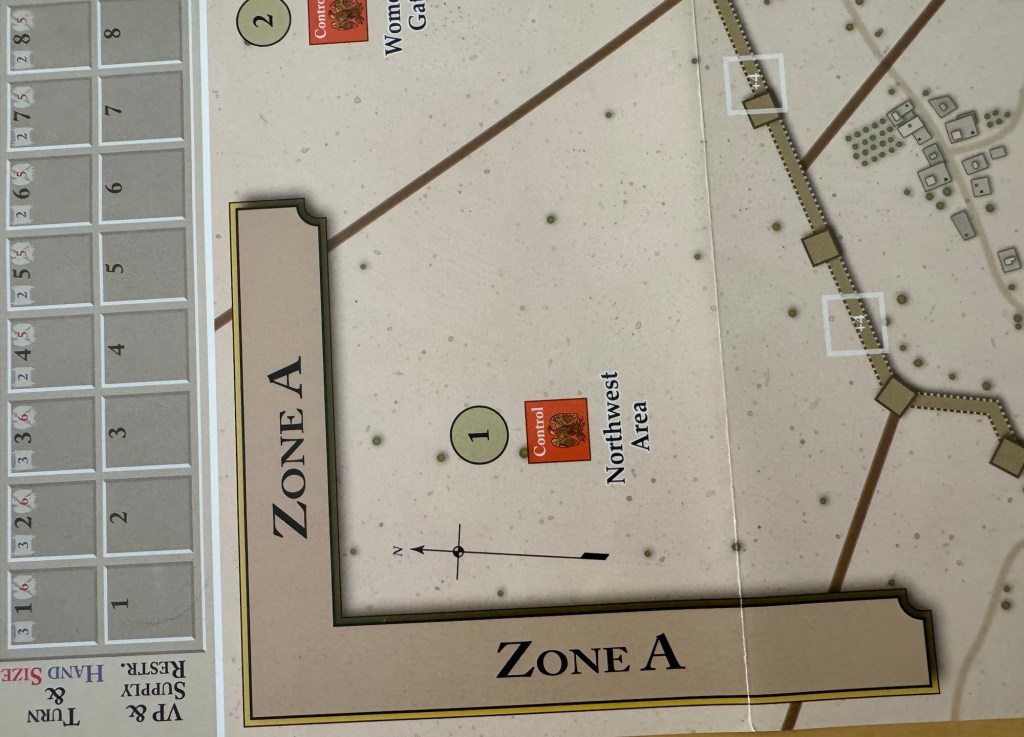
One final element that I want to take a look at in this piece is the various Zones located on the outside of the city itself. These include Zone A (located in the upper right hand corner), Zone B (located in the upper left hand corner), Zone C located in the bottom right hand corner) and Zone D (located in the bottom left hand corner). These areas are where the Roman player may place their oncoming troops and units. From these areas, they will then activate the units in the areas to attack and move against the walls defending the city. I really like the way the Zone Title graphics are laid out as they are clear, stand out from the background of the terrain, although it is just a darker shade of brown than the sandy desert, and that they are in a large substantial type face.
Another landmark that I was drawn to was the famous, at least to those who are readers and students of the Bible, Pool of Siloam. It is actually named Siloam Pool but played a central role in the story of Jesus as he made his way about the city teaching his doctrine, healing the sick and the afflicted and also in communing with the downtrodden and less fortunate. The Siloam Pool has long been considered a sacred Christian site, even if the correct identification of the site itself has remained uncertain at best. According to the Gospel of John, it was at the Siloam Pool that Jesus healed the blind man (John 9:1–11) by rubbing clay into his eyes and instructing him to wash in the waters of the pool. Traditionally, the Christian site of the Siloam Pool was the pool and church that were built by the Byzantine Empress Eudocia (c. 400–460 A.D.) to commemorate the miracle recounted in the New Testament.
The pool itself plays a very prominent role in the bottom right of the city and stands out to all who look upon it. I even like that the Water Gate and King’s Pool have been identified on the board itself and is a nice addition to provide an understanding of the layout and connection of various spots. There is nothing overly fancy about the way the Pool itself is drawn onto the board. No shading or lines, which would have been a nice addition to add some movement and life, but it is prominently there with a connection to the stream flowing to the top of the pool.
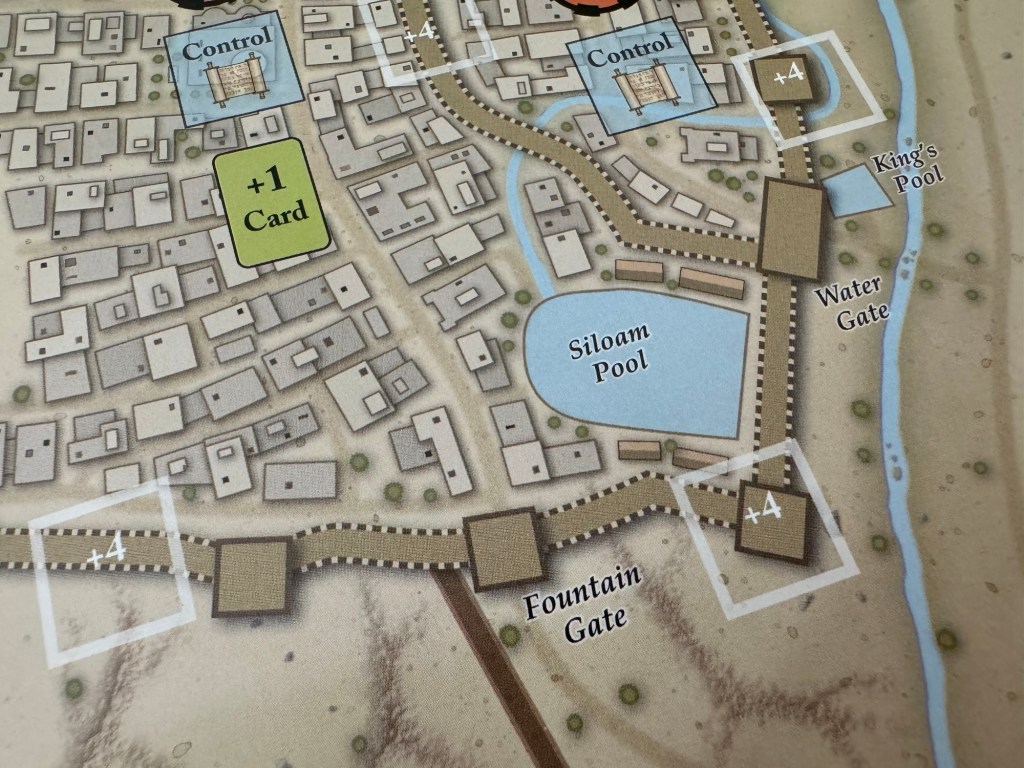
I also would point out the very nice Control boxes that are adorned with a papyrus scroll and colored blue as well. This color is the color of the Judean troops and counters and once a Roman control marker is placed in the box it stands out starkly to the lite blue.

I was very impressed with the artistic touches used on the board and feel that the choices made have improved the experience of the game and created some connection to the players. I don’t think that is the finest example of board art in this series, as this one still lands squarely on the functional side of that coin, but it is very nice and pleasing to behold and I am grateful to Charles Kibler for his effort with this game. I believe that this game has flown a bit under the radar of most wargamers and I would hope that this piece brings a bit more attention to it so that others may enjoy the game as much as we did.
Here is a look at our unboxing video so you can get a good look at the components:
Here is a look at our video review of the game:
I also posted an interview with the designer Scott Blanton and you can read that at the following link: https://theplayersaid.com/2023/06/19/interview-with-scott-blanton-designer-of-storm-over-jerusalem-the-roman-siege-from-multi-man-publishing/
Finally, I spent some time writing a full First Impressions style post and you can read that at the following link: https://theplayersaid.com/2023/06/07/first-impressions-storm-over-jerusalem-the-roman-siege-from-multi-man-publishing/
The next board that we will take a look at in the series is Barbarians at the Gates: The Decline and Fall of the Western Roman Empire 337-476 from Compass Games designed by Kris Van Beurden and illustrated by Shayne Logan.
Here are links to the previous entries in the series:
Kekionga!: A Dark and Bloody Battleground, 1790 from High Flying Dice Games
Campaigns of 1777 in Strategy & Tactics Magazine #316 from Decision Games
Battle Hymn Volume 1: Gettysburg and Pea Ridge from Compass Games
From Salerno to Rome: World War II – The Italian Campaign, 1943-1944 from Dissimula Edizioni
This War Without an Enemy: The English Civil War 1642-1646 from Nuts! Publishing
Holland ‘44: Operation Market-Garden, September 1944 from GMT Games
Maori Wars: The New Zealand Land Wars, 1845-1872 from Legion Wargames
Imperial Struggle: The Global Rivalry – Britain & France 1697-1789 from GMT Games
Stilicho: Last of the Romans from Hollandspiele
Nevsky: Teutons and Rus in Collision, 1240-1242 from GMT Games
A Most Fearful Sacrifice: The Three Days of Gettysburg from Flying Pig Games
Donnerschlag: Escape from Stalingrad from VUCA Simulations
Keep Up the Fire!: The Boxer Rebellion Deluxe Edition from Worthington Publishing
Liberty or Death: The American Insurrection from GMT Games
Lanzerath Ridge: Battle of the Bulge from Dan Verssen Games
Salerno ’43: The Allied Invasion of Italy, September 1943 from GMT Games
Bayonets & Tomahawks: The French and Indian War from GMT Games
Undaunted: Normandy from Osprey Games
Traces of War from VUCA Simulations
SCS Ardennes II from Multi-Man Publishing
Almoravid: Reconquista and Riposte in Spain, 1085-1086 from GMT Games
Walking a Bloody Path: The Battle of Fallen Timbers, August 20, 1794 from High Flying Dice Games
All Bridges Burning: Red Revolt and White Guard in Finland, 1917-1918 from GMT Games
-Grant

Charles Kibler did the map for Avalon Hill’s Siege of Jerusalem (1989). The map for SoJ is really good, but it looks like Charles has stepped it up quite a bit for Storm over Jerusalem. I wonder if he had new information on the layout of Jerusalem in 70AD? I don’t see SoJ being redone anytime soon, so no chance of an updated map from Charles for it.
LikeLiked by 1 person
Definitely has made some aesthetic improvements in the way the city is presented in this game. I would love to get a copy of the Avalon Hill Siege of Jerusalem game to compare and contrast.
LikeLike