
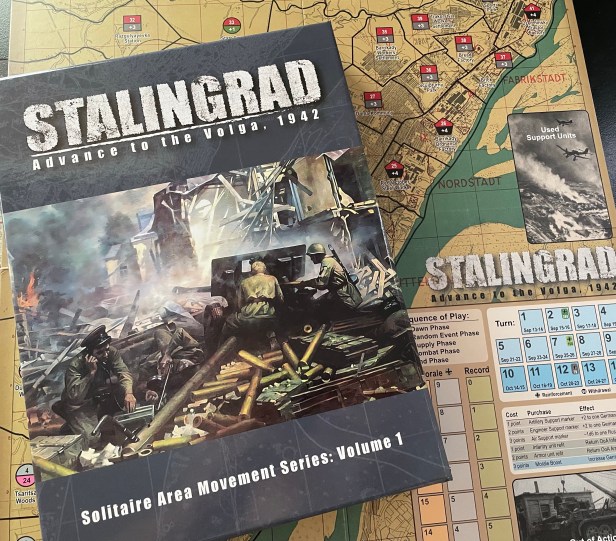
Stalingrad: Advance to the Volga, 1942 from Revolution Games/Take Aim Designs is a solitaire wargame that deals with the historical campaign by the German Sixth Army to attempt to overwhelm and capture the Soviet city of Stalingrad between September 13 and September 30, 1942 during World War II. The player will be in charge of commanding the attacking German forces and the game rules will handle the defending Soviet forces. The AI and the overall design itself really worked well to create a very interesting and challenging game that requires the player to make decisions about where and how they will attack, what they will do when confronted by the different Defense Strategy of the defenders and how to best manage their Supply and Morale. I really have enjoyed my experience with Stalingrad: Advance to the Volga, 1942 but it hasn’t been because of the depth and intelligence of the AI but because the game is well put together, well thought out and frankly just works.
In this series of Action Points we will take a look at the board and discuss the Areas identifying numbers and shapes, discuss the Terrain and take a look at the various boxes and tracks used to play the game, examine the various Soviet Defenders and their Defensive Strategies, take a look at how combat works and how Support Units are used, investigate the focus on Supply and management of German Morale by the player and finally discuss some simple elements of strategy.
Board
One of the best parts of the game is the detailed and beautiful board. The board depicts the city of Stalingrad and the outskirts approaching the city proper where combat took place between September 13 and September 30, 1942. The scale is approximately 1 inch = 800 meters and the really great part of the board is that they took what appears to be a topography focused map from the time and superimposed it on the board and then divided it up into Areas based on the goals and focus of the design.

Areas
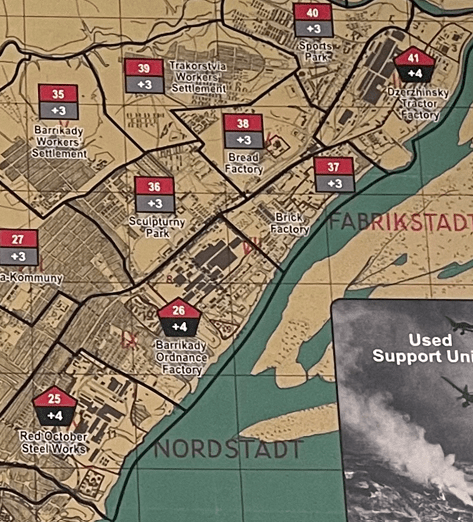
The board is divided into 50 numbered locations which are referred to as Areas. Two Areas are considered to be Adjacent to each other if they share a common boundary which enables units to move directly from one to another. These Areas include both German Army entry Areas as well as Areas that are occupied and defended by the Soviets. One other important distinction about these Areas is the Volga River on the east side of the board and its adjacency to Areas along it. Any of the areas that are adjacent to it give the Guards Units an extra die in combat resolution. The Volga River serves no other purpose but is a very striking line of demarcation for the play area as located to the right of the river are the Turn Track, Morale Track, Record Track and several boxes for units including the Out of Action Box, Available Support Units Box and Used Support Units Box.
Before we go any further, I want to highlight the utility of each of the Areas and discuss the multi-colored and numbered boxes contained in each. Each of the Areas on the map is outlined in thick black lines and contains various geometric shapes, including squares, triangles, circles and pentagons, which are identifying aspects needed for the player. These aspects are divided into two halves in these shapes. The top half of the shape contains a number which is solely used to identify the numbered areas, which range from 1 up to 50. Each of these Areas has a color as well with the number that has a specific meaning to assist in setup. If the Area is initially under German Control, the top half of the geometric shape will be colored gray. Areas that are initially under Soviet Control are colored red.

You will also notice that in the Areas that are initially under German control, such as Areas #1 (Hill 126.3) and #2 (Hill 144.5) pictured above, that there are some additional numbers located in the bottom half of the shape. In this case, in Area #1 is the number 295 and in Area #2 the number 71. These coincide with German units from specific formations that will start the game in these Areas. These formations are color coded for easy recognition. In Area #1, the German 295th Infantry Division will start with 3 counters along with the 244th B Assault Gun. In Area #2, the German 71st Infantry Division with start with 3 counters along with the 244th A Assault Gun. To make identification even simpler, the counter bears the setup Area number to the right of the NATO Symbol.

The shape is also important to identify the terrain type of the Area along with the color located in the bottom half of the shape. This is important because the Soviet defender units are setup from a pool of units that are associated with each of the 4 terrain types. The circle shapes are associated with Clear Terrain and are color coded green, the triangle shapes are associated with Elevated Terrain and are color coded brown, the square shapes are associated with Light Urban Terrain and are color coded gray while the pentagon shapes are associated with Heavy Urban Terrain and are color coded black. You will also notice that there is another number with a “+” symbol in front of it in the bottom half of each shape. This is the Area’s Terrain Effects Modifier or TEM and ranges from +1 to +4). The TEM is used when resolving attacks by the player against the Soviet units located in that Area.
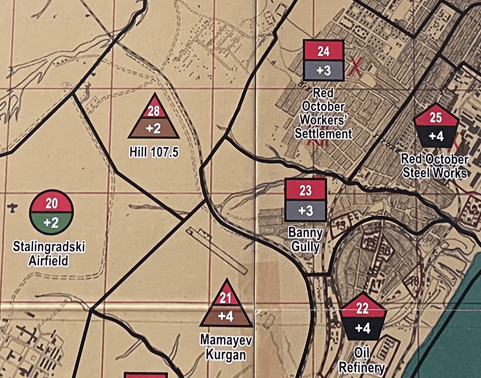
Another aspect to pay attention to are the Areas which are adjacent to the Volga River, as they will provide any Guards units located there an additional D6 to be used in combat. There are 10 such spaces including Areas #8, 10, 12, 13, 14, 22, 25, 26, 37 and 41. Of these Areas adjacent to the Volga, 4 are Light Urban Terrain and 6 are Heavy Urban Terrain. This aspect really makes these Areas difficult to take by the Germans and will most likely take a few rounds of attacks to successfully dislodge the dug-in Soviets.
Various Tracks and Boxes
There are also several Tracks and Boxes located on the board that are used during the game to track various aspects such as Supply, current German Morale, the Turn and available and used units. Let’s take a look at each of these administrative aids.
Turn Track
On the right side of the board, just under the title written there, is located the Turn Track. The Turn Track is used to note the game’s current Turn. At the end of each Turn, the player will advance the Turn Marker and follow the instructions from icons listed in the various Turn spaces. The base game is 9 Turns long and represents the first 18 days of fighting in the city of Stalingrad from September 13th to September 30, 1942. Each of the Turn Track spaces represent 2 days. There is also a shorter 5-Turn scenario called the Factory District Scenario that uses just Turns 10-14. This shorter scenario covers the second great effort by the Germans to win the battle of Stalingrad from October 14th to October 31, 1942. The Turn spaces for the shorter scenario are colored a different shade of blue to differentiate them from the base game.

You will also notice the presence of several different icons in different Turn spaces, including Turn 2, Turn 7, Turn 9 and Turn 12. There is a German iron cross with different colors (dark green, light green and gray) that denote specific historical reinforcements of divisions for Germany. There is also a “W” icon located in Turn 9 that denotes that the German player must withdraw the the four units of the 29th Motorized Division from play at the start of the Turn. This withdrawal may also occur as a result of a Random Event roll.
Morale Track
The Morale Track is located on the right side of the board near the Turn Track and is represented by 20 square boxes with a number appearing in the upper left hand corner of each square. This number is the current Morale Value. The Morale Track is used to record the state of German Morale during the game. If the German Morale Marker is located in the squares on the left hand side colored peach numbered 19-10, then the German player will receive a +1 Morale Bonus to their Total Attack Value during combat. If the Morale falls below 10 and is located on the right side of the Morale Track in the light gray colored squares then the German player will receive a -1 Morale Bonus to their Total Attack Value during combat.
Morale is a very important concept in the game and the player must be aware of where they are on the Morale Track and also how to avoid losing Morale during combat. Certain Soviet Defensive Strategies will cause the German Morale to be reduced if the defending units are not Overrun (doubled) in combat but we will discuss this more in a later Action Point. At the end of every Turn, the German Morale will be reduced by -1 to simulate the grueling nature of the combat in Stalingrad.

Record Track
The Record Track is used to keep track of any Supply Points not allocated by the German player during the Supply Phase. These banked Supply Points may be allocated in any future Supply Phase. It is also used to keep track of the number of Areas under German Control for purposes of determining Operational Victory. The Record Track is located to the right of the Morale Track and has 10 boxes that are colored light green and numbered 0-9.
Out of Action Box
The Out of Action Box is located on the board just under the Turn Track and to the right of the Morale Track and Record Track. The Out of Action Box is a place to hold German units that were selected for loss during the Combat Phase. These units are eligible to be returned to play through the expenditure of Supply Points. The costs for these units to be returned to play are shown in a table located above the Out of Action Box. It will cost 1 Supply Point to reform and return to play an Infantry Unit and 2 Supply Points to refit and return an Armor Unit to play.
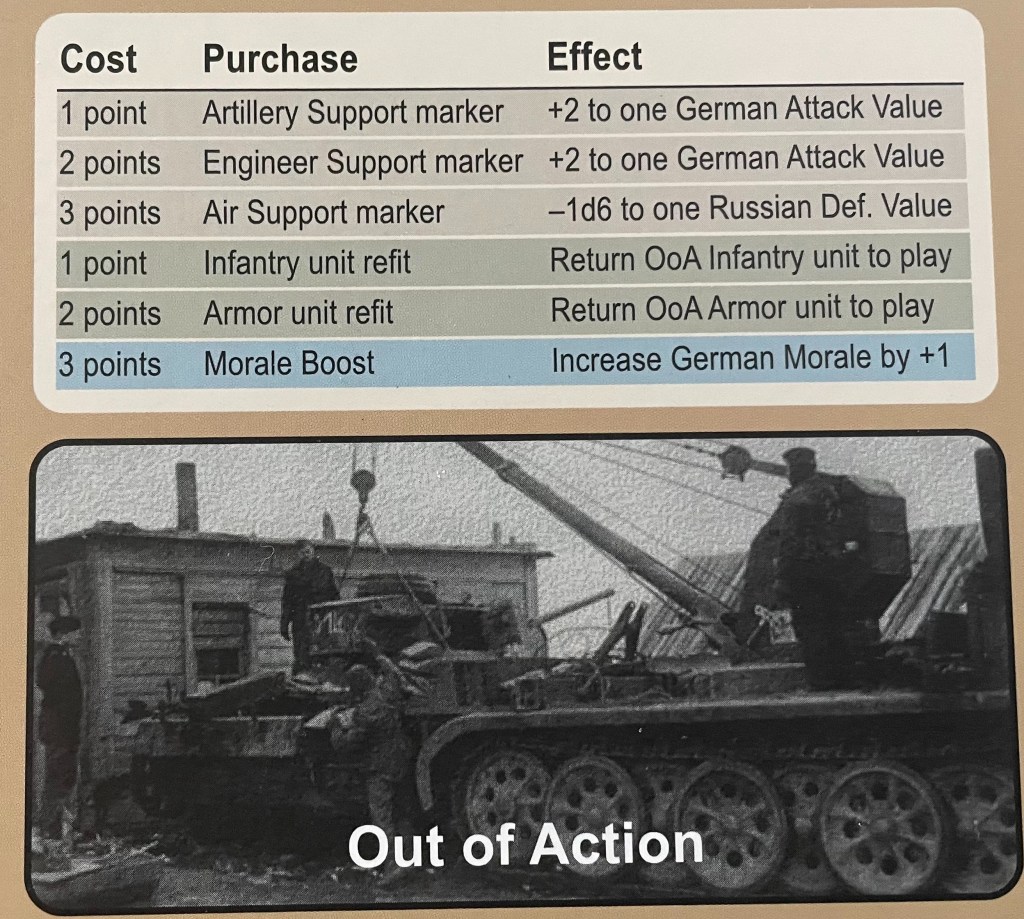
I actually really liked that these units could be rebuilt and it costs Supply Points which are scarce and if players are doing this they had better be planning properly or they will find they don’t have enough Supply to do well supported attacks. Supply can be used to also purchase Support Units such as Artillery Support (1 Supply Point), Engineer Support (2 Supply Points) and Air Support (3 Supply Points). Supply may also be spent to increase Morale although it is very expensive at 3 Supply Points. You must remember that Supply is determined randomly at the beginning of the Turn by the German player rolling 4D6. This means that you will gain a range of 4-24 Supply each round. I found that I generally received between 8-15. Anything more than that is a bonus and if you roll poorly you will find yourself unable to make progress in your objective to Control Areas.
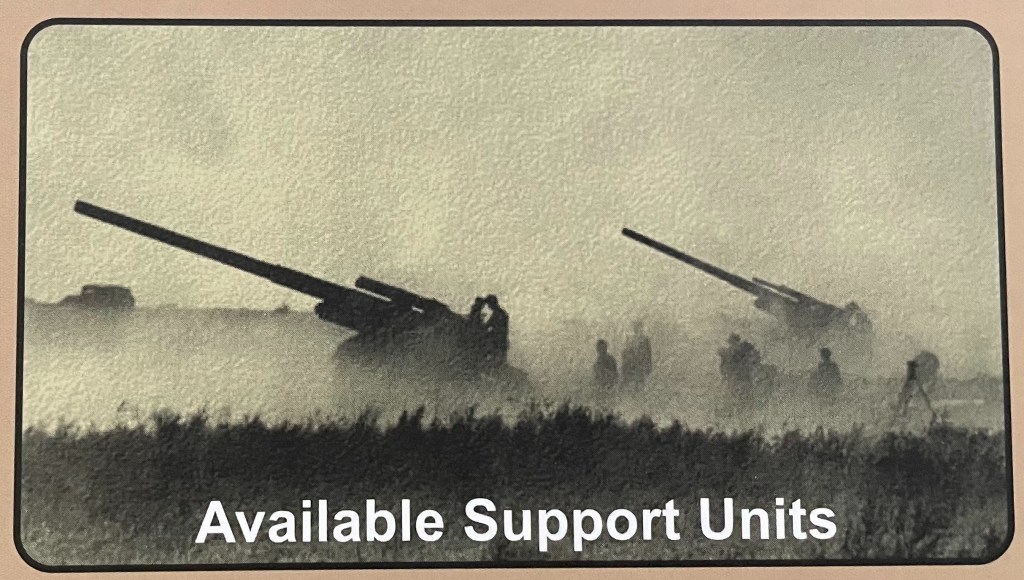
Available Support Units Box
The Available Support Units Box is located under the Out of Action Box and holds Air, Artillery, and Engineer Support Unit markers which have been purchased by the German player during the Supply Phase. The Support Units placed here are available to be used during combat and if they are not used, they stay in the Available Support Unit Box to be used on a later Turn. There is no limit to the number of markers that can be held here subject to the counter limit provided with the game.
Used Support Units Box
The Used Support Units Box is located separated from the other boxes above the title printed on the board. This box holds Air, Artillery, and Engineer Support Unit markers that the German player used during the Combat Phase. This is typically where all of the markers are stored until purchased.

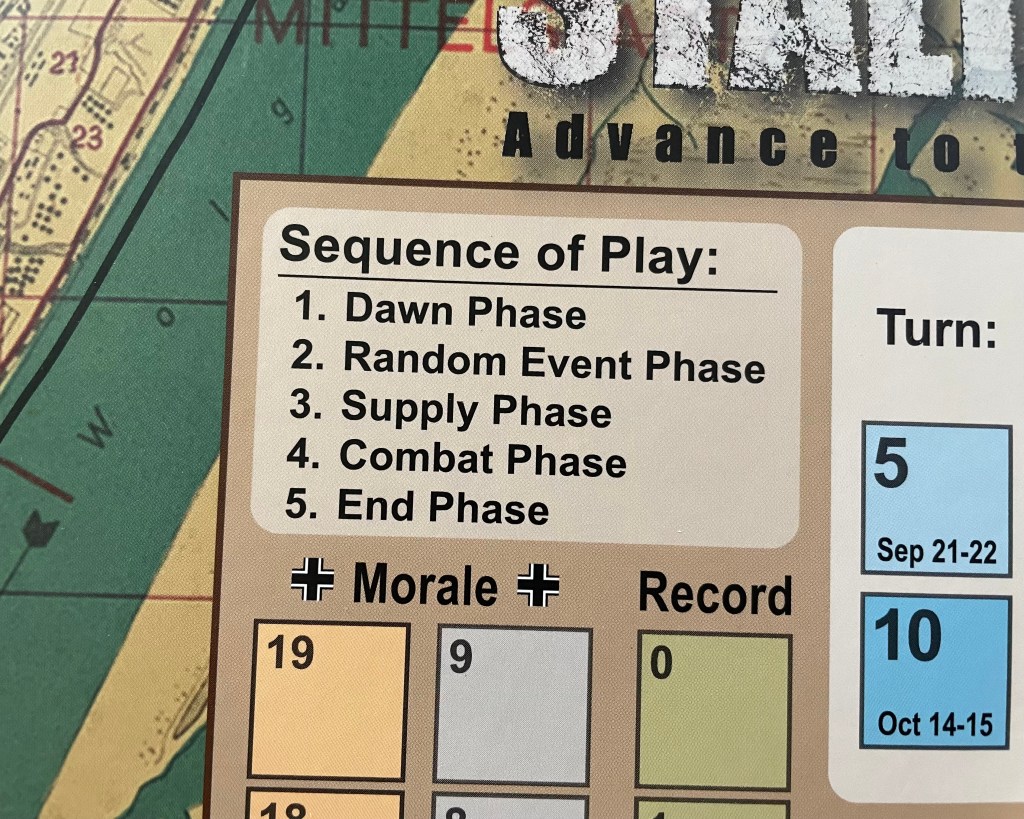
Sequence of Play
As should be the case with every solitaire game, the Sequence of Play is shown on the board just to the left of the Turn Track. The Sequence of Play in the game is not complex and consists of five separate phases including Dawn Phase, Random Event Phase, Supply Phase, Combat Phase and End Phase. I find that once you get about half of a game behind you, you can generally play the game by following the on-board printed Sequence of Play and by using the various other play aids such as the costs for purchasing u nits and the Turn Track.
The board is fantastically gorgeous as they took an old map of the city and overlaid the lines for the various areas on top of it leaving that as a backdrop. The Soviet defender boxes are very clear as well and I really liked the use of the colors and how they placed the Terrain Effects Modifier (TEM) on the bottom of the Area number circle so you can place the Defender Counters on top of the TEM and see them together. Really well done! The on-board aids are also very good with the Sequence of Play, the Morale, Supply and Control Tracks large and easy to read and the Turn Track also big with notations about reinforcements right in the boxes. They also printed out the costs for the purchase of Support Units right on the board and also gave the Effect there as well. This made the game really easy and comfortable to play.
Overall, a very nice historically based canvas upon which to play out this titanic struggle for the city of Stalingrad!
If you are interested, I wrote a First Impressions post on the game and you can read that at the following link: https://theplayersaid.com/2023/04/11/first-impressions-stalingrad-advance-to-the-volga-1942-from-revolution-games-take-aim-designs/
In Action Point 2, we will examine the various Soviet Defenders and their Defensive Strategies.
-Grant
