Stalingrad: Advance to the Volga, 1942 from Revolution Games/Take Aim Designs is a solitaire wargame that deals with the historical campaign by the German Sixth Army to attempt to overwhelm and capture the Soviet city of Stalingrad between September 13 and September 30, 1942 during World War II. The player will be in charge of commanding the attacking German forces and the game rules will handle the defending Soviet forces. The AI and the overall design itself really worked well to create a very interesting and challenging game that requires the player to make decisions about where and how they will attack, what they will do when confronted by the different Defense Strategy of the defenders and how to best manage their Supply and Morale. I really have enjoyed my experience with Stalingrad: Advance to the Volga, 1942 but it hasn’t been because of the depth and intelligence of the AI but because the game is well put together, well thought out and frankly just works.
In Action Point 1, we looked at the board and discussed the Areas identifying numbers and shapes, discussed the Terrain and took a look at the various boxes and tracks used to play the game. In Action Point 2, we examined the various Soviet Defenders and took a look at their different Defensive Strategies. In Action Point 3, we looked at how combat works and how Support Units are used. In this Action Point, we will investigate the design’s focus on Supply and management of German Morale by the player.
One of the really interesting aspects of the design was that I was not just concerned with defeating the enemy and taking control of Areas. You must remember that in order to win the game, you have to hold a minimum of a total of 30 Areas on the board before the end of Turn 8. The German player starts the game in control of 9 Areas so you have to take over 21. Don’t forget or lose sight of that goal. But the game is way more than just about this victory and taking over these Areas. It is really about how well the player manages their Morale, as it directly effects combat through the addition of both positive and negative modifiers, and their available Supply which is used to purchase Support Units and return Out of Action Units to the game. And while the Morale is somewhat in your control with the ability to avoid negative effects of Defensive Strategies and good rolls, the Supply is really dependent on luck.
Supply
Supply is calculated at the beginning of turns by simply rolling 4d6 and then increasing Supply by that amount. There are no modifiers, no benefits if the offensive is going well and has captured numerous Areas. This Supply roll is simply chucking 4 dice and praying that you roll well. This means that players can expect to get a range of 4 to 24 Supply each turn. I have found through my plays though that I usually end up getting between 10-16 most of the time (which is an average of rolling 3-4 on each 6-sided die) with the occasional outlier of a high roll or low roll.
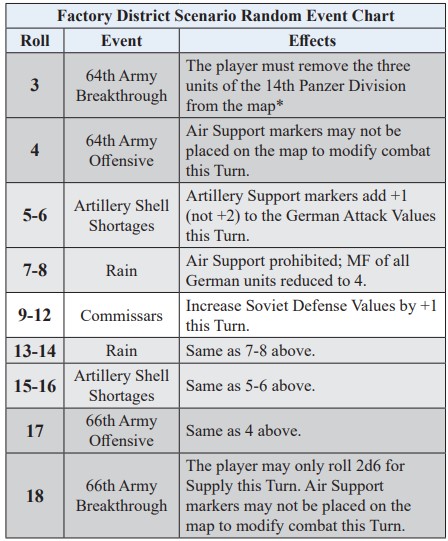
There also is a seriously negative effect on Supply that is possible if an 18 is rolled on the Random Events Chart. This result is the 66th Army Breakthrough, which refers to the 66th Army fighting to break through to the Volga River to the north of Stalingrad during September and October 1942. During Operation Uranus, the Soviet encirclement of German troops in Stalingrad, 66th Army troops linked up with those of the 62nd Army, forming the inner encirclement. Until February the army fought to destroy the pocket and then was held in reserve. If an 18 is rolled, the player will only get to roll 2d6 for Supply for that turn, which is frankly devastating but shouldn’t happen that often. In fact, I have not had it happen yet in any of my games. I like the thematic inclusion of this event and along with the other events listed on the Chart you can see that most of the rolls are bad for the Germans including things such as removing units on the board, to not being able to use Air Support Units to modify combats or even the Soviet Defense Values increasing by +1. Supply is the main worry of the game and should be as this was one of the main reasons that the Germans couldn’t close the deal and finish the Soviets in Stalingrad.
How well a player does each turn. and ultimately in the game, is determined by this roll but can be somewhat managed. I say managed but what you have to understand is there are no die roll modifiers that can increase your amounts of Supply. The player can manage this by spending their Supply wisely and not always going totally gung ho and spending everything. I always recommend not spending all of the Supply that you have each turn but saving some of it to mitigate a possible poor roll on the next turn. I typically keep 2-3 Supply over each round and this has seemed to serve me well.

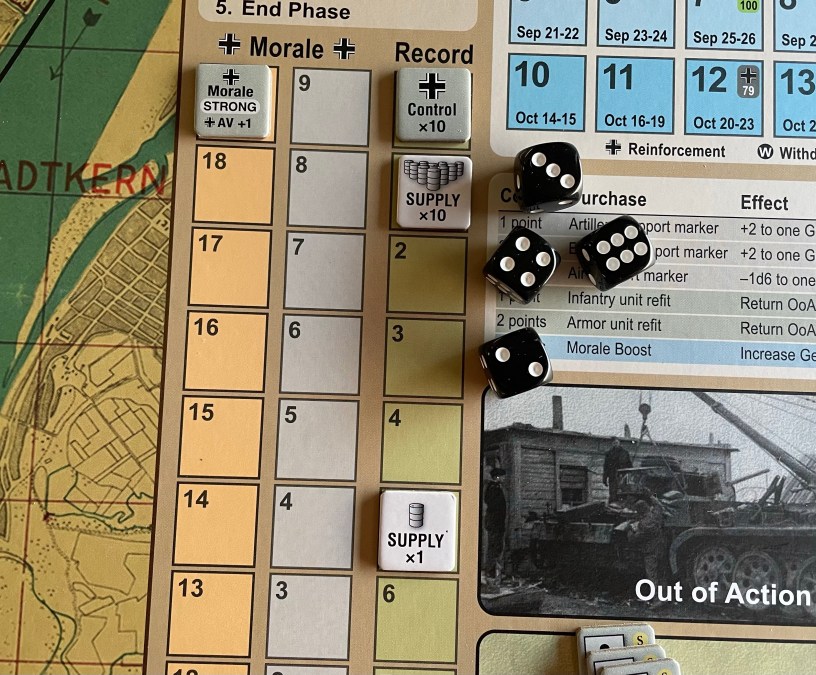
Morale
Morale is a bit of a different animal. It is very hard to keep your Morale up. Morale will be increased or decreased in several different ways including during the Random Event Phase, the Combat Phase due to a Repulse or the effects of a Soviet Defensive Strategy and always at the End Phase as a price of moving forward with the game. Fighting over the city of Stalingrad was a continual grind that drove morale down and caused many to lose their will to fight and even to live. If German Morale is ever reduced to 9 or less, the player will flip the Morale marker to its Shaken side and will lose the +1 Attack Value bonus from High Morale and will now have to face a tougher, more determined Soviet defender with a +1 being given to the Defense Value. German Morale however can be increased in two ways.
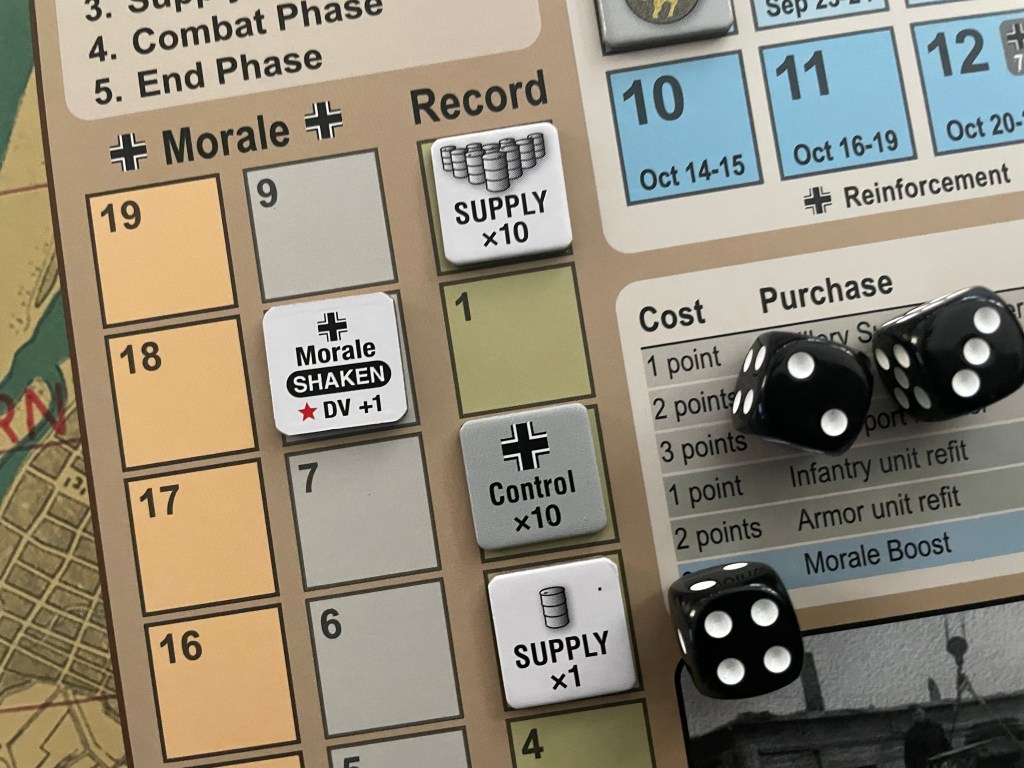
Each time that a German attack takes Control and a Control marker is placed in an Area with a +4 Terrain Effects Modifier (there are just 6 of these areas and they are all adjacent to the Volga River and right in the middle of the maelstrom that is the city of Stalingrad proper) the Morale will be increased by +1. You have to remember this though and I place red cubes in the 6 spaces to remind me of this fact as it is very important to get that bonus.
The other way to increase Morale is to spend 3 Supply points during the Supply Phase. This will buy you a +1 increase to the Morale and you can do this multiple times during the Supply Phase if you have enough Supply. But remember, that doing this is at the cost of not buying a Support Unit or gaining a Unit from the Out of Action Box.
Players have got to effectively manage these two aspects of the game or they will find they don’t have the ability to purchase the units needed to continue the war nor will their men have the ability to effectively fight due to the effects of Shaken Morale. This will cause many moments of pause as players have to think through the possibilities of winning certain battles, or how best to spend their limited Supply in buying Air or Artillery Support Units or in purchasing expensive Morale boosts. Such a great aspect of the design that can easily be overlooked in the noise and tumult of the offensive!
In Action Point 5, which is the conclusion to the series, we will discuss some simple elements of strategy.
-Grant

Great analysis and good article. This Stalingrad game is perfect for what it is. A simple wargame that is fun and still shows an insight of the Stalingrad struggle.
It reminds me of my first wargame I bought some 45 years ago: we played back then imagining we were there and watch the battle unfold…
Since that time wargaming became an art in itself with monster games, bewildering rules set and never ending complexity…
And then a simple historical game comes along that actually resets things a bit. Stalingrad advance on the Volga is such a game.
You can play it within 20 minutes of opening the box and punching the counters and STILL you feel the setting and anxiously try to play and win…
The fact it is a pure solo game is more icing to the cake.
The BIG win this game has though is that it encourages you to read and play MORE Stalingrad books and games.
That is always a great sign for me.
I hope the designer will eventually get to the Cassino theater. I would love to see that one to complement my ASL micro fights like this Stalingrad game did with revisiting Red Barricades in ASL …and others.
Your articles reminds me of reading The General as a young fanatic historical gamer and trying to replay Afrika Korps or the legendary Russian Campaign.
Speaking of which… please please Grant, do a series about the newly relaunched TRC !!!!
It is one of the monuments in the history of wargaming.
I find it a bit sad your generation missed it by a few years in age 😊.
LikeLiked by 1 person