
Stalingrad: Advance to the Volga, 1942 from Revolution Games/Take Aim Designs is a solitaire wargame that deals with the historical campaign by the German Sixth Army to attempt to overwhelm and capture the Soviet city of Stalingrad between September 13 and September 30, 1942 during World War II. The player will be in charge of commanding the attacking German forces and the game rules will handle the defending Soviet forces. The AI and the overall design itself really worked well to create a very interesting and challenging game that requires the player to make decisions about where and how they will attack, what they will do when confronted by the different Defense Strategy of the defenders and how to best manage their Supply and Morale. I really have enjoyed my experience with Stalingrad: Advance to the Volga, 1942 but it hasn’t been because of the depth and intelligence of the AI but because the game is well put together, well thought out and frankly just works.
In Action Point 1, we looked at the board and discussed the Areas identifying numbers and shapes, discussed the Terrain and took a look at the various boxes and tracks used to play the game. In this Action Point, we will examine the various Soviet Defenders and take a look at their different Defensive Strategies.
Soviet Defenders
The Soviet defender counters are divided amongst the 4 different Area Terrain Types shown on the board including Clear, Elevated, Light Urban and Heavy Urban but the actual defenders represented have no direct connection to the terrain. Each of the Soviet units is assigned a color that is associated with one of the Area Terrain Types including Clear (green), Elevated (brown), Light Urban (gray) and Heavy Urban (black) but they are randomly assigned to their assigned Area Terrain Type by a draw of units from a pool, which has more units in it than the spaces that need to have a unit placed. This means that each game will have a different mix of units and will create some variety which adds to the fog of war and uncertainty about what type of defenders you will encounter each time.
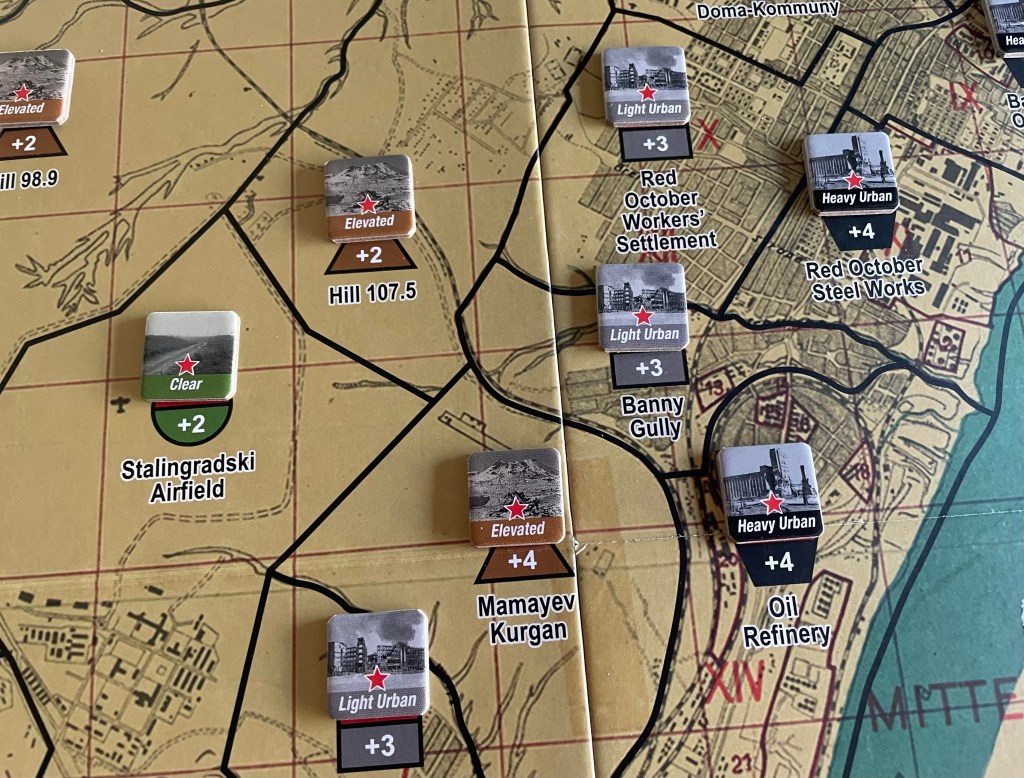
There are a total of 55 different Defender Counters in the game with 6 Clear, 8 Elevated, 32 Light Urban and 9 Heavy Urban. These 55 Defender Counters will be placed in a pool of their Terrain Type and randomly drawn out to fill the appropriate Terrain Type spaces on the board, of which there are a total of 50.
Here is a listing of the different Defender Counters found in each Terrain Type.

You will notice that Guards units do not appear in either Clear or Elevated Terrain and there are also no Heroes units found in Heavy Urban Terrain. Light Urban is the most common Terrain Type found on the board and you will see that the different defender counter types are pretty evenly distributed amongst these spaces so the player can expect to encounter a good mix of each type. But, as the draw of the Defender Counters is random, there is a possibility that certain Defender Counter types will appear less often than others but as mentioned already this provides some uncertainty about what will be encountered.
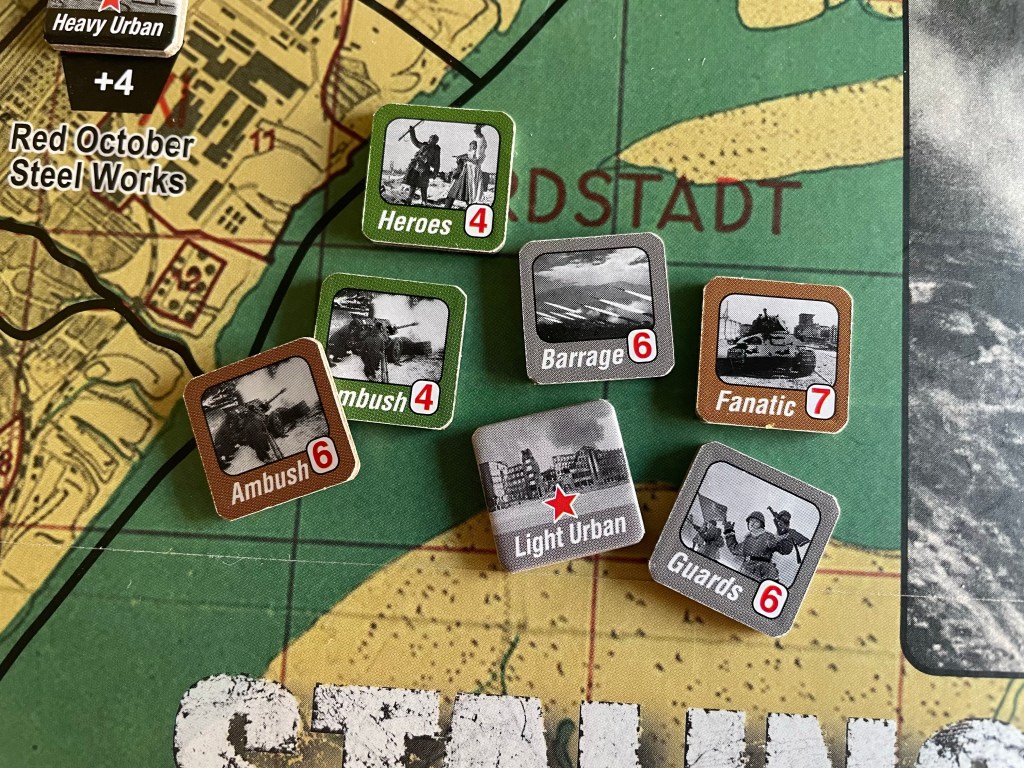
Once the Defender Counters are placed, only the Terrain Type is visible on the unrevealed side of the counter. On the reverse side are the actual unit statistics which includes Defense Factor and Defense Strategy, which is by far my favorite part of the AI. The Defense Strategy has a specific effect that will only be used when the unit is first revealed. This is a part of the game that I overlooked during my first 2 plays but once I found out that it then goes away after the first attack, then the game became way more winnable. Once the Soviet Defender Counter becomes revealed, it remains revealed and only its Defense Factor is used in combat. Remember, these Soviet units will never move either so they won’t try to cut your supply or engage weaker units on the board.
Defense Strategy
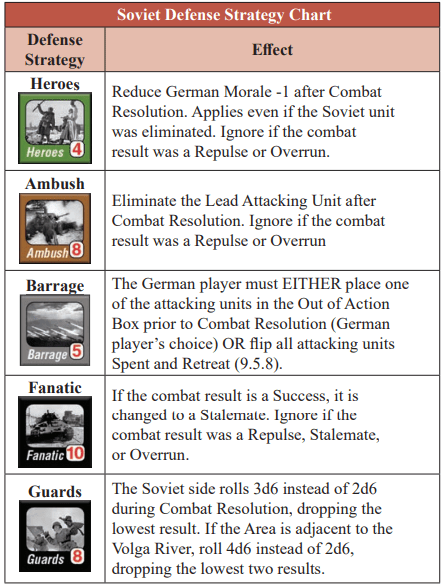
The Soviet Defender Counters will be assigned one of the 5 Defense Strategies, which include Ambush, Barrage, Fanatic, Guards and Heroes. Each of these Defense Strategies have a different ability to slow and vex the player but also have a way for the player to deal with them if they can get the dice to cooperate with them. Let’s take a look at each of these types.
Ambush
One of the best defenses that the Soviets had in a city that was being destroyed around them by continual bombardment was the rubble from the falling buildings themselves. This rubble created perfect places from which to launch ambushes to surprise their enemies. The Ambush Defense Strategy involves eliminating the lead attacking unit after Combat Resolution. This makes perfect sense as an ambush typically hits the front of a column first in order to provide the ambushers a minute to get out of there after the sneak attack. This Defense Strategy can be overcome by the attacker though if the difference between the Attack Total and Defense Total is greater than the Defense Strength of the Soviet unit. If this is the case, an Overrun has been achieved and the requirement for the attacker to eliminate the lead attacking unit can be ignored.
Barrage
When this Defense Strategy is revealed, the German player must either place one of the attacking units used in this combat into the Out of Action Box prior to Combat Resolution or can flip all of the attacking units to their Spent side and Retreat from the area. This is a really tough choice as you have to either lose a unit to the Out of Action Box that will have to be purchased later with your scarce Supply and lose their attack benefit to the Combat or choose to simply give up and retreat out of the area. Either way you are probably going to lose this Combat so the choice more often than not is to Retreat. This is a good example of the press your luck style of choices in the game and an aggressive player will more often than not choose to continue the attack anyway and take their loss.
Fanatic
I hate Fanatics! They are just so tough to defeat as you have to have a result of an Overrun to avoid their effect. And their counters generally have a very high Defense Factor of at least 8 and their highest value is a 10. This makes them really hard to defeat let alone defeat them by more than their Defense Factor. If the Combat result of an attack would have been a Success, it is then changed to a Stalemate with the presence of the Fanatic Defense Strategy. The player can ignore the effect if the combat result was an Overrun.
Guards
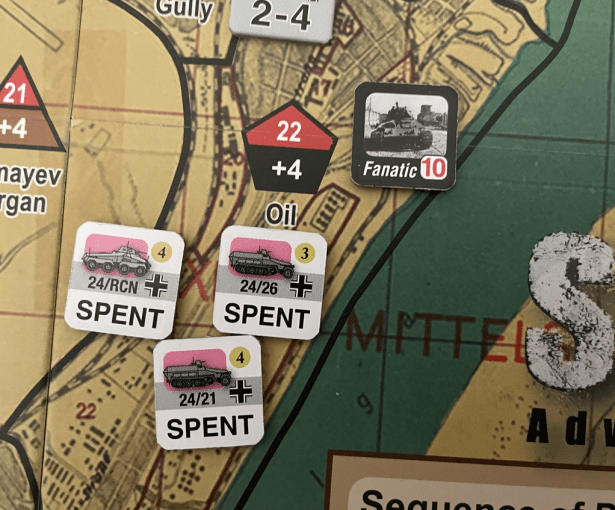
The Guards Defense Strategy is one of the more difficult ones as it simply gives the defender more dice to roll based on where they are located. The more dice the defender has to roll, the better the possibility of better rolls. The Soviet side will roll 3d6 instead of the normal 2d6 during Combat Resolution when a Guards Defense Strategy is present in an Area being attacked. The lowest of the 3 values will be dropped from the total after the dice are rolled. Also, it gets worse as if the Area is adjacent to the Volga River, the defender will roll 4d6 instead of 2d6, dropping the lowest two results. There are 10 such spaces including Areas #8, 10, 12, 13, 14, 22, 25, 26, 37 and 41. Of these Areas adjacent to the Volga, 4 are Light Urban Terrain (usually providing a +3 Defense) and 6 are Heavy Urban Terrain (usually providing a +4 Defense). This aspect really makes these Areas difficult to take for the Germans and will most likely require a few rounds of attacks to successfully dislodge the dug-in Soviets.
Heroes
The Heroes Defense Strategy is a really bad one to encounter as it will reduce the German Morale by -1 after Combat Resolution. This -1 Morale will apply even if the attack is a success and the Soviet unit was eliminated. It can be ignored however if the combat result is than of an Overrun. Morale is one of your most precious resources, with Supply being the most important, as when high it provides a +1 on attacks for the Germans and you must manage it properly to win this game.
These 5 Defense Strategies are really a very unique way to handle this conflict. I really think it is appropriate thematically as the attacking Germans encountered all types of defenses as they advanced closer to the city itself and as the combat became bloodier and slower due to the presence of rubble from damaged or destroyed buildings that would offer protective cover to the defenders as well as their resolve being stiffened as the city came closer and closer to defeat.
I really hate a few of these Defense Strategies including Barrage and Fanatic. I must also clarify that by hate, I really mean they are great as the harder the game is the better when its a solitaire game. Barrage forces the player to either place one of their attacking units in the Out of Action Box before the Combat Resolution step, which means this unit will not contribute to the combat, or stop the combat and flip all units to their spent side which effectively ends the combat at that point. This is not the worst of the strategies but if drawn at the wrong time can really make it hard on the Germans as losing the one unit makes it much harder to continue the attack in later turns as you simply have less Combat Factors and you will have to buy that unit out of the Out of Action Box with your limited supply.
Also Fanatic is really difficult to overcome as well as when revealed if the result of the combat is successful then it will be changed to a stalemate and force the player to have to stay in the area to attack next round. The only way this can be avoided is to cause an Overrun by beating the defender by at least the same number as their Defense Factor. Any of these strategies that slow the player’s advance down are devastating as you are working against the clock and every attack that has to be redone in a later turn slows the advance down and can add up to a loss.
But this part is my favorite of this aspect of the game and the AI used in the design. I have a choice as a player about how I deal with these Defense Strategies. I can either take what they are dishing out, such as in the case of the Barrage and decide not to continue the attack, or I can push my luck. As an example of what I am talking about, in the case of some of these Defense Strategies there is language to the effect “Ignore if the combat result was an Overrun”. If the attack is a Success and the difference between the Attacker Total and Defender Total is greater than the Defense Strength of the Soviet unit, an Overrun has been achieved. The Soviet Unit is eliminated and the achievement of an Overrun result will cancel out the effects of the Heroes, Ambush and Fanatic Defense Strategies. So I have a choice about how I then conduct this combat with the hope of overcoming and ignoring the negative effects of these Defense Strategies. I can use lots of my precious Support Units, up to a maximum of 1 per German unit involved, to attempt to make the difference at the end of combat as high as possible hoping to get over the Defense Strength. Or I can just rely on a few and hope that the dice are kind. I love this option and the choice that I have in it. It really makes the game feel tense and I find that I stress over each combat as I go through a turn.
I hope that you got a feel for how the Defense Counters work and the tactical puzzle that the player must solve in order to continue with the offensive each turn on their path to capturing and controlling 40 or more Areas. The game is won if the German player controls at least one Heavy Urban Area and the German Controlled markers on the Record Track are 40 or greater. This result isn’t a true victory though as it just an Operational Victory and is roughly the same as the historical result. The player must do better than this to truly win the game but I can assure you it is really tough! It definitely can be done but takes a bit of luck, some grit and good dice rolling.
If you are interested, I wrote a First Impressions post on the game and you can read that at the following link: https://theplayersaid.com/2023/04/11/first-impressions-stalingrad-advance-to-the-volga-1942-from-revolution-games-take-aim-designs/
In Action Point 3, we will take a look at how combat works and how Support Units are used.
-Grant
