I have become much more interested in solitaire wargames over the past 5 years or so. I really enjoy trying to understand the situation depicted and how the design team has addressed the AI and how it operates tp create a challenging and engaging experience. Sometimes these AI have a very lengthy and involved list of priorities that they take based on the situation and these can be really well done and create a very challenging game but are sometimes exhausting to operate. Other AI’s can be very basic and rely on the actions of the player. These type sometimes seem too simple and don’t create a real challenge. But, a good middle ground is preferable as I want the game to be difficult but also playable. Well, in Stalingrad: Advance to the Volga, 1942 from Revolution Games/Take Aim Designs, the AI and the overall design itself really worked well to create a very interesting and challenging game. In fact, after 3 1/2 plays, I have yet to taste victory. I really have enjoyed my experience with Stalingrad: Advance to the Volga, 1942 but it hasn’t been because of the depth and intelligence of the AI but because the game is well put together, well thought out and frankly just works.
The game is a simulation of the historical campaign by the German Sixth Army to attempt to overwhelm and capture the Soviet city of Stalingrad between September 13 and September 30, 1942. The player will be in charge of commanding the attacking German forces and the game rules will handle the defending Soviet forces. In this First Impressions post I will share my thoughts about this great design from Mike Rinella.
Soviet AI Doesn’t Make Choices…The Choices are Made for It at Setup
There is nothing mind blowing about the AI in Stalingrad: Advance to the Volga, 1942. It doesn’t make choices about what priority areas to defend or attack using a complex and bloated flow chart. Doesn’t make choices about what units to send or how to go about maintaining supply. And it doesn’t pull any fast tricks on you with drawn cards or other random elements once revealed. But what is there really works well for the battle, the scale and the focus of the game. I want to make sure that this point is clear. The AI in the game works. It works really well in my opinion and is one of the things that I simply adore about the system. Don’t get me wrong though. I have played some very complex and involved solitaire games with lengthy AI rules, priorities and actions, which is also a good thing and made for a very rewarding and interesting play experience. But Mike Rinella chose well with this system and the battle while keeping his mind on the focus of the strategic situation and what he was trying to reinforce about the Battle of Stalingrad, which I will cover a bit later in this piece.
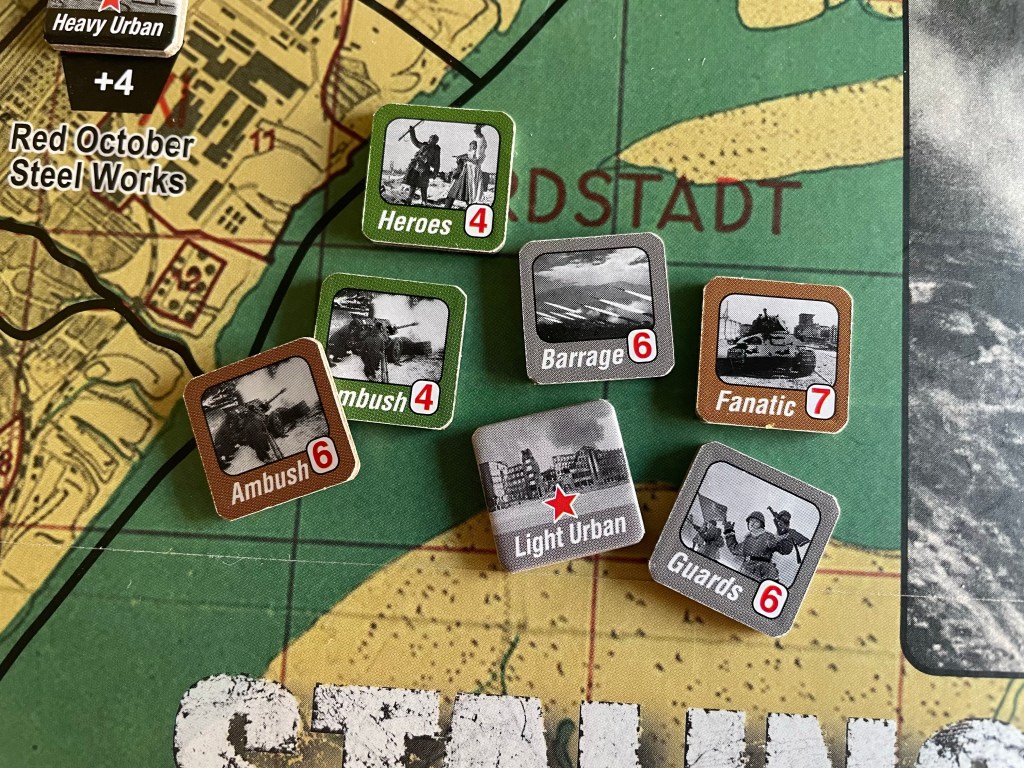
The Soviet defender counters are divided amongst the 4 different Area Terrain Types shown on the board including Clear, Elevated, Light Urban and Heavy Urban but the actual defenders represented have no direct connection to the terrain. Each of the Soviet units is assigned a color that is associated with one of the Area Terrain Types Clear (green), Elevated (brown), Light Urban (gray) and Heavy Urban (black) but they are randomly assigned to their assigned Area Terrain Type by a draw of units from a pool, which has more units in it than the spaces that need to have a unit placed. This means that each game will have a different mix of units and will create some variety which adds to the fog of war and uncertainty about what type of defenders you will encounter each time.
Once placed, only the Terrain Type is visible on the unrevealed side of the counter. On the reverse side, is the actual unit statistics which includes Defense Factor and Defense Strategy, which is by far my favorite part of the AI. The Defense Strategy has a specific effect that will only be used when the unit is first revealed. This is a part of the game that I overlooked during my first 2 plays but once I found out that it then goes away after the first attack, then the game became way more winnable. Once the Soviet defender unit becomes revealed, it remains revealed and only its Defense Factor is used in combat. Remember, these Soviet units will never move either so they won’t try to cut your supply or engage weaker units on the board.
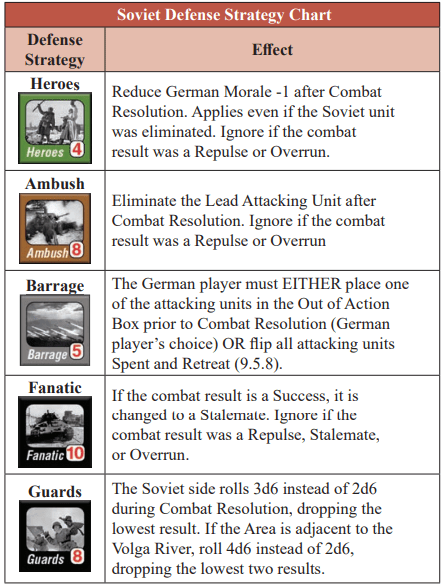
These 5 Defense Strategies are really a very unique way to handle this conflict. I really think it is appropriate thematically as the attacking Germans encountered all types of defenses as they advanced closer to the city itself and as the combat became bloodier and slower due to the presence of rubble from damaged or destroyed buildings that would offer protective cover to the defenders.
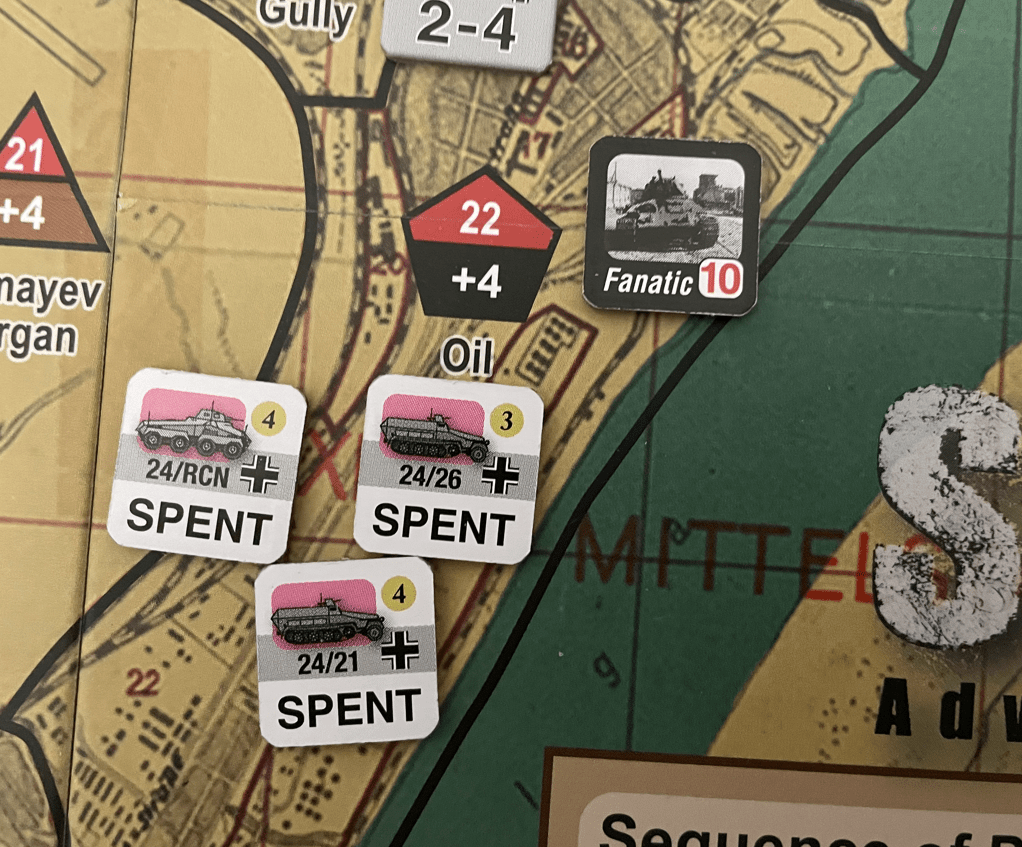
You can see the specifics about each of the Strategies in the graphic above but I wanted to call out a few of my most hated. These hated ones are Barrage and Fanatic. I must also clarify that by hate, I really mean they are great as the harder the game is the better when its a solitaire game. Barrage forces the player to either place one of their attacking units in the Out of Action Box before the Combat Resolution step, which means this unit will not contribute to the combat, or stop the combat and flip all units to their spent side which effectively ends the combat at that point. This is not the worst of the strategies but if drawn at the wrong time can really make it hard on the Germans as losing the one unit to continue the attack means you have less Combat Factors and you will have to buy that unit out of the Out of Action Box with your limited supply. Also Fanatic is really difficult to overcome as well as when revealed if the result of the combat is successful then it will be changed to a stalemate and force the player to have to stay in the area to attack next round. Any of these strategies that slow the player’s advance down is devastating as you are working against the clock and every attack that has to be redone in a later turn slows the advance down and can add up to a loss.
But this part is my favorite of this aspect of the game and the AI. I have a choice as a player about how I deal with these Defense Strategies. I can either take what they are dishing out, such as in the case of the Barrage and decide not to continue the attack, or I can push my luck. As an example of what I am talking about, in the case of some of these Defense Strategies there is language to the effect “Ignore if the combat result was a Repulse or Overrun”. A Repulse is really not a choice for the player as this is simply a total failure and the defender has a higher Defense Total than the Attacker Total. But, the Overrun is very interesting! If the attack is a Success and the difference between the Attacker Total and Defender Total is greater than the Defense Strength of the Soviet unit, an Overrun has been achieved. The Soviet Unit is eliminated and the achievement of an Overrun result will cancel out the effects of the Heroes, Ambush and Fanatic Defense Strategies. So I have a choice about how I then conduct this combat with the hope of overcoming and ignoring the negative effects of these Defense Strategies. I can use lots of my precious Support Units, up to a maximum of 1 per German unit involved, to attempt to make the difference at the end of combat as high as possible hoping to get over the Defense Strength. I love this option and the choice that I have in it. It really makes the game feel tense and I find that I stress over each combat as I go through a turn.
Love the Support Units
The player has the option of purchasing various Support Units that can be used in combat to increase their chances of success. These Support Units include Air, Artillery, and Engineer markers which the player will have to purchase during the Supply Phase of each round. An Air Support Unit is the best and provides the player the opportunity to roll a d6 and reduce the Defense Value of the Soviet unit by that number. This can really make a difference in the outcome of combats and can also be a huge assist when the player might be trying to achieve an Overrun result to avoid a negative effect. The Artillery Unit provides a +2 to the Attacker Total of the German player when played and the Engineer Unit also provides +2 to the Attacker Total but also gives the added benefit of cancelling the Rubble effect of Light or Heavy Urban Terrain if using the Advanced Rules.
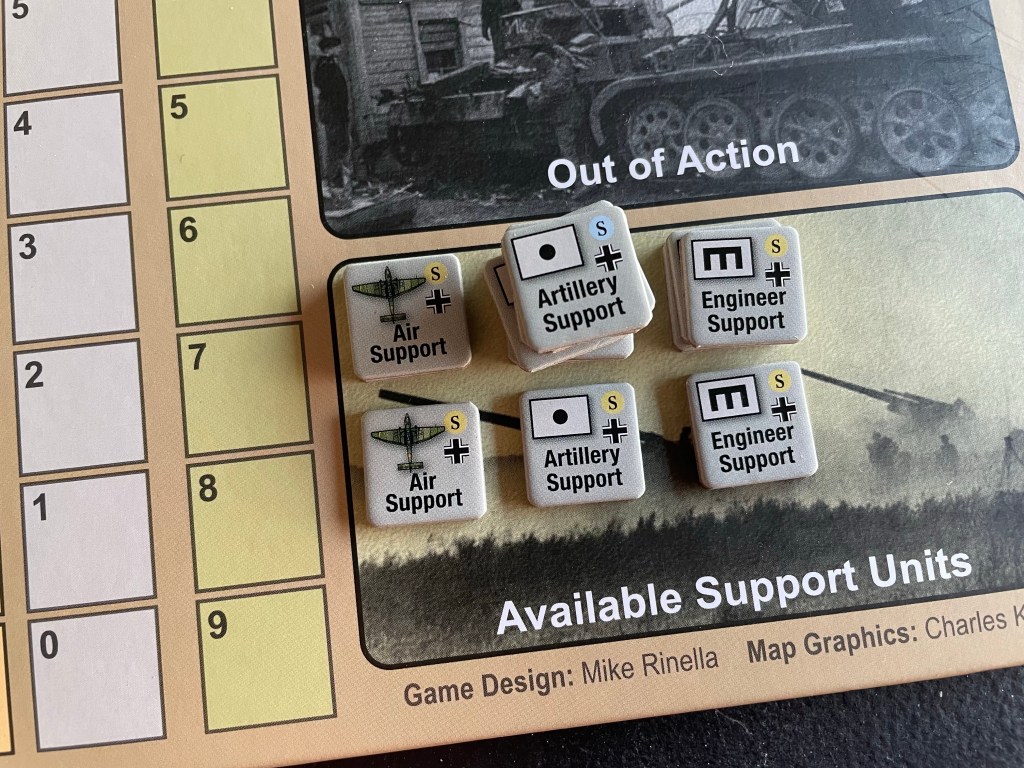
I really liked the addition of these Support Units to the game as I think at this scale, commanders have more responsibility in answering those local command staff who are requesting these type of assets to assist in a combat. This really gave me the feel of that overall commander role and gave me the responsibility of assigning my limited assets to where they are most needed.
Game is About Managing both Morale and Supply
One of the really interesting aspects of the design was that I was not just concerned with defeating the enemy and taking control of Areas. You must remember that in order to win the game, you have to hold a minimum of a total of 30 Areas on the board before the end of Turn 8. The German player starts the game in control of 9 Areas so you have to take over 21. Don’t forget or lose sight of that goal. But the game is way more than just about this victory and taking over these Areas. It is really about how well the player manages their Morale, as it directly effects combat through the addition of both positive and negative modifiers, and their available Supply which is used to purchase Support Units and return Out of Action Units to the game. And while the Morale is somewhat in your control with the ability to avoid negative effects of Defensive Strategies and good rolls, the Supply is really dependent on luck. Supply is calculated at the beginning of turns by rolling 4d6 and then increasing Supply by that amount. This means that players can expect to get a range of 4 to 24 Supply each turn. I have found through my plays that I usually end up getting between 10-16 most of the time with the occasional outlier of a high roll or low roll. How well a player does each turn is determined by this roll but can be managed. I always recommend not spending all of the Supply that you have each turn but saving some of it to mitigate a possible poor roll in the next turn. I typically keep 3-5 Supply over each round and this has seemed to serve me well.

Morale is a bit of a different animal. It is very hard to keep your Morale up. Morale will be increased or decreased in several different ways including during the Random Event Phase, the Combat Phase due to a Repulse or the effects of a Soviet Defensive Strategy and always at the End Phase as a price of moving forward with the game. If German Morale is ever reduced to 9 or less, the player will flip the Morale marker to its Shaken side and will lose the +1 Attack Value bonus from High Morale and will now have to face a tougher, more determined Soviet defender with a +1 being given to the Defense Value. German Morale however can be increased in two ways. Each time that a German attack takes Control and a Control marker is placed in an Area with
a +4 Terrain Effects Modifier (there are just 6 of these areas and they are all adjacent to the Volga River and right in the middle of the maelstrom that is the city of Stalingrad proper) and can be increased by 1 point by spending 3 Supply points during the Supply Phase.
Players have got to effectively manage these two aspects of the game or they will find they don’t have the ability to purchase the units needed to continue the war nor will their men have the ability to effectively fight due to the effects of Shaken Morale. This will cause many moments of pause as players have to think through the possibilities of winning certain battles, or how best to spend their limited supply in buying Air or Artillery Support Units or in purchasing expensive Morale boosts. Such a great aspect of the design that can easily be overlooked in the noise and tumult of the offensive!
Combat is Pretty Involved but Feels Correct
Let’s now take a closer look at combat and even give you a simple example to illustrate how it works. Combat is very well done in this one but does rely on dice rolling. I like to call this a dice masher as you will be rolling a fist full of dice during combat, including both your attacking German dice as well as those of the defending Soviets.
The Combat Procedure is involved but not complex. Attacks are resolved by comparing the Attack Value of the attacking German units plus a roll of 2d6 versus the Defense Value of the defending Soviet unit plus a roll of 2d6. Or in other terms Total Attack Value compared to Total Defense Value. The real interesting part is how these values are calculated.
First off, the player will designate their Lead Attacking Unit and this unit will provide its full Attack Factor to the AV as a base. The player then makes a decision to place any available Artillery, Engineer or Air Support Units into the combat and places these markers in the Area that is the target of the attack. You have to remember though that you can only place as many Support Markers as you have attacking units and this can never be more than 4 as the stacking limit is 4. The Total Attack Value and Defense Value will be calculated and then the player will roll 2d6 for the attack and at least 2d6 for the defense (sometimes with the Guards units the defender can roll up to 4d6). Once the dice are rolled, the rolled value will be added to the Attack Value and Defense Value and then the final results will be compared. This process is fairly involved, has a lot of possible additions, but really is very straightforward. No CRT to consult. No major calculations needing calculus or ratios. Just straight up comparison on values and then determine results.
The German player has a lot of elements that go into their Attack Value calculation though. The Attack Value is equal to the sum of the Attack Factor of any one attacking German unit of the player’s choice by designating it as the Lead Attacking Unit. The player will then add +1 to the Attack Value for each additional unit participating in the attack (no matter what their Attack Factor is) up to a maximum of +3, +2 for each committed Artillery Support Unit committed and +2 for each Engineer Support Unit committed and then a +1 for the special Divisional Integrity Bonus if the attack includes at least three units from the same division. Finally, if Morale is high, the German player will add +1. Most of the time, the base Attack Value before the 2d6 dice roll is 7-10 depending on the Attack Factor of the Lead Unit and how many other units are participating and whether they are from the same formation.
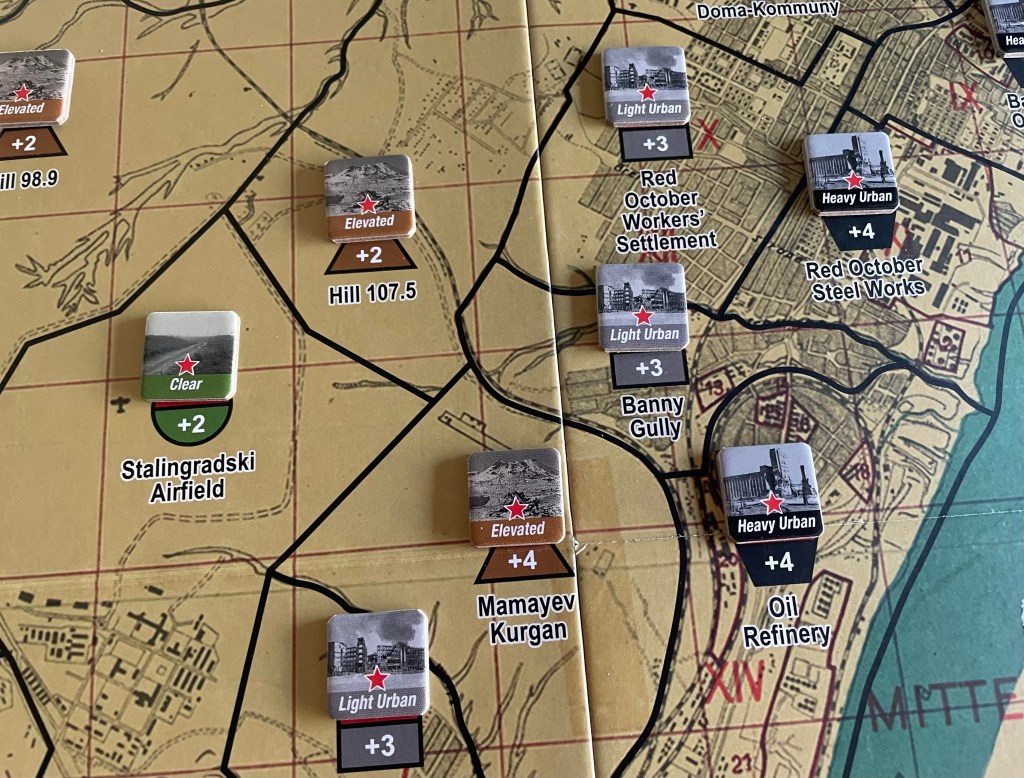
Calculating the Defense Value is much simpler as it consists of the sum of the Defense Factor of the Soviet unit in the Area plus the Area Terrain Effect Modifier printed on the board. Typically, this is +1 Clear (+2 for the Stalingradski Airfield), +2 Elevated (+4 for Mamayev Kurgan), +3 Light Urban (+4 for Central Rail Station) and +4 for Heavy Urban. Also, if the German Morale is Shaken (9 or less), then the Defense Value of the Soviet Unit will be increased by +1. If the German player uses an Air Support Unit, they will roll 1d6 and subtract that number from the Soviet Unit Defense Value. This normally results in a range of DV from 8-14 in the hardier Heavy Urban locations and makes attacking sometimes very dicey. Then 2d6 is rolled and the DV is totaled.
Combat is never a given in this one though as the roll of 2d6 creates some widely variable results. This is probably the one part of the game that I questioned. I would probably have used a 1d6 but the 2d6 does create some real anxiety as you are going into combat. When you roll well, it is not an issue but the unfortunate luck that I operate with causes me to roll lots of 1’s and 2’s and generally leads to losses. Lots of losses. Now that you see how combat works and is calculated, let’s take a look at a simple example.
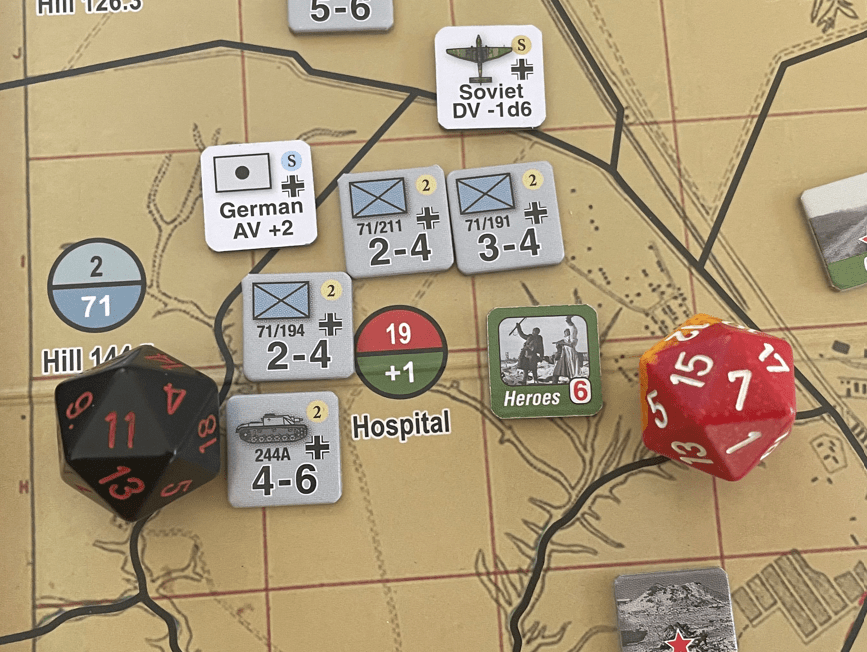
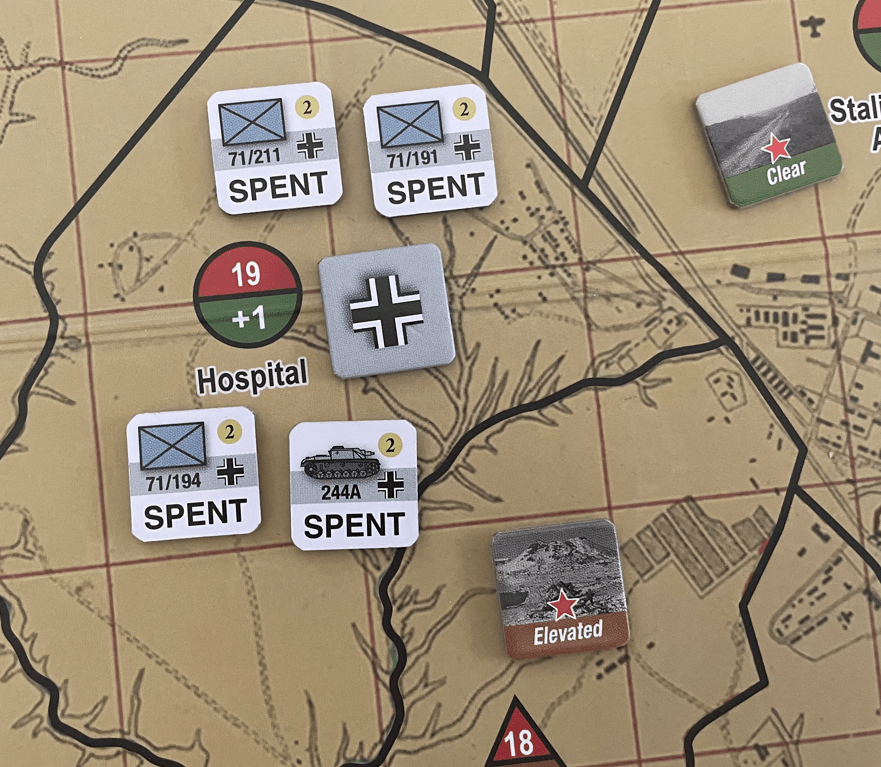
In this example, the 71st Panzer Grenadiers are attacking into Area #19 which is Clear Terrain and has Hospital identified on the board. The 71st enters the Area with the Stug 244A attached and which will be used as the Lead Attacking Unit with its 4 Attack Factor. Once all attacks are declared and all units move into the Area, the Soviet Defender is revealed and it turns out to be a Heroes Unit, which means that German Morale will be reduced by -1 at the end of combat unless an Overrun was achieved. The Attack Value is calculated for the German player by taking the Attack Factor of the Stug of 4 as the Lead Attacking Unit and adding +3 (+1 for each supporting unit attacking in the area) to it along with a +1 Divisional Integrity Bonus because there are 3 units from the same formation (71st Panzer Grenadiers). Morale is also strong and an additional +1 will be added to the total bringing their Attack Value to 9 before the roll of 2d6 and the addition of the Support Units. The German player adds +2 to the AV from the use of an Artillery Support Unit bringing that total to an 11 (shown on the black d20 which are not included with the game but make it easier to calculate and remember the totals). The Soviet Defense Factor for the Heroes units is a 6 but will be increased by +1 for the Terrain Effects Modifier from the Clear Terrain for a total of 7 (shown on the red d20). So at this point, the German AV is 11 to Soviet DV of 7, which is a difference of 4.
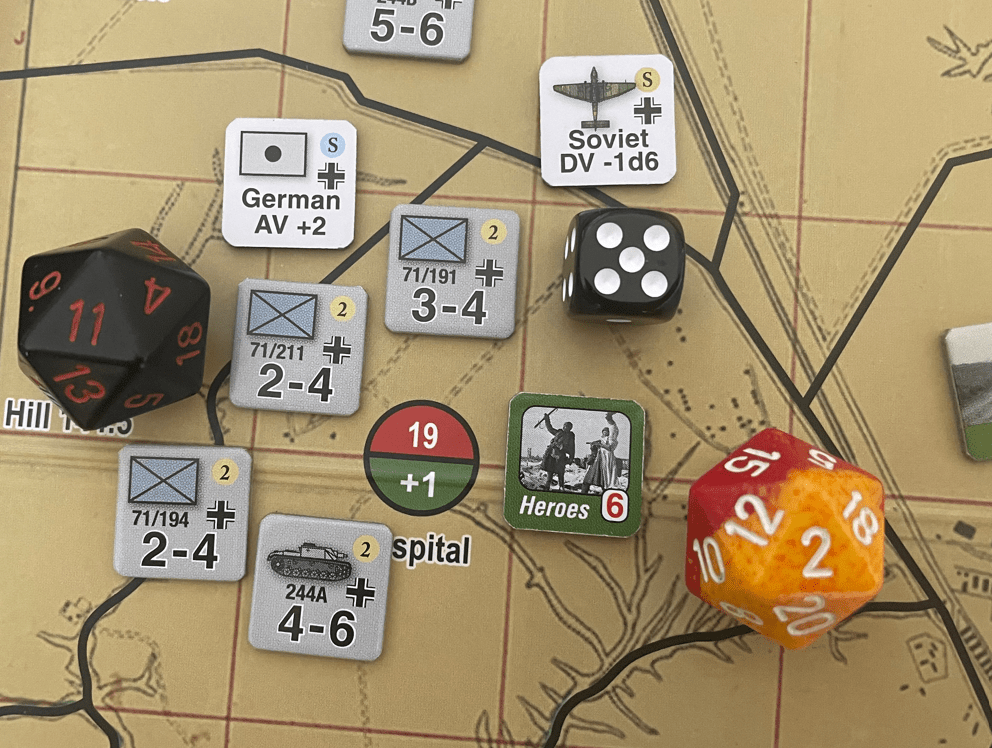
Next, we have to deal with the Air Support Unit that was committed to the combat by rolling a d6 and then subtracting from the Soviet DV that value to a minimum of 0 (it can never go below 0 no mater what the roll is). A black d6 is rolled and results in a 5, which means the Defense Value of the Soviet Unit will be reduced by 5 from 7 to a 2. That is a very good result and shows the importance of these Air Support Units. This means that it is very possible, even likely that the final result of this combat will be an Overrun because the difference between the AV and DV will be higher than the Soviet Heroes Unit Defense Factor of 6.
Next each side, the attacker and the defender, will roll 2d6 and add that to their Attack and Defense Value. The German player rolls 9 on 2d6 while the Soviet defender rolls 6. Adding these to the previously identified Attack Value and Defense Value the Germans have a Total Attack Value of 20 (11 + 9) and the Soviets have an 8 (2 + 6). The German player wins the combat as their TAV is greater than the Soviet TDV and the difference is 12 (20 – 8). This difference of 12 is greater than the Defense Value of 6 for the Heroes units and it is considered a result of Overrun.
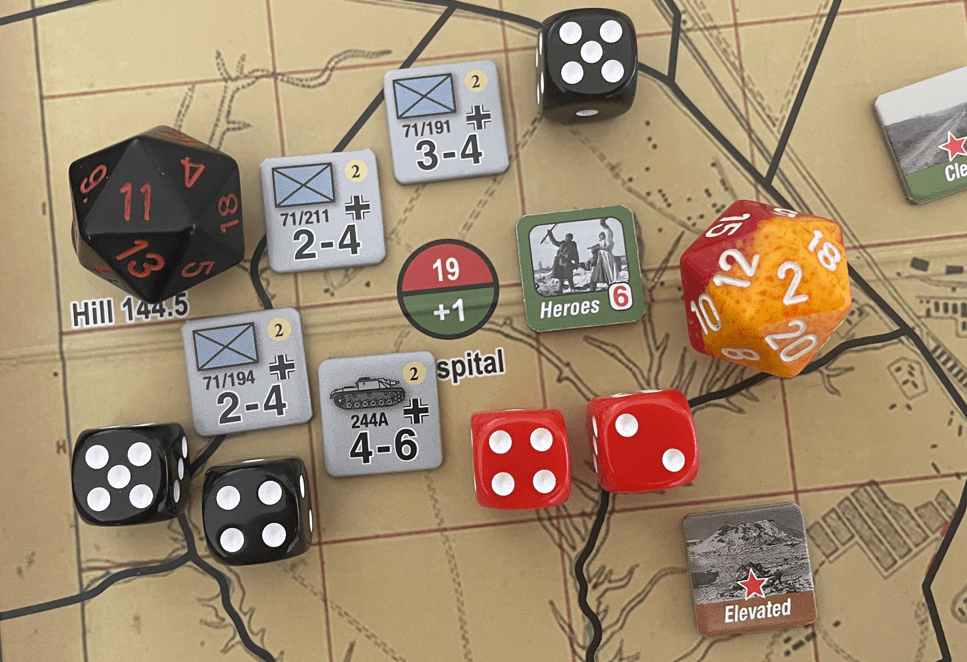
The Soviet counter is removed from the board and placed back into the box as it was defeated and the German player places a Control Marker in the space. Then they flip all of their participating units in the combat to their Spent side by turning the counters over. This was an Overrun and because of that fact, the negative Morale effect from the Heroes unit was avoided. If the difference between the TAV and the TDV was not greater than the Defense Factor of the Soviet Heroes unit, the German player would have been required to lower their Morale by -1.
Combat is a very interesting and well done part of the design but it does take a bit of time. At the start, you will have between 5-6 total combats each round and they each take 3-5 minutes to adjudicate because you have to do some calculating and make decisions about how you are going to utilize your scarce resources. This could have been sped up if the game included an on-board track where players could calculate the TAV and TDV each combat. But alas, it was not added to the board. I will discuss this a bit more in my last point.
Bloody Streets was a Nice Addition to Capture the Attritional Feel of the Battle
One of the historical parts of the combat and campaign in the city of Stalingrad was the continual fighting mixed with sabotage, booby traps, snipers, difficulty with supply, etc. Even when there was no open conflict going on, there was always something happening as they Soviets just picked and picked at the Germans attempting to bruise and bloody them in order to devastate and cripple their morale. This historical concept in included in the design with the concept of Bloody Streets. If an attack force of Germans ever ends their combat phase in an Area with a still alive Soviet defender, at the start of the next Combat Phase, they might sufferer negative effects from the Bloody Streets roll. At the start of the Combat Phase, the player will have to roll 1d6 for each Contested Light Urban and Heavy Urban Area. The roll then coincides with a chart which has the following effects:
1-4 No effect
5 Reduce Morale by -1
6 Flip the unit(s) to their Spent side AND then also reduce Morale by -1
Also, there is a +1 die roll modifier if the Soviet unit is a Guards unit in an Area with a +4 Terrain Effects Modifier. More often than not, these rolls will have no effect but when you do end up rolling a 5 or 6, you will literally feel the air in your lungs be forced out into a visceral scream of rage. I really liked the addition of this part to the game. It made me think really hard about how much I wanted to attack certain Light Urban or Heavy Urban Areas if I didn’t have enough support from units or Air, Artillery or Engineer Support Units. And that is exactly why I love it because I think that the German commanders had to consider these type of things as they advanced into the city and began to encounter stiffer resistance and more determined defenders who were shielded by rubble and aided by buildings. Such a nice addition to the design!
Production is Awesome….But Needed Something
This game is very well produced. The board is fantastically gorgeous as they took an old map of the city and overlaid the lines for the various areas on top of it leaving that as a backdrop. The Soviet defender boxes are very clear as well and I really liked the use of the colors and how they placed the TEM on the bottom of the Area number circle so you can place the Defender Counters on top of the TEM and see them together. Really well done!
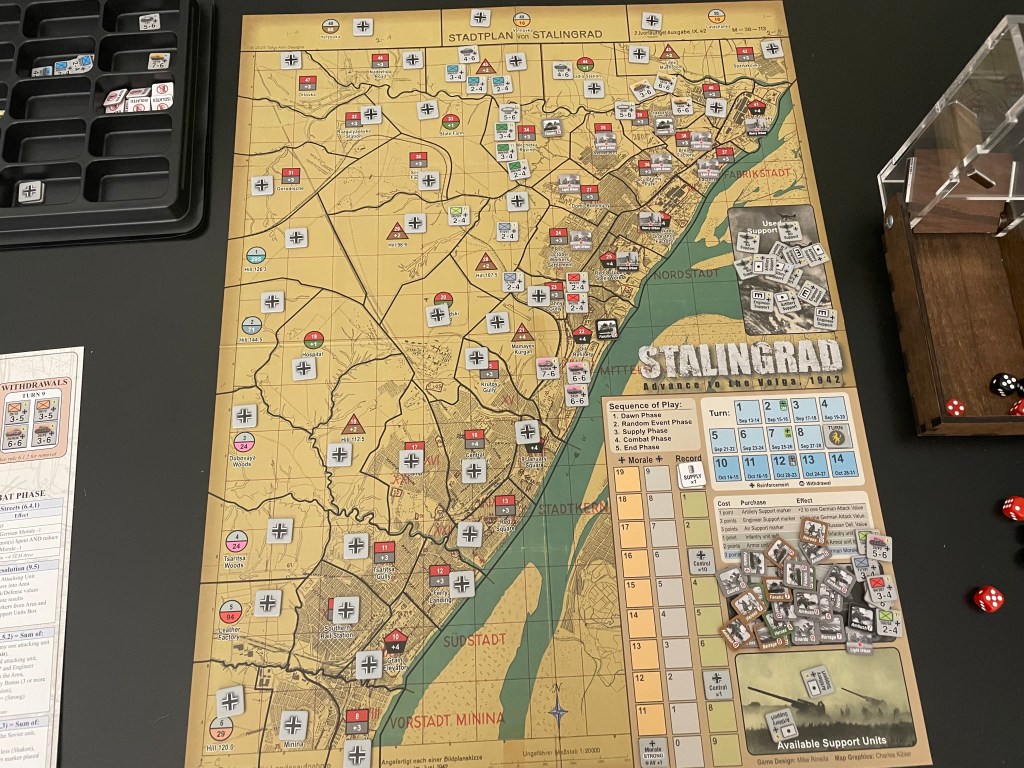
The on board aids are also very good with the Sequence of Play, the Morale, Supply and Control Tracks large and easy to read and the Turn Track also big with notations about reinforcements right in the boxes. They also printed out the Costs for the purchase of Support Units right on the board and also gave the Effect there as well. This made the game really easy and comfortable to play.
But, they didn’t include cards/counters to track the Random Event effects throughout the turn, which I think was a big miss nor did they provide an on-board track where players could calculate the TAV and TDV each combat. This simply makes the game a slow grind as you have to do a lot of calculating for each combat or use d20’s like I did. In solitaire games especially, right up there with a well designed AI and a clean Sequence of Play, is the need for good on-board aids to help the game be played including charts, graphs, rules reminders, etc. They also should have put the Bloody Streets table on the board as well but this didn’t bother me as much. Overall, a very nice game production wise and a great price. I pre-ordered it and paid $40.00 and you can still buy it today for $40.00. A fantastic value and you had better get a copy before they are all sold out because this just might be my solitaire game of the year for 2023.
Great Game
In summary, Stalingrad: Advance to the Volga, 1942 from Revolution Games/Take Aim Designs is a winner! Mike Rinella hit a home run with this one. Easy to understand rules, great combat, fantastic production, great decision points and a lot of dice rolling, which I really like and expect from most solitaire wargames. This one has it all and plays fast and furious and just feels so satisfying, whether you win or lose. I always had that feeling of just one more game and I think I can crack it….and I just kept on trying and trying and after writing this will get back to the table and play it again. I loved this one and I look forward to the other volumes in this new Solitaire Area Movement Series.
Here is our unboxing video so you can get a closer look at the components:
-Grant

I am just getting my copy soon; can’t wait!
LikeLiked by 1 person
You will definitely enjoy it! It is really very good. Fast playing with some great decision points and the feeling of pressing your luck even though your troops are spent and you don’t have many support units left. Enjoy!
LikeLiked by 1 person
Great review Grant, you touched on all the salient points. I would add, that the Cards and tracking sheet for combat totals, can now be downloaded, thanks to Stuka Joe. As you stated these would be quite helpful, especially when multiple battles can get things a bit confusing. Put you Die away and use the sheet and cards, they really work !!
I love this game, may be the best Sol game I have yet played!
LikeLiked by 1 person
Thanks. I saw they were available from Stuka Joe on BGG but they should have been included in the game. I have put my D20 away and use them now.
LikeLike
I agree 100% with your conclusions it is a superb Stalingrad game.
I belieeve Stuka Joe (who else) published an aid on BGG to help calculatie the AV and DV factors.
I did what you suggested : use a D100 (2x D10) to track the DV you need to beat.
The game becomes almost unbeatable though by using the optional Streets rule.
In its standard game you have a 30% winning chance. The Streets rule makes that 1% ?
One small difference: I like the deeper AI Bots of the kinds of Conflict of heroes Eastern Front, Enemy Action series or the recent card driven solo mechanics of Jason Carr too !
The more variation in solo mechanics the better.
My hope is on a Monte Cassino game in the near future with this system !
LikeLiked by 1 person
Winning is very challenging. It is important to remember though that the Defensive Strategy for the Soviet units doesn’t carry over into a 2nd round of combat. So if you fail in the first attack you get an easier 2nd attack.
Recently, there was a Manila game announced in the same system called Manila, the Stalingrad of the Pacific.
LikeLike
“Once the Area is entered, the Soviet Defender is revealed and it turns out to be a Heroes Unit”
You don’t reveal the defender until after you’re done moving units into its area for this action round: (last sentence of 8.1) “An Unrevealed Soviet Unit is Revealed (9.4) after movement into the Area is completed but prior to combat.”
So you can’t choose to pile more units into the attack based on the defense strategy, although you can choose to pile on more support. Are you sure you played this right?
The rules are generally well done, but the super-important details of what happens in what order within an action round unfortunately are not.
LikeLike
I played correctly. I moved all my units into areas and then started revealing them before attacks started. Just a slip of a word in a sentence.
LikeLike
OK, good. Did you know you’re also allowed to move some units, attack, and then move other activated units? What you just wrote suggests not.
The rules on action rounds really needed to be restructured to explain the exact sequence more explicitly.
The fact that you misplayed for 2 games that defense strategies only apply to the first combat in an area, and you’re very experienced with wargames, is another sign that the rules aren’t the greatest.
LikeLike