Stalingrad: Advance to the Volga, 1942 from Revolution Games/Take Aim Designs is a solitaire wargame that deals with the historical campaign by the German Sixth Army to attempt to overwhelm and capture the Soviet city of Stalingrad between September 13 and September 30, 1942 during World War II. The player will be in charge of commanding the attacking German forces and the game rules will handle the defending Soviet forces. The AI and the overall design itself really worked well to create a very interesting and challenging game that requires the player to make decisions about where and how they will attack, what they will do when confronted by the different Defense Strategy of the defenders and how to best manage their Supply and Morale. I really have enjoyed my experience with Stalingrad: Advance to the Volga, 1942 but it hasn’t been because of the depth and intelligence of the AI but because the game is well put together, well thought out and frankly just works.
In Action Point 1, we looked at the board and discussed the Areas identifying numbers and shapes, discussed the Terrain and took a look at the various boxes and tracks used to play the game. In Action Point 2, we examined the various Soviet Defenders and took a look at their different Defensive Strategies. In Action Point 3, we looked at how combat works and how Support Units are used. In Action Point 4, we investigated the design’s focus on Supply and management of German Morale by the player. In this Action Point, which is the conclusion to the series, we will discuss some simple elements of strategy.
Strategy Points
First point that I wish to make is that I don’t consider myself an amazing tactician. But I do believe that all games can be a bit more enjoyed if you follow some basics of strategy. There are always things that the players should be focused on and remember as they play that will help guide their decisions and give them a greater chance at victory. These points that I am sharing for Stalingrad: Advance to the Volga, 1942 are such guiding principles.
Managing Supply
If you remember from the last Action Point, Supply is calculated at the beginning of turns by simply rolling 4d6 and then increasing Supply by that amount. This means that players can expect to get a range of 4 to 24 Supply each turn. I have found through my plays though that I usually end up getting between 10-16 most of the time (which is an average of rolling 3-4 on each 6-sided die) with the occasional outlier of a high roll or low roll.

How well a player does each turn. and ultimately in the game, is determined by this roll but can be somewhat managed. I say managed but what you have to understand is there are no die roll modifiers that can increase your amounts of Supply. The player can manage this by spending their Supply wisely and not always going totally gung ho and spending everything. I always recommend not spending all of the Supply that you have each turn but saving some of it to mitigate a possible poor roll on the next turn. I typically keep 2-3 Supply over each round and this has seemed to serve me well.
If you don’t have the Supply to purchase needed Support Units or replace your losses from the previous round, you will find your efforts to progress slowing and finally grinding to a halt. This is sometimes unavoidable but take heart. This is a simple to set up game, with not a lot of counters, and you can easily be up and going again in about 15 minutes.
Priority of Spending
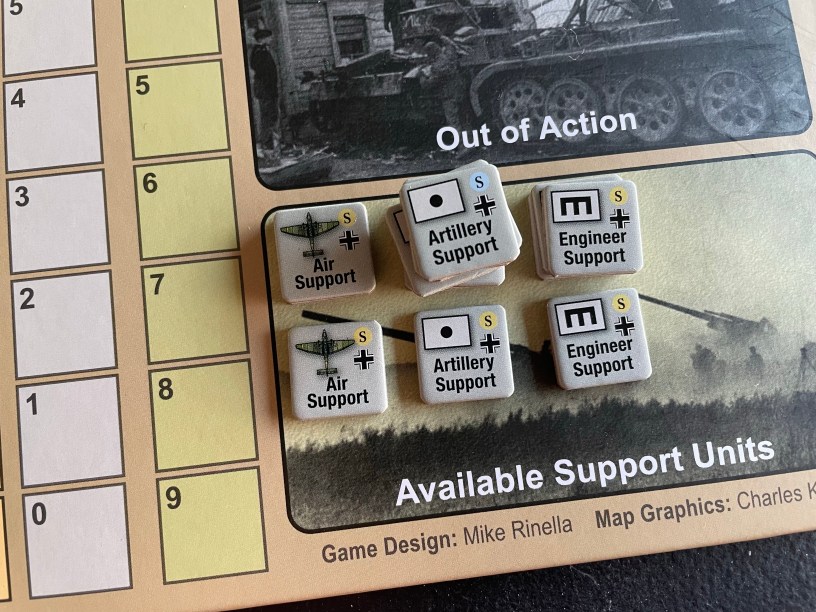
This game is a lot about managing your scarce resources to get the best results out of your attacks in order ot make progress toward your goal of controlling 40 Areas. The costs of these Support Units is a very interesting design choice. Artillery Support Units cost the least at just 1 Supply Point each and there are a total of 8 of these available. These will be the bread and butter of each turn’s use of Supply by the player as they can always afford an Artillery Support Unit no matter what has happened. The Engineer Support Units are a bit more pricey, as they cost 2 Supply, but still just provide a +2 modifier in combat. Their real value is if the player is using the Advanced Rubble Rules and these can be used to nullify that benefit to the Soviet Defenders. This Support Unit is my least purchased unit but can make a big difference. Their cost though makes it harder to purchase them on a regular basis. The Air Support Units are the best in the game, but also cost the most at 3 Supply. As noted, the player will always receive one of these Units at no cost each turn. Purchasing these is the number one priority of the player and I would rather buy these than say Artillery Support if I am in a pinch for Supply.

The priority is always Artillery Support Units, then Air Support Units and then any leftover funds should first be used on bringing Out of Action Units back. I almost never buy Engineer Support Units unless I am using the Advanced Rubble rules and then I only buy them when I am attacking into Heavy Urban Areas where they will make a difference.
One final concept about spending priority. Morale is the other side of the game that must be managed. If the German Morale is at 10 or above, the Germans will get a +1 to their Total Attack Value. But if this Morale drops below 10, the Soviet defenders will then gain a +1 to the Total Defense Value. This can make a huge difference in whether your attacks are successful or not. Keep this in mind as you can spend 3 Supply to increase your Morale by +1. This is pricey and should only be used when necessary but is definitely another thing that the player must keep in mind.
Dealing with Random Events
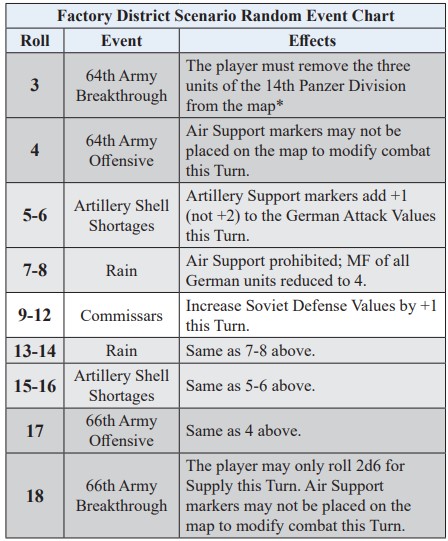
There is nothing quite as bad as having to roll on the Random Events Table in the game. None of the possible outcomes are positive for the player. Not a single one. They are all bad and will effect your turn by taking away your use of Air Support Units, or reducing the benefit of Artillery Support Units or even reducing the dice that you will roll for determining Supply that turn. The Random Events were included in the design to replicate the issues that the Germans had with this difficult offensive into a prepared and defended major city with overextended supply lines. The Random Events end up slowing the German progress and give the player a sense of the frustration that the German command (Paulus) would have experienced in dealing with logistical and military variables outside of the actual battle for Stalingrad.
I read in the rules where the designer tried to form the results of these events to create a bell curve with the most commonly occurring results being Soviet Commissars (die result of 9-12) which increase the Soviet Defense Values by +1, or problems with German logistics (die rolls of 4-6 (54th Army Offensive or Artillery Shell Shortages), 7-8 (Rain that decrease Movement Factors and prohibits the use of Air Support), 13-14 (same as Rain) and 17 (66th Army Offensive). You will simply have to grin and bear it as you roll on this Table at the beginning of each turn prior to your Supply determination. I actually really appreciated this aspect of the design as it truly makes it challenging each turn no matter how well or poorly the offensive is going.
Soviet Defense Strategies
The Soviet Defender Counters will be assigned one of the 5 Defense Strategies, which include Ambush, Barrage, Fanatic, Guards and Heroes. Each of these Defense Strategies have a different ability to slow and vex the player but also have a way for the player to deal with them if they can get the dice to cooperate with them. If you are interested in the effects of each of the Defense Strategies, I will point you toward Action Point 2.
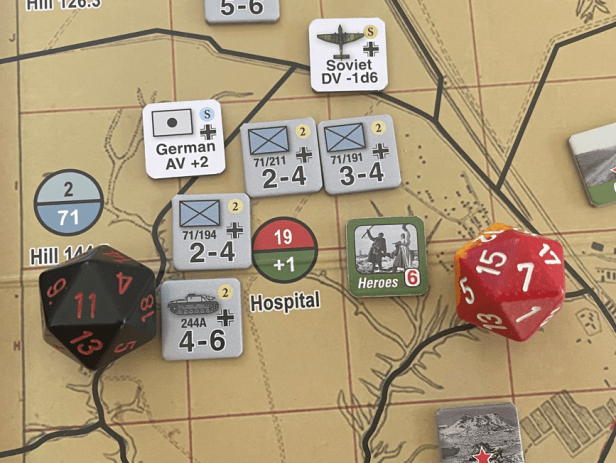
But this part is my favorite of this aspect of the game. I have a choice as a player about how I deal with these Defense Strategies. I can either take what they are dishing out, such as in the case of the Barrage and decide not to continue the attack, or I can push my luck. As an example of what I am talking about, in the case of some of these Defense Strategies there is language to the effect “Ignore if the combat result was an Overrun”. If the attack is a Success and the difference between the Attacker Total and Defender Total is greater than the Defense Strength of the Soviet unit, an Overrun has been achieved. The Soviet Unit is eliminated and the achievement of an Overrun result will cancel out the effects of the Heroes, Ambush and Fanatic Defense Strategies. So I have a choice about how I then conduct this combat with the hope of overcoming and ignoring the negative effects of these Defense Strategies. I can use lots of my precious Support Units, up to a maximum of 1 per German unit involved, to attempt to make the difference at the end of combat as high as possible hoping to get over the Defense Strength. Or I can just rely on a few and hope that the dice are kind. I love this option and the choice that I have in it. It really makes the game feel tense and I find that I stress over each combat as I go through a turn.
What I recommend is to asses the Defense Strategies before you after the Soviet Defender Counters are revealed and prioritize what Areas you truly need to take over and what negative effects you wish to avoid taking. This should then set your priority for what Support Units are used in each attack. Remember, you don’t have an unlimited supply of these Support Units and you also might have negative modifiers to some of them based on the Random Events Table roll. Just understand you will not be able to take each Area you have chosen to attack and you cannot win every single battle. The dice are just too unpredictable for you to guarantee any result as the 2d6 format for attacks gives a wide range or possible roll results from 2-12.
I hope you have success in using my points of strategy. I cannot say that I am an expert at the game or that I consistently win, because I still lose even when using these strategy points, but if you use these points in your game you will do better than if you don’t. I really have enjoyed playing Stalingrad: Advance to the Volga, 1942 and have come to truly appreciate the design and its fascinating mechanics. The game is winnable, but it takes guts to sometimes simply throw caution to the win and attack. The Germans have got to be aggressive here and utilize their assets wisely. But remember, sometimes the dice are just unkind, either in attacks, with Supply rolls or Random Event rolls. You just have to make the best of the cards you are dealt and move on. The next turn will be better….or might just be worse!
-Grant