
Stalingrad: Advance to the Volga, 1942 from Revolution Games/Take Aim Designs is a solitaire wargame that deals with the historical campaign by the German Sixth Army to attempt to overwhelm and capture the Soviet city of Stalingrad between September 13 and September 30, 1942 during World War II. The player will be in charge of commanding the attacking German forces and the game rules will handle the defending Soviet forces. The AI and the overall design itself really worked well to create a very interesting and challenging game that requires the player to make decisions about where and how they will attack, what they will do when confronted by the different Defense Strategy of the defenders and how to best manage their Supply and Morale. I really have enjoyed my experience with Stalingrad: Advance to the Volga, 1942 but it hasn’t been because of the depth and intelligence of the AI but because the game is well put together, well thought out and frankly just works.
In Action Point 1, we looked at the board and discussed the Areas identifying numbers and shapes, discussed the Terrain and took a look at the various boxes and tracks used to play the game. In Action Point 2, we examined the various Soviet Defenders and took a look at their different Defensive Strategies. In this Action Point, we will take a look at how combat works and how Support Units are used.
Support Units
Let’s first get a look at the different assets that the player has at their disposal for enhancing combat in the game in the form of various Support Units. The player has the option of purchasing these Support Units that can then be used in combat to increase their chances of success. These Support Units include Air, Artillery, and Engineer markers which the player will have to purchase during the Supply Phase of each round. An Air Support Unit is the best and provides the player the opportunity to roll a d6 and reduce the Defense Value of the defending Soviet unit by that number. This can really make a difference in the outcome of combats and can also be a huge assist when the player might be trying to achieve an Overrun result to avoid a negative effect. The Artillery Unit provides a +2 to the Attacker Total of the German player when played and the Engineer Unit also provides +2 to the Attacker Total but in addition grants the benefit of cancelling the Rubble effect of Light or Heavy Urban Terrain if using the Advanced Rules.
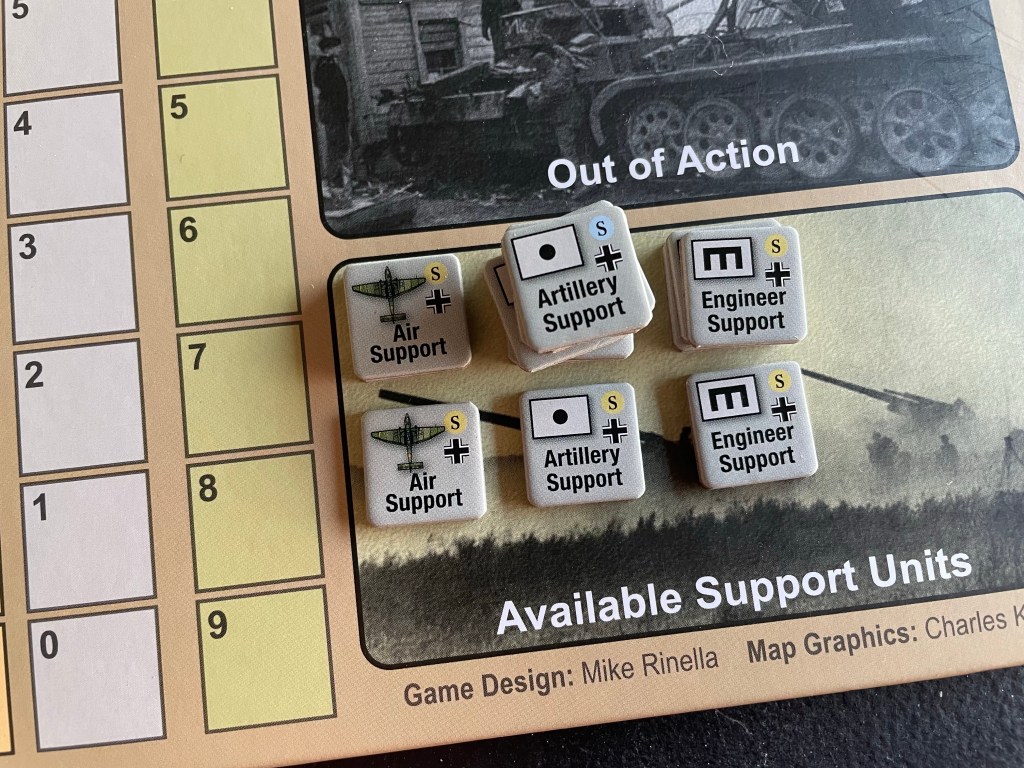
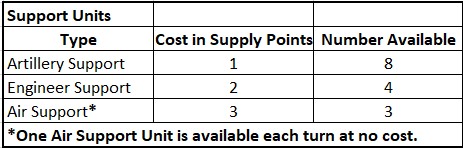
The costs of these Support Units is a very interesting design choice. Artillery Support Units cost the least at just 1 Supply Point each and there are a total of 8 of these available. These will be the bread and butter of each turn’s use of Supply by the player as they can always afford an Artillery Support Unit no matter what has happened. The Engineer Support Units are a bit more pricey, as they cost 2 Supply, but still just provide a +2 modifier in combat. Their real value is if the player is using the Advanced Rubble Rules and these can be used to nullify that benefit to the Soviet Defenders. This Support Unit is my least purchased unit but can make a big difference. Their cost though makes it harder to purchase them on a regular basis. The Air Support Units are the best in the game, but also cost the most at 3 Supply. As noted, the player will always receive one of these Units at no cost each turn. Purchasing these is the number one priority of the player and I would rather buy these than say Artillery Support if I am in a pinch for Supply.
I really liked the addition of these Support Units to the game as I think at this scale, commanders have more responsibility in answering those local command staff who are requesting these type of assets to assist in a combat. This really gave me the feel of that overall commander role and gave me the responsibility of assigning my limited assets to where they are most needed.
Combat
Let’s now take a closer look at combat and even give you a simple example to illustrate how it works. Combat is very well done in this one but does rely on dice rolling. I like to call this a dice masher as you will be rolling a fist full of dice during combat, including both your attacking German dice as well as those of the defending Soviets.
The Combat Procedure is involved but not complex. Attacks are resolved by comparing the Attack Value of the attacking German units plus a roll of 2d6 versus the Defense Value of the defending Soviet unit plus a roll of 2d6. Or in other terms Total Attack Value compared to Total Defense Value. The real interesting part is how these values are calculated.
First off, the player will designate their Lead Attacking Unit and this unit will provide its full Attack Factor to the AV as a base. The player then makes a decision to place any available Artillery, Engineer or Air Support Units into the combat and places these markers in the Area that is the target of the attack. You have to remember though that you can only place as many Support Markers as you have attacking units and this can never be more than 4 as the stacking limit is 4. The Total Attack Value and Defense Value will be calculated and then the player will roll 2d6 for the attack and at least 2d6 for the defense (sometimes with the Guards units the defender can roll up to 4d6). Once the dice are rolled, the rolled value will be added to the Attack Value and Defense Value and then the final results will be compared. This process is fairly involved, has a lot of possible additions, but really is very straightforward. No CRT to consult. No major calculations needing calculus or ratios. Just straight up comparison on values and then determine results.
The German player has a lot of elements that go into their Attack Value calculation though. The Attack Value is equal to the sum of the Attack Factor of any one attacking German unit of the player’s choice by designating it as the Lead Attacking Unit. The player will then add +1 to the Attack Value for each additional unit participating in the attack (no matter what their Attack Factor is) up to a maximum of +3, +2 for each committed Artillery Support Unit committed and +2 for each Engineer Support Unit committed and then a +1 for the special Divisional Integrity Bonus if the attack includes at least three units from the same division. Finally, if Morale is high, the German player will add +1. Most of the time, the base Attack Value before the 2d6 dice roll is 7-10 depending on the Attack Factor of the Lead Unit and how many other units are participating and whether they are from the same formation.
Calculating the Defense Value is much simpler as it consists of the sum of the Defense Factor of the Soviet unit in the Area plus the Area Terrain Effect Modifier printed on the board. Typically, this is +1 Clear (+2 for the Stalingradski Airfield), +2 Elevated (+4 for Mamayev Kurgan), +3 Light Urban (+4 for Central Rail Station) and +4 for Heavy Urban. Also, if the German Morale is Shaken (9 or less), then the Defense Value of the Soviet Unit will be increased by +1. If the German player uses an Air Support Unit, they will roll 1d6 and subtract that number from the Soviet Unit Defense Value. This normally results in a range of DV from 8-14 in the hardier Heavy Urban locations and makes attacking sometimes very dicey. Then 2d6 is rolled and the DV is totaled.
Combat is never a given in this one though as the roll of 2d6 creates some widely variable results. This is probably the one part of the game that I questioned. I would probably have used a 1d6 but the 2d6 does create some real anxiety as you are going into combat. When you roll well, it is not an issue but the unfortunate luck that I operate with causes me to roll lots of 1’s and 2’s and generally leads to losses. Lots of losses. Now that you see how combat works and is calculated, let’s take a look at a simple example.
In this example, the 71st Panzer Grenadiers are attacking into Area #19 which is Clear Terrain and has Hospital identified on the board. The 71st enters the Area with the Stug 244A attached and which will be used as the Lead Attacking Unit with its 4 Attack Factor. Once all attacks are declared and all units move into the Area, the Soviet Defender is revealed and it turns out to be a Heroes Unit, which means that German Morale will be reduced by -1 at the end of combat unless an Overrun was achieved. The Attack Value is calculated for the German player by taking the Attack Factor of the Stug of 4 as the Lead Attacking Unit and adding +3 (+1 for each supporting unit attacking in the area) to it along with a +1 Divisional Integrity Bonus because there are 3 units from the same formation (71st Panzer Grenadiers). Morale is also strong and an additional +1 will be added to the total bringing their Attack Value to 9 before the roll of 2d6 and the addition of the Support Units. The German player adds +2 to the AV from the use of an Artillery Support Unit bringing that total to an 11 (shown on the black d20 which are not included with the game but make it easier to calculate and remember the totals). The Soviet Defense Factor for the Heroes units is a 6 but will be increased by +1 for the Terrain Effects Modifier from the Clear Terrain for a total of 7 (shown on the red d20). So at this point, the German AV is 11 to Soviet DV of 7, which is a difference of 4.
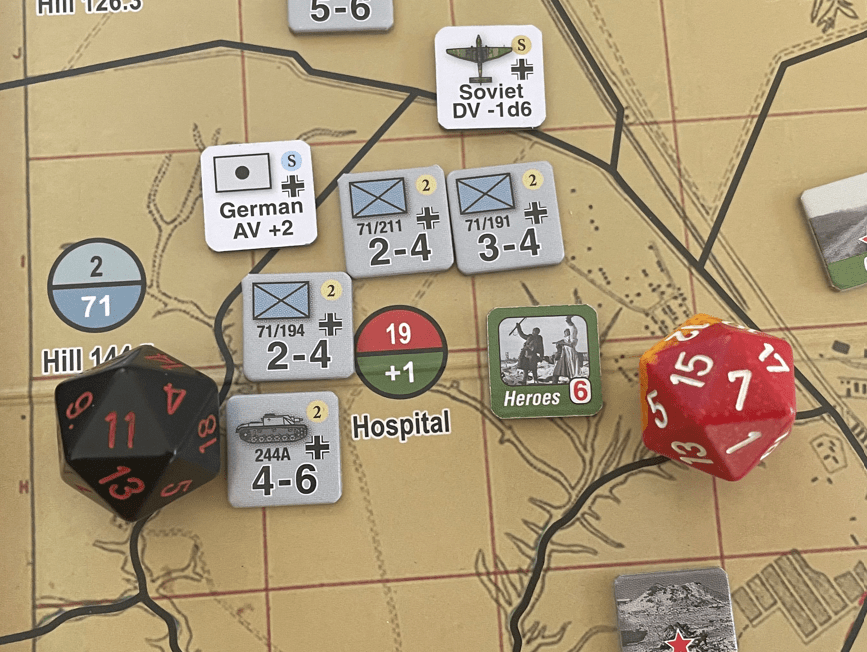
Next, we have to deal with the Air Support Unit that was committed to the combat by rolling a d6 and then subtracting from the Soviet DV that value to a minimum of 0 (it can never go below 0 no mater what the roll is). A black d6 is rolled and results in a 5, which means the Defense Value of the Soviet Unit will be reduced by 5 from 7 to a 2. That is a very good result and shows the importance of these Air Support Units. This means that it is very possible, even likely that the final result of this combat will be an Overrun because the difference between the AV and DV will be higher than the Soviet Heroes Unit Defense Factor of 6.
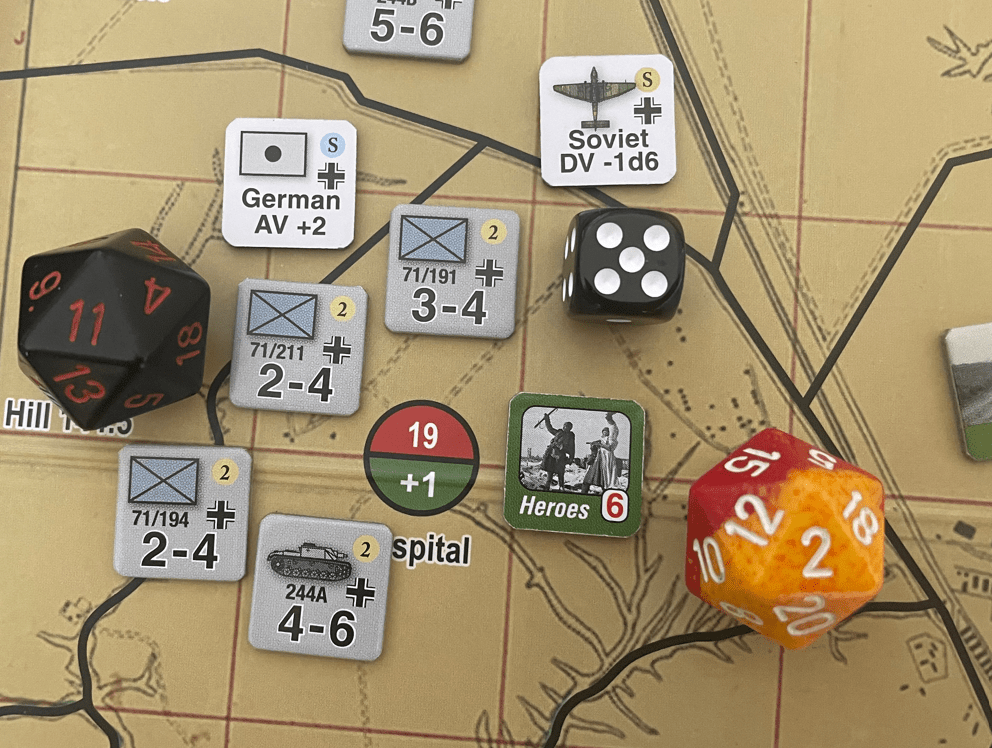
Next each side, the attacker and the defender, will roll 2d6 and add that to their Attack and Defense Value. The German player rolls 9 on 2d6 while the Soviet defender rolls 6. Adding these to the previously identified Attack Value and Defense Value the Germans have a Total Attack Value of 20 (11 + 9) and the Soviets have an 8 (2 + 6). The German player wins the combat as their TAV is greater than the Soviet TDV and the difference is 12 (20 – 8). This difference of 12 is greater than the Defense Value of 6 for the Heroes units and it is considered a result of Overrun.
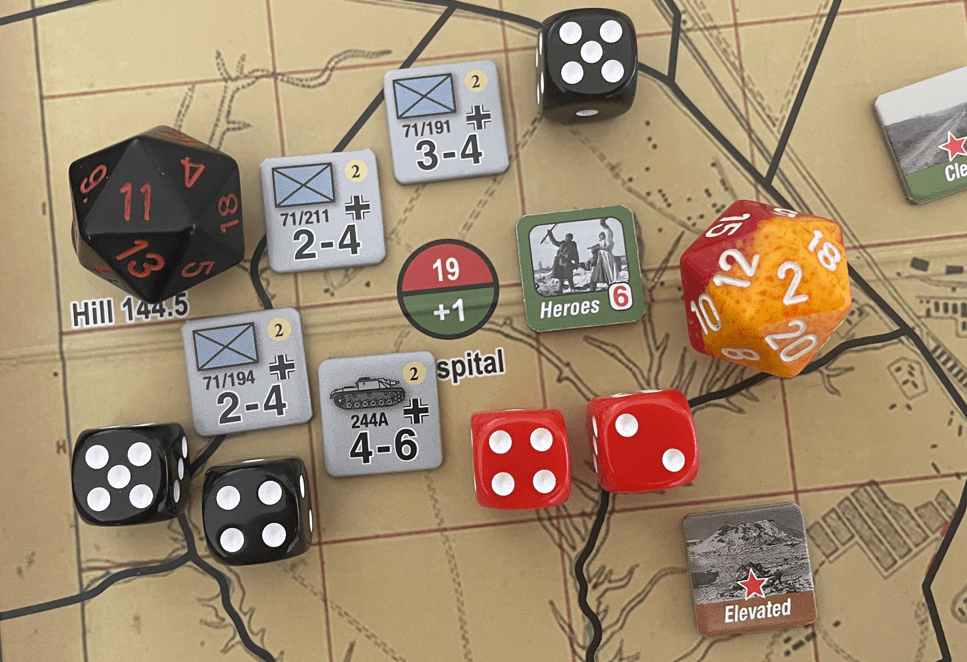
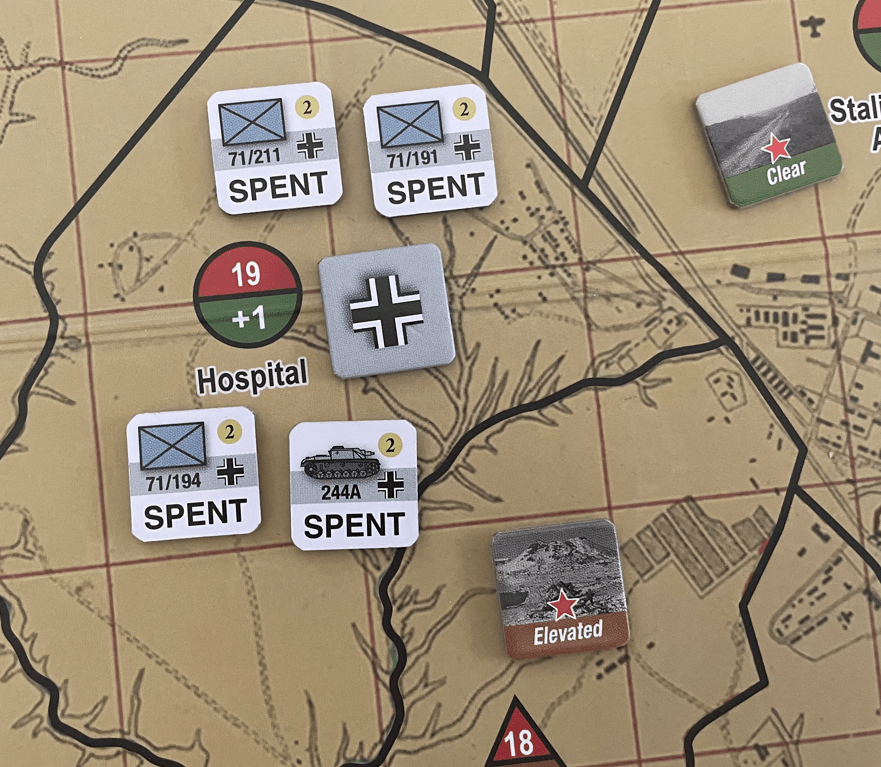
The Soviet counter is removed from the board and placed back into the box as it was defeated and the German player places a Control Marker in the space. Then they flip all of their participating units in the combat to their Spent side by turning the counters over. This was an Overrun and because of that fact, the negative Morale effect from the Heroes unit was avoided. If the difference between the TAV and the TDV was not greater than the Defense Factor of the Soviet Heroes unit, the German player would have been required to lower their Morale by -1.
Combat is a very interesting and well done part of the design but it does take a bit of time. At the start, you will have between 5-8 total combats each round and they each take 3-5 minutes to adjudicate because you have to do some calculating and make decisions about how you are going to utilize your scarce resources. This could have been sped up if the game included an on-board track where players could calculate the TAV and TDV each combat. But alas, it was not added to the board.
In Action Point 4, we will investigate the design’s focus on Supply and management of German Morale by the player.
-Grant

Thanks guys for this thorough material. I like how you use special dice to calculate the final numbers – I was using the 4 dice provided in game but sometimes it was not enough. Anyway, I am going to try the game with all optional rules soon and see how it goes!
LikeLiked by 1 person
Stuke Joe has posted some helpful aids in calculating combat strengths as well as cards to remind you of the various events on BGG. Here is a link: https://boardgamegeek.com/filepage/255387/stalingrad-advance-volga-1942-event-cards
LikeLiked by 1 person
Thanks! Cards I already printed (really useful!) but I somehow missed the aids. Will use them for sure.
LikeLiked by 1 person
“Dice masher” I like this term. I’m going to borrow it from you, Grant.
Enjoyable read!
LikeLiked by 1 person