I have been scouring the earth for good games covering one of my favorite historical periods in the American Revolutionary War. I have played 12 of them to date, and you can read about them in my Gaming the American Revolution – Ranking the Games We Have Played post that I update every year around the 4th of July.
One new game that I found and played is Don’t Tread on Me: The American Revolution Solitaire Board Game from White Dog Games. Don’t Tread On Me is a strategic-level solitaire simulation of the American Revolution and is based on the popular Vietnam Solitaire: Special Edition game system from White Dog Games. This game though takes a very different perspective on the conflict as the player plays as the British side along with American Loyalist forces against the forces of George Washington and the Continental Congress as controlled by the game system’s AI. I really like this one as it is not only about battle, although it does definitely have its share of conflict, but it features a number of interesting aspects about the revolution including political control, state loyalty levels which change over time and due to events and the outcomes of battles, and even a system dealing with the naval aspect of the conflict in dealing with smugglers and their attempt to bring the rebels arms and ammunition.
In Action Point 1, we covered the map and its various Counties and their terrain types and the Turn Record Track to give perspective to how the action plays out and how the player must meet the demands of Lord North and King George III. In Action Point 2, we looked at the differing units and their abilities as well as the anatomy and meaning of the values on the counters. In Action Point 3, we started taking a deeper look at the various phases of the Sequence of Play beginning with the Smugglers Phase and the Naval Phase. In Action Point 4, we examined the British Ground Phase, which deals with so many different aspects including Winter Attrition, Amnesty, Paroles, British Unit Purchase and Deployment and Moving around the map. In this Action Point, we will move to the Battle Phase and dive into the procedure used, examining the use of Militia and take a look at the interesting Combat Results Table and finally take a look at an example.
Battle Phase
We discussed this in the last post but Battle occurs between British player forces and Rebel forces when there are units of both sides located in the same County, not just in the same State. Battle involves only ground units including Foot, Horse, Indian and COS Units, although it can be affected by the presence of the French Fleet in an adjacent Sea Zone but not with bombardment like you might be thinking.
There is no cost for Battle like there is for using your Ships to combat the Smugglers. Once a Battle is declared, the Units should all be removed from the map and placed into the Battle Box printed on the map. In order to make sure you remember where the Units came from, and therefore so you can remember the Terrain that the Battle is occurring in, there is a Battle Marker that should be placed in the County involved where the Battle is happening.
One of the reasons that this game is long is that there can be several Battles per Turn as they can come about as a result of moves during several different phases throughout a Turn. Battle can occur specifically at three points in the Turn. The First Battle Phase, the
Second Battle Phase which occurs after the Place Rebels Phase where Continental reinforcements are placed from the Smugglers in Sea Zones, and during the Rebel Campaigns Phase. The general procedure used when a Battle occurs is always the same but there are differences in the order of which Battles will be fought in the different Phases.
In the First Battle Phase, the British have the initiative. The British player will get to choose the order in which all Battles are fought. In the Second Battle Phase, the Rebels have the initiative and this means that all Battles during this Turn are fought in a fixed order, starting from Québec, then County 1-2 in New England, and proceeding County by County until the last Battle is fought in County 6 of Carolina. In the Rebel Campaigns Phase, the Rebels have the initiative and the same procedure as during the Second Battle Phase is followed.
Battle Procedure
After initiative is determined, the Battle Procedure will be the same each time following a very regimented process that covers 3 pages in the rulebook. But don’t worry, it really is pretty simple and moves faster once you have gone through it a few times. There also is a really excellent fan made Player Aid that outlines each step in the Battle Procedure on Board Game Geek created by Chris Hammons (cwhhbu) that I printed off and use and it is a lifesaver for sure. Let’s take a look at each of these steps.

Check for French Intervention
The first step that we will undertake is to Check for French Intervention. But you will not have to do this until it is at least Turn 7. The key to this step is where the Battle is being fought. If the Battle happens in a County marked with a blue die symbol, then the French
may intervene in that Battle.
The process is simple as the player will roll 1D6, and subtract -1 from the die if the French Fleet is shadowed. If the Fleet is in Boston, it will intervene on a modified roll of
4, 5 or 6. If the Fleet is in the Caribbean, it will intervene on a modified roll of 5 or 6.
If the French Fleet does intervene, the French Fleet will be placed in the Sea Zone corresponding to the State where the Battle takes place.
Next, the player will place the French Army in the Rebel stack in that Battle. The French Army will come from anywhere on the map with the only exception being unless it’s in the Prisoners of War Box. On any other roll, the player will will simply leave the French Fleet in its base location of either Boston or the Caribbean. Once placed into a Battle, the French Army remains where it is on the map until it retreats, advances or intervenes somewhere else, or is taken prisoner as a result of a loss.
As you can see from the Strength Points on the French Army counter, they are pretty powerful and you have to be prepared for their intervention if and when you fight a Battle in a County where they can intervene. I never take for granted that they will miss their roll, even though it is a 50/50 proposition, and try to make sure I have more Strength Points in those Battles. If you can somehow kill them or take them prisoner, that can be a big blow to the the Rebels and will make your job easier for the remainder of the game, or at least until they get paroled or exchanged.
Call for Militia
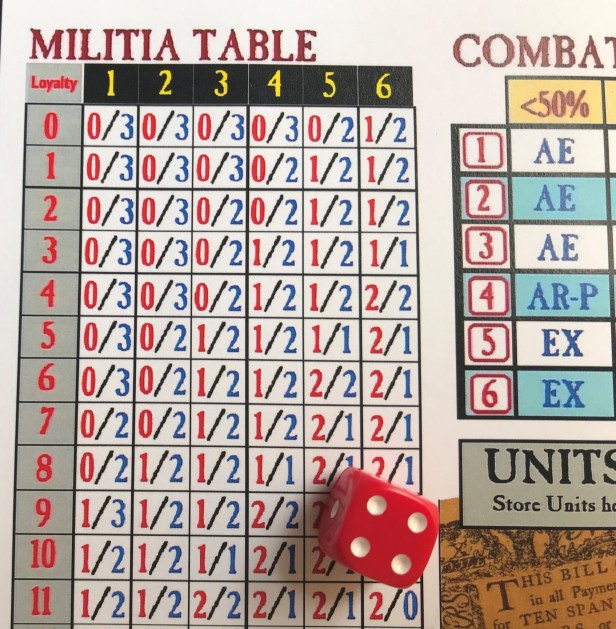
The next step is to find out how many Strength Points of Militia will show up for each side during the Battle and this is determined by referencing the Militia Table and a die roll. First though, you will have to find the State in which the Battle is occurring and it’s current Loyalty Level on the Turn Record Track. Then simply find the corresponding row on the Militia Table. Roll a die and cross-reference the two to determine whose local Militia show up for the Battle and how many. The result will be in the form of two numbers with the first number being red and representing the British Loyalist Militia and the second number being blue representing the Patriot Minutemen. For example, if the result is a 1/2 this means one Loyalist Militia and two Rebel Militia will appear to fight. The player then simply adjusts the Militia Present markers on the Militia Present Track accordingly. These numbers will be factored into the final Total Strength Points and the odds calculation.

As you look at the Militia Present Table, you will notice that the higher the Loyalty Level the less chances that Rebel Militia will show up to the Battle and the greater number of Loyalist Militia that will show. Everyone loves a winner and it was no different in the American Revolution. People tended to support the side that was “winning” at the moment.
There are also several other factors that will modify the results of the Call for Militia.
- Indian and Hessian Effect: If a Battle has any Indian or Hessian units in it, subtract -1 from the Militia die roll (no more than -1 maximum). The Minutemen were always more eager to show up for a fight if the detested Hessians or hostile Indians were on the menu.
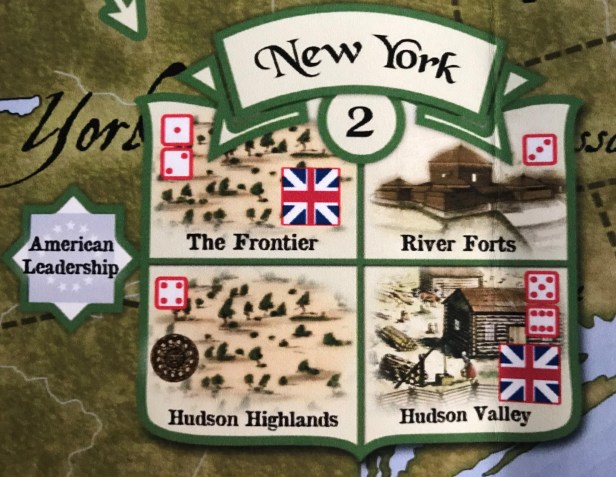
- Loyalist Strongholds: Any County with a British flag icon is a hotbed of Loyalist support. New York is a perfect example of this as there are two Counties with the British flag icon located in them including The Frontier and Hudson Valley. If a Battle is fought there, add +1 to the Militia die roll.
- No Militia Areas: Two of the areas on the map, Québec and Quaker Country (Pennsylvania 3-4), are marked with icons representing Guy Carleton in Québec and a typical Quaker in Pennsylvania. In any Battle in either place, do not roll for Militia. The Battle proceeds with no Militia present. French-speaking people in Québec weren’t thrilled with either side, forcing both to rely on their regular armies and large parts of Pennsylvania were settled by pacifist Quakers and German religious sects like Mennonites and Dunkers who shunned both warring parties and lent them no goods or assistance.
- Vermont: If the Vermont marker is in its Pro-British Box, then add +1 to the Militia roll for any Battle in New York.
I have found that the addition of Militia to a Battle normally makes very little difference. More often than not, one side or the other will get an advantage of 1 SP which doesn’t factor in too much to the overall calculation of odds. For example, if the British have 6 SP and the Rebels have 5 SP, an addition one way or the other only marginally changes the percentage. 6/5 equates to 120% while a 7/5 (which represents the addition of 1 SP from the Militia) equals 140%. For example, if the British increase from 6 SP to 7 SP from one Militia, they will find themselves only increasing by 20% and on the CRT, this range still falls under the 150% next step column so it makes no difference.
British Horse Reaction
The British player may now move any Horse Unit from any County in the State where the Battle is occurring and add the Horse Unit to the Battle, even if that Horse Unit has already fought. But remember that the British may not conduct this Horse Reaction move in a State where the Rebel “H. Lee” Horse Unit is located. Horse Units are very mobile and valuable Units as they can add to any Battle in the State several times and bring good SP with them (4 for Wilderness, 4/3 for Farm and 3/2 for Town/Fort). I like to make sure to have at least one Horse Unit in each State if possible to be able to add them to all of the Battles.
Total Strength Points
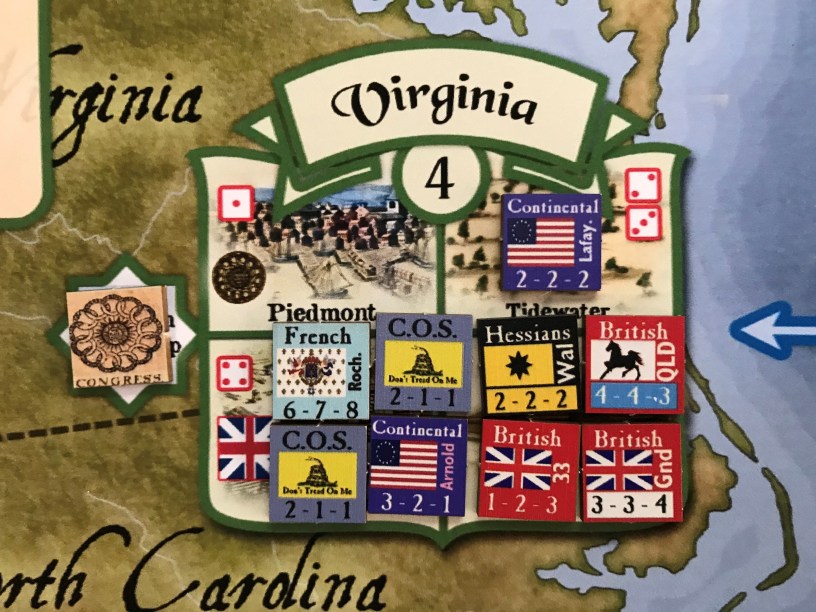
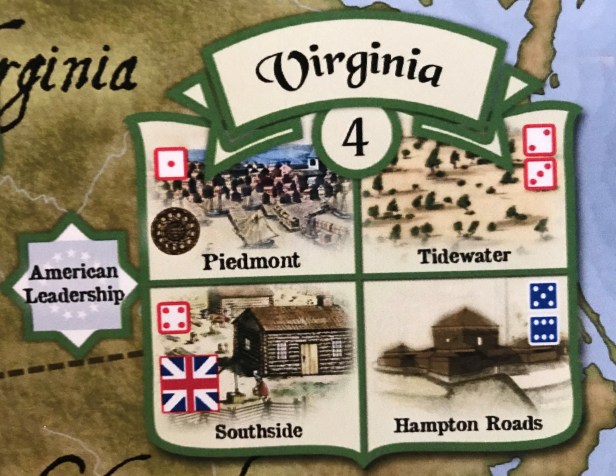
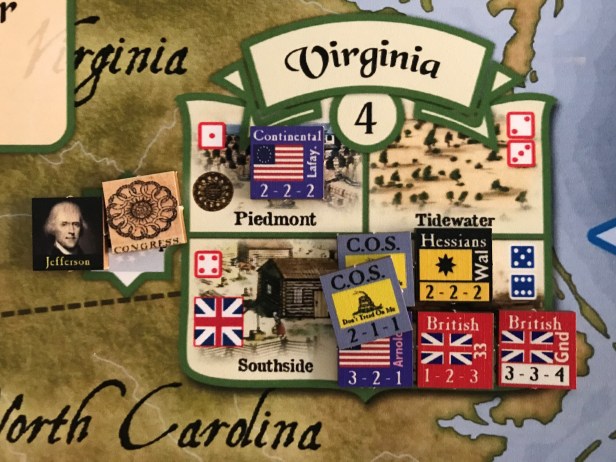
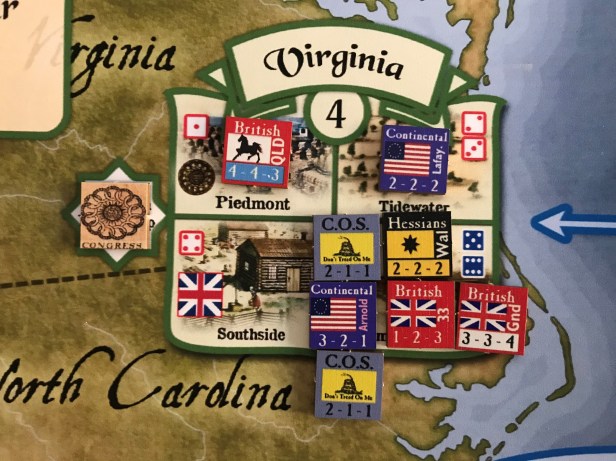
Each side in the Battle now totals their own Strength Points. Each County is assigned a Terrain, which includes Wilderness, Farm, Town, or Fort. The type of Terrain determines the SP’s of a Unit fighting in that County. Virginia is a State that contains all four different Terrain types. Piedmont is Town, Tidewater is Wilderness, Southside is Farm and Hampton Roads is Fort. The pictures illustrate the different Terrain types.

Each Ground Unit has three numbers printed on their counter to indicate the Unit’s strength. These values are from left to right Wilderness, Farm, and Town/Fort. For example, a typical 1-2-3 British Unit has 1 SP in the Wilderness, 2 SP on the Farm, and 3 SP in a Town/Fort. In Battle, each Militia Unit always has 1 SP regardless of the Terrain.
This one took me a while to get used to remembering which numbers were used for what Terrains but the handy dandy Battle Procedure handout shown above has the fantastic graphic shown to the right identifying the different types. Now you just have to remember Wilderness, Farm, Town/Fort (WFTF helped me to remember!) for the numbers shown on each counter.
Calculate Odds
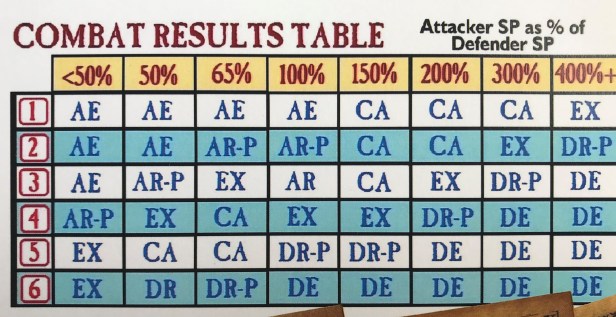
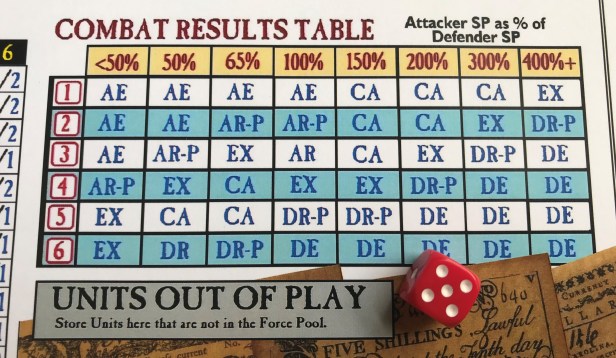
Now you will have to use math. But don’t worry, it is really very simple! To resolve a Battle, always divide the total Attacker SP’s by the total Defender SP’s to obtain a percentage result. Always round the result down to the nearest percentage expressed by a column on the Combat Results Table. This is why my point above regarding the Militia and them not necessarily making a difference is so true. For instance, if you have 8 Rebel SP’s attacking 3 British player SP’s, then 8 ÷ 3 = 266%, rounding down to the 200% column. Any ratio under 50% will always use the 50% Column.
Check for Column Shifts
Following along with the rules exceptions is the importance of Column Shits. If a Column Shift occurs in a State, any Battle fought there is fought on the CRT column to the left or the right of where it should be fought. This can make a bid difference in the outcomes of Battles and you have to pay attention to what Column Shifts might be coming for the Rebels or the ones that you can take advantage of. I recommend looking at the possible Shifts before committing to moving your Units into a County with Rebel Units. Forgetting a Column Shift can be the difference between victory and loss!
There are several different Column Shifts that are possible.
- Congress: If the Battle takes place in a State where Congress is in the American Leadership Box, then all Battles in that State are fought with one Column Shift favoring the Rebels.
- Thomas Jefferson: If the Battle takes place in Virginia while Thomas Jefferson is located in the Leadership Box, then all Battles in Virginia are fought with one Column Shift favoring the British. From the rules, there is a note that is very interesting about this Column Shift. Jefferson was a great writer but a lousy military leader. Note that if Congress and Jefferson both happen to be in Virginia at the same time, the Column Shifts will cancel each other out.
- Vermont: If the Vermont marker is in its pro-Rebel box, then Ethan Allen’s “Green Mountain Boys” are busy aiding the Revolution. All Battles in New York are fought with one Column Shift favoring the Rebels. (.)
It is very important to remember that if the Column Shift states that it is in favor of the Rebels that this means that any British attack under these circumstances will take 1 Column Shift to the left and any Rebel attack takes 1 Column Shift to the right. The same is said if the Column Shift is in favor of the British that this means that any British attack under these circumstances will take 1 Column Shift to the right while any Rebel attack takes 1 Column Shift to the left.
Determine Results
Now that you have carefully calculated the Total Strength Points of each side in the Battle and taken into account all Column Shifts, the next step is simply to roll 1D6 and then cross-index the die roll row with the appropriate CRT Column to see the final result of the Battle. Remember that each Unit defeated will have a different ending location and it is important to remember these properly. When any Committee of Safety Unit is eliminated, it is placed into the Rebel Force Pool. When any Indian Unit is eliminated, it goes back to the Available Indians Box. When any Continental, French, or other British player Unit is eliminated, it is placed in the Prisoners of War Box. As you may remember in our discussion in our last Action Point where it will wait until it may later be Amnestied or Paroled. The Battle Results are shown on the CRT in various abbreviations.
The CRT abbreviations are as follows:
AE: Attacker Eliminated. All attacking units are eliminated, and the Defender wins the Battle.
AR: Attacker Retreats. The Attacker’s units retreat and the Defender wins the Battle.
AR-P: Attacker Retreats-Pursuit. The Attacker’s units retreat and the Defender wins. The Defender may now Pursue the losers.
CA: Counterattack. The initial attack is parried as the defending side launches a bold counterattack! Refight the Battle: the original attacker is now the defender; the original defender is now the attacker. Roll a die on the 100% column of the CRT (ignore the real
odds, ignore Column Shifts, and leave any existing Militia and French in place.) Apply that final result to the Battle.
DE: Defender Eliminated. All defending units are eliminated, and the Attacker wins the Battle.
DR: Defender Retreats. The Defender’s units retreat and the Attacker wins the Battle.
DR-P: Defender Retreats-Pursuit. The Defender’s units retreat, and the Attacker wins. The Attacker may now Pursue the losers.
EX: Exchange. Pay close attention to the total of Strength Points (SP) on each Side in the Battle, including Militia. The side with the lower SP total is completely eliminated and loses. The winning side then must eliminate a number of SP’s to equal the number of eliminated SP’s on the losing side; however, if this would result in the winner losing every unit that fought in the Battle, he retains his weakest non-Militia unit (to control the battlefield now that the Battle is over). If the Rebels win an EX and the French Army is in the stack, the French always survive to hold the battlefield. If forces in an Exchange are exactly equal, then the Battle is a draw and both sides are completely eliminated and nobody wins!
R: Retreats: There are two different types of Retreat. An AR (AR-P) or DR (DR-P) result will compel the Attacker or Defender to Retreat from the County where the Battle took place.
Now that we have an idea about all the steps included and necessary in a Battle, let’s take a look at an example with as many of these elements included as possible.
Example of Battle
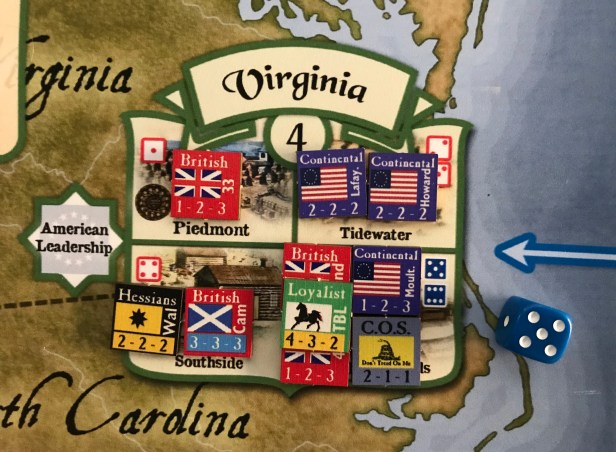
Here is a look at our example. The Battle is occurring in Hampton Roads County in the State of Virginia. The British player has three Units in the space including a 2-2-2 Hessians Unit, a 1-2-3 British Foot Unit and a 3-3-4 British Foot Unit. The Rebels are attacking into the space and have three Units including two 2-1-1 COS Units and a 3-2-1 Continental Unit. The Terrain type for the space is Fort and if you remember the acronym WFTF we will be using the Strength Point on the far right for each Unit involved. With that in mind, the Total Strength Points for the British are currently at 9 while the Rebels are at only 3.
The first thing that needs to be done is to check for French Intervention as there is a blue die symbol in the County (there are actually two but we only care if there is a blue die symbol). The current Turn is past Turn 7 so we will make the check by rolling 1D6 and looking for a number that is a modified roll of 4, 5 or 6 as the French Fleet is in Boston and there is no modifier as the Fleet is not being Shadowed by a British Frigate. The die result is a 5 and the French will intervene in this Battle. The French Fleet marker is moved from Sea Zone 3 Long Island Sound to Sea Zone 5 Chesapeake Bay which is attached to Virginia. Then the French Army marker will be placed with the Rebel forces attacking into Hampton Roads adding their 8 Strength Points for the Fort Terrain to the Rebels current Strength Point Total of 11. The British are now outnumbered with 11-8 SP’s. This could be bad for them but wait there are still steps to consider that will improve their chances.
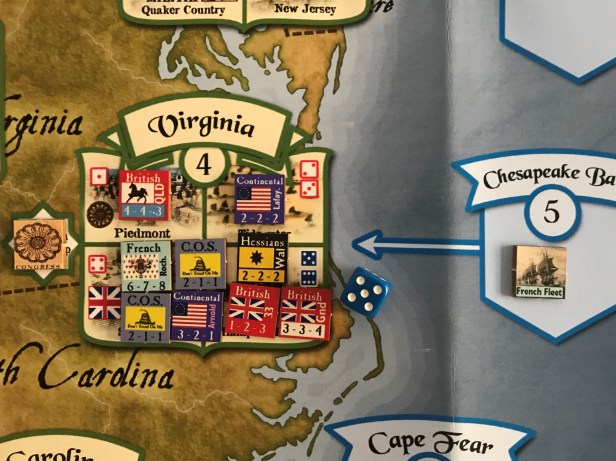
We now will do a Call for Militia and need to know what the Loyalty Level is for the State of Virginia so we know what Row to use on the Militia Present Table. The current Loyalty Level is a 7 so that is good for the British. The only problem is that there is a Hessian Unit present in the space and this will reduce the roll by -1. A single D6 is rolled and results in a 5 being rolled which is reduced to a 4. We consult the Militia Present Table and find that the result means that the British will gain 1 Militia while the Rebels gain 2. This brings the Total Strength Points to 13 for the attacking Rebels and 9 for the Defending British.
We now move to the British Horse Reaction step which will find the British being able to add the 4-4-3 Horse Unit located in Piedmont County to join the other British forces located in the Fort in Hampton Roads. This will add the Horse Unit’s 3 SP’s to the Total Strength Points for the British making the final total 13-12.

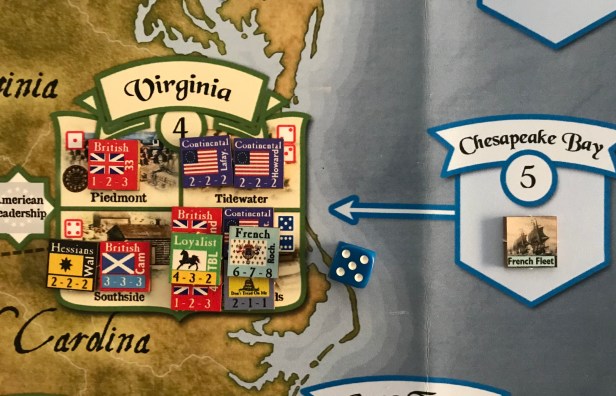
We now calculate the odds and divide the Rebel Attacker SP (13) by the Defender British SP (12) and get a final % of 1.08% rounded down to 100%. We will use the 100% Column on the Combat Results Table. But before we roll, we check for any Column Shifts that are available. There is one for the Rebels as Congress is located in the American Leadership Box of Virginia and will add a positive Column Shift to the attacking Rebels. This means we will shift to the right to the 150% Column which is much better for the Rebels.
We now roll a D6 and cross reference the roll with the appropriate value in the Column. a 5 which will result in utter disaster for the British. The result is a DR-P, which isn’t necessarily the worst result normally but due to the fact that the French Fleet is located in the Sea Zone and there is only a retreat option to the sea available the British Units will be eliminated!
And that is not all. The eliminated Units, which would normally be placed into the Prisoners of War Box, are instead removed from the game! They are lost and can never return to quell the rebellion. This is really devastating for the British as their Horse Unit and the 3-3-4 British Foot Unit are really powerful. So how could this happen? Well, first off the Rebels rolled well. On a roll of 1-3 in the same column the British would have had the opportunity to Counter Attack which means that the attack is parried as the defending side now launches an attack of their own! The Battle will be re-fought but now the original attacker is the defender; the original defender is now the attacker. Roll a die on the 100% column of the CRT and ignore the real odds, ignore Column Shifts, and leave any existing Militia and French in place. Apply that final result to the Battle. There would have been a chance! An Exchange result would have even been better but this is very devastating. Think of this result as the result at Yorktown that culminated in the end of the war in the surrender of Cornwallis to the tune of The World Turned Upside Down being played by the British as they came out to surrender.
Battles are risky but are necessary and the British player has to have the odds stacked in their favor before they decide to attack. I will tell you that I pay attention to all of the Column Shits potential and other elements and frankly always assume the rolls will be bad. You have to fight Battles with good odds…period! 150% or higher is recommended and frankly the results don’t get really good until you are on the 300% or 400% Column. Plan wisely because one misstep and the game will be nigh unwinnable.
In Action Point 6, we will take a look at the Place Rebels Phase and the ominous Rebel Campaigns Phase.
-Grant
