
I have been scouring the earth for good games covering one of my favorite historical periods in the American Revolutionary War. I have played 12 of them to date, and you can read about them in my Gaming the American Revolution – Ranking the Games We Have Played post that I update every year around the 4th of July.
One new game that I found and played is Don’t Tread on Me: The American Revolution Solitaire Board Game from White Dog Games. Don’t Tread On Me is a strategic-level solitaire simulation of the American Revolution and is based on the popular Vietnam Solitaire: Special Edition game system from White Dog Games. This game though takes a very different perspective on the conflict as the player plays as the British side along with American Loyalist forces against the forces of George Washington and the Continental Congress as controlled by the game system’s AI. I really like this one as it is not only about battle, although it does definitely have its share of conflict, but it features a number of interesting aspects about the revolution including political control, state loyalty levels which change over time and due to events and the outcomes of battles, and even a system dealing with the naval aspect of the conflict in dealing with smugglers and their attempt to bring the rebels arms and ammunition.
In Action Point 1, we covered the map and its various Counties and their terrain types and the Turn Record Track to give perspective to how the action plays out and how the player must meet the demands of Lord North and King George III. In Action Point 2, we looked at the differing units and their abilities as well as the anatomy and meaning of the values on the counters. In this Action Point, we will begin taking a deeper look at the various phases of the Sequence of Play beginning with the Smugglers Phase and the Naval Phase.
Smugglers Phase
During the American Revolution, there was a constant flow of weapons, ammunition and goods of war that enterprising individuals were willing to take the risk to sell to the Rebels. This would require running of the blockade by the British Royal Navy and could be very risky. In this game, the Smugglers are just a procedural part of the overall process to get Continental Units placed in the various States to challenge the player. The player will have to make sure that they don’t ignore the Smugglers though and must invest their scarce resources into stopping them by attacking with their available Frigates.

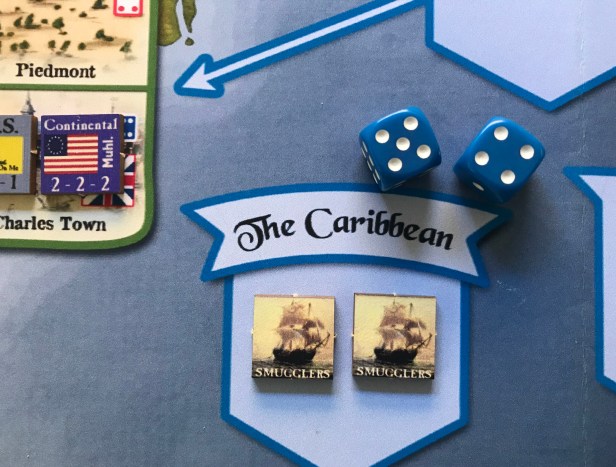
During the Smugglers Phase, if there are any Smugglers counters located in The Caribbean Sea Zone, rolls are made to place two of those Smugglers per turn off the American coast into numbered Sea Zones. The process is pretty simple and involves the player rolling 2D6. If there is only one Smuggler, then one die will be rolled and if there are no Smugglers, then no dice will be rolled. The number of Smugglers on the map will be directly correlated to the attention that the player pays to this phase. But remember, it will cost to use your Frigates to attack these Smugglers and you will have to manage your scarce funds properly in order to be able to utilize your fleet while also buying enough fighting Units to fend off the growing rebellion.
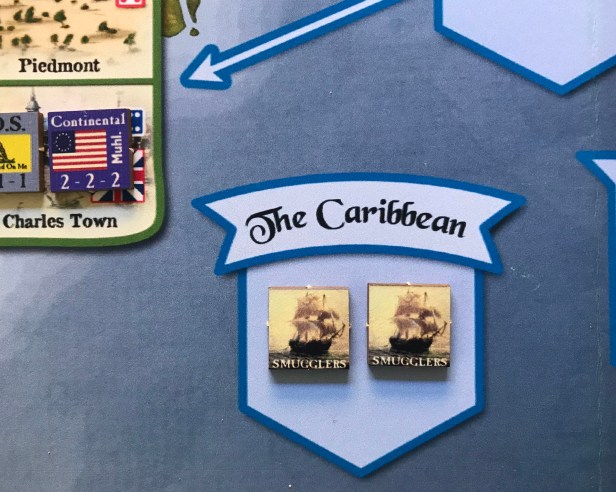
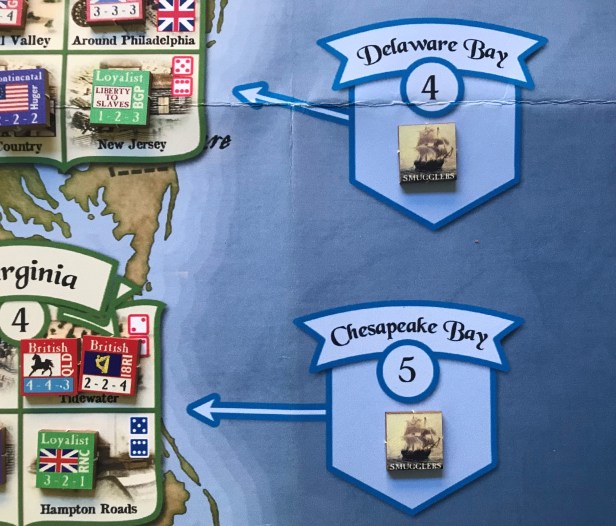
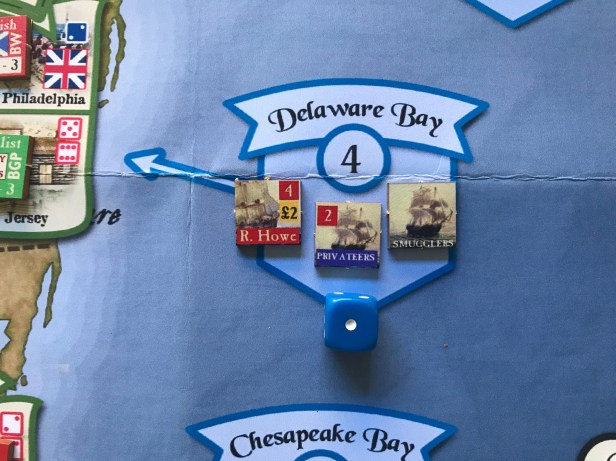
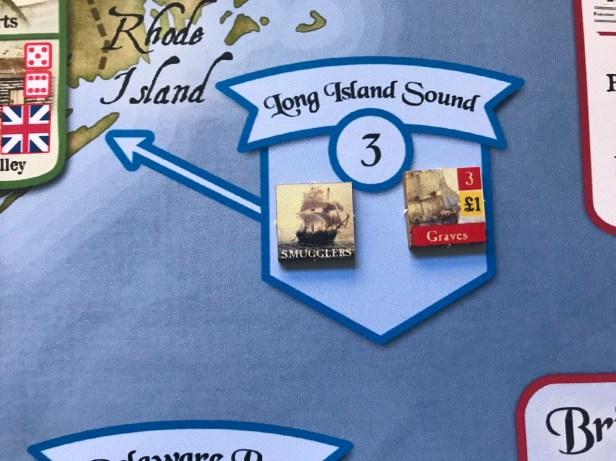
Each of the numbers generated with the rolls will coincide with one of the Sea Zones numbered 1-6. These Sea Zones are as follows: 1 – North Atlantic, 2 – Massachusetts Bay, 3 – Long Island Sound, 4 – Delaware Bay, 5 – Chesapeake Bay and 6 – Cape Fear. Each of these Sea Zones is connected to one of the States via a blue line, but not to the State with the same number as the Sea Zone. This is due to the fact that Sea Zone 1, which is the North Atlantic, connects each round to the Target State as called out on the Turn Record Track. A maximum of two Smugglers may occupy any one Sea Zone. Any die roll that would place a third Smuggler into a Sea Zone will have no effect and the player does not re-roll and that Smuggler will remain in The Caribbean supposedly drinking rum on the beach. So take that as a gift and run with it!
So, why does the player need to worry about this phase? Well, when you reach the Place Rebels Phase later in the Turn Sequence each Smuggler will deploy a new Continental reinforcement to the State that coincides with the Sea Zone where the Smuggler is located. This is a random process and the Smuggler will have its target State already determined, but will then roll a D6 to determine the County where the Unit will be placed. Basically, you will need to make sure you give this phase the appropriate due or you will find that you have a wave of new Continental troops to fight each round and will quickly get overwhelmed. You also have to ask yourself do I use my funds to activate my Frigates, thereby stopping potential reinforcements from making it ashore where I have to fight them, or do I ignore the Smugglers and simply buy more Units to fight them when they get ashore?
Privateers
Now that we understand the role of Smugglers, let’s take a look at their protectors the Privateers. Privateer Units are an amalgamation of many elements and include several different representations of of naval ships of the time including the fledgling and tiny Continental Navy but also includes American freebooters who obtained Letters of Marque and Reprisal from individual States that legalized their attacks on the British Fleet. The British considered these Privateers to be pirates of course but even they couldn’t really take the high ground in this as they utilized pirates to harass Spanish and French shipping during times of war. The Rebels have two Naval Units that are identified as Privateers and these Units really are only considered an “armed” Smuggler. These Units function as Smugglers and will bring reinforcements ashore and must also follow the no more than 2 Smugglers per Sea Zone rule but the difference is that these Units fire back when fired upon.
Privateers are placed in The Caribbean due to News Headlines like “John Paul Jones!” or through Random Events like Dutch Smugglers.
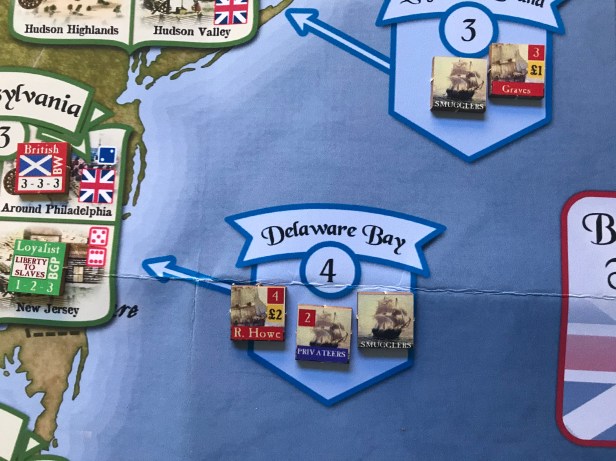
Privateers have a Strength of 2 and will shoot back when attacked by Frigates. They will only hit on a 2 or less but this is still something that will make the player think before attacking them. When a Frigate attacks a Privateer, the Privateer gets to fire first so it could lead to the British Frigates being destroyed before they even fire wasting those resources paid to activate them. A Frigate has to attack a Privateer before they can attack any Smugglers located in the same Sea Zone.
If a Privateer Unit is located in The Caribbean, then when the dice are rolled to place Smugglers, the lower of the two dice which results in a successful Smuggler being placed (remember they can not be placed if there are already two Smugglers in the rolled Sea Zone) will place a Privateer instead. If there happen to be 2 Privateers then they can both be placed as a part of this Phase.
Now that we understand how the Smuggler Phase works, and even understand some of the challenges and why this Phase needs to be focused on, lets take a look at the Naval Phase.
Naval Phase
The Naval Phase is a key part of the game and can lead to some really bad results for the player if things don’t go the right way for the British. Remember that this game does include dice so there is some randomness but there are elements that the player has control over and must utilize in order to keep things under control in the high seas off the coast of America.
Rebase the French Fleet
If the current Turn has a Hurricane Warning Flag on the Turn Record Track (a red filled in square surrounded by another square), then it is hurricane season in the Caribbean. This means that the French Fleet will be moved to Boston from its current location.

During Turns where there is not a hurricane, the French Fleet will be moored in the Caribbean. Why is this important? Well, if the French Fleet is free and in a Sea Zone it can possibly intervene in a Battle that is occurring in that State. This intervention comes in the form of the French Army counter being placed in that space and participating in the battle providing a greater challenge for the British to overcome.
Shadow the French Fleet – Intervention
We will cover this intervention in greater detail in a later post but this part is very important to the British player and can be a true source of trouble. This intervention is subject to a die roll and is not guaranteed, which is a good thing for the player, but you do have the ability to negatively modify that roll as well if the player has assigned a Frigate to “shadow” the French Fleet.
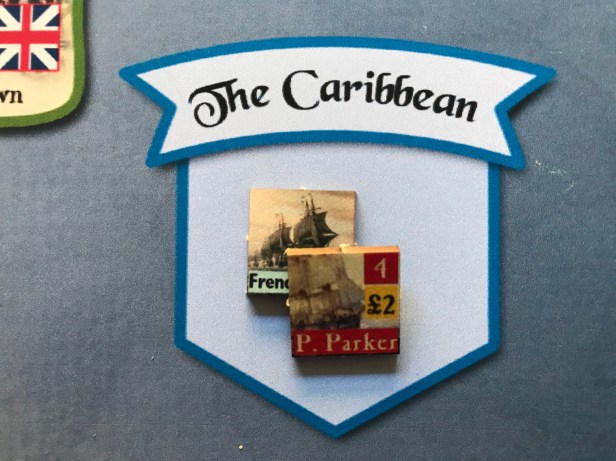
One Royal Navy Unit that is still located in the At Sea Box may be sent to shadow the French Fleet at the end of the Naval Phase. The Unit will simply be placed on top of the French Fleet and then modifies that intervention roll negatively. This action doesn’t cost any £ but there is an opportunity cost to it as you will be unable to battle the Smugglers with that one Unit assigned to shadow.
Attack Smugglers
Dealing with the Smugglers is one of the major focus points of the Naval Phase. The player may assign Royal Navy Units located in the same Sea Zones as Smugglers to attack them. But they must get to that Sea Zone first. At the beginning of this phase, the player can take any British Ships that are in the Ships at Sea Box and then place them in any Sea Zone next to the Smuggler that the player wishes to attack. Remember though that for each of the Royal Navy Units that you wish to use you must pay the costs listed on that Unit, either £1 or £2.
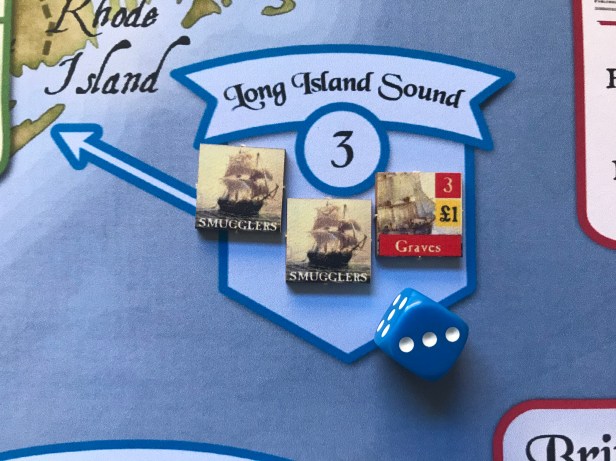
The attack is simple as the British player simply calls out a target in a Sea Zone where they have placed the Frigate and then rolls a D6 hitting and destroying the target if they roll less than or equal to their own strength which is shown in the upper right corner of the counter. The Graves and Arbuthnot hit on a 3 or less while the Parker and Howe hit on a 4 or less. A hit Smuggler is removed and placed in The Caribbean Sea Zone where it can be placed the next turn during the Smugglers Phase by the AI. Once each Frigate has attacked, whether they missed or hit, they are then placed back into the In Harbour Box for refitting, resupply and repairs.
The Smugglers Phase and Naval Phase has the potential to really snowball unless you invest in using your Frigates to attack those Smugglers. There are a total of 8 Smugglers counters in the game, plus another 2 Privateers who act as Smugglers, so you can see that they just keep coming and if you have several poor rolls over a few Turns you will see that there are 4-6 new Continental reinforcements being placed in the States each Turn and you will quickly be overwhelmed leading to the player being unable to control States to meet their Turn goals, which leads to the Liberty Marker being increased, ultimately ending in a loss.
In Action Point 4, we will dive into the British Ground Phase, which deals with so many aspects including Winter Attrition, Amnesty, Paroles, British Unit Purchase and Deployment and Moving around the map.
-Grant
