
I have been scouring the earth for good games covering one of my favorite historical periods in the American Revolutionary War. I have played 12 of them to date, and you can read about them in my Gaming the American Revolution – Ranking the Games We Have Played post that I update every year around the 4th of July.
One new game that I found and played is Don’t Tread on Me: The American Revolution Solitaire Board Game from White Dog Games. Don’t Tread On Me is a strategic-level solitaire simulation of the American Revolution and is based on the popular Vietnam Solitaire: Special Edition game system from White Dog Games. This game though takes a very different perspective on the conflict as the player plays as the British side along with American Loyalist forces against the forces of George Washington and the Continental Congress as controlled by the game system’s AI. I really like this one as it is not only about battle, although it does definitely have its share of conflict, but it features a number of interesting aspects about the revolution including political control, state loyalty levels which change over time and due to events and the outcomes of battles, and even a system dealing with the naval aspect of the conflict in dealing with smugglers and their attempt to bring the rebels arms and ammunition.
In Action Point 1, we covered the map and its various Counties and their terrain types and the Turn Record Track to give perspective to how the action plays out and how the player must meet the demands of Lord North and King George III. In this Action Point, we will take a look at the differing units and their abilities as well as the anatomy and meaning of the values on the counters.
Units
There are many different types of Units in the game that represent the armed forces that fought in the American Revolutionary War. There are British Units typically referred to as Lobster Units and American units typically referred to as Rebel Units.
Lobster Units are any red colored Unit that has British printed at the top of the counter no matter what type of Unit they are or what flag or band that they have printed on their counter. The British have variety in their Ground Units including the mentioned British, Loyalist, Hessian and even Indian Units. Rebel Units are any Ground Unit on the Rebel side and include several different types of Units as well. There are COS or Committee of Safety Units, the French Army, and Units associated with the Continental Army referred to as Continentals.
Each of the counters represent individual Units and their counters include many different elements of interesting information including nationality, type of Units and strength. There are also symbols and various numbers printed on these counters that represent historical flavor and don’t have much of an impact on the game. Some British Units carry a specific colored rectangular box that is drawn through the numbers on the bottom portion of the counter. Let’s take a look at these different Unit designations and explain how they effect the game.
Band Color
Certain British, Hessian and Loyalist Ground Units are grouped into specific categories by a colored rectangular box referred to as a Band. In the picture below you can see each of these different Bands that include no color, Blue, Gold and White.
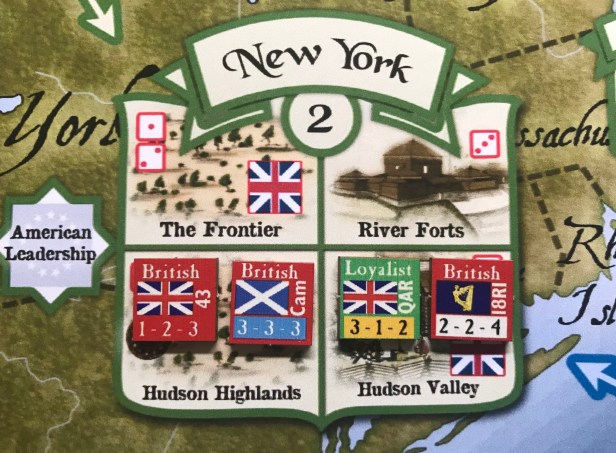
Blue Band Units are available at the start of the game but are removed from the game on Turn 11 due to an “Invasion Scare!”, which is one of the News Headlines listed on the Turn Record Track. This event coincides with the French and Spanish Fleets setting sail for the English Channel, threatening to land over 40,000 fighting men in England, then wheeling around and heading for Gibraltar to lay siege to the British forces there threatening their position in mainland Europe. The Blue Band Units are removed as they historically were sent back home to defend against these French and Spanish moves. The player does receive 2 Gold Band Hessian Units for their Force Pool to make up for this loss of 4 Blue Band Units.
Gold Band Units are not available at the start of the game but do come into the British Force Pool due to specific News Headlines that occur on the Turn Record Track. An example of this is the “France Declares War!” News Headline, which states that France allies with the Rebels for the remainder of the game and directs the player to place the French Army Unit in Boston and the French Fleet in the Caribbean but also to place a few new Units into the British Force Pool, including a White Band British Foot Unit and a Gold Band Loyalist Foot Unit. Other News Headlines that add Gold Band Units to the British Force Pool are “Independence Declared!”, “Invasion Scare!” and “Lord Germain’s New Plan!”.
White Band Units are not available at the start of the game but also come into the game as as result of News Headlines. They can also be removed from the game through Events such as in the War in India/Caribbean Event where any one White Band Unit on the map will be sent overseas to deal with Britain’s growing list of enemies.
Hessian Units
The Hessians did most of the dirty work in the American Revolution and were there because of King George III’s connection to Hanover. He used these mercenaries to do most of the early fighting in the Colonies and as you might imagine these Units are featured prominently in the game. When purchasing new Units to add to their forces on the map, the player must first give priority to buying Hessian Units. The British player must first buy any available Hessian Unit which they can afford. Only after all of the Hessian Units are purchased and placed on the map can the player buy available British Units.
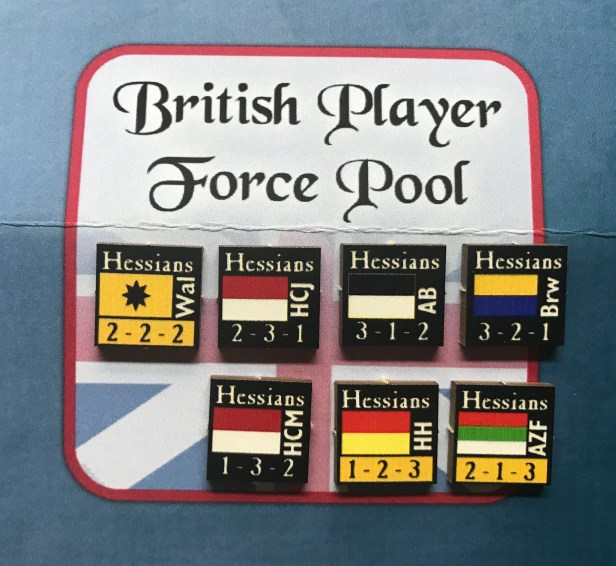
One key point that I wish to expound upon here while we are talking about the Hessian Units is the concept of State Control. The goal of the game is to control 3 States each turn, of which one of these States must be the Target State discussed in the previous post. If the player controls the 3 States, then the Liberty Marker will stay where it is and will not increase. In order to win the game, the Liberty Marker can never reach 9 and must stay below this level for the full 16 Turns of the game. This is not an easy task I can tell you!
In order to Control a State, the British player must have the only Units located in the State during the Liberty Phase of the Turn Sequence. British and Loyalist Units can count for purposes of determining Control but Hessian and Indian Units do not count. I bring this point up as you start the game with only 9 Units on the board that can Control a State, and 3 of these Units (White Band British Foot) start in the Boston Box and cannot leave this box until Turn 3 so they cannot count towards Control during Turn 1 and Turn 2. What makes this more of a problem is that you have to purchase all of the available Hessian Units in the British Force Pool before you can purchase your British Units that allow for Control. If you happen to get unlucky results in your first few battles, you could really not have much of an ability to Control States and might see the Liberty Marker jump each Turn. This could mean a fast ending game in a British loss. You must be aware of your Units, their makeup and their capabilities in order to be effective in this game.
Loyalist Units
Not all of the colonials supported the American Revolution and were happy to remain under the control of the British crown. There were many reasons for this, including ideological differences from their Patriot brethren, economics, status and their position in the government. In the game there are Loyalist Units that can come into the game through Events and offer their service on the battlefield to the British. The Loyalist have only Ground Units and these Units are Foot and Cavalry.

Horse Units are very mobile and can be moved from any County in a State where a battle is ongoing to join in the fray. The other kicker is that these Horse Units can join in another battle in the State even if they have already fought a battle in that State this turn.
The Rebels have a lone Cavalry Unit which represents “Light Horse” Harry Lee and serves the purpose of blocking the British Infantry from using their special Forced March ability that allows them to move any British Units from State to State during the British Ground Phase to get into position to attack the Rebels.
Indian Units
The Indian Units can only be accessed when the Indians Attack Event is rolled during the Random Events Phase. These Units represent braves from two tribes that were loyal to the crown in the Mohawk and Cherokee. When the Event is rolled, if there are any Indian Units in the Available Indians Box, the player chooses one and then places them on the map. If the Indian Unit chosen is Mohawk, it will be placed into either New York or Pennsylvania. If Cherokee, it will be placed into either Carolina or Virginia. The Indian Units must be placed into the lowest numbered County that is free of Rebel Units. Once placed, the player will have to reduce the Loyalty Level of the State by -1 as the colonials didn’t appreciate the use of “merciless Indian savages” against them as stated by Thomas Jefferson.
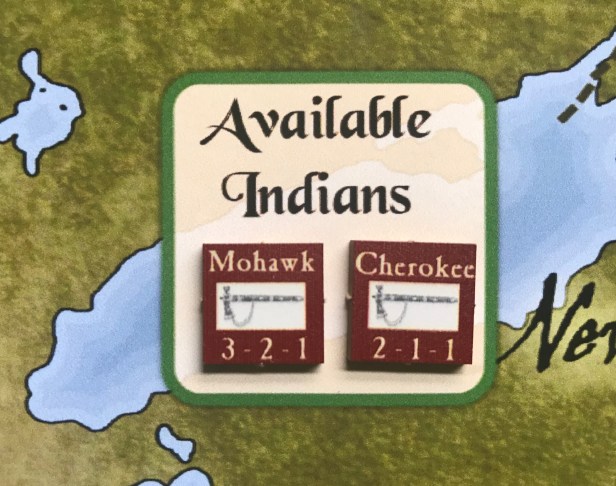
As you can see from the numbers on the bottom of the counters, the Indian Units are best in the Wilderness where they will add 3 SP to the battle but do not fight as well in Farm or Town/Fort Terrains.
Naval Units
Only the British player has Naval Units that can be purchased and placed on the map. There are Privateers, Smugglers and the French Fleet for the Rebels that can be placed on the map due to Events or simply at the beginning of the Smugglers Phase if there are available Smugglers located in the Caribbean.
These Naval Units play a small but key part in the game and it is important for the British player to get their best Naval Units on the board as quickly as is possible to combat the Smugglers who will bring in guns, ammunition and other instruments of war to arm more and more Rebels in the Colonies. The British player’s Naval Units consist of two 4 Strength Frigates (Howe and Parker) and two 3 Strength Frigates (Graves and Arbuthnot). These Frigates are used to attack Smugglers located in Sea Zones before they can deliver their goods to the shore. The Privateers act the same as Smugglers but can defend themselves when attacked by British Frigates. They are placed in the Caribbean due to News Headlines like “John Paul Jones!” or through Random Events like Dutch Smugglers.
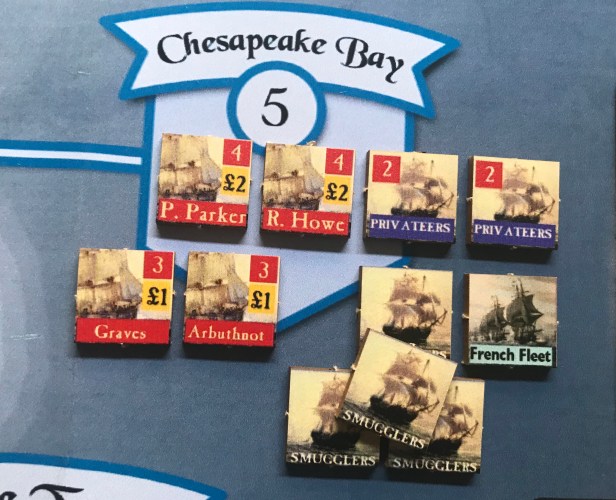
The British Naval Units attack Smugglers during the Naval Phase and the price listed on the counters must be paid in order to use the Frigate for that Phase. As you can see in the picture above, the lesser Frigates only cost £1 while the better Frigates will cost £2 to use.
Rebel Units
There are two different types of Rebel Units available to the AI including the Committees of Safety (COS) Units and the Continentals. These Units are placed during the Place Rebels Phase (not a very fancy name I know but definitely descriptive of what happens during it) and will deploy in a County regardless of the presence of any other Rebel Units or British Units.
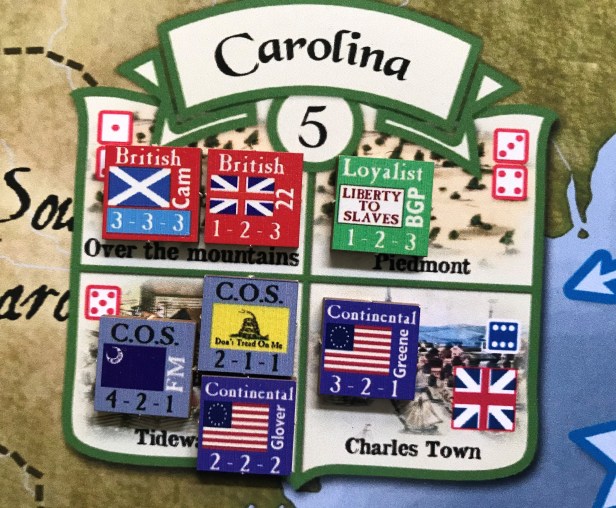
If there are any COS Units in the Rebel Force Pool at the beginning of the Place Rebels Phase, the player will roll a die to select a State. If a State is chosen on a roll of 1-5, then another die will be rolled to select a County within that State where the COS Unit will be placed. If the original State roll was a 6, two COS Units will be placed in a random state by rolling another D6. No more than 2 COS Units can deploy during this phase. There is a special COS Unit that is marked with an FM and stands for the Swamp Fox Francis Marion. If a COS Unit is to be placed in Carolina, and the FM COS Unit is in the Force Pool, this Unit must be placed in Carolina.
Next during the Phase we move to placing the Continental Army Units. The player will roll a die and start with that Sea Zone and follow through the remaining Sea Zones until all have had a chance to place a Continental. In each Sea Zone where there is a Smuggler Naval Unit, the player will then roll a D6 and place one randomly drawn Continental Unit into the State connected by a line to that Sea Zone and into the County number that was rolled.
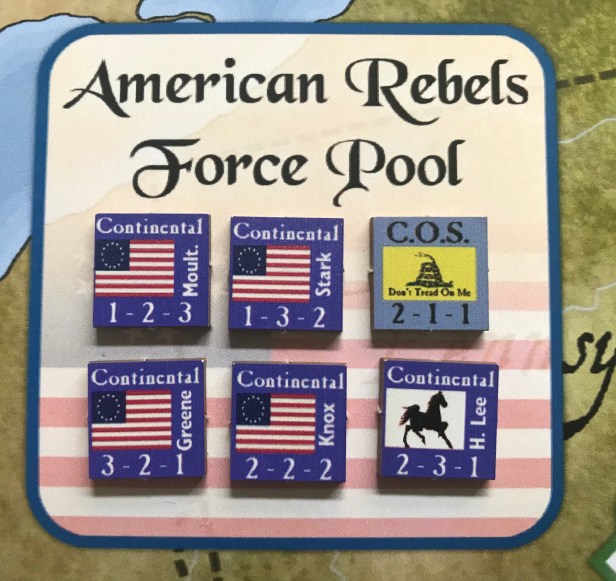
The Continental Army Units are represented by various different Strength Points and have their leader identified on the right side of the counter. Some of these units are better fighters in Wilderness (Greene) as compared to other Continentals (Stark) while some are more adept at fighting on Farms or in Towns/Forts. If a roll is made to place a random Continental and there are no more remaining in the draw cup, that State’s Loyalty Level will be reduced by -1 instead.
Here is the breakdown of the 16 different Continental Units:

Now that you have a better idea for the differences between each side’s Units, and their different special abilities, let’s take a look at the numbers that determine how effective they are in combat.
Strength Point Numbers
Each County has their own terrain type assigned and are represented by pictures of that type of terrain drawn in the box. There are four different types of terrain including Wilderness, Farm, Town and Fort and each of these terrains have a different value for each type of unit that is fighting in them, as shown on their individual counters.

There are three numbers listed on each counter and these values are the Strength Point Numbers that the Unit will add to the battle based on the terrain they are fighting in. From left to right, the numbers are for Wilderness, Farm and Town/Fort. A typical 1-2-3 British Unit would add 1 SP in the Wilderness, 2 SP on the Farm and 3 SP when in a Town or Fort. This is very thematic as the British Units were considered heavy Infantry and were outfitted best to fight in open terrain where their Brown Bess Muskets could be brought to bear on targets standing all in a line with brightly colored uniforms. They were not very well suited for guerrilla style fighting in the forests, woods and scrub brush of the Colonies. On the other hand, the Continentals generally are better fighting in the Wilderness or on Farms but that is not always the case as some Units are very good in Towns or Forts, such as the 1-2-3 Moultrie Continental.
I really like the distinctions that the designer has assigned to the Units in the game as it is very historical and provides the player with the opportunity to not only enjoy the gaming experience but learn some history. Battles are a very interesting part of the game and can be very challenging depending on several factors influencing those battles including Loyalty Level of the State and how this effects Militia mustering, the presence of Congress in the State, leaders and the mix of the best Units for the terrain in which the battle will occur. I love the detail of this game and am excited to share it with you over the next month or so as we dive into the different elements of the experience.
In Action Point 3, we will begin to take a look at the various phases of the Sequence of Play starting with the Naval Phase and Smugglers Phase.
-Grant
