With It or On It was simply a revelation and an utter joy to play. Not often do we say that about new gaming experiences and especially not for a fast playing wargame but this system just created such an interesting and tactical experience that I had to share it with you. With It Or On It is the first game in a new Shields & Swords Ancients Series from Hollandspiele that uses a system developed in the Shields & Swords Series that deals with medieval battles. The series is not overly crunchy, and doesn’t overdue it with different armor and weapon types, but simplifies these elements into a concept called Combat Class. The game takes the vantage point of the player as an overall commander where you control several different wings and have to play a series of Command Chits to activate them. The game is light, fast playing and the rules overhead is low but the game has some really interesting decisions regarding how to go about defeating your opponent.
In Action Point 1, we covered the basics of the system and looked at the different types of units available to the commander. In Action Point 2, we dove into the very interesting Command Phase where the player must make tough decisions about how to use their limited double sided Command Chits. In this Action Point we will explore a bit deeper into the various Phases of the Sequence of Play giving more detail on the Skirmish Phase and Move Phase.
Skirmish Phase
Of the concepts in the game that was a bit hard for us to grasp at first was this concept of a Skirmish Zone. Each Foot Wing projects a Skirmish Zone extending three squares from the Unit’s location on the battlefield and moving straight ahead toward the enemy’s side of the map. The Skirmish Zone is basically an area that the Units can attack from range if they have that ability. The interesting thing about this Skirmish Zone though is that it literally will disappear the moment that any enemy Foot Unit moves next to the Zone. To me this rule was a bit unclear as there is a situation where you will do two hits to an Enemy Wing if they are in your Skirmish Zone. With that revelation, I took this to mean that they have just entered the Skirmish Zone (as they have to stop upon entering) and they are in the row of the Skirmish Zone adjacent to its limit. If I am wrong, maybe someone can educate me on this.
Horse Units also project a Skirmish Zone but they are a bit different than those of a Foot Unit. Their Skirmish Zone extends only two squares from its Units but in all eight directions, which forms a square and never goes away if an enemy Unit comes adjacent to it. Think of this Skirmish Zone as reflecting the maneuverability and speed of a mounted Unit.
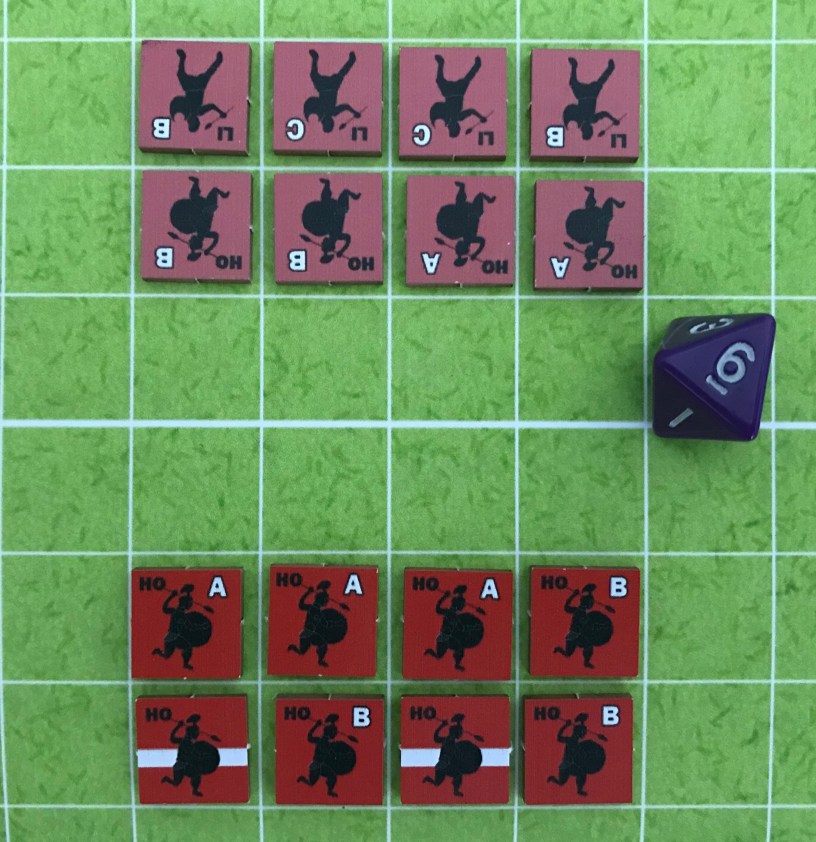
Let’s try to get a visual of this Skirmish Zone by lining up Units and taking a look.
As long as a Wing has a Skirmish Value, which is normally listed in the text of the scenario that is being played, those Units will extend that Skirmish Zone three squares in front of them. This is the area that enables Units to attack from range with a Skirmish Action.

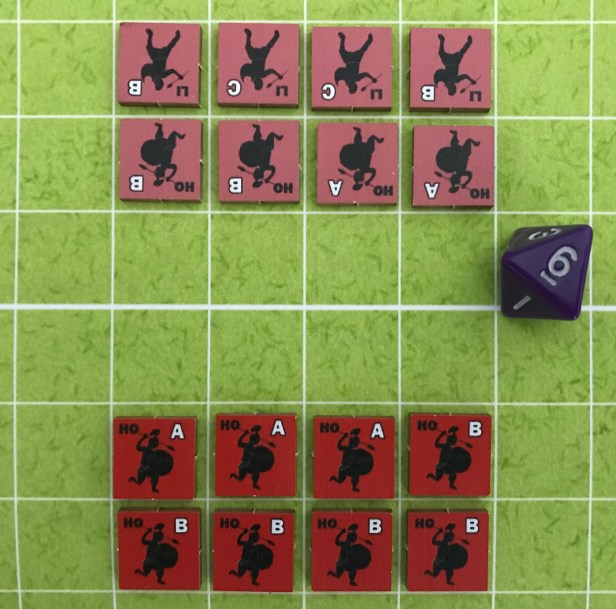
Now on to the benefit of this Skirmish Zone, as it can be quite useful and cause lots of trouble for your enemy as they attempt to advance on your Wings. While a Foot Wing’s Skirmish Zone exists, and remember that existing means that no Foot Unit has moved next to the Zone, and that player forces have a Skirmish Factor of 1 or greater, it can be issued a Skirmish Command. During the Skirmish Phase of a Wing that has been issued a Skirmish Command, they can target one of the enemy Wings the attacking Wing has a straight line from one of it’s Units to a Unit belonging to the targeted enemy Wing. Of course this is a moot point if the Wing doesn’t have a Skirmish Factor.
The process is pretty simple then. The acting player will roll one die and add the Skirmish Factor Value indicated for that side in the battle instructions. If the modified total is 8 or more, and the targeted enemy Wing is not yet entered the attacking Wing’s Skirmish Zone, one enemy Unit of the owning player’s choice will be Exhausted. If the enemy Wing has moved within the attacking Wing’s Skirmish Zone then two enemy Units are Exhausted. Remember, that Skirmish is effective at that mid-range as the weapons being used by the Peltast Units are typically javelins, spears or slings which are most effective within that intermediate range. Once the enemy enters that Skirmish Zone though the Peltast Units would move to the back of the line to get out of the line of the charging infantry. If the attacking player played the Bonus + Skirmish Command Chits, then two consecutive Skirmish Phases are performed, one right after the other. The only limit is that these Skirmish Actions can only target the same enemy Wing.

These Skirmish Attacks can be utterly brutal and can really lead to an advancing line of Hoplites to have to consider whether they advance into combat or try to Rally before moving again. The thing is is they try to Rally and do poorly, they will then set themselves up for a follow up Skirmish Attack that is sure to start destroying their Units and degrading their combat effectiveness. I typically try to run up on Skirmish Capable Units as quickly as I can, so that I can nullify their advantage and take the fight to them.
That statement now brings us to the Move Phase.
Move Phase
During a Wing’s Move Phase, Units that are not Exhausted may move up to a certain number of squares, which is totally dependent on the Command Chits that were chosen and when they are used. If the Move Phase is the first Action Phase of the turn, meaning this was the first Command Chit that you decided to use of the two that you played, Units from one Wing may move four squares. But, if the Move Phase is the second Action Phase of the turn, Units may only move two squares. The reason that I mentioned Units that are not Exhausted is that only Fresh Units may move. When Units are Exhausted they must make a successful Rally check in order to get flipped over and be able to Move. This means that you will lose Units from your Wing as you move up on an Enemy Wing if they have a Skirmish Factor.
Foot Units and Horse Units have different ways that they can move, which makes perfect sense, and is one of the reasons that Horse Units are valuable on the battlefield as their maneuverability makes for some interesting choices. Foot Units can only move orthogonally. Orthogonally means that they can move straight ahead or to the side but never diagonally. They must also keep in line with the rules of Facing. However, Horse Units may move in all eight directions.
Now to the concept of facing. Unless otherwise specified, each Foot Unit Faces forward, which means in the direction moving toward the opponent’s Edge of the map. This Facing cannot be changed and Foot Units may not move toward their own map edge
but may only move to the left, to the right or forward.
At the time that Foot Units on opposing sides become adjacent to each other and are Facing one another they are now considered to be Engaged. Not to be married, but to go about the work of death and destruction as they enter melee. Once Engaged, these Units cannot move and when they become Engaged those Units stop their movement. There is no charging overrun in this one. If there are multiple Wings that have advanced over a few turns, the enemy Units that are laterally adjacent both to the left or the right are
not considered to be Engaged and their movement is not prohibited. This is the only effect of Facing/Engagement. It does offer some opportunity for your more mobile Units, such as the Horse Units, to move up on the flank of an opponent and assist in defeating them as the main force of infantry attacks from the front. Remember that Horse Units Face in all four orthogonal directions simultaneously and can move in all eight directions. The only time that Horse Units are considered to be Engaged with enemy Units is if both are Horse Units and they are orthogonally adjacent. This then means that the Units cannot move any further and the Horse Units main advantage is then nullified. Foot Units that find themselves adjacent to Horse Units are not prevented from moving.
I think that the most important aspect to understand about Movement is that the instant that any Unit belonging to the acting Wing moves into an enemy Skirmish Zone, it must
stop movement, even if it has squares remaining. This is illustrated in the picture below.
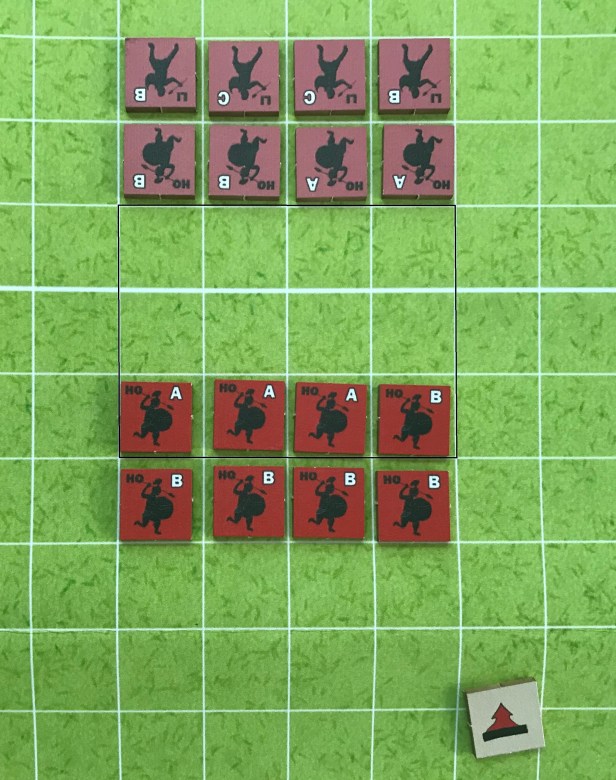
If any Unit belonging to a Wing begins the Move Phase in an enemy Skirmish Zone, for that Phase all Units in that Wing may move only one square. If the Bonus + Move Command Chit are used, the acting Wing performs a Bonus Move Phase immediately after the first. The Bonus Move will always be the second move of the Move Phase and the activated Units may only move two squares. They may also only move forward toward the enemy map edge, not to the left or the right. This action is not about subtly positioning your Units but simply hauling ass and getting into the fight. In the rulebook, Tom talks about why this limitation was placed on the Bonus Move Phase. He stated this “prevents the Wings from becoming too flexible and mobile in the hands of clever players. As a general rule, the armies of this period weren’t ‘clever'”. Movement is not a major part of the game but you can utilize your Horse Units to outflank your enemies and cause some havoc that will be hard to recover from.
I love the Skirmish Phase and Move Phase because you have to think about how to get at your enemy if they have a Skirmish Factor. In one of our first plays, Alexander had lots of Wings of Peltasts and they were simply cutting me in pieces. The only thing that saved me was good Leaders in my Wings and some poor rolls on Alexander’s part. But this experience taught me that you have to plan your movement in order to avoid as much as possible the negative effect of those nasty Skirmish Zones. You will be unable to avoid them and you will undoubtedly lose Units to them. I hate having to leave Units behind as I continue moving after we have taken fire from the Skirmishers. It just seems like such a waste of a good spear. But that is part of the game and really injects some tension into battles.
In Action Point 4, which is the final entry in this series, we will focus on understanding the Combat Phase taking a look at the Unit Type Modifier Matrix and how it works with the Combat Results Table and then take a look at a few examples of battles.
-Grant

@Grant re: Skirmish action rule and Zone “existence”. Is it that the acting wing can advance into optimal range and not have its Skirmish Zone immediately disappear as the enemy unit the acting unit is engaging _didn’t_ “move” into the acting wings zone – thus causing the “no-skirmish-zone-if-an-‘enemy’-unit-moves-into-the-skirmish-range-rule” to apply? It would mean you could theoretically deny your opponent the “skirmish” action because your wing did move into his opponents zone. This does seem to jibe with the movement rules as you explained them. I’ve seen similar actions in other games to represent other maneuver & momentum of “wings” before Close combat engagement. Tho’ this is just a guess.
LikeLike