
I have been scouring the earth for good games covering one of my favorite historical periods in the American Revolutionary War. I have played 12 of them to date, and you can read about them in my Gaming the American Revolution – Ranking the Games We Have Played post that I update every year around the 4th of July.
One new game that I found and played is Don’t Tread on Me: The American Revolution Solitaire Board Game from White Dog Games. Don’t Tread On Me is a strategic-level solitaire simulation of the American Revolution and is based on the popular Vietnam Solitaire: Special Edition game system from White Dog Games. This game though takes a very different perspective on the conflict as the player plays as the British side along with American Loyalist forces against the forces of George Washington and the Continental Congress as controlled by the game system’s AI. I really like this one as it is not only about battle, although it does definitely have its share of conflict, but it features a number of interesting aspects about the revolution including political control, state loyalty levels which change over time and due to events and the outcomes of battles, and even a system dealing with the naval aspect of the conflict in dealing with smugglers and their attempt to bring the rebels arms and ammunition.
In this series of Action Points we will cover the map and its various Counties and their terrain types and the Turn Record Track to give perspective to how the action plays out and how the player must meet the demands of Lord North and King George III, we will take a look at the differing units and their abilities as well as the anatomy and meaning of the values on the counters, take a look at the various phases of the Sequence of Play including the Naval Phase and Smugglers Phase, British Ground Phase, Battle Phase and procedure, placing new Rebels Phase and Rebel Campaigns, Logistics and Liberty Phase and the Random Event Phase and the various victory conditions.
Map
First off, I must say that I have the edition where the map was upgraded and it is very clean and functional and I like it very much.
The map for the game covers that portion of North America where the majority of the fighting took place during the American Revolutionary War, including the original 13 colonies, parts of Canada and the seas just off the coast of the Eastern Seaboard but also referencing the Caribbean with a box.
The colonies are broken down into 5 large regions that are called States in the game. The 5 large regions are an amalgamation of several colonies and then are assigned a number.
States and Counties
New England is number 1 and generally represents Massachusetts, New Hampshire, Rhode Island and Connecticut. New York is number 2 and is made up of only New York. Pennsylvania is number 3 and contains Pennsylvania, New Jersey and Delaware. Virginia is number 4 and includes Virginia and Maryland. Carolina is number 5 and and represents North Carolina, South Carolina and Georgia.
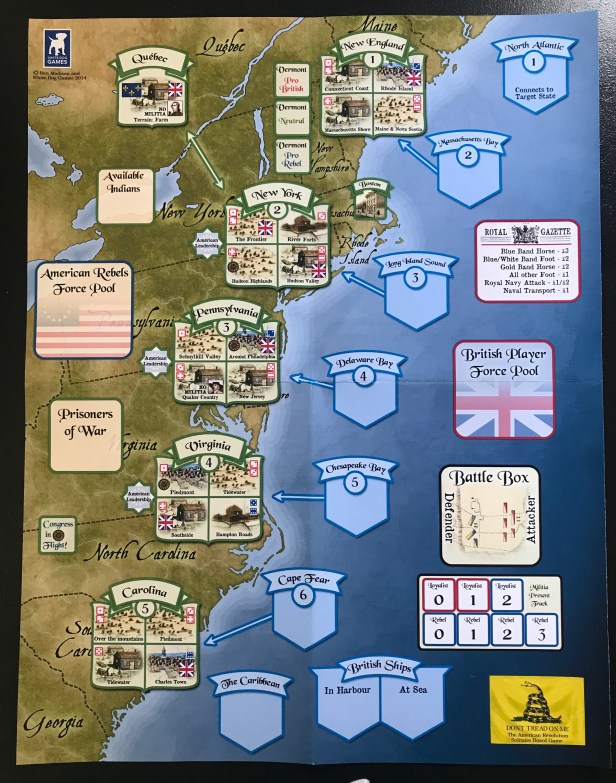
The States are then broken up into 4 different smaller areas called Counties. I know that many of you might be asking why the designer chose to call these areas States when Americans refer to them as Colonies. Well, I am not sure that I have a really good answer to that question. The game is from the perspective of the British as the player is playing as the crown so calling them either Colonies or Provinces would have made sense but remember that the different regions consist of more than just one colony (except for New York of course) and calling a group of Colonies by the name of States makes some sense.
 Each of these Counties have their own terrain type assigned and are represented by pictures of that type of terrain drawn in the box. There are four different types of terrain including Wilderness, Farm, Town and Fort and each of these terrains have a different value for each type of unit that is fighting in them, as shown on their individual counters. I have always been a fan of paying attention to terrain type and how it effects battle. It makes perfect sense that troops fight differently in different types of terrain. When you have a bit of cover, like you do when you are in a Fort or Town, you tend to be able to stand and fight with more confidence. On the other hand, the difficulty of uneven ground full of thick brush and undergrowth make for maneuvers being more difficult and marching more of a chore as when you are in the Wilderness.
You will also notice in the Counties that they are marked with a number of colored dice symbols and values ranging from 1-6. These dice symbols are used to determine the random placement of Rebel units in that State during the Place Rebels Phase. The blue dice are associated with the French and whether or not they will take part in the battle in that County. The French cannot intervene until after Turn 7 but this dice roll for intervention becomes a major problem for the British later on.

Special Symbols – No Militia Areas and Loyalist Strongholds
There are also a few special symbols contained in the various Counties that are very important. The first I will cover is the No Militia Areas, which are found in Pennsylvania (Quaker Country 3-4) and Quebec and are marked with portraits. The portrait in Pennsylvania is no one specific but simply is a representation of a typical Quaker, while the portrait in Quebec is Guy Carlton. These areas mean that during a battle in those Counties there will not be a Militia roll and the battle will proceed without Militia support.
The second special symbol used is the British Union Jack flag that appears in at least one County in each State (New York has two such symbols). This symbol is representative of a Loyalist Stronghold and means that during a battle in the location a +1 modifier is added to the Militia die roll for the British. These areas were typically hotbeds of support for the crown and the anti-revolution crowd.

The Vermont Track
Located in the area between the New England and New York States is found the Vermont Track. This track is associated with the Arlington Junto which is a modern term for a faction who petitioned for a free and separate Vermont from Massachusetts. They gained their name because they used to meet in the Arlington House owned by Thomas Chittenden. This track can be changed up or down through the Vermont Check on the Specific Events List found in the rule book and if in the Pro-British Box will add +1 to the British Militia roll during battle, while if in the Pro-Rebel Box will add a column shift to the Patriots during battle.
Sea Zones
On the map are identified various Sea Zones that are also assigned a number that coincides to a D6 for the placement of Smugglers. These Smugglers represent the brave sailors who would risk anything to make a buck and ferry supplies and ammunition to the rebels. Each round during the Smugglers Phase, up to two Smugglers can be placed from the Caribbean into the various numbered Sea Boxes. 2D6 are rolled and one Smuggler is placed in the corresponding boxes.
The Smugglers will later be used to place an additional Continental into the target areas by a random die roll that will coincide to a County in that State. This means that more Continentals being deployed will have to be dealt with by the British player. It is important for the British to use their Naval units to destroy these Smugglers as often as possible but activating your Naval umits will require the expenditure of your scarce funds. You also only have four ships, including the R. Howe, Parker, Graves and Arbuthnot, and will never be able to keep them all off of the map.

You will notice that each of the Sea Zones is connected to one of the States by a line except for Sea Zone 1 (North Atlantic) which will connect to the Target State identified on the Turn Track for the current Turn.
I find the naval portion of this game to be very interesting even though it is fairly simple and very random. There are a total of 5 Smugglers that will be placed during Turn 1 and more that can be added in subsequent turns so the player must pay attention to this aspect and will be forced to spend their resources on using their Naval units.
Various Other Boxes
There are various other boxes and tracks contained on the map and I will briefly cover these now. Each box serves a specific purpose and the name frankly gives a good idea of how they function.
Battle Box
 The Battle Box is a simple box that helps the player to line up and thereby understand the forces at their disposal and up against which they are fighting. The Defender is placed on the left of the Battle Box while the Attacker is located on the right side of the Battle Box.
Militia Present Track
Conveniently located just under the Battle Box is the Militia Present Track. This track is very important as it marks the number of Militia units that will be participating in the battle for each side and simply adds to the total strength of the attacking and defending armies. The presence of Militia units boils down to a die roll and then cross referencing the Militia Table found on the Turn Record Track. A result is shown and that many Militia units will be placed into the battle. The marker will be moved to that number and these Militia simply add to the total Strength of the side for which they have arrived. Militia are determined at the outset of each battle and are never carried over from battle to battle but the marker is reset at the end of each battle.
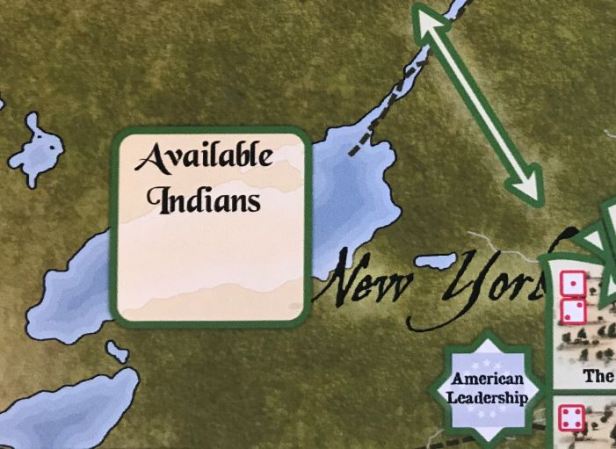
Available Indians Box
The Available Indians Box holds the Indian units that can be used by both sides as combatants. These units represent the Mohawk and Cherokee tribes. At setup, the two available Indian units are placed in this box and are released when the Indians Attack event is rolled from the Specific Events List. If the Mohawk unit is chosen it will be placed into either New York of Pennsylvania and the Cherokee will be placed in Carolina or Virginia.
Force Pool Boxes
 There are on-map boxes provided to hold the available units for each side and they are referred to as Force Pool Boxes. At Setup, the player will place all of the available units into these boxes. The American Rebels Force Pool Box will have the 16 Continentals and the 3 Committee of Safety (COS) units placed into the box upside down and mixed as these will be drawn randomly when placed. I like to put an opaque container (usually my little metal condiment cups) into the box with the units placed inside for ease of drawing. The Force Pool Boxes hold all of the units available and if called to place a unit from these boxes and there are no units to draw, then a unit will not be drawn. If that is the case for the Rebels, the British player will be getting crushed.
Prisoners of War Box
Any time a Continental, French or other British unit is eliminated from a battle it is placed into the Prisoners of War Box. These units may later be either amnestied or paroled.
Amnestied happens during the British Ground Phase when either side has more than 5 units in the box. These units over the 5 are placed into the appropriate Force Pool Box. Paroles is when the British player will select an equal number of British player units and Continental units from the Prisoners of War Box and places them in their appropriate Force Pools. No more units can be paroled than the size of the smaller force in the box. This is a great thematic choice by the designer as it really fits with the type of fighting of the time where whole armies were never destroyed but broken, forced to retreat and with some prisoners being taken.
Now that you are familiar with the map and how the various locations and boxes are used, let’s take a look at the all important Turn Record Track which acts as a guide to tell the player when certain actions or events happen, what their target for the current Turn is and how much income they will receive.
Turn Record Track
The Turn Record Track contains 17 different boxes numbered 0 to 16. All of these boxes, with the exception of the 0 box, represent game Turns. A Turn in the game represents a 6-month period of time and Turn 1 starts in early 1775 while Turn 16 is late 1781. These boxes are not just used for marking turns but for other various purposes including tracking income, State’s Loyalty Level, what special News happens at the start of the Turn and the Target State for the Turn. Let’s take a closer look at these elements.
Income
During the Force Adjustment Phase, the player will gain income in pounds (£) as shown in the year’s box in the upper right hand corner. The pounds will be tracked on this same Turn Record Track with a marker. As you play the game, you will begin to realize that you never quite have enough money to do what you need to during the turn. The pittance that you are sent by London just isn’t enough. Money can be saved from one Turn to the next but you can never exceed £16.

As you can see in the picture here there is a menu of prices listed on the map itself for easy reference called the Royal Gazette, which is a thinly veiled reference to the Rivington Gazette published by James Rivington. Here is listed all of the costs for various types of units and actions, including Royal Navy Attack and Naval Transport.
Income can also be used to increase the State’s Loyalty Level during the Logistics Phase in a process called Trading with the Enemy. For the player to take this action, there must be a Lobster unit located in the State that they wish to increase and then for each £1 spent the player can raise the State’s Loyalty by +1.
News – Special Events
The Turn Record Track includes News headlines which the player must implement at the beginning of the Force Adjustment Phase. These headlines includes various special happenings that coincide with events in the history of the Revolution including Admiral Rodney! (a plucky move by the Admiral to try to close engage with the French fleet at the Battle of the Saintes in 1782), Benedict Weds Peggy! (a reference to the brash General who would turn traitor as he marries prominent Loyalist Peggy Shippen), Boston Evacuated! (Britain withdraws from the city and ushers in the command of General George Washington), Charlottesville Road! (a plot to kidnap Thomas Jefferson) among many others. These headlines are listed in a given year and the events of the News will change the circumstances of the coming Turn. It is somewhat gamey that you know they are coming and can somewhat plan but that is part of the process. And frankly, even though you know it is coming, sometimes you just can’t do much with that knowledge.
State Loyalty Levels
The State Loyalty Levels are one of the most important parts about the Turn Record Track as it will effect how well you as the British can prosecute the war on the colonies. The Loyalty Level is how the player determines the number of Militia that show up during battles for each side. If the Loyalty Level is high for a State where a battle is taking place more Militia will show up to fight for the British while if the Loyalty Level is low more Militia will fight for the Rebels. This is important as it will allow or prevent the British from destroying armies and reducing the patriot resistance.

Red colored State abbreviations in brackets identify a specific State’s Loyalty Ceiling as their Loyalty Level can never go higher than this amount. In the picture to the right you can see that Virginia has a Loyalty Ceiling of 11. The five States that have a Loyalty Ceiling are Carolina, New England, New York, Pennsylvania and Virginia.
Target State
Each Turn the Turn Record Track will designate one State as a Target. This simply means that London wants you to take control of the listed State by the end of the Turn. Also by the end of the Turn, London wants the player to control a total of 3 States, including the Target State. If the player doesn’t control the Target State and two other States at the end of the Turn, then the Liberty Marker will advance one space forward automatically as the Patriots are becoming emboldened by the player’s failure.

You will notice in the picture above that each year has a specific Target State called out, but sometimes that Target State carries over for a few years, as shown here with the Target State being New England during Turn 1 and Turn 2. You will also notice that the color of the text listing the Target State changes when the Target State changes. In this example, the Target State changes in Early 1776 from New England listed in red text to New York listed in green text. So why do you care about Loyalty? Well, this is how the Patriots win and you lose the war. If the Liberty Marker ever reaches 9, the game ends and the American Revolution is a success!
I really like the way the information is laid out on the map and on the Turn Record Track as you generally have everything that you need to play the game right there. There is a pretty good play aid included as well to keep you on track with the Sequence of Play and there are some very helpful play aids that people have created and posted on Board Game Geek. This game just feels right. I like the thematic elements and how various bits of history have been injected into the game. The only thing that I am not keen on is playing as the British, but if my loss rate has anything to say it is that the American Revolution will be a success most of the time. I have played three times and never come close to winning. I am getting the hang of the game though and now know better how I am supposed to go about it but doing that successfully is another thing entirely.
In Action Point 2, we will take a closer look at the differing units and their abilities as well as the anatomy and meaning of the values listed on the counters.
-Grant
