I love good little historical conflict simulation games that take a look at some of the most important battles in history and use a different approach to tell their story. Recently, I played such a game in Freeman’s Farm 1777 from Worthington Publishing. Freeman’s Farm 1777 is the first in a new Battle Formations Game Series that are designed for both solitaire and two players.

The focus of this new system is on the individual formations that appeared on the battlefield and places the players in the role of commander to make decisions about which formations to activate and how to use those formations to position themselves to attack the enemy. The key to these decisions is the morale of those formations as each command utilizes one of their levels of morale and if pushed too far, through attacking or being attacked, the formation will be forced to take a morale test to see if it will break, but we will discuss this more in later entries in this series.
In this series of Action Points we will take a look at the very interesting board that represents the locations and roles of both sides formations as well as their relative positions on the battlefield, we will examine the Formation Cards and how the Activation Cards are used to command each as well as the different commanders and how morale tests effect the game, we will look at the economy of Momentum Cubes and how they are used to purchase the all important Tactics Cards and finally we will look at a few different examples of combat.
The Battlefield
The Battle of Saratoga, commonly referred as 1st and 2nd Saratoga, were a series of two battles fought on September 19, 1777 (Freeman’s Farm) and October 7, 1777 (Bemis Heights) between the British commanded by Major-General John Burgoyne and Patriot forces commanded by Major-General Horatio Gates and Major-General Benedict Arnold. In August 1777, Burgoyne had forced his way from Canada down the Lake Champlain route to Fort Edward on the Hudson River. General Schuyler lay with the American Army to the south, covering the New York State capital, Albany. Burgoyne’s campaign to invade the American Colonies, which had seemed so promising when the army set out, was rapidly souring.
The first engagement happened on the afternoon of September 19th and saw both armies converge on Freeman’s Farm. Arnold led his forces into the battle while Gates sat atop a fortified position at Bemis Heights about a mile to the south.
We know that the battles of 1st and 2nd Saratoga were American victories and eventually led to the French joining the side of the rebellion as they were finally convinced that the Patriots had the ability to win the war.
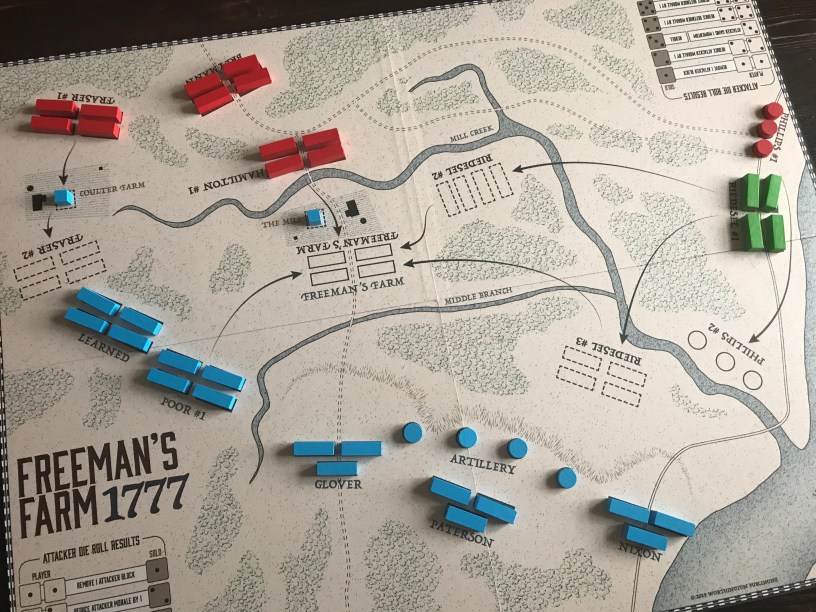
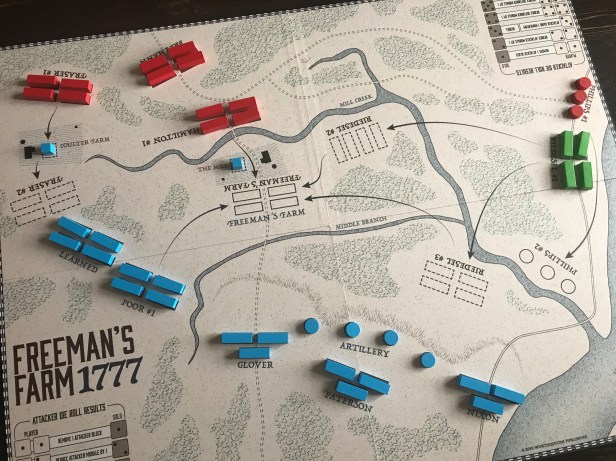
The below map shows the positions of the various forces involved.

This new series of games has centered the focus on formations and how they can interact with each other on the battlefield. It simply looks at how the relative positioning of the formations opens up opportunities for attack or provides advantages or disadvantages to one side or the other. We will get into some of these elements later but think on this. If you are above an enemy formation on high ground or have a superior firing angle on a formation in battle, shouldn’t you gain an advantage? And furthermore, if you are relatively inexperienced green forces and are facing the smoking gun barrels of your enemy’s cannons, don’t you think that your attempts to return fire will be less effective than if firing with hardened troops from cover? This spatial element is a major inclusion in the design and really feels right and makes your choices as commander that much more difficult as you decide how to activate your troops to take advantage of the situation.
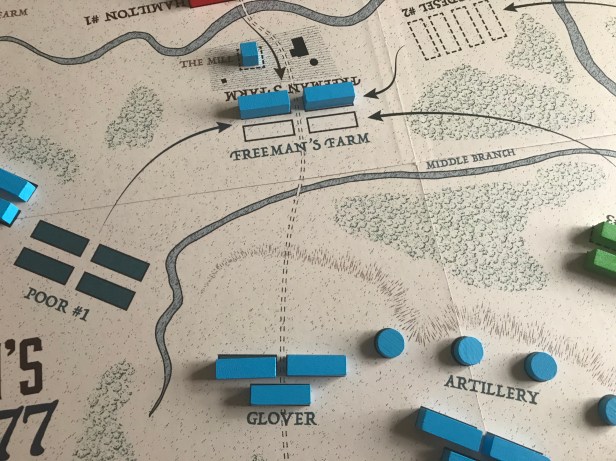
I really have enjoyed this spatial relationship during my plays of the game and think that the approach is very novel. If you will, please compare the above drawing of the actual engagement with the below picture of the game board and see that the spatial relationship of the disposition of the formations is true to the historical situation.
Now, let’s take a look at the board and how this spatial relationship on the battlefield plays out.
The Board
The game board map represents the Freeman’s Farm battlefield and the positions of the American and British formations that fought in the battle. The opposing formations can attack each other and move to and contest various positions on the battlefield to gain advantages. You will notice in the picture below arrows show where named formations may move on the battlefield when they are activated and under certain conditions. These troop formations are represented on the game board by wooden pieces with troops being rectangles and artillery represented by disks. Each of the pieces are colored either Red for the British, Blue for the Americans or Green for the German mercenaries.
You will also see that the movement locations on the map have dotted lines for the various forces and a formation name that can move to it and occupy it. For example, to the right of Freeman’s Farm in the center are four rectangular dotted line boxes with the name Riedesel #2. This simply means that this area is where Baron Reidesel’s formation can move to threaten any American forces at Freeman’s Farm.
The one exception to the naming of formations that can enter a location is the Freeman’s Farm location at the center. This movement location can be occupied by various formations from either side, but may only be occupied by one formation at a time. There is no requirement in the game to hold this position by either side in order to claim victory but it does give advantages to both sides when attacking.
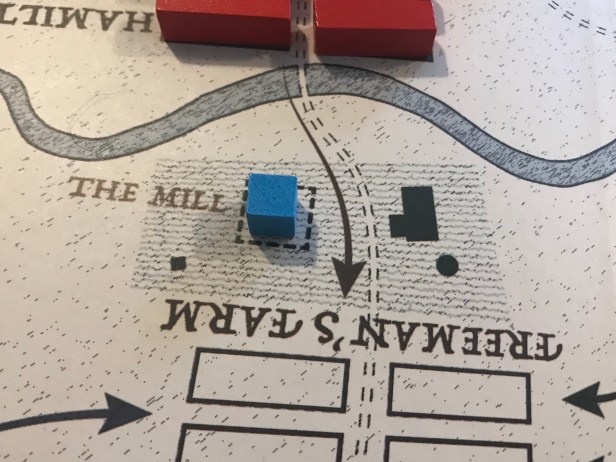
Two key locations on the game board are Coulter Farm and The Mill. The occupation of these two locations is with skirmishers, represented by a cube of the color of the side occupying it. Occupying these positions provides benefits and are a condition of moving some formations.
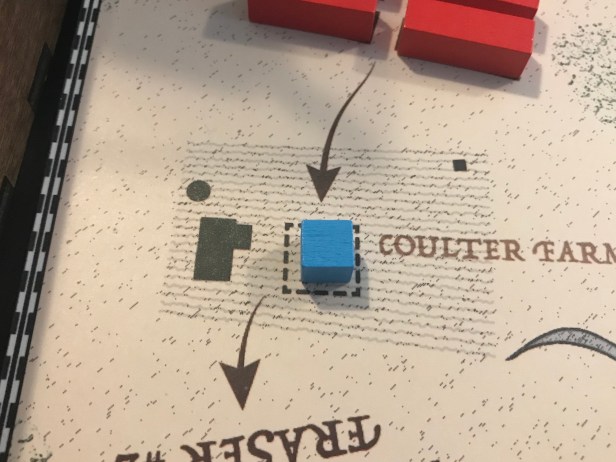
with skirmishers it passes into control of the British and the player will place a
red cube there. And vice versa if Fraser is broken/destroyed Coulter Farm is automatically controlled by the Americans and you will place a blue cube there.

Glover is located on the bottom center of the game board in between Poor to the left and Paterson and the Patriot artillery on the right. Glover has the following four command options:
- Reinforce Poor 1-2 units (no combat);
- Reinforce Paterson 1-2 units (no combat);
- Attack an enemy formation at Freeman’s Farm (either Hamilton #1 or Riedesel #2)
- Activate the American artillery
The main purpose of Glover is to reinforce both Poor’s and Paterson’s formations as they begin to take losses from British attacks. In the pictures below, you will see that Poor has incurred the loss of two troops and is vulnerable to being eliminated by Hamilton. With Glover’s activation, he can move 1-2 units to bolster Poor’s position.
This formation serves a vital role in the Americans chances for victory and must not be overlooked. The only victory condition of the game is for you to break or eliminate 3 enemy formations. Formations such as Glover can help to stave off a loss by assisting their allied formations. In fact, if the Americans plan to have Poor at Freeman’s Farm, they must support this formation with reinforcements as they will come under attacks from Hamilton, Riedesel (if he moves from Riedesel #1 to Riedesel #2) and from Fraser if he takes out Learned.

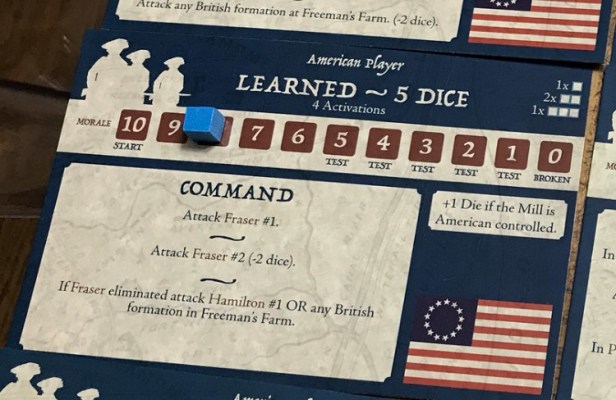
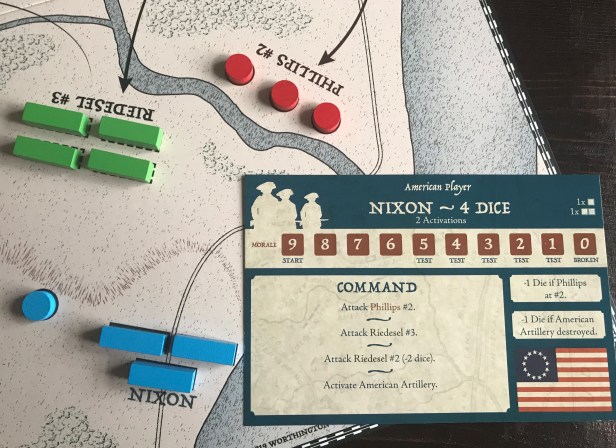
One last interesting element about positions on the board. There are positions that will grant additional dice to the attacker for control of areas but there are also positions that will reduce the amount of dice that your enemy can roll. In the below picture, you see that Nixon will roll -1 die if Phillips is located at Phillips #2. This means that each time you activate Nixon’s formation to attack any target, they will roll -1 die. This example shows the importance of relative position on the battlefield. While the Americans are being faced with British artillery on the right, they have their attention split and will be less effective until Phillips no longer is located at Phillips #2.
I hope you were able to see how this design has used the concept of the battlefield in a very interesting and tactical way as locations, and their relation to each other, effect the outcome of battles. Typically in normal hex and counter wargames, this concept is governed by range and terrain modifiers but in a simpler introductory wargame design, the same concepts show up to make for a very interactive and thinky tactical puzzle that players must solve.
In Action Point 2, we will take a look at the various Formation Cards and how they are activated using the Activation Cards.
-Grant

Great overview. It is an approach to game design I’d not seen before.
Cheers,
Pete .
LikeLiked by 1 person
This is a different design but sounds interesting. The board seems very high end quality. Interesting and novel design that I admit perks my interest. Thank you for sharing.
LikeLiked by 1 person
You are welcome Steven. The game is an introductory wargame but has some very interesting elements and you can play it solo. Thanks for reading.
LikeLike
I have had my eye on this one. I love the artwork of the map/board. For solo gaming – what is your opinion on replay value? Is that limited – due to the low number of units/formations and positions for movement available? Thanks for the review.
LikeLiked by 1 person
The solo game is pretty interesting and very challenging as the solo AI doesn’t follow the normal dice rules of needing doubles of a certain number to do hits or morale hits. This can be very challenging. So it might take a few plays to figure it out and some luck to win. Plus you can play both sides.
LikeLike