I really love a tough, hard to win solitaire game. There is something about putting a plan together and trying to make it happen that really connects with me, even in the face of great odds and longshots. Don’t get me wrong, I am not a masochist and do like to actually win games from time to time but there is something about the struggle and the pain you feel as you see your plans fail time and time again that makes the first victory feel so rewarding! Recently, Worthington Publishing has published several of these type of tough solitaire games. Late last year, I played and did terribly at Tarawa 1943 as it was simply brutal. I played about 10 times and only won once but after looking back I think that I did some things incorrectly that made my victory possible. Ooops! Now, they have come out with 2 new Great Sieges Series games focused in antiquity that are both brutal as well.
The first of these games that I decided to play was 1565 Siege of Malta designed by the very talented Maurice Suckling of Freeman’s Farm 1777 and Chancellorsville 1863 fame. The game deals with The Great Siege, as it’s also known in history, where the Ottoman Turk’s westward expansion broke against the wall of Christian defense on the small but strategically significant archipelago of Malta in the Western Mediterranean. The Ottoman Turk invasion force was huge as the armada delivering the troops was almost three times the size of the vaunted Spanish Armada defeated by the English (and the weather) in 1588. It was supported by around 40,000 troops. Malta was defended by around 500 Knights of St. John and 5-6,000 other soldiers, including civilians. The Turks failed to capture all of the important fortresses in the area, among them Fort St. Elmo, Fort St. Angelo and Fort St. Michael. Had they captured all of them, the most likely outcome would have been sustained Turk expansion into Europe, including into Sicily, Italy, Spain and perhaps even France. This siege historically is a very important and pivotal moment in the future of Europe.
Maurice used the vehicle of the Great Sieges Series from Worthington Publishing to tell this story. The Great Sieges Series highlights command decisions by players fighting against a solitaire game engine opponent that uses a deck of cards to determine their actions. These games have been designed for easy set up and quick game play and 1565 Siege of Malta can be played in about 30-45 minutes once the rules are learned.
Feels Like a Siege
When I play a game that is about a siege, I want to feel like I am under siege. Does that make sense? To me, there needs to be a pinch regarding time. Sieges could last for months, but in this siege the Turks were working against the clock as they really had to complete the conquest prior to the seasonal winds turning against them and trapping their armada on Malta. They also needed to get out prior to winter setting in as they couldn’t rely on the island itself to sustain their 40,000 man army as its not that big and there just isn’t much there as far as supply goes. In my opinion, replicating this tension is something that the Great Sieges Series models very well as this element is hard-baked into the system with the timer being the size of the counter order deck that you are fighting against. When playing as the Turks or Knights, you can make the deck 3 different sizes. These sizes correspond to a difficulty rating with less cards being tougher than more cards. For playing as the Turks, 20 cards is the toughest setting, and in my opinion very unlikely for a victory, 24 cards is a regular setting and mimics the historical length of the siege while 27 cards is considered easy mode. When playing as the Knights of St. John, which is the easier of the 2 factions to win with, tough is 20 cards, regular is 25 and 27 cards is easy mode. I really like that there is a built in timer with the cards and this is very well done. I even like that I can ease into the game and play on a less difficult setting to get my feet wet and explore the various strategies.
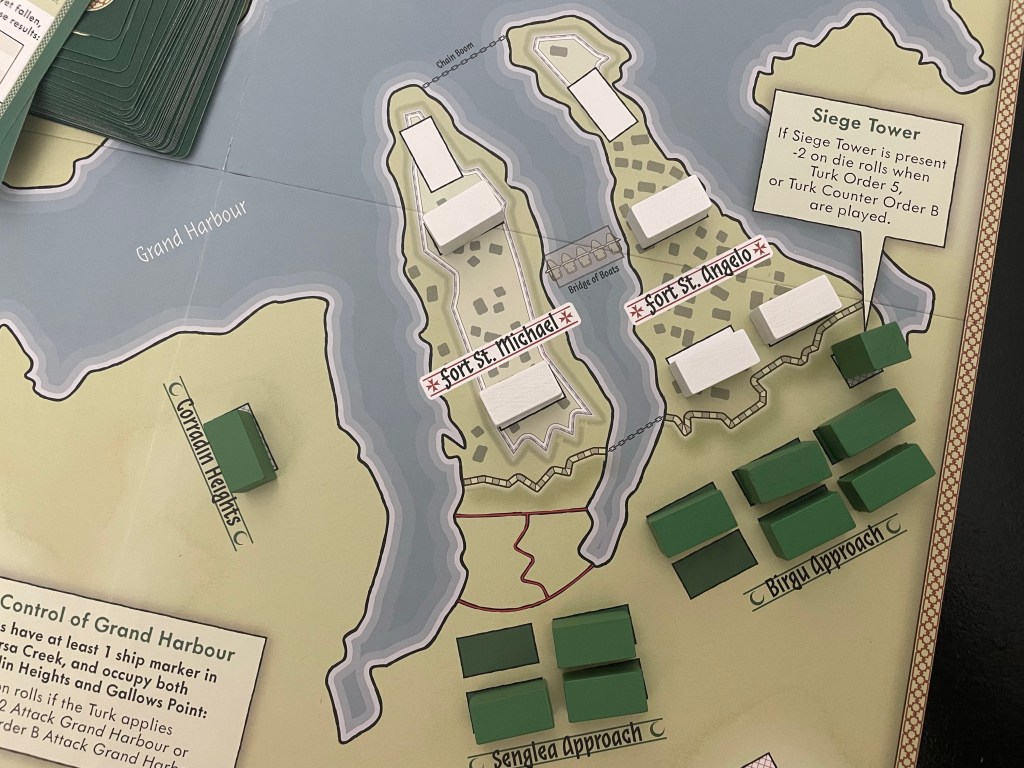
I also really like the different planning aspects of the siege that you have to prepare in order to be successful with some of your orders. A good example of this concept is the building of the Siege Tower that happens only when you play an Aggressive Commander Card to place that tower. Once placed, the tower will grant the Turks a -2 DRM on rolls for Order 5, which is an assault on Fort St. Angelo. The Turks always want to roll low on their charts as lower results equate to greater enemy force losses or morale losses. This Siege Tower only benefits the Turk player though when using Order 5. Makes perfect sense and is an investment into building it. But as with all great sieges, the defenders will try to destroy that type of infrastructure as soon as it is raised and the Knights of St. John have several cards in their Counter Order Deck that will outright remove that Siege Tower from the board only to see the Turks have to build it again. This feels very thematic and even though it hurts when it happens, it feels right to have been included!
Finally, I really get the feeling of being the overall commander in this game. Whether I am playing as the Turks lead by Grand Vizier Mustafa Pasha or as the Knights of St. John lead by Grand Master Jean de la Valette, I am in command of the actions that I take and decide how to go about defending or attacking. I am constrained by my available orders but this is very thematic as you cannot possibly do all that you want to do in this type of siege. You only have so many men, so much ammunition and supply and only so much time as these things are not accomplished in a minute. The design, and I feel the system, really reinforce the feeling of being in charge of the siege or the defense and I really like that about the game.
Tells a Very Interactive Narrative
In these solitaire games, I am always interested in the narrative that they create. You can just play the game, not reading the cards and just making your decision and dice rolls, but then you are cheating yourself of the immersion you can get from this narrative. When a decision is made, a lot rides on the die rolls. Literally life or death for the attackers and the defenders. This aspect is really what draws me to this game. It is really hard to win as the Turks, not so much as the Knights. So you most likely will not win often as the Turks and no matter what you do either the dice or the cards will hate you and ruin your day. But what story do the dice and cards tell? That is the question that I want to answer for you in this segment.
Let’s take a look at a few of the specific areas of the board that provide various modifiers and turning points in the siege. We already discussed the construction of the Siege Tower above and how it can make your chance of success greater as the Turks. There are also some areas that the Turks will want to focus on attacking as they lead to some really interesting outcomes. First up, is the Knights at Mdina.
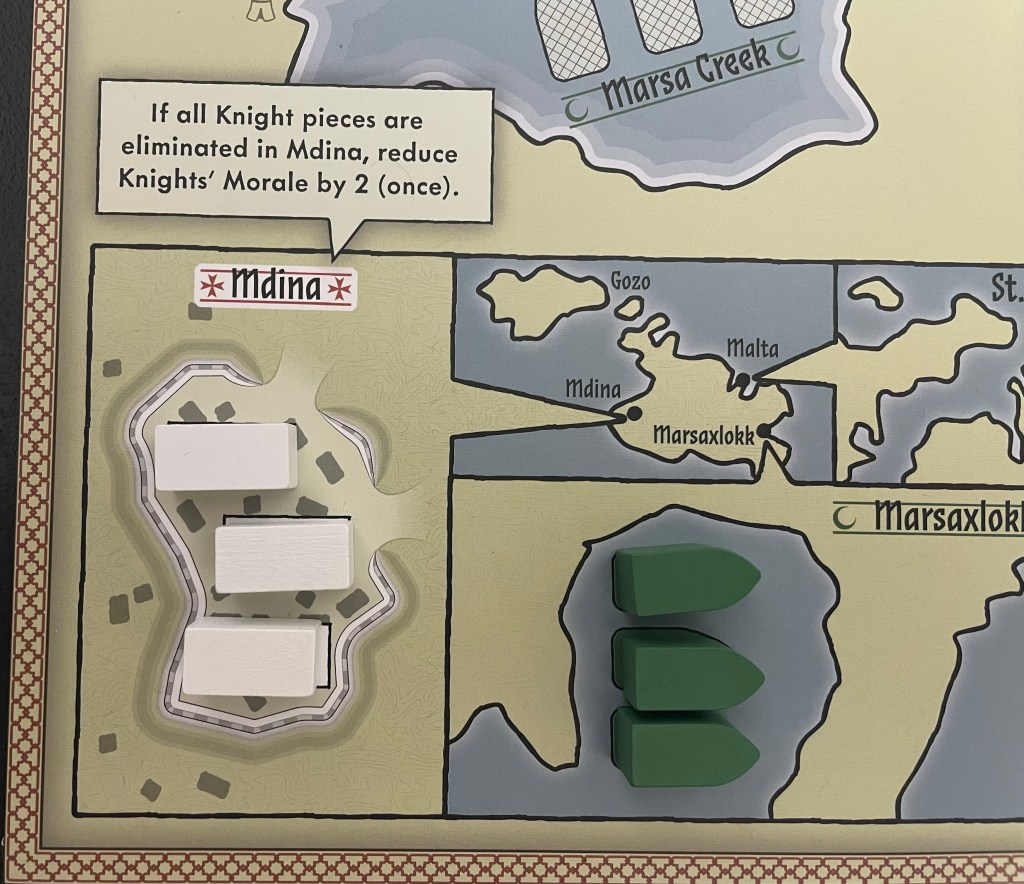
Mdina
Historically, Mdina was a lightly defended area of the island, far away from the main attacks. But that doesn’t mean it didn’t play a role. In late September, as the weather was turning, Mustafa ordered a march on Mdina, intending to winter there. However the attack failed to occur. The poorly-defended and supplied city started firing its cannon at the approaching Turks at pointlessly long range. No damage was done to the Turks but the calculated bluff scared the Turks away by fooling them into thinking the city had ammunition to spare. On the map, there are spaces for a 3 Knight blocks that represent the light garrison there. If the Turks can somehow defeat all 3 of these Knight blocks it will be a crushing blow by reducing the Knight’s Morale by 2. Mdina can be attacked by the Turks with the use of Order 3. With 3 defending blocks though, and probably only getting 4 cracks at this before the game ends this is a tough one. It has only been successful for me once, but man was that an exultant feeling! I rolled the dice and sure enough it came out in my favor and I literally cheered out loud! It was a devastating blow to the Knights as they lost 3 total Morale, losing 1 Morale for each of the blocks as well as the overall 2 Morale loss when the final piece is removed. That was a big hit with a total of 5 lost Morale. I just love the struggle and the joy or sorrow at this part of the battle. It is only a minor point in the grand scheme but it is really fun working at trying to get it to come out in the Turks favor.
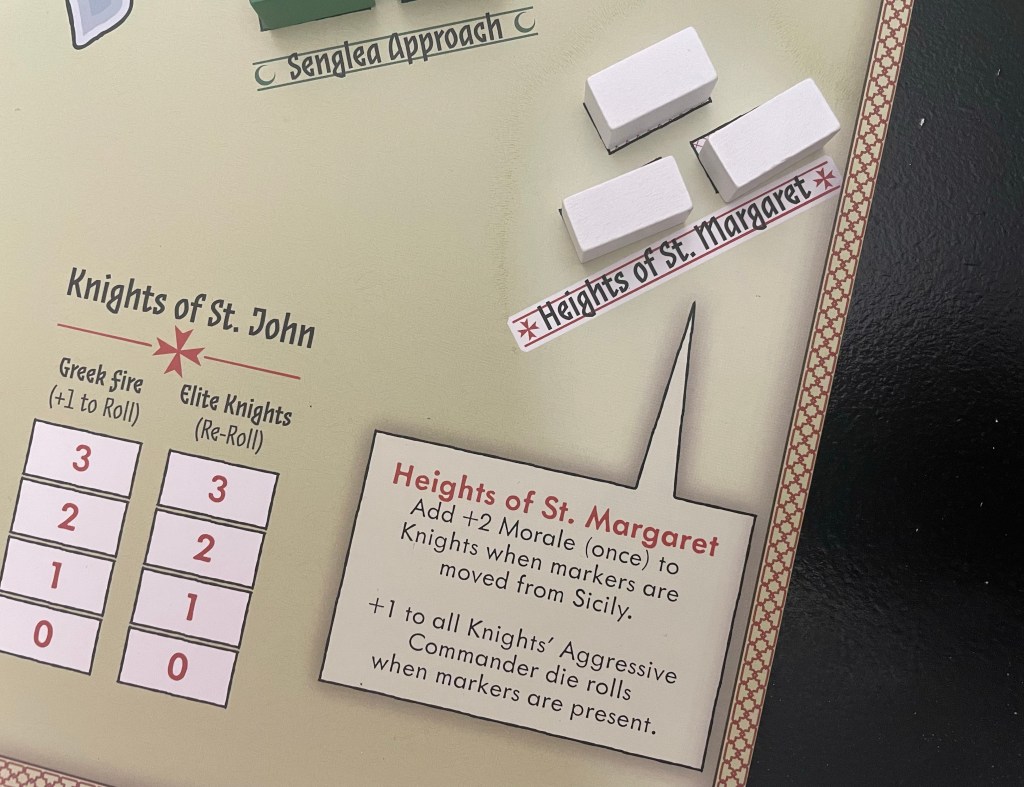
Heights of St. Margaret and Reinforcements from Sicily
Another example of these narrative generating parts of the game is the reinforcements that can assemble at Palermo in Sicily and make an appearance at the Heights of St. Margaret. The reinforcements are brought about by a card from the Knight’s Counter Order Deck and there are several of these that can be included. When the cards appears, a single Knight block is placed in one of the 3 locations on Sicily and nothing else happens. This represents the outside Christian world deciding whether they will send reinforcements to aid the beleaguered Knights of St. John on Malta. Once the 3rd such card is drawn, the outside world has decided to send troops and upon the next such card draw, these 3 blocks will be moved to the Heights of St. Margaret
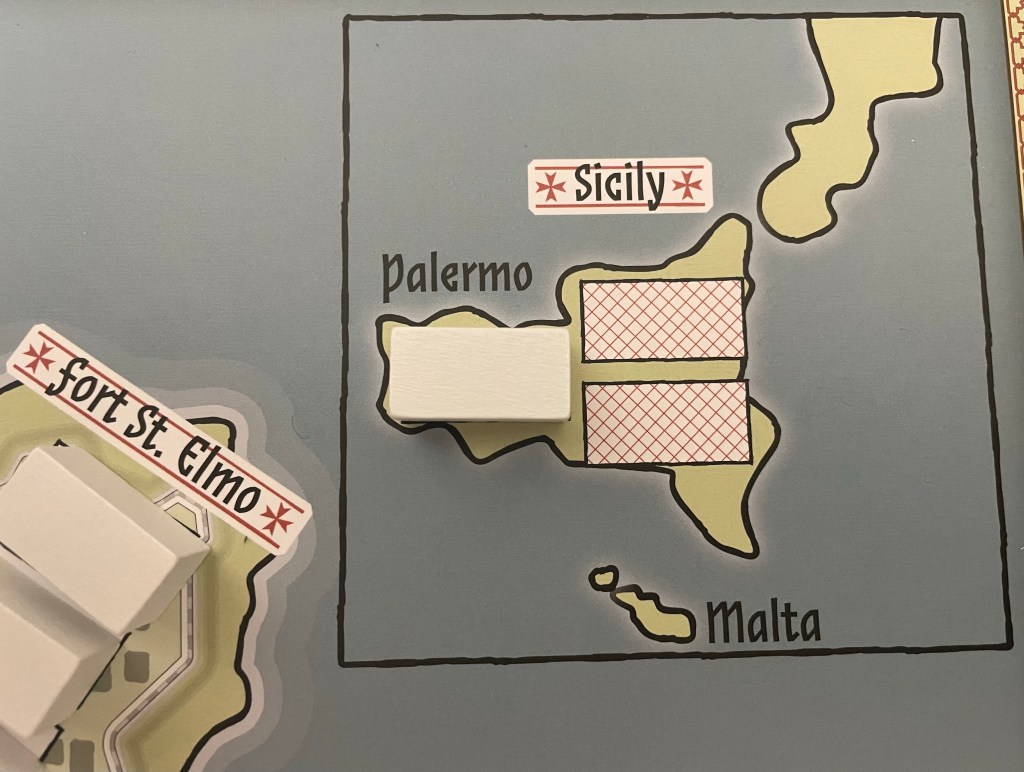
Upon their arrival, the Knight’s Morale is boosted with a one time bonus of +2. I can see it happening in my mind’s eye. The defenders, holding on for dear life, see their Christian brethren appearing on the horizon with fresh troops to aid in the defense and a cheer is let out which increases their spirits and makes them able to hold out. This can be good if you are playing as the Knights but is very deflating if you are controlling the Turks. But is is about the narrative that this creates. If it doesn’t happen, then you can surmise that the outside world decided it was a lost cause. If it does, you can see they understand that Malta would be a stepping stone to greater Europe for the Turks. Such emotion generated from a single action from a few cards. That is what makes this game interesting and different!
Very Difficult to Win…as the Turks
History tells us that the Turks lost the siege at Malta. There were many factors working against them from the limited season for the assault while the winds held to the lack of supply to provide a proper wintering place for the 40,000 troops. It was tough and consequently the game should reflect this….and it really does as the Turks will have a very hard time in winning this game. I have played 5 times and have yet to win with the Turks. I played my first game as the Knights and won easily while never truly being threatened. But as the Turks, everything will work against you!
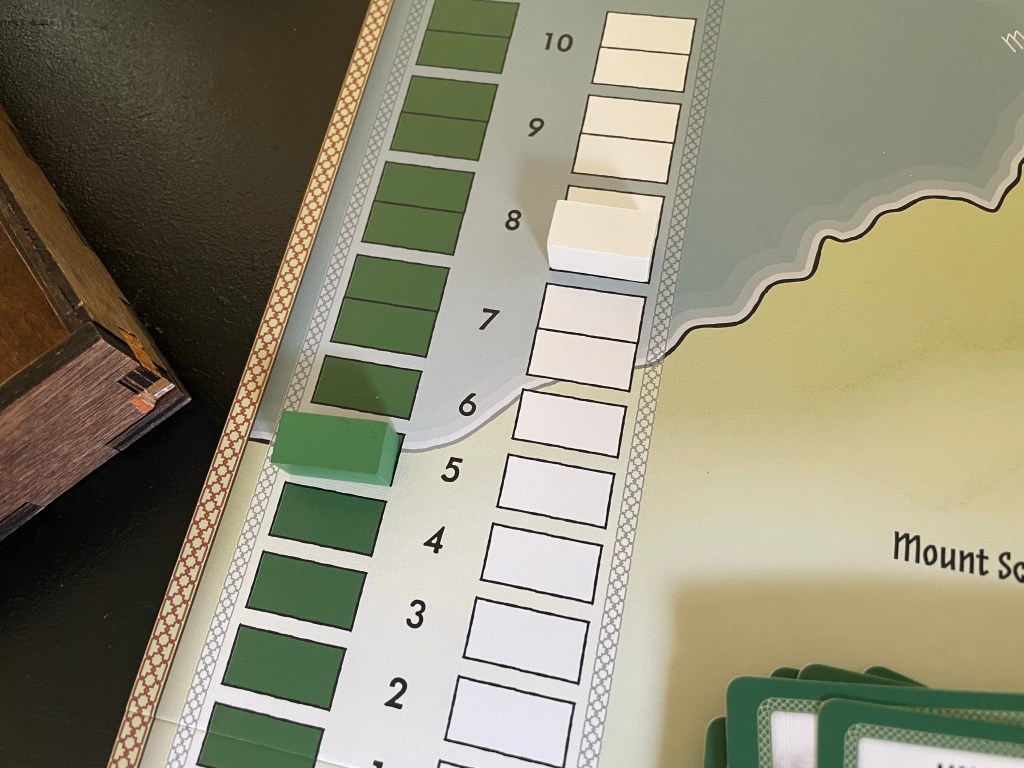
The way the game is won is by driving the Morale of the defenders (when playing as the Turks) or attackers (when playing as the Knights) to zero. Morale is lost when a unit is lost in an attack, when a result from an order roll is a loss of Morale or sometimes from an unfortunate event. Each side has a total of 15 Morale points, which are laid out on a 10 point scale with the top most areas of the track from 10-7 taking 2 Morale losses to move past and the lower areas from 6 and below taking just one such loss to move below. This is the whole key to the game and you must simultaneously drive your opponent’s Morale down while also preserving or improving your own Morale.
The Orders you will take will always be countered by an order from the other side and will determine what your rolls for these actions will result in, either a loss of enemy units or Morale or a loss in your own forces or Morale. The reasons it is so difficult for the Turks are many. First off, they actually have to do something and drive action. The Knights kind of are just sit there reacting to what is going on but the onus is on the Turks to get out and win the game by driving down the morale of the Knights. Another reason is that there are a lot of events in the Knight Counter Orders Deck that automatically reduce the Turk’s Morale or improve their Morale and undo the work that you have been struggling so hard to get accomplished. In addition to this, some of the Counter Orders will simply make it such that your rolls will end in bad results with +1 and +2 DRM’s. I will point out though that both sides have bad odds columns and will always have some trouble but the Turks just seem to have a worse time of it.
Another element that makes this game hard for the Turks are the Knight Counter Order cards that cancel your just played Order. There are about 5 of these cards, and if they all are included in the enemy deck you will be in for a long night. These cards cancel your order while simultaneously using one of the precious cards in the enemy Knights deck which remember is the timer for the game. I have found that these cards also come up for me at the worst moments when I have worked hard to get positive modifiers from having the Siege Tower constructed or have just moved troops into position around Grand Harbour to get the modifiers there. And just like that, with one draw of a card, your hard work is flushed and you don’t get to see the benefit. Some of these order cancelling cards though allow the Turks to lose a Morale to move ahead with the Order anyway but this can also be a poison pill as you cannot afford to lose Morale. There just are a lot of things stacked against the Turks!
Order System Management is Best Part of Design
Game designers will tell you that too many choices, especially in certain key areas, isn’t a good thing. Why? It can lead to players simply doing the best actions over and over again until they get the desired results. This creates disengagement from the history and leads to disappointed players because they were able to game the system and do what they needed to do. It’s not a secret, figure out what works well and simply do that action over and over until you win. So in order to increase engagement with 1565 Siege of Malta the designer removed choice from the players a bit and causes the need to refocus into different areas by making the Orders one time actions that are used up until you refresh them. The way this is accomplished through the orders systems is once an order is taken by the player, they cannot do that order again until either all 7 of their available orders are taken or they use one of their scarce resources in their Aggressive Commander Actions that resets those orders and makes them all available to the player or they play that final 7th order and all spots are used and then reset automatically.
Without any restrictions on players in this part of the game they’re free to reissue the order they need or prefer every turn. This overuse of the actions would lead us to believe that the troops engaged in the siege or combat could just attack over and over again with no real consequence. This allowance doesn’t take into account fatigue, loss, lack of supply and ammunition or command problems. What this limitation in the Order system does is forces players to carefully consider their order selections. This limitation then opens things up and forces them into a difficult decision to make on their turn. It also will give them a wider variety of outcomes from each turn and will make the experience worthwhile. I also found that the angst with these limited actions was palpable and forced me to plan ahead to get my desired result. It also allowed me to more deeply think about strategy and the implications of my different actions.
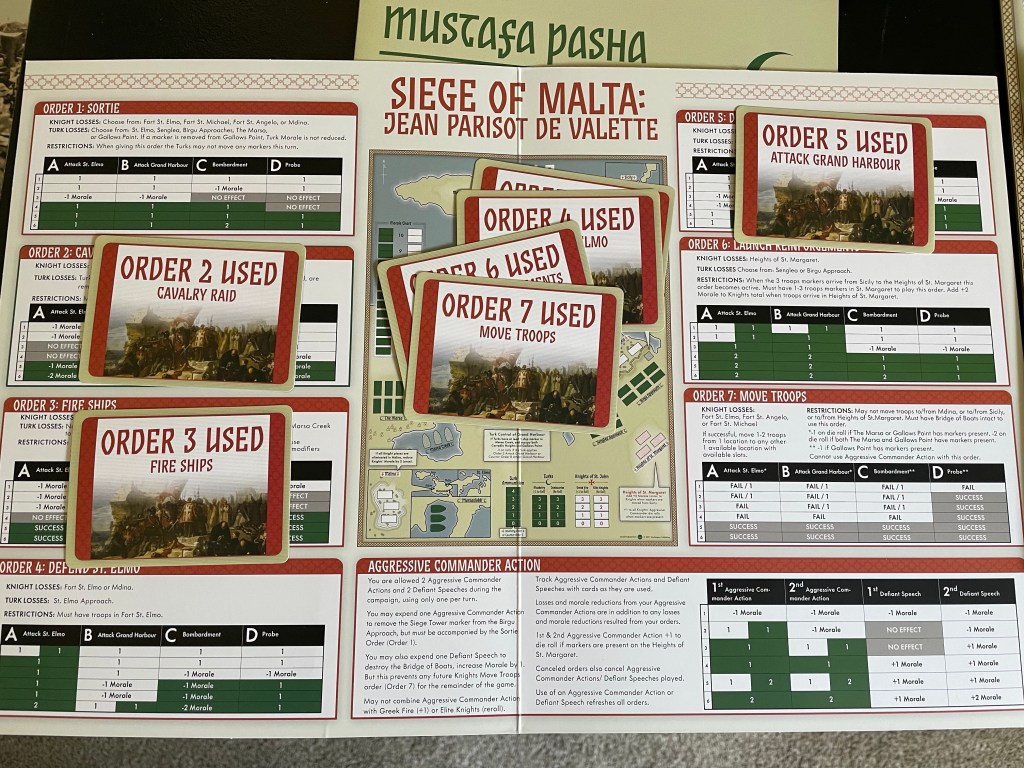
Finally with the order system, there is an aspect of resource management with the game as you have the limited Aggressive Commander actions. Their primary function is to reset the orders as mentioned earlier but you also can roll a die to attempt to inflict additional damage on the enemy as a part of the action as a bonus. This represents a commander’s initiative in making a bold or aggressive move that has a high risk high reward type of result. You just have to use them with your eyes wide open as it can really backfire! This is the best part of the game and really adds an interesting element to the experience.
Counter Orders Will Ruin Your Day
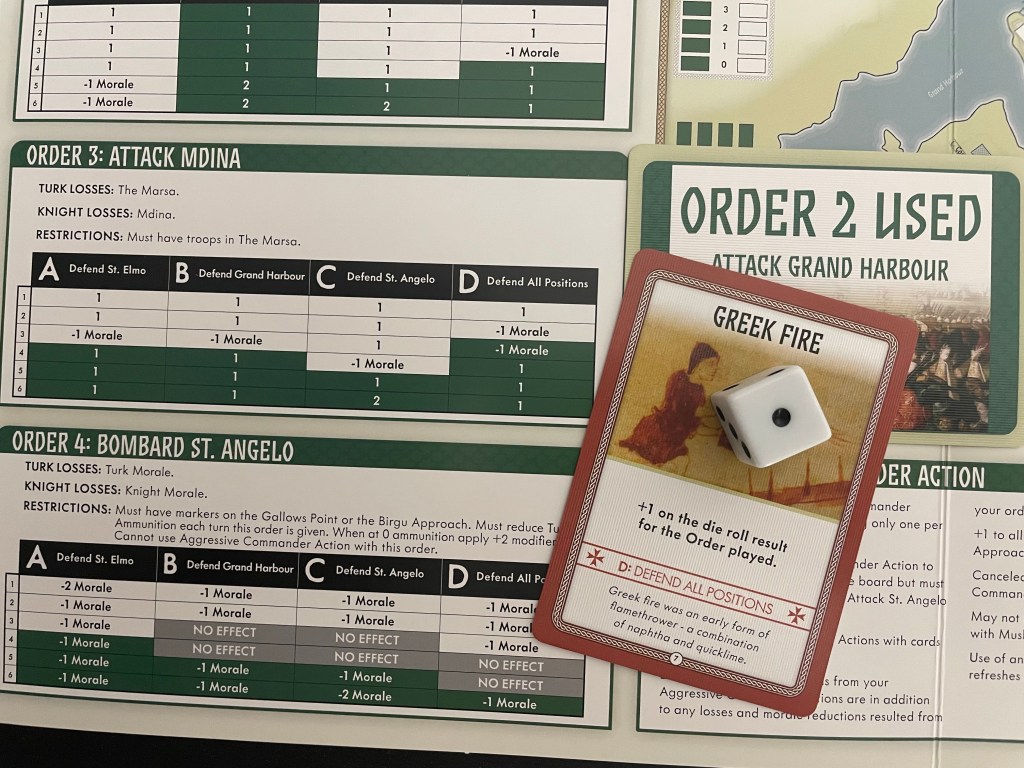
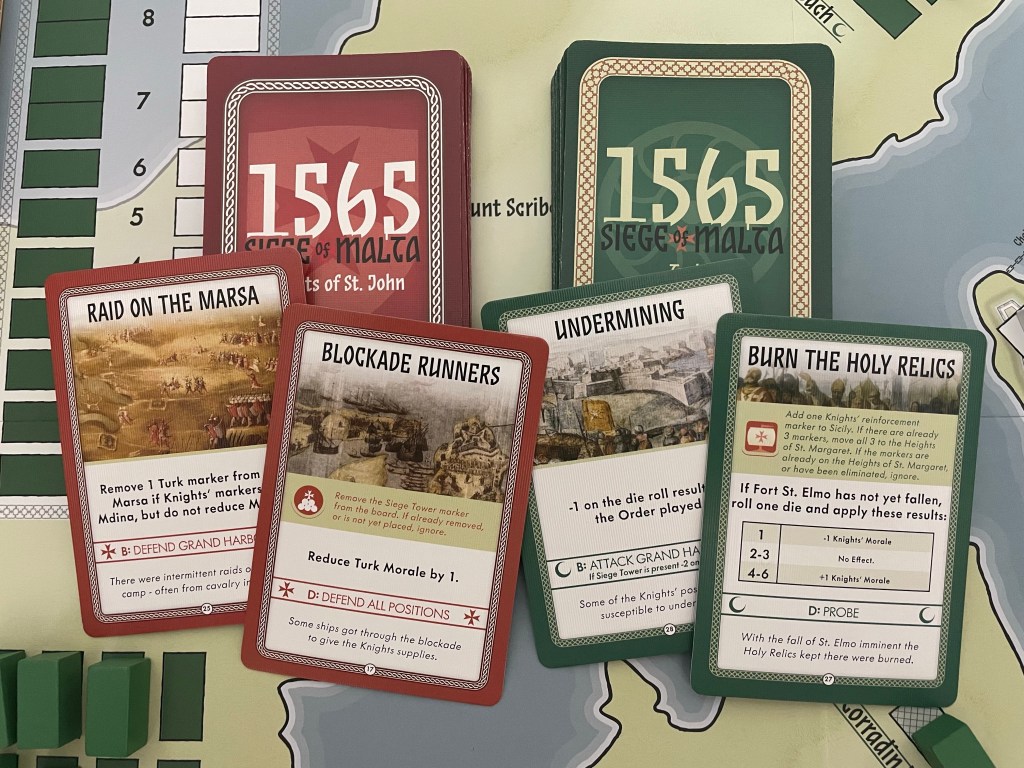
Another aspect of the order system that I actually really like but also hate at the same time is the Counter Orders. They are just evil and it always seems that I pull the wrong one at the worst time! As you can see from the cards below, the Counter Orders are designed to give direction to the AI as you are battling them. The random draw of these cards leads to you understanding what column you will be rolling on with your chosen Order. They also have text in the form of events or special actions that will go off if the conditions are met for those events.
For example, if I as the Turks played my Order 4: Bombard St. Angelo and the Counter Order pulled was Defend Grand Harbour, I would use column B for my die roll. As you can see, that column has only 2 positive results in 1 or 2 where the Knights will lose -1 Morale, while 3-4 is no effect and 5 and 6 lead to -1 Morale loss for the Turks. Had the Counter Order pulled been A or D, the positive results for the Turks could have been much better with more good results (3) and at least only 1 negative effect on Defend All Positions.
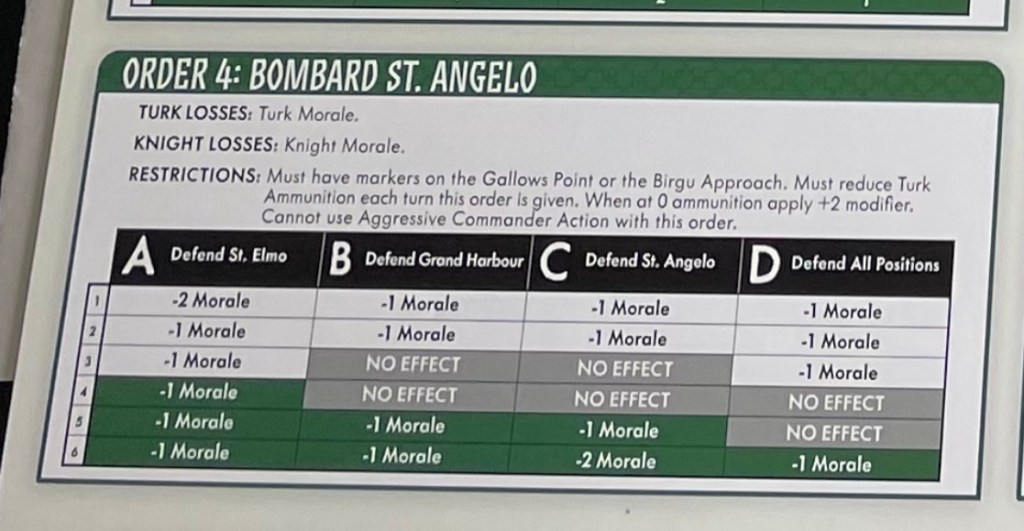
These Counter Orders are random, and they are actually different each game as there are more cards than you use so the mix will be different each time adding variety, and you never actually know if the worst cards are in the deck or not. This adds some element of fog of war and as you play more you will begin to remember the cards and know when you are through the worst or are bracing for the impact. I really hate the ones that give you +1 to your Order roll for that turn. This makes an already difficult task that much more difficult. But it is what is great about the game. You can never just rest on your laurels and get the results you think you deserve. You have to earn them and that takes persistence, planning and a bit of luck!
Lots of Decision Points…Mixed in With Lots of Luck
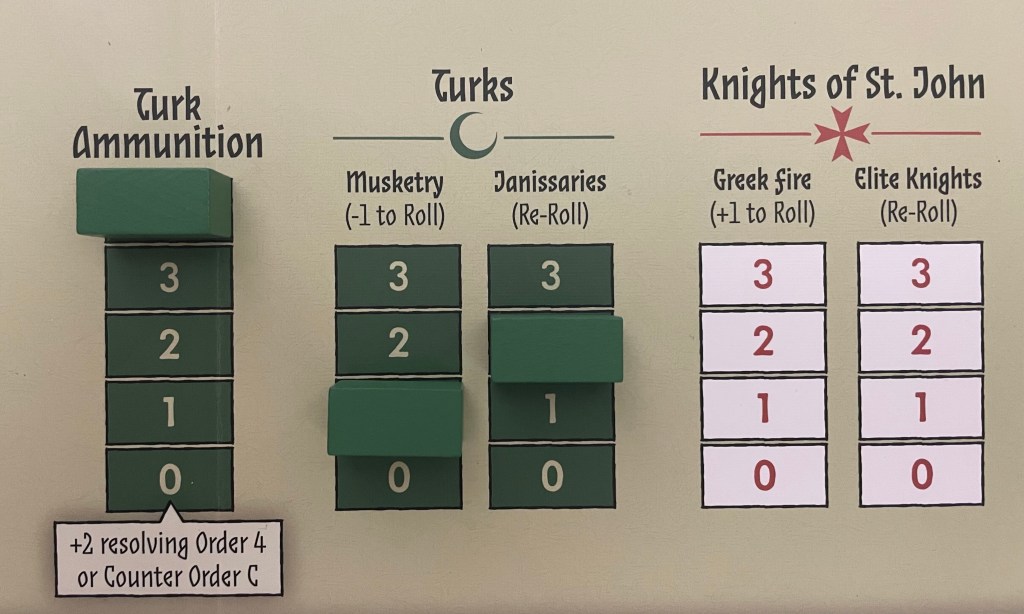
I know that the game has a lot of dice rolling as every order is decided by a die roll. But, this is manageable and you have options available to you to mitigate some of that luck and turn it towards your benefit. First off, each player has access to die roll modifiers in the form of a track. The Turks have Musketry, which can be used for a -1 DRM to any roll as they are looking for low dice rolls and Janissaries, which can be used for a re-roll. The Knights have Greek Fire which gives a +1 DRM to any roll as they are looking for high dice rolls and Elite Knights give a re-roll. The problem with these resources is that you have to decided to use them before you roll! I understand that but would prefer to have it be optional after the fact.
Second is the already discussed orders that give you bonuses such as the Siege Tower or having ships in the Marsa Creek locations while simultaneously occupying Gallows Point and Corradin Heights. These bonuses require players to plan ahead and move their forces into position for these benefits and I really like that reward. But in the end, the game is very luck dependent, with lots of dice rolling as well as random card draws. But that is what the game is and you have to be ready for some disappointment and defeat.
Great Production
Worthington has really done a great job in putting together games that are both solid and fun to play but that also contain great components. This game has a mounted board, fantastic art and design for the cards and lots of wooden blocks. These could have very easily been something else but the use of wood and upgraded materials for the cards really sets this game apart from other solitaire games that I own. There also is a well designed plastic insert that is very sturdy and has a lid to keep all of those bits and pieces in place. There really is something to be said for playing a game that looks nice and has some weight to it!
Cool System
I really like this game and am excited to play it more, at least until I win with the Turks! I like what Maurice Suckling has done with the Great Sieges Series and how he has tailored the mechanics and system to fit this siege. I like it more than his Freeman’s Farm 1777 and this one will find a place in my collection for years to come. I also really like that it is a major challenge and very difficult to win with the Turks. It is true to history and provides 2 games in one with the ability to play as the defending Knights of St. John or the attacking Ottoman Turks. A really well put together game.
I like that for whichever side you play as, the game is quick to learn, fast to play and a fun experience. There are lots of tough choices for the player that will undoubtedly lead to many a disappointing die roll, exultant die roll, and much tension as you gingerly reach for the next card from the enemy deck and hope you get the result you need….just don’t count on it!
One final comment. I’ve read a lot of cry baby comments from people complaining that the game is broken and unwinnable as the Turks. I say hogwash! It is extremely difficult, and soul crushing, but it is definitely winnable (even though I haven’t won yet!). No doubt!
-Grant

Grant, this is a great first impression rundown. I really enjoy this game, as well as 1759. It captures the chaotic, time-pressured aspect of a siege, and frankly, the randomization fits my understanding of not only sieges and unpredictability, but of warfare in general. I was able to win as the Knights in about five plays on average, just, whereas I haven’t won as the Turks, yet 🙂
The series has a very compelling “just one more go” aspect, too, that I find irresistible.
Thanks for the write-up!
LikeLiked by 1 person
First of all, I hadn’t considered this game for my BUY list. With all the sniper games and tank on tank games coming out, it slipped through the grates. After reading your review, I became interested and being a solo gamer, am considering it for a later purchase… as always, $$$$ is tight… serious decisions always must be made. Thanks for the review.
LikeLiked by 1 person
Grant, if you were to compare it to Tarawa 1943 (not historically of course, mechanically) how would it compare? Replayability, difficulty, variants?
LikeLiked by 1 person
It is totally different. Uses the order cards and is a very different focus. Remember it is a siege not an amphibious invasion.
LikeLiked by 1 person
Replay ability is very high as each result is different based on the counter orders that come up. Also what cards comprise the counter order deck changes every game. Lots of replayability and you just want to give it one more go to see if you can improve.
LikeLiked by 1 person
Now you got me! Need to purchase this game. I am also considering Siege of Syracuse (instant buy from period perspective for me). Any thoughts on this?
LikeLiked by 1 person
I have a post on Siege of Syracuse coming on Friday starting a 5 part series. It is more open meaning you can use all orders at anytime. Not the same as Malta. I like it. It is easier to win but still really interesting!
LikeLiked by 1 person
Good, those solitaire siege games seems like a great choices. Will for sure read your post Grant!
LikeLiked by 1 person