
Freeman’s Farm 1777 is a new card driven introductory level wargame from Worthington Publishing that is kicking off their new Battle Formations Game Series. The object of the game is to break three of the formations of the opposing side by the time all 15 of each side’s Activation Cards are played. Players will activate their formations and choose the best actions for it to undertake given the state of the battlefield. These actions include attacking, moving into various positions, reinforcing other formations and activating artillery.
In Action Point 1, we looked at the very interesting board that represents the locations and roles of both sides’ formations as well as their relative positions on the battlefield. In this Action Point, we will examine the Formation Cards and how the Activation Cards are used to command each as well as how Morale Tests work and effect the game.
Formation Cards
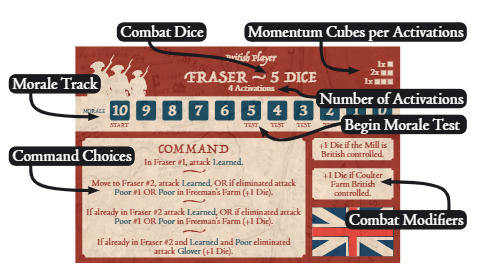
Each of the sides has a set of asymmetric and unique Formation Cards that correspond to the formations that they control on the battlefield. The Formation Cards each provide a few different important pieces of information needed to play the game including the menu of Commands available for that individual formation, the Morale Track which shows how hardy the formation is in battle and through activation, any combat modifiers specific to that formation and information about the number of dice that the formation will use during any attack. On the back side of the Formation Cards is also information for the solitaire opponent and their priority of actions.
Another key piece of information on the Formation Card is the number of Activation Cards of this formation that are in the player’s deck. There are 15 cards in each Activation Deck so understanding how many activations you can expect for each formation aids in planning your moves and attacks. You will also notice that you can also see how many Momentum Cubes per Activations there are in the decks but we will talk about this more later. These Momentum Cubes act as a type of currency that the player can use to buy re-rolls or purchase Tactics Cards
The key thing to remember about Formation Cards is that each time they are activated through the play of the corresponding Activation Card they have to pay for this activation. The payment comes in the form of paying 1 point of Morale from the Morale Track by moving the cube marker down one space. The formation may also lose Morale as they attack and are attacked throughout the game.
Morale Test
The moment that a formation’s morale reaches 5 on the Morale Track they have to conduct a Morale Test to see if they will break and leave the field. This Morale Test is conducted by rolling a single d6 with any modifiers from Tactics Cards that the player controls and then comparing that result to the current Morale of the formation (i.e. where the Morale marker is currently on the Morale Track). If the die roll is higher than the marker location, the formation has failed the test and becomes broken. If the roll is equal to or less than the marker location, the formation passes the test and remains on the battlefield. Each successive reduction in the Morale of that formation will trigger another test which will be harder and harder to pass as the number decreases. Soldiers spend their strength and will to fight in each skirmish and as they are pushed more and more, and in the face of losses, reach a point where their will to fight is gone and they break. I like how the design dealt with this issue and it feels right.
One other note about Morale. Each time the Morale level drops for a formation below 5 and each time it drops for any reason after reaching 5, either as the cost of an activation or due to Morale hits from attacking or being attacked, the formation must immediately take a Morale Test. If they fail, they immediately break and are removed from the battlefield. They cannot finish their activation.
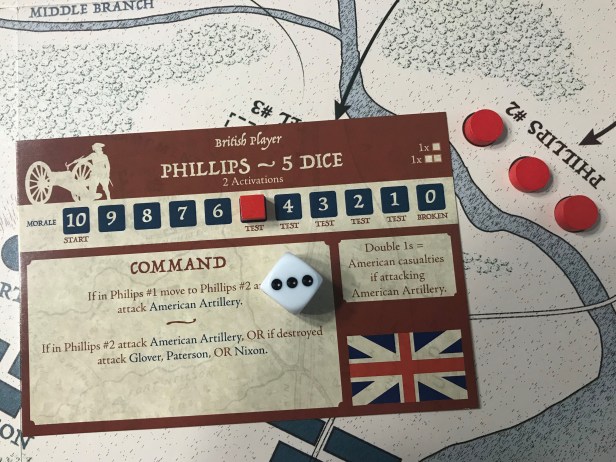
In the picture above you will see that Phillips’ formation has taken some Morale losses due to activation and Morale hits sustained in battle. Their current Morale level dropped to 5 which is the first point at which a Morale Test must be made. They have no modifiers from played Tactics Cards so simply roll a 6 sided die and roll a 3 which is below the Morale marker and means that they have passed the test and held. They can continue participating in the battle but each time they activate or take a Morale hit they will have to again take a Morale Test which will get harder to pass as their Morale drops.
Formations
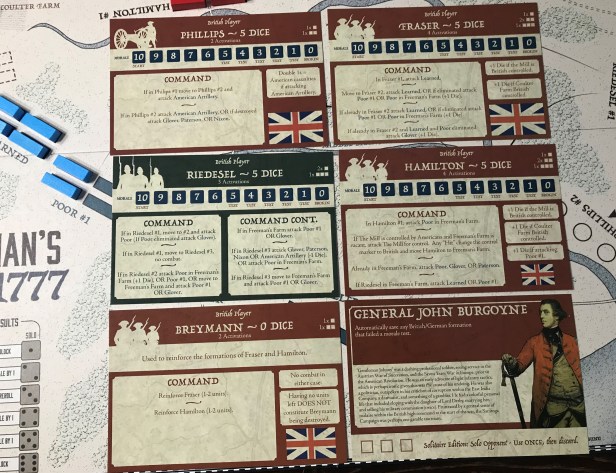
In the above picture you get a look at each of the British Formations that participate in the battle along with a look at General John Burgoyne. The British Formations include Philips (artillery), Fraser (foot), Riedesel (Hessian mercenary foot), Hamilton (foot), and Breymann (foot that only take reinforcement actions).
The American formations include Poor (foot), Nixon (foot), Learned (foot), Glover (foot who can reinforce), Paterson (foot who can reinforce) and American Artillery. Lets take a bit of a closer look at one of the British formations to give you an idea of how they work.
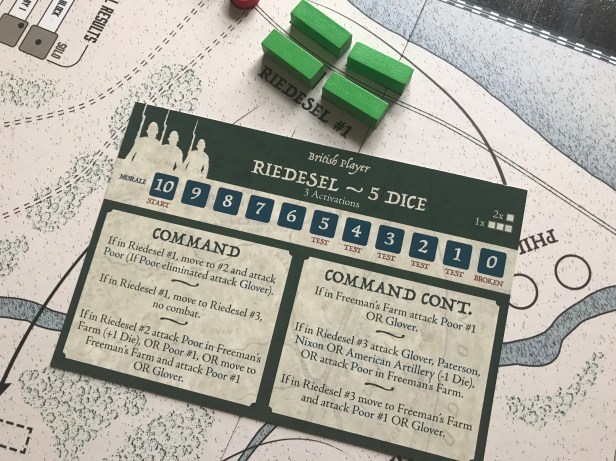
Riedesel is a powerful formation that uses 5 dice and has 10 starting Morale but only has 3 Activation Cards in the British deck. Historically, the Hessian mercenaries were on the battlefield to attack and all of their Commands deal with attacks on the Americans. The Riedesel formation has three positions on the board including Riedesel #1, Riedesel #2 and Riedesel #3. From their starting position on the board in Riedesel #1 they cannot attack any of the American formations. But, once they move to either #2 or #3, they have the option of attacking several of the American formations including Poor (if Poor is in Freeman’s Farm they will get +1 Die to their attacks), Glover if Poor is eliminated, Paterson, Nixon and American Artillery (albeit at -1 Die as they don’t have a good firing position on the American ramparts) if located in Riedesel #3
The coolest element of this design in relation to the Formation Cards is that you have lots of options, which at first glance might seem scripted and that you don’t have meaningful decisions, but I love the puzzle that you must solve in order to maximize your fire and the losses that you can inflict. The game only requires either side to break three formations to win the game so you can’t just run in willy nilly as you will get your tricorne shot off but must make calculated movements with an understanding of how many times each formation can activate and how many Activation Cards still remain in your deck.
Commanders
Historically, the battle of Freeman’s Farm saw three main commanders involved. General John Burgoyne for the British (along with his subordinate commanders) and General Horatio Gates and General Benedict Arnold for the Americans. Commanders provide one time bonuses to players but these bonuses can be a game changer. Once you decide to use the commander, you then discard them from play as they are a “one shot”. Each of the commanders also has an OR ability that players can use so you can choose how the commander will impact your game.

General Burgoyne allows the British player to activate any British formation instead of another when their Activation Card is played. This activated formation also receives +1 Die in combat for this turn. His OR ability is simply to try to save a formation that just failed a Morale Test by rolling a 1-5 on a 6-sided die. Very valuable and can be the different between victory or defeat.
On the American side, General Horatio “Granny” Gates may activate either Glover, Paterson or Nixon rather than any other formation. His OR ability is to immediately attempt to save Glover, Paterson or Nixon when they fail a Morale Test by rolling a 1-3 on a 6-sided die.
Now to my favorite commander in the battle (I have always been partial to Arnold and saw that his character flaws, namely pride and selfishness, led to his downfall.) Benedict Arnold. This man was a beast on the battlefield and was known to lead his men from the front inspiring them to greatness. With Arnold the American player can activate Learned or Poor instead of any other formation and give them +2 die in combat for that turn. His OR ability is to immediately attempt to save Learned or Poor when they fail a Morale Test by rolling a 1-4 on a 6-sided die.
We now will take a look at the fuel by which the Formation Cards act or the Activation Cards.
Activation Cards
Each side has their own deck of Activation Cards that coincide with the formations that they have in their army. When the Activation Cards are played, players can take one action with the named formation. The Activation Cards also generate Momentum according to the number of cubes that appear on the bottom of the card. This is a key to the game design and is really quite interesting as this currency provides the player with choices to re-roll attack dice or purchase Tactics Cards that give special abilities that can effect a single die roll or have lasting effects throughout the entire game. Even when a formation is broken or destroyed and their Activation Card is played, the player will still collect the Momentum cubes to use.
At the start of the game, each player gets to draw 6 Activation Cards from which they must choose three of these cards to form their initial hand and shuffle the other three cards back into the deck. From this hand, the player must devise a strategy that will attempt to foil their opponent and work toward their victory condition of having three enemy formations broken or simply lasting till the end (the Americans only).
After playing an Activation Card, the player will draw a replacement card at the end of their turn so they will always have 3 cards in hand to put together a plan of attack. I like that this was included in the design as a random draw is never a good thing in my opinion as it is just, well, too random and takes strategy out of the equation.
One more note. If you want to play a specific formation that is not included in your hand of cards, you can pay the cost of 5 Momentum Cubes to draw a specific formation out of your deck.

I hope you have a good feel for how the game moves along with the Activation Cards and the interesting decisions that come along with this mechanic. I have never been on a battlefield so don’t pretend to understand how it is but I believe that these type of activation mechanics mimic the general confusion and difficulty inherent with commands and communication among the din and smoke of battle.
In Action Point 3, we will look at the economy of the Momentum Cubes and how they are used to purchase the all important Tactics Cards. We will also take a look at some of the more interesting Tactics Cards that will cement your understanding of their importance.
-Grant

Happy New Year guys & thank you for all that you do for the Wargaming hobby. I really enjoy your Action Point series articles. I own Freeman’s Farm but have only got it to the table once. After reading this I’m inspired to get it back out & explore it deeper. I love the concept of this game.
LikeLike