Agricola, Master of Britain is a solitaire wargame that focuses on the struggle of the Roman Legions led by Gnaeus Julius Agricola the Roman Proconsul of Britain from 77 to 85 AD. Agricola spent his time in country as Proconsul attempting to pacify the Britains, consolidate Roman occupation, and subdue the various tribes. The game is designed to allow the player an opportunity to attempt to take on the role of Proconsul and apply military, diplomatic, and economic power to achieve these goals. The player must use their available Legions to attack tribes in outright revolt and then use more subtle tactics and bribery against others to conquer all resistance to allow for the Empire in Rome to prosper. The game uses a 3 Chit-Pull Cup system that represents different levels of allegiance of the different tribes on the island. Each action taken by the player will cause a chain reaction in these cups, either positively or negatively for the Romans. The player must build the right Units, investing in infrastructure in the form of Garrisons and Settlements, and build a victory point engine to accrue the required VP’s to meet the expectations of the Flavians and your allies in Britain.
In Action Point 1 we took a tour of the mapsheet becoming familiar with the various Legionary Camps, which serve as staging areas, and Tribal boundaries and discuss the Roman Legions and how they compare to the game’s 16 different Tribes. In Action Point 2, we investigated how the 3 Chit-Pull Cup system works and how the player can manipulate the cups to their advantage. In Action Point 3, we took a quick look at the Sequence of Play and reviewed the Roman Legion Actions that can be taken to accomplish the subjugation of Roman Britain and the special bonuses granted if the Agricola counter is located with the Legion performing the Actions. In Action Point 4, we took a deeper look at an example of a Battle to give you a feel for the tactical decisions necessary to be victorious and the dangers present for the Legions. In Action Point 5, we dove into and looked at a few functions that make up the Housekeeping Phase including Raids on Settlements and Forts, Tribal De-escalation, Romanization, Levy new Auxiliaries, Build Public Works and finally score Victory Points. In this Action Point, which is the conclusion to the series, we will discuss some points of strategy and I will share some of my lessons learned from numerous plays of the game.
Points of Strategy
Any game experience can be improved with the use of a bit of strategy that will assist in guiding the player toward doing what the game is trying to have you accomplish. Agricola is a light wargame that uses a very interesting and new mechanic that you must understand well in order to manipulate it and get good things out of it. I am talking of course about the 3 Chit-Pull Cup System. But once you know how to use that to your advantage, it is important to also understand some of the basic ways to focus your efforts to meet your Victory Point goals.
Understand the 3 Chit-Pull Cup System
The 3 cups each have a title and specific disposition of Tribes are placed in them. These titles include Friendly, Unfriendly, and Hostile and abstractly represent the allegiance and attitude of the different Units contained within the cups to the Roman occupation. After each action taken by any Roman Legion on the mapsheet, the player will reach into these cups and take one or more of the Units and blindly move them from their current cup to another cup as identified by the action. This is called a Cup Adjustment.

The first thing to keep in mind with this process is that each Legion Action that is taken by the player will lead to a Cup Adjustment followed by a number of Hostile Tribe Reactions which means you will blindly draw a counter from the Hostile Cup and then place it out on the mapsheet in the Tribal Box that it belongs to. So for each Hostile Tribe Reaction mentioned at the end of the action description in the rulebook you will have to place a new enemy Tribe on the mapsheet. This leads to a continual battle to keep up with the growing opposition to your occupation and you will have to make tough choices about what fires to put out first. I would recommend that you try your best to keep entire Regions clear of Tribal Units so if they are popping up in multiple Regions, try to make sure to keep at least one of those Regions free of Units by taking Legion Actions that suppress those Units.
One other point about this whole aspect of the design is that there are Actions that if taken will move the Cups in your favor as you will be allowed to perform a Cup Adjustment from the Hostile Cup to the Unfriendly Cup or from the Unfriendly Cup to the Friendly Cup. For example, the Garrison Action. This is where you will place a Legion permanently in the Region by flipping a 1-aquila Legion onto its Garrison side in a specific Tribal Box. This Legion can then be invested in to Build Public Works such as Settlements. These Settlements provide the player with Victory Points when they are at their highest level and also assist in the De-escalation of Tribes as the people like feeling protected and if you leave a Legion behind to guard their territory and prepare to invest in an improved Settlement, they will be grateful and allow you to move a Tribal Unit from the Unfriendly Cup to the Friendly Cup. This keeps the number of that Region’s Tribal Units in the Hostile Cup low and therefore minimizes their potential for being placed out on the mapsheet.
Focus on Building Your Victory Point Engine During the 1st Round
In the end, this game is about building a Victory Point Engine that will provide the required Victory Points needed to meet each Turn’s Threshold value or you will lose the game. With that in mind, you have to get started on building this engine quickly and there are some really good opportunities for that during Turn 1.
If you focus on trying to clear out the Tribes located in the Orange Region, which will be a challenge that first round as you only have 3 Legion Actions, you can possibly gain 1 VP for it being vacant. There are four spaces in that Region and you will most likely have at least 5-6 Tribal Units to deal with. If you use your free Leader Actions to Negotiate with at least one of the Tribes, and remove it from the Box it is located in to the Friendly Cup, you can then use your 3 Legion Actions to attempt to clear out the other 3 Boxes. This will cost you some of your coins but you probably can spend 1 or 2 and still be able to levy a few new Auxiliary Units and also build up one of your Garrisons to a +2 Settlement. I didn’t say it would be easy but it can be done.
You should also start building up your Settlements as soon as you can and this will unfortunately require you to use a Legion Action this 1st Turn to place a Garrison that the player may then pay 2 coins during the Housekeeping Phase in order to replace a Garrison with a +2 Settlement Marker. You must remember though that this Settlement progression is a process and takes several rounds to complete. You can then finalize the process during the next Turn for that one Settlement by paying the cost to change it to a +3 Settlement which will begin scoring Victory Points each round. By Turn 3, you should have at least 2 +3 Settlements on the mapsheet and will be earning 2 VP from them.
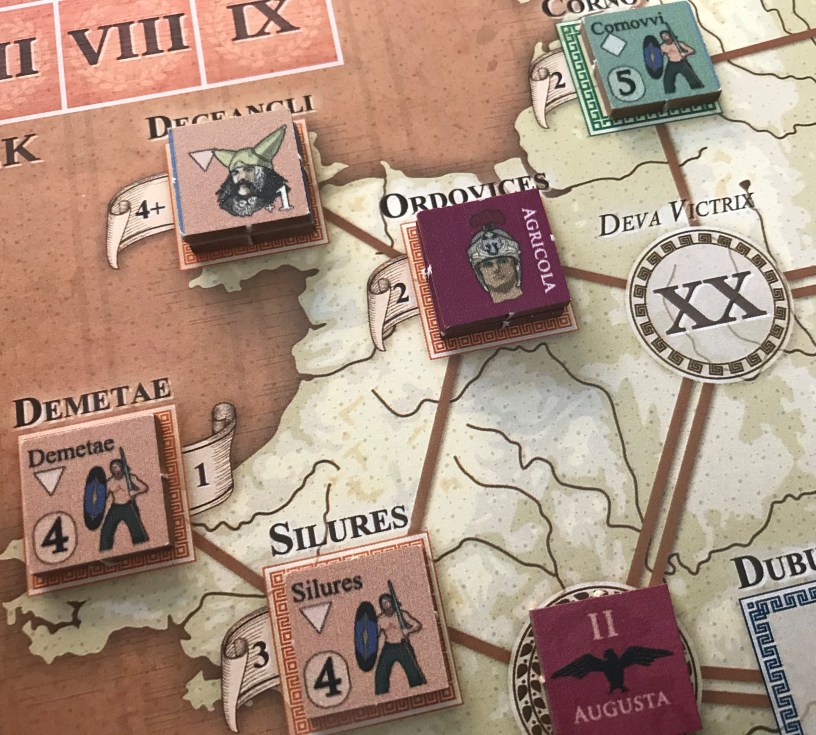
Finally, you will want to at least instigate one Battle during the 1st Round in order to be able to promote one of your 2-aquila Legions to its 3-aquila status as this will gain you one additional Victory Point. Simply choose to use the IX Hispania Legion as it contains a 2-aquila Legion and attack the Ordovices Tribal Box after moving to the Deva Victrix Legionary Camp and adding Agricola to your Legion. This can all be done with the intent of still trying to clear the Orange Region. All told, if you follow these two suggestions, the player can most likely gain at least 3 VP (1 for your existing 3-aquila Legion, 1 for a cleared Blue Region and 1 for a cleared Red Region) and possibly up to 6 VP during the 1st Turn if they get lucky and can clear the Orange Region, win a battle and promote their 2-aquila Legion and find a Tribal Leader that they can defeat. If these things happen, you will be on your way to having 75% of the required 8 VP to meet the Turn 2 VP Threshold already.
Hunt Down the Tribal Leaders
For each Tribal Leader that is in the Dead Pool, the player will gain 1 VP during the Victory Point step of the Housekeeping Phase. This can be the source of 8-15 VP over the course of the game if the player can find and kill these Leaders over the first 2 Turns and is very important to your hopes of victory. I have found that at least one of these Tribal Leaders will get drawn from the cup during Turn 1 as your Legion Actions invoke Cup Adjustments and Hostile Tribe Reactions and you will have the opportunity early to at least find one of these Leaders. But not always. Remember this drawing is random and may not happen the way I am saying.

Once a Leader is placed, it should be your goal to take them out immediately so that you can add that Leader to the Dead Pool and score that Victory Point each Turn through the end of the game. There are three such Tribal Leaders in the game. There is an unnamed Leader for each of the Orange and Green Regions and there is one special Leader for the Red Legion, the mighty Calgacus. If Calgacus is on the mapsheet at the end of Turn 8, you cannot win the game unless you defeat him at the Battle of Mons Graupius. I recommend that you try your best to hunt down and eliminate these Tribal Leaders as soon as they are placed as their Victory Points each round are simply invaluable. Easier said than done though as when they are fought, they will add their Leader Bonus to the total calculation to determine the number of Tribal Battle Units you will face on the Tribal Formation Table. Be cautious but you must succeed in defeating them if you hope to have a realistic chance at victory.

Use Agricola When Taking Actions
The Agricola enhanced actions can be very good and proper planning can reward the player significantly. When Agricola is stacked with the Legion taking an Action, they will gain a fairly significant benefit to that action. For example, when taking the Suppress Action Agricola will allow the player to remove the next Tribal Unit in the stack if the roll is successful so this can be a two for one situation. This is especially important if the Tribal Unit below the top-most Unit is a 5 or 6 Resistance Value and would normally be much harder to remove.

Another example is the Garrison Action. The Agricola Effect of taking a Garrison Action is that the player can then remove a Tribal Unit in an adjacent Tribal Box for free. This can be very advantageous when you have Tribal Units there with high Resistance Levels and can also be quite a nice efficient bonus. Anytime you can do something without having to pay for it with an Action is a good thing. Remember in a previous point we discussed trying to clear out the Orange Region during the 1st Turn. This Agricola Effect can make that a reality as it may allow you to take out an adjacent Tribal Unit without taking an extra Action.
Agricola Effects are about efficiency and due to the fact that the player only has a few Actions per turn, using them wisely is of utmost importance to doing all that you need to do to reach your Victory Point Threshold for each Turn.
Combine Two of Your Legions to Form a Superior Fighting Force
As the game progresses and the player has cleared the Orange Region and has started to make progress into the Green Region it is advisable to combine two of the Legions in order to make a superior fighting force that is poised to take on Calgacus at the Battle of Mons Graupius that we have mentioned. The only draw back to this is that when you take an Action with those joined Legions, it will cost 1 Legion Action per Legion participating in the Action. So, a Battle will cost 2 Legion Actions, a Suppress will cost 2 Legion Actions, etc. Also, you must remember that it will also double the number of Hostile Tribe Reactions so you will see more and more Tribal Units being added to the mapsheet that you will have to deal with.
Why is it important to combine two Legions together? It becomes about numbers. A single Legion typically has between 2-5 Legion Battle Units and possibly 2-3 Barbarian Auxiliaries. But, when you combine them, you will have considerably more fighting forces including 4-10 Legion Battle Units and 4-6 Barbarian Auxiliaries. This becomes important in matching the number of enemy Tribal Battle Units that you will face in Battle. Remember, that as the game ages and you begin to fight Battles versus Tribal Units that include a Tribal Leader that this will increase the number of Units you have to face. In fact, when the Battle of Mons Graupius comes around you will be facing the maximum Tribal Battle Units of 13 plus each Unit will take two hits to defeat. You will lose Units. There is no way around this but you have to be able to maintain a good fighting force if you hope to win the game.

Use your Barbarian Auxiliaries to Defeat Powerful Tribal Battle Units
It is a very valuable addition to your Legions when you are able to recruit new Barbarian Auxiliary Units. These Units will cost 1 coin and you can never simply choose them but have to draw them out of the Friendly Cup. They supplement and enhance your fighting force and frankly I recommend that they be used to take on the most powerful Tribal Battle Units in any given fight. I would also say that they are expendable, I know that this sounds terrible, but it is true. They are cheaper to replace than your Legions and will not cause any greater unrest among the local populace when they are lost in Battle.
As you can see in the picture below, I have used the Welsh Auxiliary Units to line up versus the two largest Tribal Battle Units on the board. That row on the left is simply like “murderers row” as the Unit’s Attack and Defense Factors are among the highest among the Tribal Battle Units with values of 5 and 6. If you look at the 5-6 Tribal Battle Unit and then the 6-6 Tribal Battle Unit adjacent to each other whatever Unit is located engaged with them will have to withstand an 11 attack (remember you have to combine each Unit’s Attack Value and then the Roman Unit lined up against them must defend against that value by rolling a D8 and then adding their Defense Factor to the die roll). In this example, the player will have to roll an 8 on a D8 in order to survive as they only have a Defense Factor of 4. If for some reason the Romans don’t have Initiative, and with Agricola attached they always will unless there is a Tribal Leader present, they will be attacked first. If they have Initiative the player will get an opportunity to attack first and kill enemy Tribal Battle Units to even the odds before they can unleash that wicked attack.
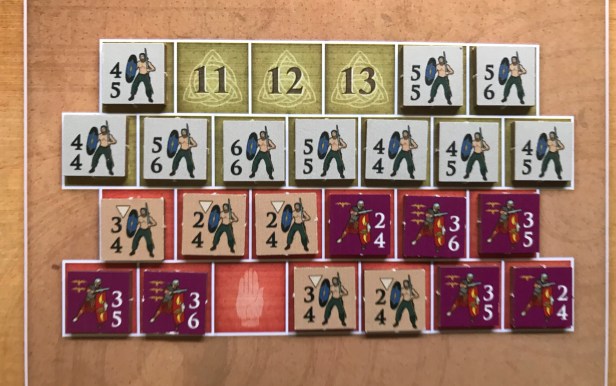
Use the Auxiliaries to absorb hits before you move your Legions into the Battle. Sometimes you get lucky and will withstand the attacks and kill several Units and will have a cake walk of a battle but sometimes it just doesn’t work out. Don’t lose your Legions when you have expendable fodder in the Auxiliaries. You will thank me later as you are earning VP’s for your 3-aquila Legions and not encouraging the resistance by losing your Legions in Battle.
Protect Your 3-aquila Legions
While your 3-aquila Legions are very powerful with an Attack Factor of 3 and a Defense Factor of 6, and must be used in order to win some of the more difficult fights you will encounter, they are also valuable to you as a source of VP’s. I recommend that you don’t risk them in Battle and utilize your lower Quality 1- and 2-aquila Legions or better yet your Auxiliaries. Another important distinction here is that at the end of a Battle, you have the opportunity to increase the Quality of 1 Unit from each Legion that participated in the Battle. Why not use your 1- and 2-aquila Units to give them a chance to be improved. If they don’t participate in at least one Attack or Defense during a Battle, they cannot be chosen to be promoted. Keep this in mind as you try to protect your best Units as they cannot be promoted beyond a 3-aquila Legion. So why risk them if you don’t have to?
Be Cautious About Spending VP to Purchase New Legions
If you remember from our post on the Housekeeping Phase, after scoring your VP for the Turn, you may spend VP to recruit additional 1-aquila Legion Battle Units for the following costs:
• Minus 3 VP for one Unit
• Minus 5 VP for two Units (the value buy as I like to call it)
• Minus 8 VP for three Units (going all in as this is very expensive and you should really think thrice before doing this)
This step in the process comes before you have to finally show that you have met the VP Threshold for the Turn. So, you have to pay attention to not spending your VP under the Threshold as the VP requirement is not enforced until after the purchase of the Legion Battle Units step. This is one of the trap elements of the game and you have to keep in mind that the game can only give you about 90 total VP during the course of play (that is actually a lot) but this assumes you get advantages from killing Tribal Leaders, which doesn’t always happen as sometimes they just aren’t drawn, as well as you are able to clear Regions early to gain the VP benefit. If you buy too many units, you will drop below the required game end VP Threshold of 75. Keeping that in mind, you will only be able to buy new Legions at most 3 times, and only twice if you go for the big 3 Units purchase. Don’t overbuy and consider where you stand and how things are going before you buy. You will get a feeling for when to buy and how much to spend but that really only comes after a few plays.
I hope you have success in using my points of strategy. I cannot say that I am an expert at the game or that I consistently win, because I still lose even when using these strategy points, but if you use these points in your game you will do better than if you don’t. I really have enjoyed playing Agricola and have come to truly appreciate the design and its fascinating mechanics. The game is an introductory solo game and after 4 or 5 plays will start to become the same experience as you will have learned the tricks and strategies and it will become less of a challenge. Remember though that any time you are drawing things randomly, like the Tribal Units from the Hostile Cup, or rolling dice that you can never be sure of the outcome. I am truly looking forward to playing the next game in this series called Charlemagne which uses the same 3 Cup Chit-Pull System but adds in some additional elements that increase the difficulty and variability of the game experience. I cannot wait to share that one with you as well as I play and learn the game and enjoy learning history and basking in the glory of a well designed experience.
-Grant

Fantastic analysis, I especially like your ideas for building VP engine in Turn 1!
LikeLiked by 1 person
Thanks. I feel that this game is more of a Euro style game that has some war elements included and you have to think about things in a bit different manner than with a hex and counter wargame. Great game though and I have really been enjoying the followup to this one Charlemagne. Tougher experience but still a great game.
LikeLiked by 1 person
I think the resemblance to EURO comes from the fact that in order to pacify Britain you just cannot use only brutal force, but all other means which has to be planned in advance and in correct order. The battles are also not so common. as often more can be achieved without it (though, they allow for promotion which in the end yearns VPs).
LikeLiked by 1 person
While combining two legions is great for battle, paying two actions to move hurts, and lets gauls fall in behind you while you are bunched up. I typically only do it when I step into the red area
LikeLike