Agricola, Master of Britain is a solitaire wargame that focuses on the struggle of the Roman Legions led by Gnaeus Julius Agricola the Roman Proconsul of Britain from 77 to 85 AD. Agricola spent his time in country as Proconsul attempting to pacify the Britains, consolidate Roman occupation, and subdue the various tribes. The game is designed to allow the player an opportunity to attempt to take on the role of Proconsul and apply military, diplomatic, and economic power to achieve these goals. The player must use their available Legions to attack tribes in outright revolt and then use more subtle tactics and bribery against others to conquer all resistance to allow for the Empire in Rome to prosper. The game uses a 3 Chit-Pull Cup system that represents different levels of allegiance of the different tribes on the island. Each action taken by the player will cause a chain reaction in these cups, either positively or negatively for the Romans. The player must build the right units, investing in infrastructure in the form of Garrisons and Settlements, and build a victory point engine to accrue the required VP’s to meet the expectations of the Flavians and your allies in Britain.
In Action Point 1 we took a tour of the mapsheet becoming familiar with the various Legionary Camps, which serve as staging areas, and Tribal boundaries and discuss the Roman Legions and how they compare to the game’s 16 different Tribes. In Action Point 2, we investigated how the 3 Chit-Pull Cup system works and how the player can manipulate the cups to their advantage. In this Action Point, we will take a quick look at the Sequence of Play and review the Roman Legion Actions that can be taken to accomplish the subjugation of Roman Britain and the special bonuses granted if the Agricola counter is located with the Legion performing the Actions.
Sequence of Play
The game is played over a series of 8 game turns until an end game trigger occurs that will result in your victory or defeat. Each game turn, the player will take a number of Legion Actions as shown on the Legion Action Track. As I mentioned in our last Action Point, each Legion Action that is taken will have an equal and opposite reaction from the 3 Chit-Pull Cups, sometimes moving units from the Friendly Cup to the Unfriendly Cup, from the Unfriendly Cup to the Hostile Cup, and sometimes even de-escalating things and moving units from the Hostile Cup to Unfriendly, or Unfriendly to Friendly Cup and will also cause new Tribal units to be placed out on the mapsheet. These reactions will change the way the Britains feel about Roman rule and their disposition between the 3 Chit-Pull Cups; Friendly, Unfriendly and Hostile. A Hostile Tribe Reaction simply means you will reach into the Hostile Cup, draw forth one counter for each such Reaction and then place those counters in the appropriate Tribal Box in the Region.
Prior to taking each of the Legion Actions for a turn, the player can perform what are called Leader Actions. Once the player has taken all of their actions for the turn, or passed on taking their remaining Actions, the turn will end and will move to the Housekeeping Phase. Now that you get a feel for how the game plays out, let’s take a closer look at the Legion Actions.
Legion Actions
Before we go into all of the different types of actions that the Legions can take, we need to look at how a Legion Action is resolved in the framework of the game. The first step in this process is to identify what Legion is taking the action. This might seem logical and not necessary of discussion, but sometimes the player will find that they have 2 or even three of their Legions stacked together, particularly near the end of the game as the Romans are trying to conquer the Red Tribes in the north. If there are 2 or more Legions stacked together, you will need to identify whether 1 or even 2 of the Legions are going to take the Action. If one Legion is taking the Action, the player will only pay 1 Action but if both are involved it will cost one Action for each Legion. The Hostile Tribe Reactions will also increase if there are more than one Legion stacked together. For each Legion taking an Action, there will be the listed number of Hostile Tribe Reactions per Legion involved.
The Legion can also move prior to taking the action but are not required to move, with the exception being of Peacekeeping. When a Legion is designated to take an Action, it may first move to any adjacent box. Finally, if your Leader Agricola or the Tribal Leaders are with the Legions or in the effected Tribal Region where Actions are being taken, those Actions will be enhanced or constrained. The Agricola enhanced actions can be very good and proper planning can reward the player significantly. Now that we have a good understanding of some of the basics, let’s now dive into the different Actions available to the Roman player.
Suppress Action
The Suppress Action is a way for the Romans to attempt to quell unrest among the civilian population in Tribal Boxes where rebellion is growing. This Action can only be taken if there are one or two Tribal Units located in the Tribal Box where the Action is being taken. If three or more Units are present in a box, the Tribe is then considered to be in open rebellion and can only be dealt with at the point of a Gladius with the Battle Action.

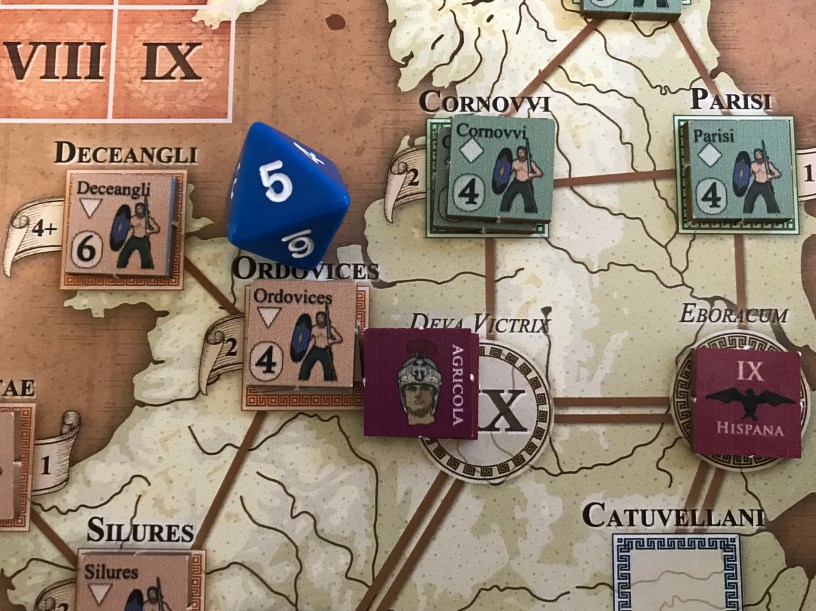
The process for a Suppress Action is very simple. The player will simply take the Action in a connected Box by looking at the Resistance Value of the top most Unit in the stack. The Resistance Value is found in the bottom left-hand corner of the counter. The player then rolls the 8-sided die and is looking for a result that exceeds the listed Resistance Value. There are no modifiers to the roll so this roll can be challenging but is worth it, particularly if the Legion taking the Action has Agricola attached. Agricola will allow the player to remove the next Tribal Unit in the stack if the roll is successful so this can be a two for one situation. This is especially important if the Tribal Unit below the top-most Unit is a 5 or 6 Resistance Value and would normally be much harder to remove.

If the Tribal Leader for the Region is located in the Box where the player wants to try to attempt a Suppress, the Leader will block this attempt. If it is in the Region, the Leader will add it’s Leadership Bonus to the Resistance Value of each Tribal Unit in the Region. This benefit can seriously hamper the Roman’s attempt to put down rebellion so you might want to consider Battling the Leader and eliminating them before trying to Suppress.
If a Tribal Box only contains a single Tribal Unit, the only way to remove that Unit is through a Suppress Action as you can only start a Battle when there are at least 2 Tribal Units in the Box. This will be an Action you will have to take more than you want to and you will fail at it a lot of the time. But never fear, you have plenty of Actions but you have to get those Regions cleared quickly in order to start building your Victory Point machine.
The Suppress Action does cause quite a stir among the local resistance though as it will cause 2 Hostile Tribe Reactions to occur. This can lead to lots more units popping up in this same Region but can also be the cause of more buildup in a different Region. You just have to take your chances as this is one of the more important Actions at your disposal. Another way to look at adding more units though is that may then qualify the Tribal Box for a Battle Action or you can remove that second Tribal Unit with Agricola. So, adding units is sometimes a good thing.
A couple of comments on the strategy of the use of a Suppress Action. When you can, using Suppress to avoid an open fight with a large enemy is key to preserving your forces. As you saw from the discussion above, the Suppress roll will have to overcome the top Tribal Unit’s Resistance Value. If this value is 4 or less, it is a no brainer to take the Suppress Action as this is a 50/50 roll on the 8-sided die. If the Resistance Value starts to creep over 5 it becomes that much harder to Suppress but still might be better than risking open battle depending on the health and disposition of your Legions. We haven’t covered the Battle Procedure yet, but when you attack a Tribal Box you will make a roll and add the top most Unit’s Resistance Value to generate a number of Enemy Battle Units to fight. The higher that modified roll, the more units you will have to fight. The only negative consequence to taking a Suppress Action and failing is that you will still have to deal with Cup Adjustment and Hostile Tribe Reactions.

Garrison Action
The Garrison Action is the literal leaving of a Legion behind to form a permanent garrison to protect the recently pacified Tribes in a specific Tribal Box. This action assists the player in Romanization of the area as the presence of the garrison will deal with pop up resistance after the Region is cleared.

The Garrison Action can only be taken in a Tribal Box that is completely free of Tribal Units. There also cannot be a Tribal Leader present in any Tribal Box in the Region. Thematically, the Legions would only have been able to remain behind in the area to build a fort, improve roads and patrol the area if they believed that they had eliminated all resistance in the area and that there weren’t any pockets of dissidents left to harass the effort. The process of building of fortifications and improving the area to house a Legion and to be be able to provide sustenance and food was time consuming and couldn’t be completed if the process was being interrupted.
The process is pretty simple. The player chooses and removes a single Legionary Battle Unit from the active Legion’s Holding Box. Then place a Garrison Counter, which is found on the opposite side of the 1-aquila Legionary Battle Unit, in the chosen Tribal Box and that is it. No rolls needed, nor income required. The fact that the Garrison Counter is found on the back side of the 1-aquila Legionary Battle Unit should give you a hint as to which Units you should choose to leave behind. The 1-aquila Legionary Battle Units are your weakest Units and are easiest to replace. You would never want to sacrifice a 2 or 3-aquila Unit as you have won battles in order to improve the Unit to that level…unless you have no other choice of course.

The Agricola Effect of taking a Garrison Action is that the player can then remove a Tribal Unit in an adjacent Tribal Box for free. This can be very advantageous when you have Tribal Units there with high Resistance Levels and can also be quite a nice efficient bonus. Anytime you can do something without having to pay for it with an Action is a good thing.

The final point I wish to cover regarding the Garrison Action is that you cannot take this Action if there is a Tribal Leader in the Region. This Leader’s influence is simply too encouraging to the resistance that they will not allow the Romans the time to build the required infrastructure to support the Garrison. You must go after these Leaders in order to take this important Action. You also will find that killing a Tribal Leader early on in the game will return 7-8 Victory Points to your total as the Romans will earn 1 VP for a dead Leader each turn after they are defeated. You also will earn VP’s for each +3 Settlement that is built during the game at the end of each turn. This Settlement building process takes at least 2 turns though as you have to first place a Garrison, then during the Housekeeping Phase at at the end of turn must spend 2 Talents to increase that Garrison to a +2 Settlement and then wait a full turn before you can spend 2 more Talents to improve the +2 Settlement to a +3 Settlement. These +3 Settlements will increase your Income level and also return VP’s at the end of each turn for each +3 Settlement in Britain.
The Garrison Action also helps you to pacify the locals as it will cause a Cup Adjustment where the player will move 1 Tribe from the Unfriendly Cup to the Friendly Cup. This keeps up a steady flow of recruitable Barbarian Auxiliaries that the player can pay to recruit from the Friendly Cup. The only downside of this Action is that it will cause one Hostile Tribe Reaction and could see another Unit pop up like a brush fire in this same Region.
Peacekeeping Action
The Peacekeeping Action is kind of like the Romans marching around thumbing their noses at the local populace reminding them that they were conquered and are subjects of the Roman Empire….in the nicest way possible of course! It actually is a show of the power of the Legion to any onlookers who might have thoughts of rebelling yet again.

This power move allows the Romans to adjust the Hostile Cup by moving 1 Hostile Tribe down to the Unfriendly Cup. Typically, this is used to thin out the Hostile Cup in an attempt to keep the conquered Tribal Units of a particular Region off the mapsheet and to calm them down. It also can be used to devastating effect with the Garrison Action to create a new pool of recruits from the conquered Tribes.
The Action requires that a Legion must move to an adjacent Tribal Box that contains no Tribal Units in a Region with no Tribal Leader present. One of the interesting things about this is that Legionary Camps are counted as being in the Blue Region. Why is this significant? Well, it means that the Romans can use this Action in the Blue Region by simply moving from Camp to Camp and consolidating their Legions together into a massive stack to attempt to invade the Green Region while performing this Action to move some Tribal Units between the various Chit-Pull Cups.

The benefit of the Peacekeeping Action is that the player can move Tribal Units down to a more reasonable stance. Removing a Tribal Unit from the Hostile Cup to the Unfriendly Cup means that it cannot be drawn to be placed on the mapsheet during a Hostile Tribe Reaction. Once you have defeated an entire Region and quelled the Tribes, this is important because you don’t want them to pop up behind you. Remember that the game is ended if you don’t reach the VP Threshold identified on the Game Turn Record Track and the way you score VP is from having Regions vacant of Tribal counters, killing Tribal Leaders and building +3 Settlements. Getting the Regions cleared out is only half the battle as you will have to keep it clear to win.

That is where the use of Peacekeeping is so important. It also is very important in moving your Legions around the mapsheet. If Agricola is attached to a Legion taking this Peacekeeping Action, the Legion will be allowed to Move around the mapsheet more quickly. Movement is never really provided as an Action that you can take so you really move by doing Peacekeeping. The Action only causes 1 Hostile Tribe Reaction so it can be taken without fear of causing an avalanche of new Tribal Units to fight.

Battle Action
The final Action we will take a look at is the Battle Action. This is where the Roman Legions use their power and advantage to openly attack rebellion in the Regions. We will not be covering the mechanics of Battle in this post, as that is to be the subject of it’s own post, but we will talk about how it is used and the limitations it has.
First off, Battle is never a given, even though the Romans were great tacticians and had the best armor and weapons. There is quite a bit of luck involved as the dice can be very unkind. The way the dice are mitigated though is having improved your Legions from their starting 1-aquila Legions to the mighty and extremely hard to kill 3-aquila Legions. The difference in Legions was discussed in the first post in the series but the Quality of these Legions is very different. This Quality represents the experience and discipline of the Unit and is shown by either 1, 2 or 3 aquila symbols in the upper left hand corner of the counter. The Attack Factor is the Unit’s basic ability to attack and is the top number on the right side of the counter. This number will range from 2-3. The final number is the Defense Factor and is the Unit’s basic ability to defend against attacks from the Tribes. This number is the bottom number on the right side of the counter and ranges from 4-6. The difference between the 2 and 3-aquila Units is only +1 Defense Factor but I will tell you that makes them very hard to kill and serves you very well in the game as you typically are outnumbered and will have to defend against at least 2 Units more often than not.

The Battles are fought on the Battle Display and the number of Tribal Units that the Legions will have to fight is determined by a modified die roll. You first look at the top most Tribal Unit on the stack that the Legions are attacking and use it’s Resistance Level as a base. In the below picture, you will notice that the Brigantes Tribal Unit on top has a 6 Resistance Level. An 8-sided is rolled and added to the Resistance Level to create the Tribal Formation value. In this example, the die roll results in a 4 and when added to the 6 Resistance Value totals 10. If there was a Tribal Leader in the area, its Leadership Bonus would be added to this total.

Once the final Tribal Formation Value is determined the player will refer to the Tribal Formation Table found on the back of the rule book. First identify the Tribe that is being attacked and then find their column, in this case it is the Brigantes, and then find the Die Roll row to determine the number of Tribal Battle Units to draw randomly from the Battle Cup. As we look at the table, we see that there will be 9 Battle Units drawn from the Battle Cup.

Once these Battle Units are drawn, we move to the Battle Display and begin to setup the Units for both sides. But first, you must determine who has the Initiative. The Roman player will have the Initiative most of the time unless there is a Tribal Leader in the Region where the Battle is taking place. But, if Agricola is in the Box, then the Roman player will retain Initiative even if there is a Tribal Leader present. But if the Tribal Leader is present in the Box where the Battle is occurring, Agricola will lose the Initiative to the Tribal Leader. So what does Initiative do for the player?
When the Initiative is possessed, the Roman player will deploy their Legions after the enemy forces have been deployed. Also, and an even bigger benefit, is that the Roman Legions will get to Attack first before the Tribes. That is the way these Battles are setup and we will discuss this further in the next Action Point in the series.
Finally, the Cup Adjustments from these Battles are pretty interesting. After the Battle, the player will move 1 Friendly Unit to the Unfriendly Cup. This is a reaction to aggression and bloodshed by the Romans against the Tribal allies and brothers of the Tribes. Aggression begets aggression and there is sometimes no other way to gingerly handle the situation. The Hostile Tribe Reactions are also interesting and in essence represent a boldness by the Tribes as they are spurned on by the loss of Legions. When a Legion is killed in Battle, 1 Unfriendly Unit will move to the Hostile Cup for each such killed Legion. After this movement, 2 Hostile Tribe Reactions will occur. Violence brings the tribes together and forces them to retaliate. I like this aspect of the design as it makes a lot of sense in the overall theme of the occupation.
Passing
There are times when the Roman player has Actions remaining but has accomplished all that they needed to during the turn. They then might make the strategic choice to Pass their remaining Actions. Why would they do this? Well, one of the major reasons is that each action has an equal and opposite reaction. And these Hostile Tribe Reactions are going to spawn more resistance on the mapsheet and if too many Units get placed back into cleared and pacified Regions, the VP status of that cleared Region will be put into doubt. Plus, for each passed Action, the player will gain 1 VP. I hate to admit this but there have been games where I was needing 1-2 VP’s in order to meet the required minimum for the end of a turn and found myself passing my valuable Actions, as well as paying precious Talents to gain a few more VP. This game is full of this type of meaningful decisions and that is why I like it so much. Sometimes simply passing is your only reasonable Action choice and a good leader will know when to hold onto their gained ground rather than pushing their luck.
In Action Point 4, we will take a deeper look at an example of a Battle to give you a feel for the tactical decisions necessary to be victorious and the dangers present for the Legions.
-Grant

I just recently had chance to play that game and it is fantastic small gem. It is so engrossing and each time you fail you want to restart and try new approach. The amount of dice rolling is significant, but that make s luck much less impacting the game. I am glad you are enjoying this too!
LikeLike
And my first impressions – I was inspired by you guys to try this!
LikeLiked by 1 person
I’m glad that you had a chance to play it. It is a great little game and I have enjoyed it immensely. I have played 5 times and won three times, with one being by the skin of my teeth.
LikeLiked by 1 person
Yes, the game is addictive and you want to try again and again. Thanks for pointing me to this little jewel!
LikeLiked by 1 person