Agricola, Master of Britain is a solitaire wargame that focuses on the struggle of the Roman Legions led by Gnaeus Julius Agricola the Roman Proconsul of Britain from 77 to 85 AD. Agricola spent his time in country as Proconsul attempting to pacify the Britains, consolidate Roman occupation, and subdue the various tribes. The game is designed to allow the player an opportunity to attempt to take on the role of Proconsul and apply military, diplomatic, and economic power to achieve these goals. The player must use their available Legions to attack tribes in outright revolt and then use more subtle tactics and bribery against others to conquer all resistance to allow for the Empire in Rome to prosper. The game uses a 3 Chit-Pull Cup system that represents different levels of allegiance of the different tribes on the island. Each action taken by the player will cause a chain reaction in these cups, either positively or negatively for the Romans. The player must build the right Units, investing in infrastructure in the form of Garrisons and Settlements, and build a victory point engine to accrue the required VP’s to meet the expectations of the Flavians and your allies in Britain.
In Action Point 1 we took a tour of the mapsheet becoming familiar with the various Legionary Camps, which serve as staging areas, and Tribal boundaries and discuss the Roman Legions and how they compare to the game’s 16 different Tribes. In Action Point 2, we investigated how the 3 Chit-Pull Cup system works and how the player can manipulate the cups to their advantage. In Action Point 3, we took a quick look at the Sequence of Play and reviewed the Roman Legion Actions that can be taken to accomplish the subjugation of Roman Britain and the special bonuses granted if the Agricola counter is located with the Legion performing the Actions. In this Action Point we will take a deeper look at an example of a Battle to give you a feel for the tactical decisions necessary to be victorious and the dangers present for the Legions.
Resolving Battles
Battles are larger military engagements between the Roman Legions and the enemy Tribes and is really the last line of defense if other actions fail to quell the uprisings. Battles can only be started when there are at least 2 or more Tribal Units in a Box. You cannot attack a single Tribal unit and must use the Suppress Action to deal with this small of a presence. When a Battle is triggered, either through a Battle Action or an enemy Ambush, it will be resolved on the separate Battle Display.

The process is fairly simple and follows these steps:
Deploy Units on the Battle Display, paying attention to who has Initiative;
Then a sequence of alternating Defense and Attack Rounds that occur until all forces on one side have been eliminated;
The last step is the usual Cup Adjustments and Hostile Tribe Reactions if the Battle was triggered by a Battle Action.
There is a special Battle called Mons Graupius that has some unique rules. We will cover these steps in a bit more detail in this post and also go through a simple example as we go along.
Initiative
We discussed Initiative in our last post but it is a very important part of the process so I will reiterate it here. The Roman player will have the Initiative most of the time unless there is a Tribal Leader in the Region where the Battle is taking place. But, if Agricola is in the Box, then the Roman player will retain Initiative even if there is a Tribal Leader present in the Region. But if the Tribal Leader is present in the Box where the Battle is occurring, Agricola will lose the Initiative to the Tribal Leader. So what does Initiative do for the player?
When the Initiative is possessed, the Roman player will deploy their Legions after the enemy forces have been deployed. Also, and an even bigger benefit, is that the Roman Legions will get to Attack first before the Tribes. Deploying Units after the enemy has deployed is very key as you can then survey the battle field and place your better 3-aquila Legion Units where they can absorb hits and do the most damage.
Enemy Deployment
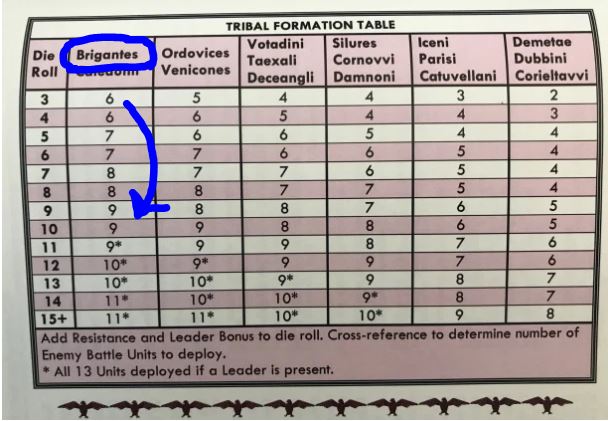
The Enemy deployment will take place either before or after the Romans deployment, depending on who has Initiative. We covered how the Enemy Army is generated in our last post but let’s look at it a bit more closely here. The number of Tribal Units that the Legions will have to fight is determined by a modified die roll. You first look at the top most Tribal Unit on the stack that the Legions are attacking and use it’s Resistance Level as a base. In the below picture, you will notice that the Brigantes Tribal Unit on top has a 6 Resistance Level. An 8-sided is rolled and added to the Resistance Level to create the Tribal Formation value. In this example, the die roll results in a 4 and when added to the 6 Resistance Value of the top most Tribal Unit totals 10. If there was a Tribal Leader in the area, its Leadership Bonus would be added to this total. For this example, there is no Leader present.

Once the final Tribal Formation Value is determined the player will refer to the Tribal Formation Table found on the back of the rule book. First identify the Tribe that is being attacked and then find their column, in this case it is the Brigantes, and then find the Die Roll row to determine the number of Tribal Battle Units to draw randomly from the Battle Cup. As we look at the table, we see that there will be 9 Battle Units drawn from the Battle Cup. That is a lot as this was a high roll. This will be a challenging battle for the Romans. In looking at the Table you will notice that if there is a Tribal Leader present that you will add their Leader Bonus to this roll and if the final modified number is higher than 10 in the Brigantes column you will have to fight all 13 of the Tribal Units in the Battle Cup.
The player will then reach into the Battle Cup and draw forth Tribal Battle Units one at a time and place them in order on the Battle Board. Meaning that the first Tribal Unit drawn will be placed in the 1 space, the second Tribal Unit drawn will be placed in the 2 space, and so on and so forth until the appropriate number of Tribal Battle Units have been drawn and placed.
The Tribal Battle Units are gray as compared to the Blue, Orange, Green or Red Tribal Units that can be hired into your armies after they are friendly towards the Romans. The Tribal Battle Units have two sides to their counters, one that is simply gray and the other that has a red outline. The red outline Units are only used in a special Battle called Mons Graupius, which will be a very tough Battle for the Romans if they are not prepared. It is really challenging as all 13 Tribal Battle Units will be on the board and oriented with the red outline side is face-up. This red outline means that these Units have to be defeated twice in order to be killed and once hit the player will flip them over to their gray side and still has to attack and kill them again.

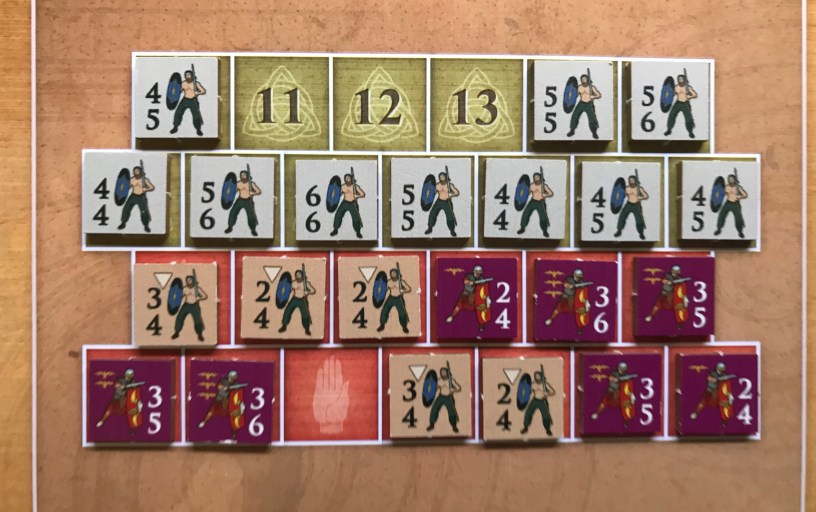
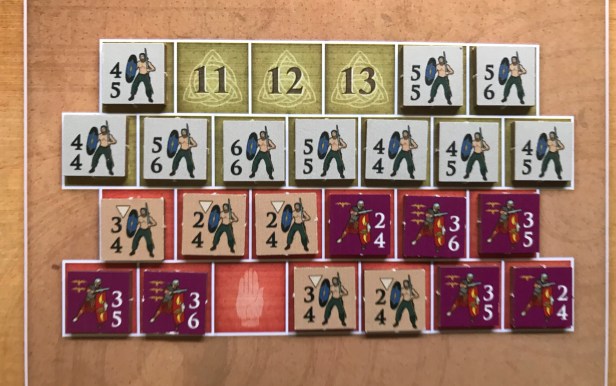
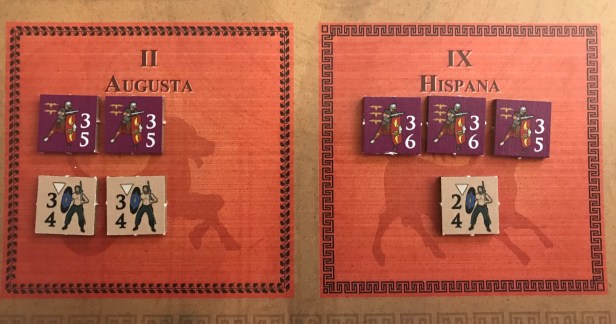
Shown in the picture above is the Battle Board showing the two Legions which are involved in this example Battle including the II Augusta Legion and IX Hispania Legion. The Augusta Legion has a total of 7 Units including one 1-aquila Legion, two 2-aquila Legions and one 3-aquila Legion with three Auxiliary Units; two with a 2 Attack Factor and one with a 3 Attack Factor. The Hispania Legion has 5 total Units including one 1-aquila Legion, one 2-aquila Legion and one 3-aquila Legion with 2 Auxiliary Units; one with a 2 Attack Factor and one with a 3 Attack Factor.
We now will draw out 10 Tribal Battle Units one at a time from the Battle Cup. We reach in and draw forth the first Tribal Battle Unit and it is a 4 Attack Factor unit. This unit is now placed in the 1 space.
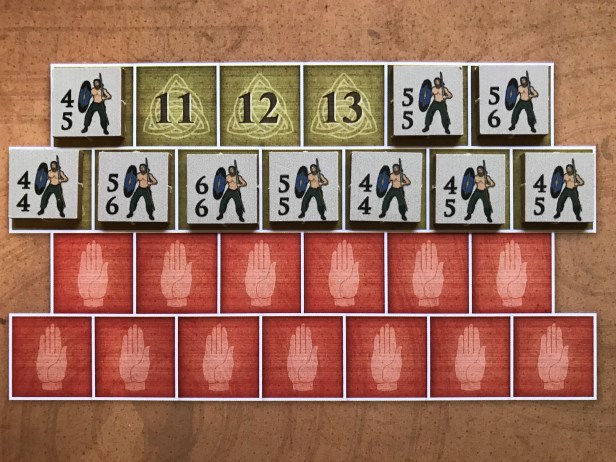
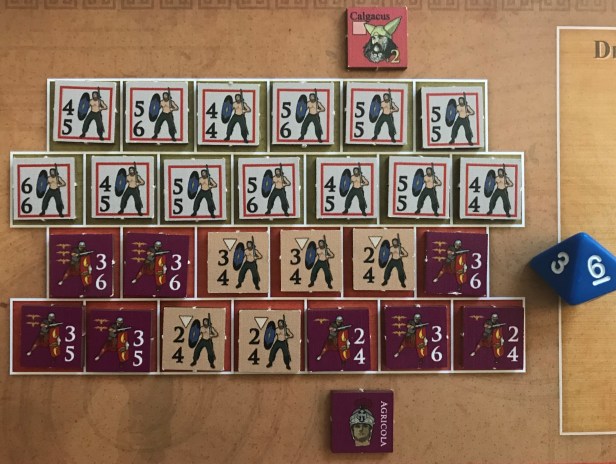
This process repeats itself, with the player drawing out one Tribal Battle Unit at a time, and placing them in the next highest numbered space on the Battle Board. Notice one thing though in the top row. When the 8th Tribal Battle Unit is drawn, it is placed on the top row at the far left but then the 9th Tribal Battle Unit is placed on the far right edge of the top row. This then alternates back and forth with the 10th, 11th, 12th and 13th unit. After completing this process, we have the following setup for the 10 Tribal Battle Units in our example of Battle.
Now that we know how the Tribal Battle Units are deployed, lets look at how the Roman player places their Legions on the Battle Board.
Legion Deployment
The first step is to determine which Legions in a stack are participating in the Battle. If the Battle was triggered by a Battle Action, only the Legions that took that Battle Action may participate. This might mean that not all of your Legions can participate, only those that you actually used an Action to activate. If it was triggered by an Ambush, only one of the Legions in the Ambushed Box may participate and the player can freely choose which Legion to use.
Once the choice is made, the player will place Legion Battle Units and Auxiliary Units from the participating Legion’s Holding Box into the non-numbered spaces of the Tactical Display. The player doesn’t have to deploy all of their eligible Battle and Auxiliary Units, but any Units not deployed may not participate in the Battle, and may not ultimately be eligible for promotion at the end of the Battle. The player also cannot deploy any Units in the “back” row until all spaces adjacent to enemies (or that will be adjacent to enemies should you deploy first) are filled.
This part of the Battle process is very important for the player and you should take great care in deciding how to distribute your Units. Remember that when you reach the Defense Round that you must surpass the total of all Units that you are adjacent to in the Battle formation. This is usually 2 Units but could be just one if you had the Initiative and were able to successfully attack and destroy one of the Tribal Units. There is no harm in holding back some Units if you don’t need them and are afraid of losing them. I will be honest that I do sometimes hold back my more powerful Tribal allies as I don’t want to lose them for no reason and usually the Legions can stand up to attacks. I do however typically push my Auxiliaries into the front to attack the strongest parts of their line in a hope of destroying them before my Legions can move in and mop up without too much risk.
Here is the final layout of my Legions and Auxiliary Units.
Let’s now move to the Attack Round where you will see the danger in taking the fight to the Tribal Units and also understand clearly how important Initiative and Tactical Advantage is for the Romans.
Attack Round
During an Attack Round, the player must make one Attack with each of their Units, including both Legions and Auxiliary, that occupies a square that borders and is adjacent to a square on the Battle Board containing an Enemy Battle Unit. This is done moving from left to right in strict order. If there are two Enemy Battle Units adjacent, you must attack the Enemy Battle Unit with the higher Defense Factor, unless Agricola is present in the Tribal Box in which the Battle takes place. This is called Tactical Advantage, and allows the player to choose which of the two adjacent Enemy Battle Units will be the target of the Attack. I cannot stress how important this is as you if you can choose your target you can more easily eliminate a unit and increase your chances of successfully defending against their attack in the Defense Round. If you have the choice, pick the lesser Defense Factor so you can almost guarantee a kill (remember you will still have to roll and dice can decidedly unkind).
To make the Attack, the player will roll the 8-sided die and add the attacking Unit’s Attack Factor. If the final modified die roll exceeds the enemy’s Defense Factor, it is eliminated. If it is equal to or less than the enemy’s Defense Factor, there is no effect. Once one Attack has been made by all eligible Units, the Attack Round ends, and a Defense Round begins.
Let’s take a look at this first round of Attack and see how the Battle goes for the Romans. Remember, that in this example of Battle the Romans have Initiative due to Agricola being with the Legions who are attacking the Brigantes and therefore have Tactical Advantage and will get to Attack first taking out Tribal Battle Units that would be attackers.
First, we will focus on the two Auxiliary Units holding down the Roman left flank as they will try to Attack the 5-6 Tribal Battle Unit located in between the two of them. They are doing this because if they can kill that Unit it improves their chances of surviving during the Defense Round. The 3-4 Auxiliary Unit rolls and the die results in a 4 when added to its Attack Factor of 3 totals 7 and exceeds the Tribal Battle units Defense Factor. The Tribal Battle Unit in the 2 space will be removed and the 2-4 Auxiliary Unit will now decide to attack the 6-6 Tribal Battle Unit to its right. The Unit rolls and gets luck as it rolls a 5 when added to its Attack Factor of 2 totals 7 and is greater than the Tribal Battle Unit’s Defense Factor so it is killed.
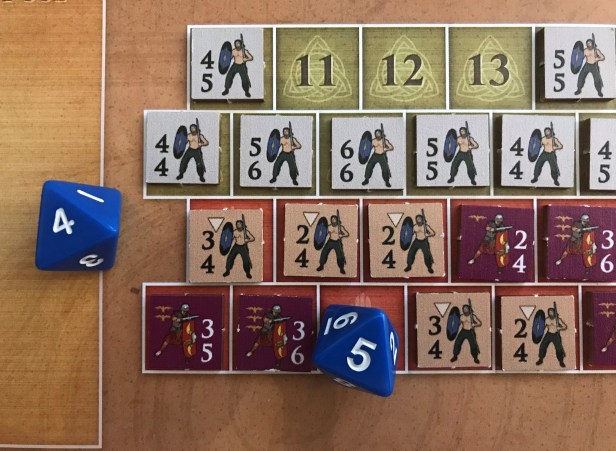
Both Units in the 2 and 3 space will be removed and do not get an opportunity to attack back. Here is what the line now looks like.

We continue down the line from left to right and next have the 2-4 Auxiliary Unit attack the 5-5 Tribal Battle Unit. With an Attack Factor of only 2, the Unit must roll a 4 or higher in order to overcome the target’s Defense Factor of 5. The die is rolled and is a 1 which means when added to it’s Attack Factor of 2 totals 3 and misses.

The 1-aquila Legion now has a choice. Does it attack the same Unit hoping to eliminate it thereby eliminating an attack on the Auxiliary Unit during the Defense Round or does it attack the easier 4-4 Tribal Battle Unit hoping to help out its comrade Legion to its right? Tough choice but it will go for the 5-5 Tribal Battle Unit and defeats it easily with a roll of an 8 when added to its Attack Factor of 2 totals 10 and destroys the target.
The 5-5 Unit in the 4 space will be removed and does not get an opportunity to attack back. Here is what the line now looks like.

We continue down the line from left to right and next have the 2 Legions on the end of the line having a much easier time of it then the Auxiliary Units as their three likely targets are all 4-4 or 4-5 Units and don’t offer as much resistance as the already killed 5-5 and 6-6 Tribal Battle Units. The 3-aquila Legion decides to attack the middle 4-5 Tribal Battle Unit to its right and needs to roll a 3 or higher on the die. It rolls and whiffs with a 2. Hhmmmm, not what they were hoping for. Now we move to the final Legion and it decides to target the 4-5 Tribal Battle Unit on the right flank so that it can minimize the attack against it during the Defense Round. It needs to roll a 3 or higher and rolls a 6 when added to its Attack Factor of 3 totals 9 defeating and removing the Tribal Battle Unit.
After the first Attack Round, the Legions have done well thanks to the Initiative and holding Tactical Advantage as they were able to choose their targets and eliminate some very tough units with lucky rolls. Here is what the line looks like after this first Attack Round.

Let’s put our Battle example on hold as we talk about the Defense Round and its mechanics.
Defense Round
During the Defense Round, the player must Defend against one Attack for each Unit that is adjacent to an Enemy Battle Unit. This is done similarly to the Attack Round moving from right to left in strict order. To Defend, roll the die and add the defending Unit’s Defense Factor. Compare the final, modified die roll with the Attack Factor of all Enemy Battle Units adjacent to that defending Unit. If the die roll exceeds the total Attack Factors of the Enemy Battle Units, the attacked Unit survives. If the roll is less than or equal to the total Attack Factor, the Unit is instead eliminated and will be added to the Dead Pool. What this means is that each Enemy Battle Unit will get to attack twice in the same Defense Round. The concept of a crowded line means that your attacks have a chance of striking each opponent that a single Unit is engaged with.
Once each eligible Unit has Defended against the enemy Attacks for the round, the player must now make adjustments to the frontline where Units fell in combat. There is a simple process to this which includes the following:
• There are any of your Units involved in the Battle who are not themselves adjacent to any Enemy Battle Units; these Units are considered to Unengaged Units.
• There are any empty, non-numbered squares that are adjacent to Enemy Battle Units; these are Holes In The Line and must be filled immediately. This is accomplished by moving one of the Unengaged Units into one of the Holes In The Line. The player will continue to do this until there are either no Unengaged Units or no Holes In The Line.
The player will then determine if:
• There are any Enemy Units involved in the Battle who are not themselves adjacent to any of the player’s Units; these Units are Unengaged Enemy Units.
• There are any empty, numbered squares that are adjacent to the player Units; these are Holes In The Enemy Line.
Then beginning with the Unengaged Enemy Unit with the highest Defense Factor, move that Unengaged Enemy Unit into the lowest-numbered Hole In The Enemy Line. Then, move on to the remaining Unengaged Enemy Unit with the highest Defense Factor, and the current lowest-numbered Hole In The Enemy Line, repeating the process until there are no Unengaged Enemy Units or no Holes In The Enemy Line. If two of the Unengaged Enemy Units have the same Defense Factor, move the one with the highest Attack Factor first. If the situation is still tied, the player will choose one to move.
Keeping and holding the line is a key element to any Ancients battle. When Units were shoulder to shoulder their tactics worked better than where there was no one to their left or right. This is one of the reasons that the Romans were so successful was their phalanx training and use of reserves behind the frontline to assault over the heads of the troops engaged with the enemy. If these Units are separated or there are a large gaps in their lines they would simply disintegrate, either because the Units disengaged and treated or were overwhelmed from the flank. In the game, this is represented well with some simple isolation rules.
The final step is to check if any Enemy Battle Unit fulfills the following Automatic Elimination Criteria:
• It is adjacent to one or two of your Units, and it is the only Enemy Battle Unit adjacent to those specific Units.
• Its Attack Factor is less than or equal to each of those Units’ individual Defense Factors.
If there are any Enemy Battle Units that fulfill both of these criteria, they are considered Isolated and will be eliminated. Once these line adjustments have been made, the Defense Round will end and the next Attack Round will begin.

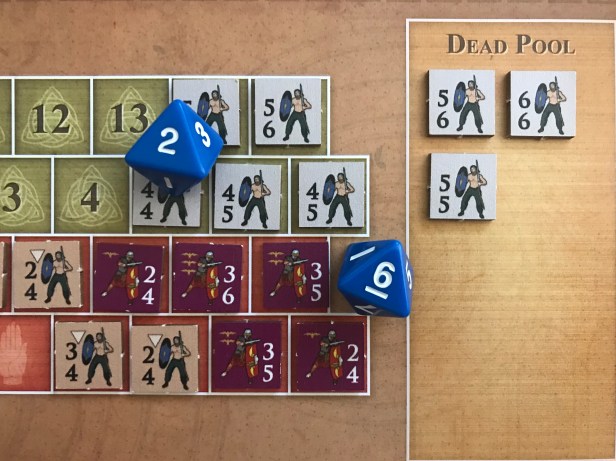
Let’s take what we learned about the Defense Round and continue our example of Battle. Remember that the player must Defend against one Attack for each Unit that is adjacent to an Enemy Battle Unit. This is done similarly to the Attack Round moving from right to left in strict order. Let’s first take a look at the left flank and the pitiful (soon to be Isolated) Tribal Battle Unit. The Roman player now rolls a die and adds their Defense Value to the roll. If this roll exceeds the Attack Factor of the attacking Tribal Battle Unit, the attack has been defended and you move on to the next Unit in the line. As you might notice, the attack cannot be successful in this instance because the Tribal Battle Unit does not have an Attack Factor that is higher than the Auxiliary Unit. Any roll by the Auxiliary Unit will mean success as they will exceed the Attack Factor of the attacking Unit. A 2 is rolled on the die and when added to the Defense Factor of the Auxiliary Unit totals 6 which means a successful defense. Let’s move to the next Unit in line.

The next Tribal Battle Unit has the same values as the previous attack we discussed so we see that the 1-aquila unit doesn’t have to roll and successfully defends the attack. Now to the toughest of the battle as we will combine the Attack Factors of the two Tribal Battle Units adjacent to the 3-aquila Legion. Because there are 2 Battle Units adjacent we will combine the Attack Factors of both Units as the target for the Roman Legion to overcome to defend the attack. This should be pretty easy as the 3-aquila Legion has a Defense Factor of 6 and only needs to overcome a combined Attack Factor of 8 from the 4-4 and 4-5 Tribal Units.
The Legion rolls the die and disaster! A 2 when added to the Legion’s Defense Value of 6, which is the best a Legion can obtain, only equals the Attack Factor and results in the Legion being killed. As you can see, those Tribal Battle Units are not necessarily powerful individually but when combined can mean defeat. That is why it is key to try to take out every other Unit so they cannot gang up on your Units.

The 3-aquila Legion is removed to the Dead Pool and now the Tribal Battle Units have company and can claim at least some form of victory that will lead to further uprisings and unrest as well will see as we look at the Housekeeping Phase in our next entry in this series.

The final 2-aquila Legion doesn’t have to take an attack as their Defense Factor of 5 is higher than the adjacent Tribal Battle Unit who has an Attack Factor of only 4. This ends the Defense Round and we will now move the Units around to fill Holes in the Line. Here is the line as we end the first Attack and Defense Round.

We now can see that we have Holes in the Enemy Lines as well as a Hole in the Line for the Romans that must be filled. We do this first for the Tribal Battle Units by choosing the Unit with the highest Defense Factor which is the 5-6 Tribal Battle Unit. We move this Unit into the lowest numbered open space which is the 2 space.
We repeat this process filling the Holes in the Enemy Line until all Units have been moved up from the back row. When the Units have the same Defense Factor the one with the highest Attack Factor is moved first. In our example, the 5-5 Tribal Battle Unit will be moved adjacent to the 5-6 Unit then followed by the final 4-5 Tribal Battle Unit. The line is now repaired and we are ready to fill the lone hole in the Roman line.

The Romans also have a hole and it must be filled. The player can fill this hole however they choose and decides to bring in the big guns and move the other 3-aquila Legion into the hole.

The lines are now repaired and the Battle will now move back to the Attack Round where the Romans will get to attack the Tribal Battle Units as they retain Initiative due to the presence of Agricola and will use Tactical Advantage to choose their targets carefully to ensure that they do not lose any more Legions. Let’s now take a look at the End of Battle Phase to see how the player promotes and reorganizes their Legions.
End of Battle
The sequence of alternating Attack Rounds and Defense Rounds continues until the Battle ends, meaning that all of the Roman player’s involved Units have been eliminated or all of the Enemy Battle Units have been eliminated. If the Romans lose all of their Units in a Battle, this is considered a Military Disaster and will end the game in your defeat.
We are not going to play out the remaining rounds of Battle other than to say that the Romans won the battle but lost 2 Auxiliary Units in addition to one more Legion to some poor dice rolling. The final Dead Pool was full and looks like this.

Promotion and Reorganization
If the Battle ended in Victory, for the Roman player you now perform the following post-Battle steps in the order given:
1. Promotion and Reorganization: Each full Legion Map Unit whose component Battle Units participated in the Battle may Promote one Legion Battle Unit, providing
that the chosen Legion Battle Unit participated in at least one Attack Round or Defense Round (made a die roll). 1-aquila Units may be promoted into 2-aquila Units, and 2-aquila Units into 3-aquila Units. Simply exchange or flip the piece as needed. You will notice though that each of the different types are limited by the number of pieces available. There are seven 1-aquila Legion Units and seven combined 2- and 3-aquila Legion Units. Once all Promotions have been made, the player may Reorganize the surviving Legion Battle and Auxiliary Units for all Legions that participated, as if you were resolving Agricola’s Reorganize Legion Action.
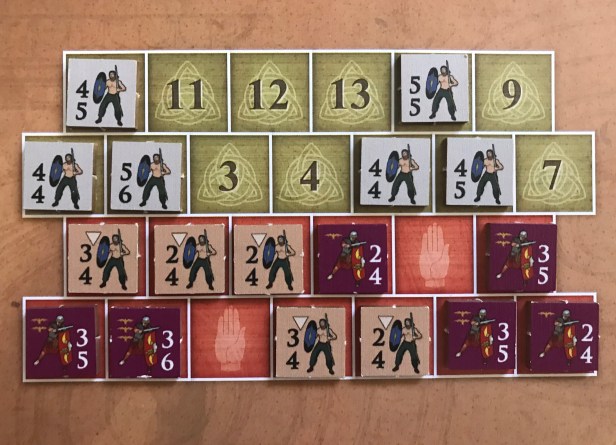
In this instance, the player decides to promote the 1-aquila Legion Unit from the Augusta Legion and the 2-aquila Legion Unit from the Hispania Legion. Here is a look at the final reorganization after promotions.
The player then goes through several administrative steps, some of which we have covered in our post about the Actions, including Cup Adjustments, Resolve the Dead Pool, Eliminate Tribal Units and Resolve Hostile Tribe Reactions.
The only one I want to mention here is the Cup Adjustments. Battle is a tricky thing. You can dominate the Tribes if you get some good rolls and remove their Tribal Units from the Mapsheet in order to quell that resistance and make your way towards your goal of clearing out Regions to score Victory Points. But remember that each action has an opposite and equal reaction in this game as it will effect the way the people feel about your presence in their country and their appetite for rebellion and possibly open war.
During the Cup Adjustments, for each Legion Unit that was killed in Battle you will move 1 Tribal Unit from the Unfriendly Cup to the Hostile Cup. The shedding of blood has incited them and the death of a Legion has given them new courage and hope that they can defeat you and regain control of their own country. You also will move 1 Tribal Unit from the Friendly Cup to the Unfriendly Cup for each Legion Map Unit that participated in the Battle. In our example, we had two Legion Map Units involved in the II Augusta Legion and IX Hispania Legion. This will cause two Friendly Tribal Units to change their stance and believe that you are a menace and will have them relocate to the Unfriendly Cup. This means you have less Auxiliary Units to recruit and will ultimately begin to see pop up brush fires in Regions that you have previously pacified.
Battle is a very important part of your strategy in Britain but must be used judiciously and you must take great care to plan out your lines so that you can minimize the damage you take as your Legions are your most important tool to use against the rebellion and coming Battle of Mon Graupius with Calgacus. These Legions take time to rebuild and require you to spend Victory Points to get new recruits in the form of 1-aquila Legions. Be cautious with them but don’t be afraid of Battle as you can win often but will take losses now and again.
In Action Point 5, we will take a look at a few functions that make up the Housekeeping Phase including Raids on Settlements and Forts, Tribal De-escalation, Romanization, Levy new Auxiliaries, Build Public Works and finally score Victory Points.
-Grant

Thank you very much for this article on that fantastic small jewel (I like it very much too!) One thing which I would like to comment and draw everybody’s attention to is like how battles without Roman initiative are fought (especially dreaded Mons Graupius). It starts with Defensive round (yeah, barbarians can do some significant damage than) BUT it is followed by redeployment first, before Romans will Attack. That allows legions to attack with full strength / line. I forgot about it in my first two games which caused Mons Graupius to be unbeatable.
LikeLike
Good point. I know that I struggled with that as well during my first play or two. Not having Initiative makes the battles really difficult.
LikeLiked by 1 person