
We highlighted this game in our May Wargame Watch feature because it was a solitaire game on an interesting looking raid on a key Russian harbor during World War I. I have said this many times before in our various pieces on the games from High Flying Dice Games but I really enjoy that they take a look at lesser known battles and make interesting games on those subjects. This game is definitely following along in that pattern.

Grant: What historical event does your new game Seeing Red cover?
Paul: The game portrays the British raid against the Soviet military harbor and port of Kronstadt. It was considered by many at the time to be the most heavily guarded port in the world, and served as the primary base of the Soviet’s Baltic Fleet.
Grant: What does the title Seeing Red mean and what should we learn from it?
Paul: The British and many other western nations, including the USA, viewed the new Soviet state with alarm and much animosity. The Communist government, or “Reds” for the new Soviet Union flag as well as their violent Revolutionary doctrine and rise to power, was then locked in a bitter civil war against the non-Communist forces of Russia (dubbed “Whites”). The British naval forces in the Baltic were actively supporting the Whites, as well as other forces in the region that were fighting the Reds. The Soviet naval forces based in Kronstadt had been enjoying success in driving off the British, as well as supporting their forces in the war to defeat the Whites as well as spread Communism to neighboring countries (notably the break away Baltic states and Poland). The raid was a daring gambit to destroy or neutralize as many Soviet warships based there as possible.
Grant: The game is a solitaire affair and as such is a bit different from most of your other designs. What type of mindset do you have to have when designing a solo game?
Paul: Deciding upon what role the active player will be taking, as well as how the “enemy forces” will be played are key in a solitaire play game. Other important considerations are the play balance. If it is too easy for a player to win then there is no challenge. If it is too hard then the player will feel frustrated. The luck factor cannot be perceived to be greater than in any other game, as the player must feel their decisions are driving the game and will play the key role in determining its outcome. If any of these elements are “off”, the game will likely see little time on the table; something that any game designer wants to avoid at all costs.
Grant: What were your biggest challenges in the design and how did you overcome them?
Paul: Getting good sources to determine exactly what the Soviet defenses were and the ships that were based there at the time of the raid can be a real challenge with a battle in World War I. The design is based upon my Depths of Courage Series of games, as the more I read about the raid the more convinced I became that that design would serve as a good “starting point” in crafting a game about the raid.
Grant: What other solo games have you designed and what have learned through those efforts?
 Paul: As mentioned above, the Depths of Courage Series were the starting point for this title, but modified extensively throughout to cover the unique aspects of this raid (aircraft support, surface combat, spotlights among others). Other solo play games I’ve designed that are totally different are St. George’s Valor: The Raid on Zeebrugge, Breaking the Ice: The 1942 Great Lakes “Winter Fleet”, and A Reign of Missiles: The Gaza Missile Crisis, November 2012. I also developed the solitaire play games by Roberto Chiavini that we published, Gliders From the Sky: The Raid on Eben Email, Christmas in Hell: The Battle of Ortona, as well as the solo play game by Rod Bauer, Profile in Courage: PT-109.
[Editor’s note: We have published interviews on two of the Depths of Courage Series games including The Attack on Gibraltar Harbor, December 1941 and The Attack on Algeciras Harbor, July-December, 1942.]
Grant: What units are available to the player? How do they best use their air and naval units to meet their objectives?
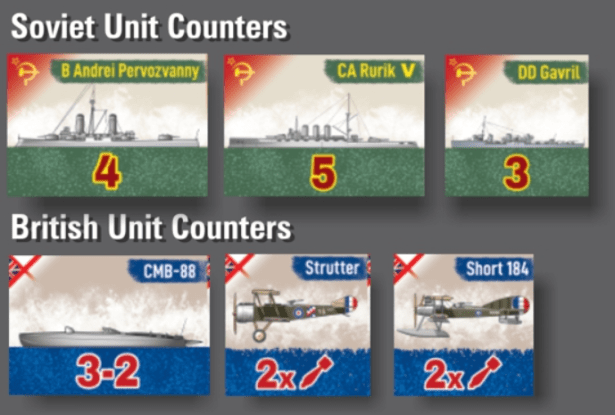
Paul: The British player has 8 motor torpedo boats (MTBs) that are armed with torpedoes and 8 air units (3x Sopwith Strutters, 2x Sopwith 2F.1, and 3x Short 184) that are used to attack the Soviet spotlights and gun crews working the guns of the warships and harbor defense installations.

Grant: What is the anatomy of the different naval and air units?
Paul: The British MTB’s have protection and movement factors. The British air units have factors indicating how many attacks a unit can make (1 or 2).
Grant: What is the Turn Sequence?
Paul: There is a four phase game turn. First there is an Action Step when British units are moved or conduct attacks after drawing a card to determine how many units can do so. Second is a Soviet Reaction Step during which new units may appear (reinforcements showing up or targets are acquired by the British), Harbor Alert and/or Defense levels adjusted and Soviet attacks determined and resolved. Third is the British Attack Resolution Phase and lastly is and End Phase where the turn marker is adjusted, markers removed and the Soviet Spotlighting status is resolved.
Grant: How are the number of actions a player can take determined?
Paul: The player must determine what units to move and when, what targets to attack, and when, whether the MTB’s should engage in evasive maneuvers, if damaged air units should remain in play or attempt to escape, and when/if the raid should be ended and the surviving MTB’s make their escape.
Grant: What different actions can players take during the Action Step?
Paul: There is a full “decision tree” as described above, but limited by the card that is drawn at any given moment. The player will not be able to do everything all of the time, and the odds that the Soviet Alert and Defense Levels will likely go up, not down, making the mission harder to accomplish with each phase and/or turn, will mean the player will feel increasing pressure as the game goes on. Hard decisions have to be made and then lived with with each card draw and die roll.
Grant: What is an Evasive Maneuvers marker? Why is this important?
Paul: The Evasive Maneuvers marker can be applied to an MTB to make it harder for the Soviet guns to hit them. Such a marker can be applied or removed whenever the MTB is activated. The offset is that an MTB marked as performing Evasive Maneuvers cannot attack.
Grant: Can we see an image of the map? Can you take us on a tour of the different areas and tracks?

Paul: The map takes up most of the playing area and depicts the entire harbor. The British raiders enter from the west end of the map (where the Start/Escape area is located). The military base where most of the warships were docked is at Kotlin Island in the middle of the map, and the docks of St. Peterburg where some of the warships could also be docked are at the eastern end. Anchor symbols and DR indicators printed on the map denote where docked/anchored Soviet warships set up or reinforcement patrolling Soviet warships can appear. The SAL (Soviet Alert Level), HDL (Harbor Defense Level), Turn Record Tracks and a holding space for evacuated damaged British air units are printed along the map margins.
Grant: What is the SAL track and what role does it play?
Paul: The Soviet Alert Level (SAL) abstracts the level of alertness of the harbor garrison and warships’ crews to the raid, and their ability to respond. The numbers printed on the track are DR modifiers used when resolving spotting attempts, attacks and adjusting the HDL.
Grant: What is HDL and what does it represent?
Paul: The Harbor Defense Level (HDL) represents the number of guns and personnel actively involved in defending against the British raid.
Grant: What happens during the Soviet Reaction Step?
Paul: The AI rolls a die and checks the SAL to determine if the HDL is adjusted. A card is then drawn to determine what the Soviet Defenses will do. British air units can adversely affect Soviet attacks and spotlighting attempts depending upon where they have been placed and if they are damaged or not.
Grant: How does combat work?
Paul: Die rolls are made to resolve attacks. For Soviet attacks, the SAL and HDL’s are used and if the modified DR result is less than or equal to the HDL a hit is scored against the target MTB. High DR’s (misses) can also cause adverse adjustments to the SAL (effects of the growing chaos and confusion, as well as mounting casualties).
Grant: What happens during the British Attack Step?
Paul: The player declares which of the activated MTB’s will attack targets in an adjacent map area (attacks against a target in the same area are not allowed). Each MTB can attack only once, so the decision to do so, and against what target, can be hard and key to winning or losing.
Grant: What modifiers are there for British torpedo attacks?
Paul: The attack DR is modified by the number of hits (damage) sustained by the MTB, if an air unit is also present (attacking the target), and if the target is anchored or not. The target’s hull protection factor is then subtracted from the modified DR result. If the difference is greater than 0 a number of hits equal to the difference are then applied to the target. Once the number of hits equals the target’s hull protection factor it is considered sunk. DR difference results of less than 0 have no effect (the torpedo attack failed).
Grant: What happens during the End Step?
Paul: The Evasive Maneuver markers are removed, DR checks are made against the HDL to determine if any Spotlight markers remain in play or are removed, and any Air units that made their second attack are removed from the map; if damaged they are placed in the Damaged Air Units holding area or removed to the Escape space if undamaged. Finally the card deck is reshuffled and the game turn marker advanced (the latter only if this wasn’t the last turn of the game).
Grant: What is a Spotlighted marker?
Paul: The harbor’s defenses had many spotlights that were used to help illuminate ships in the harbor and docks, as well as against attacking aircraft. As noted above, this was a very well and extensively guarded military facility.
Grant: What causes the turn to end?
Paul: The second time a Joker card is drawn the game turn ends. If the second Joker card is drawn before there were no numbered or face cards drawn before. The first time a Joker card is drawn that triggers a random event check. Which way cause it to end more often?–Most often (90+% of the time) the turn ends when the second Joker is drawn.
Grant: What ways do players earn Victory Points? What is the VP threshold for a victory?
Paul: The player wins by scoring victory points (VP). VP are scored for each hit on a Soviet warship that was not sunk, and for sinking Soviet warships. VP are lost for each British MTB sunk (no VP lost for any hits on MTB’s) and destroyed British air units. A Decisive Victory is won by scoring 20+ VP, a Major Victory with 10-19 VP, a Minor Victory with 5 through 9 VP. The player loses the game if 4 or less VP are scored.
Grant: What was the historical result of the raid?
Paul: Historically the British lost 1 air unit, sunk the Pamiat Azova and inflicted severe damage on the Petropavlavsk and Andrei Pervozvanny for 17 or 18 VP.
Grant: What variants are available and what do they restores my from history?
Paul: There are some Random Events in the game, and the Soviet Armored Cruisers Aurora and Rurik can also be put into play as variant units. The Aurora fired the shot that signaled the start of the Revolution and was in reserve status and based at Kronstadt. The variant assumes it was anchored in a less secure area of the base when the raid occurred. The Rurik had been a constant thorn in the side for the British, and they badly wanted to take it out of action. However, that warship was in dry dock at the time of the raid and not vulnerable to the MTB’s torpedo attacks. The variant assumes the Rurik’s repairs were either not yet started or had been completed and was anchored with the rest of the fleet when the raid was launched.
Grant: What is challenging about these variants?
Paul: They do add more targets to the mix, and along with it some more challenging decisions for the player to make. These additional warships will be harder to sink, and therefore will likely take more than one attack to do so. Do you feel lucky enough to bring them into play?
Grant: What do you think the design does well?
Paul: I think the game does a good job of telling the story of the event and creating a lot of tension and nail biting moments. The game also forces the player to make a lot of really difficult choices about how to use their assets.

Thanks Paul for this interesting look inside the game. Another very cool simulation of a lesser known corner of history.
If you are interested in Seeing Red: The Raid on Kronstadt Harbor, August 18, 1919 you can order a copy for $11.95 from the High Flying Dice Games website at the following link: http://www.hfdgames.com/red.html
-Grant

That looks an interesting game.
Cheers,
Pete.
LikeLiked by 1 person
Could be an interesting game. The background story though is probably a lot more intricate than here described. You could probably describe it as one of those many occasions when a party has outsmarted itself by uncontrollable strategies.
Lenin and Trotsky were key elements to infuse enough power into a revolution. If they as communists were viewed as dangerous as thereafter described, it makes no sense why the British would allow and make it possible for Lenin to travel to Russia. It does make even less sense that USA practically simultaneously did the same thing with Trotsky. And then there’s the odd refusal from the British side to save the Tsar family, even though they were related. Probably they expected these ideologists to only weaken Tsar Russia’s war capabilities and it for sure did, but I doubt they expected to have given life to a far more dangerous and unpredictable opponent.
I know I’ve mentioned these circumstances before concerning some other game covering the Russian revolution. In this context this particular war adventure could maybe become more understandable.
LikeLiked by 1 person