
Nevsky is a wargame about the age old struggle between Latin Teutonic and Orthodox Russian powers along the Baltic frontier of the mid-thirteenth century. The game is the first entry in a new series called the Levy & Campaign Series which focuses on pre-industrial age conflicts and, as you can see from the name of the series, requires players to focus on some of the logistics aspects of warfare including providing for the payment and feeding of your vassals and their troops as well as planning out the length of service of your hirelings. This game is a very new experience for me as we had to think differently about how to go about prosecuting a war in a foreign land where you are far from your supply sources and have only a limited time to accomplish your goals before your time is up.
In Action Point 1, we covered the Service Calendar and Levy Phase as well as some of the actions that players can undertake. In Action Point 2, we examined the Command Deck and how this simple mechanic sets the tone for the game. In Action Point 3, we looked at the Arts of War cards that contain both Events and Capabilities and bring some very important special abilities to your forces. In this Action Point, which is the conclusion to the series, we finally examine parts of the Campaign Phase taking a look at various units, and take a look at an example of a Battle.
Military Units
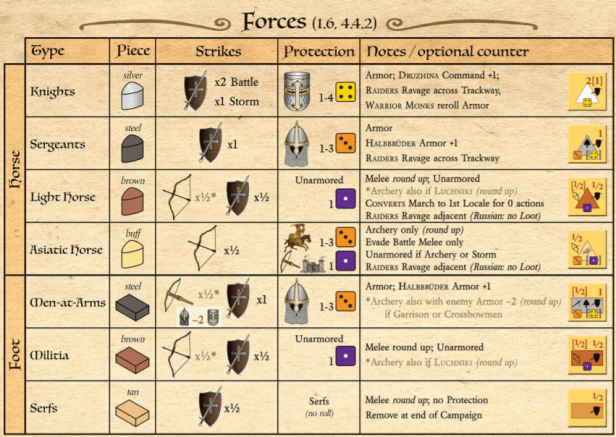
Following after Volko’s other recent designs the game represents military units with different colored and shaped wooden pieces. There are only two types of units represented by shapes including wedges for Horse units and bars for Foot units. Fear not though for those of you who hate wood, the game has an optional set of counters you can use in place of the wooden bits. Furthermore, Armored units have metallic colors and Unarmored units are non-metallic. The rules state that a single Horse unit represents roughly 50-100 mounted men while a Foot unit about 100-200 infantry.
There are three different types of Armored units as follows:
Knights – Your best attacking and defending units as Knights do 2 Hits in Battles and 1 Hit in a Storm. But they also have armor and can absorb Hits. In Battles, each successful Hit causes a Protection die roll and Routs that unit if it fails the roll. Armored units have Armor Protection and if assigned a Hit rolls a die. An Armored unit such as a Knight may absorb several Hits in succession, shielding its fellow units, as long as it succeeds on each Protection roll. A roll within the Armor range specified on the Forces table that Hit has no effect. Your Knight units can absorb Hit after Hit as long as they make the roll of 1-4 on a 6-sided die (a 66% success rate). Knights can push their luck and technically absorb a lot of hits but if they are hit they are Routed and will be removed from the field of battle. Knights are represented by silver triangle like wooden cubes called wedges.

If the Warrior Monks Capability card is in play, the Lord’s Knights will become ever more powerful as they gain the ability to reroll any one Knight’s Armor during each Archery and Melee step. That means that you can take even more risk with your best units and try to absorb even more Hits that you normally would as if you miss, no sweat, you simply reroll that one miss and then can be more careful with the rest of your Armor rolls. The fact that it works during both the Archery and Melee step is simply amazing. This card caused several groans in our plays.
Sergeants – Sergeants do 1 Hit in Battles and also have Armor Protection of 1-3 on a 6-sided die. These units are not as good as the Knight but still serve a very important front line presence in your army. Sergeants are represented by steel triangle like wooden cubes called wedges.

If the Halbruder Capability card is in play, that Lord’s Sergeants and Men-at-Arms will gain +1 Armor. This means that a Sergeant will now absorb a Hit on a roll of 1-4 (as compared to 1-3 as stated above) and a Man-at-Arms will absorb a Hit on a roll of 1-4. This extra armor value is simply amazing and will be very useful when you are Storming a castle and have to take all those Archery Hits.
Men-at-Arms – Men-at-Arms do 1 Hit in Battles and also have Armor Protection of 1-3 on a 6-sided die. They also have some special abilities if the right Capability Card has been played.

If the Balistarii Capability is in play, the Lord’s Men-at-Arms will have Archery added to their toolbox and will do so at a -2 to their target’s Armor Protection. These crossbowmen will do 1/2 Hit during the Archery Phase of Battle and will then be able to join in Melee doing 1 Hit as well. This versatility is very important and makes your forces that much more effective and able to deal out damage. Men-at-Arms are represented by black rectangle like wooden pieces called bars.
Now that we have covered the Armored units, let’s take a look at the Unarmored units.
Light Horse – Light Horse are a solid part of your army but cannot stand up to Hits like your Armored Units can. They do however have the Evade ability. Units that have Evade Protection can roll and absorb Hits just as if Armored, except that Evade is not used against Archery Hits nor Hits in Storm. This roll will only absorb a Hit on a 1 so it won’t be something that you can rely on. Light Horse do 1/2 Hits in Battle. Light Horse are represented by tan triangle like wooden cubes called wedges.

If the Raiders Capability is in play, that Lord’s Light Horse and Asiatic Horse may Ravage adjacent Locales where there are no enemy Lords but will not be able to take Loot. This makes for a very fast moving and nimble raiding force that can rack up Victory Points even if they have no Battle options available.
Asiatic Horse – Your best Light Horse units are the Asiatic Horse which only come about as a reaction to a card play. Asiatic Horse do only 1/2 Hits in the Archery Phase only but can get out of Hits in Battle. The Asiatic Horse have the Evade ability which can be very useful in keeping them fighting. Units with Evade Protection roll and absorb Hits just as if Armored, except that Evade is not used against Archery Hits nor Hits in Storm. The Asiatic Horse have an Evade value of 1-3 on a 6-sided die and can be very hard to kill. Asiatic Horse are represented by yellow triangle like wooden cubes called wedges.
Militia – Militia are lightly armed units that simply provide fodder for your armies. They are cheap and expendable but really don’t bring anything special to the battle field. They do 1/2 Hits during Battle but round up those Hits and they can Evade on a roll of 1. Militia are represented by brown rectangle like wooden cubes called bars.

If the Luchniki Capability card is in play, that Lord’s Militia and Light Horse will have Archery. This ability will make them more valuable and provide an attack during both of the phases of a Battle.
Serfs – Serfs are simply fodder for your battles and will only do 1/2 Hits per unit, although they do round up those results in Melee. They will also leave at the end of a Campaign as they must return to their farms to bring in their crops and keep your more professional soldiers fed and in the field. Militia are represented by tan rectangle like wooden cubes called bars.

Now that we have covered the different types of units available from which to build you army, let’s take a look into the Battle procedure.
Battle
A Battle comes about when one side Marches into a Locale with at least one Unbesieged
enemy Lord and the enemy does not Avoid Battle or Withdraw. All Lords located in the Locale that are not currently under Siege have to participate in the Battle. The Battle is typically referred to as a Field Battle when it is not a Siege or Storm. That means that the combat is happening without the benefit of fortifications. Players will place a Battle Marker in the Locale where the Battle is taking place. Next, there are two options for how the battle plays out; using the Battle Board or simply using the Lord Mats and move them around to represent their relative positioning on the battle field.

The Attackers will now go about positioning their Lords, followed by the Defenders. A side may have a Lord each in up to three possible Front positions including the Left, Center and Right. If they have more than three Lords, the remaining Lords will start in the Reserves which is located at the bottom of the Battle Board.
The Active Lord must start at Front center and then the player will fill in the rest of the Attackers in Front Left and/or Right positions with one other Lord present in each position, if any, and put any remaining Lords in Reserve. Then the Defender must put one Lord directly opposite each Front Attacking Lord, first in the Center, then Left and/or Right. Any remaining Lords for the Defender then go in the Reserve as well.

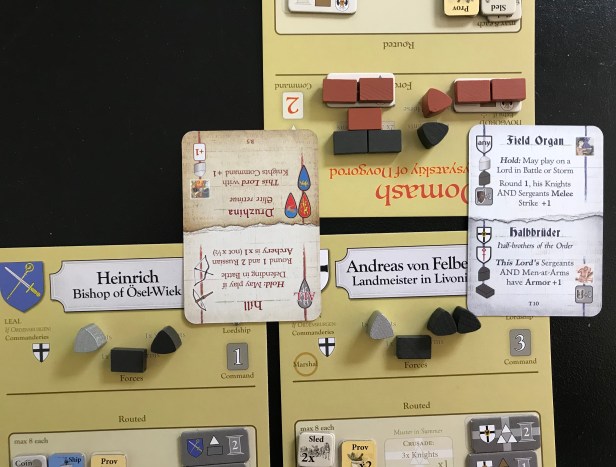
The other option already mentioned is to use the Lord Mats rather than the Battle Board and simply push them together following the same principles for the Battle Board. In the picture below, you can see that Andrea von Felben is the Lead Attacker and is therefore at the Front Center position across from the Defending Domash. Located in the Front Left is Heinrich. Arrayed on each of the Lord Mats are their forces. You will also notice that Domash has played a Capability at the bottom of his Lord Mat. This is the Luchniki Capability which gives Domash’s Militia and Light Horse Archery.

At this point, each Attacking then Defending side may play Held Events that they have in their hands. These Events give advantages such as an increase to Melee Strike or improved Archery. Once each side plays the Events, they then go off as directed. Once Arrayed, a Battle continues Round after Round, until a side Concedes or all its Lords Rout from the field. The steps for the Rounds of Battle are really pretty simple and I really like the way Hits are generated and distributed. Players initially can decide to Concede. At the start of each Battle Round, the Attacker then the Defender may declare that the Battle will end after this Round with that side as the loser but with diminished losses.
The Forces of Lords in Front Strike the Forces of the Lord directly opposite them or if Flanking those of the closest Front enemy Lord. Flanking is simply whenever a Lord at the Front has no enemy Lord directly opposite, they Strike the closest Front enemy Lord, either located on the Left or Right. The player will then total all Hits from Flanking Lords plus the directly opposed Lord, then round that number up.
There is an initiative about the Strike Phase though as Lords Strike step by step in the following order. Attackers take Hits from Defending Archery before Attacking Archers Strike.
1. Archery steps
a. Defending Archery
b. Attacking Archery
2. Melee steps
a. Defending Horse
b. Attacking Horse
c. Defending Foot
d. Attacking Foot
As you can see, Archery goes off first and the Defender gets to attack before the Attacker. Each unit simply causes ½, 1, or 2 Hits, depending on Forces and Strike type as discussed above. The player will simply total all Hits for that step, including Flanking plus directly opposing Lords, rounding up. The really interesting part of Battles though is that you do not have to roll to generate Hits. No dice are needed as units will simply generate automatically based on the Forces Striking plus any specific conditions from played Capability Cards or from played Event Cards. Dice are however used when the players attempt to use their Armor Protection to absorb Hits or Evade Hits. I frankly have never played a game like that where their is no offensive attacking roll but there is a defensive roll. At first I thought, what the heck, but it makes perfect sense. A unit of the time simply can be judged based on its armor and weapon type. Knights for example are attacking from a horse and therefore will cause more damage to a unit defending. Therefore, they are assigned an attack value of 2 Hits in Battle. The reason you roll dice is because of the uncertainty of armor and whether or not the blow or attack can be defended against. The armor for each type of unit is very different and their Armor Protection ratings are very different. Knights are the best and have success on absorbing a Hit on a roll of 1-4 on a 6-sided die (or 1-5 if a Capability card is played on that Lord). Compare this to the Armor Protection of a lesser unit, such as a Men-at-Arms, who only has a 1-3 chance of absorbing a Hit.
Once Hits are assigned and Armor Protection is done, roll a die for each Routed unit. For units of Lords who Retreated without having Conceded the Field remove all Routed units that fail to roll a 1. For all other Lords, compare each unit’s roll to its inherent Armor, Evasion, or Unarmored Protection. Use the Protection roll range shown on the Forces table for that type, unmodified by Events, Capabilities, or Battle/Storm situation. Asiatic Horse always use its Evade range. After all hits have been rolled to absorb, those units that failed those rolls are considered Routed and will be moved to the bottom of the Lord’s Mat. Remove Routed units that fail their roll to the pool.
That is pretty much it. This continues until one side is defeated as mentioned above. Let’s take a look at an example round of Battle.
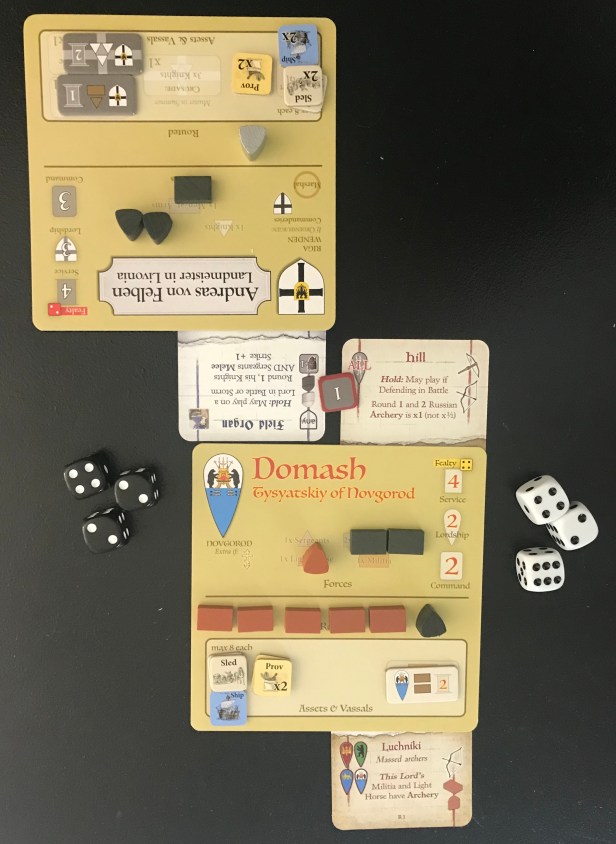
We will start this example from the Held Events stage, with the Teutons playing Field Organ and the Rus playing Hill.
Field Organ has the following effect:
This Lord’s Knights (silver colored wedges) and Sergeants (steel colored wedges) will Melee Strike at +1 during Round 1. Normally, a Knight Strikes at 2 and a Sergeant Strikes at a 1 but now will strike at 3 and 2 respectively.

On the Rus side of the coin, the Hill event has the following effect:
If defending in Round 1 or Round 2 of a Battle, Archery will have x1 rather than x1/2 per unit. This card can be devastating and might be one of the reasons that Domash decided not to leave the battle and Concede.
After Events are played, we will move to the Archery step and the Defender will shoot first followed by the Attacker. The key to this step is that the Defender hits will go off first and effect the Defenders units before they shoot.

Referring back to the Forces chart discussed above, Domash’s forces get to shoot and each of this Lord’s Militia and Light Horse units will Strike with 1/2 Hits, rounding the total up after the calculation. Normally, with a total of 5 Militia and 1 Light Horse unit, this Archery Strike would include a total of 3 Hits (6 x 1/2 = 3 Hits). But in this case, Domash has played the aforementioned Hill Event which now turns those Hits to x 1 which will result in a total of 6 Hits (1 x 6 = 6 Hits).
The targeted side now gets to to choose which of their units will take the Hits, then roll Protection for the units taking the Hits and then Routing those Hit units that fail their roll. Because the targeted Lords controlled by the Rus have a Lord that is Flanking Domash in Heinrich, some of these Hits can be assigned to the Flanking Lord. The Teutons choose to put those Hits onto the units on Heinrich’s Lord Mat. Heinrich has three total units, including a Knight with Armor Protection of 1-4, a Sergeant with Armor Protection of 1-4 and a Men-at-Arms with an Armor Protection of 1-3. The Teuton player begins to roll for Protection with their best defensive unit the Knight and the first two rolls are a 2 and a 3, which fall within the Armor Protection range of the Knight unit. But the third roll is a 5 and will Rout the Knight. There are still three Hits left to defend so the Teuton player decides to roll for the Men-at-Arms unit. The first two rolls are a 1 and a 3, which are within the Armor Protection range of the Men-at-Arms unit, but the final roll is a 6 which will Rout the unit.

The player then moves both of the Routed units below the line meaning that they are out of the remainder of the Battle. Luckily for Heinrich, there still is a Sergeant unit left on their Mat and this means that this Lord will stay in the fight. If ever all units on the Lord Mat are Routed, the Lord is considered Routed as well.

We next move to the Attacker’s Archery but the Teutons don’t have any units that can Strike during the Archery step. Next up is the Melee by Defending Horse units. Domash has 1 Light Horse and 1 Sergeant and Strikes for a total of 1 1/2 Hits, rounded up to 2 Hits. The Teutonic player decides to take the Hits first on the one remaining Sergeant on Heinrich’s Lord Mat. This decision is in order to hold onto as many of the Andreas’s Knights and Sergeants to take full advantage of the Held Event card Field Organ. Unfortunately, the Sergeant rolls a 4 and will Rout as their Armor Protection value was only a 3. This means that now Heinrich is Routed as well and removed from the Battle.

Even though Heinrich is Routed, there still is the 1 Hit remaining that must be dealt with. Preserving their opportunity to attack with Horse units, Andreas will attempt to absorb the Hit with their Men-at-Arms unit that has an Armor Protection of 1-3. The die is rolled and a 1 is the result which means the Men-at-Arms deftly dodged the attack.
Finally, the Teutons get to Strike back as Attacking Horse units now get to Strike. Andreas has a total of three Horse units, including a Knight and 2 Sergeants. Referring back to the Forces chart discussed above, we see that normally Knights do 2 Hits while Sergeants do 1 Hit. But with the text of the Held Event Field Organ being effective during Round 1, each of the Knights and Sergeants will Strike at +1, which means the Knight will inflict 3 Hits while the Sergeants will inflict 2 Hits each for a total of 7 Hits.

Domash now decides to push the Militia out front to absorb the blows rather than risking his Sergeant and Men-at-Arms who will be better in attacking when then are granted a chance to Strike. Militia are Unarmored and will withstand a Hit with a roll of a 1 on a d6. The Russian player rolls 5d6 to see if any of the 7 Hits are absorbed by the Militia. The results are 6, 1, 2, 2, 4 and only one Militia is able to take another hit. Another d6 is rolled to attempt to absorb the 6th hit but a 4 is rolled resulted in the firm Militia being Routed. With the final Hit, Domash puts it on the Sergeant and rolls a 5 meaning it failed to absorb the blow (needed a 1-3) and is also Routed.

That was a pretty powerful attack and has weakened Domash significantly as only 1 Light Horse and 2 Men-at-Arms are remaining. The Men-at-Arms will get to Strike next as we move into the Foot Melee Strike step and as always Defenders get to Strike first.

Domash’s Men-at-Arms Strike for a total of 2 Hits (x 1 Hits per unit = 2 Hits) and Andreas’s Knight is pushed ahead to try to absorb the Hits. The Knight must roll an Armored Protection and get a 1-4. The dice are rolled and the first Hit is absorbed with a 4 but the 2nd Hit strikes true as the Knight is Routed with a roll of 5.

Then the Strike moves to Andreas’s lone Men-at-Arms who inflict 1 Hit but Domash’s Men-at-Arms absorbs the Hit with an Armored Protection roll of 2 versus their 1-3 value.

The Battle is not yet over though and only Round 1 has been completed. As each side has Unrouted Lords remaining on the field, the Battle will continue into Round 2. The 2nd Round will start back at the top of the Initiative with the Concede the Field decision. If one Lord Concedes, pursuit will happen where only a few losses will be experienced by the Lord that leaves the field. This is a decision that is best made when you have very little hope of winning in order to save units to fight another time.
Nevsky is not a difficult game to learn, as all of the stages and processes have the steps involved clearly laid out to make following them very easy. The game is very cool and has some very interesting aspects such as the diceless combat for Attacks but rolls for Defense. The units are also very interesting and provide the player with a lot of choices about how to best use their available forces. You can risk your best units the Knights in trying to absorb Hits but you need to understand they do 2 Hits in Battle and if lost you might not be able to mount enough Hits to end the Battle in your favor. You can also hold onto Event cards to use when you are outnumbered to give you the advantage in Battles. These cards can easily give you a victory if used appropriately and with proper planning and tactical decisions about which units to lose to preserve remaining attack opportunities.
I actually included Nevsky on my Top 10 Wargames of 2019! checking in at #5. I feel had we had a few more plays to get more comfortable with the system you would have seen this game a bit higher on the list. But it is an amazing production and the planning aspect is so key, along with supply, that it will change your mind about logistics. I very much look forward to the next volume in the Levy & Campaign Series called Almoravid: Reconquista and Repost in Spain, 1085-1086 now on the P500.
-Grant
