The War of the Worlds is a solitaire board game that puts the player in command of the Human forces in an attempt to mount a defense against the invading Martian Tripods from the famous book by H. G. Wells. There are four versions of the game including England, France, Japan and United States East Coast that all use the same system but offers different challenges with their layout.
In this series of Action Points we will examine various parts of the well laid out Sequence of Play. In Action Point 1 we covered the Production Phase and took a look at the Display Board containing the various regions in England. In Action Point 2 we took a look at the different units, examined the very important and tactical Battle Plans and took a look at the structure of a Battle and how the Land Battle and Naval Battle Cards drive the Tripod attacks. In Action Point 3, we examined the Devastation Phase and took a look into the different types of attacks the Tripods will unleash on the regions. In this Action Point, we will dive into the Human Action Phase and Escape Phase.
Human Action Phase
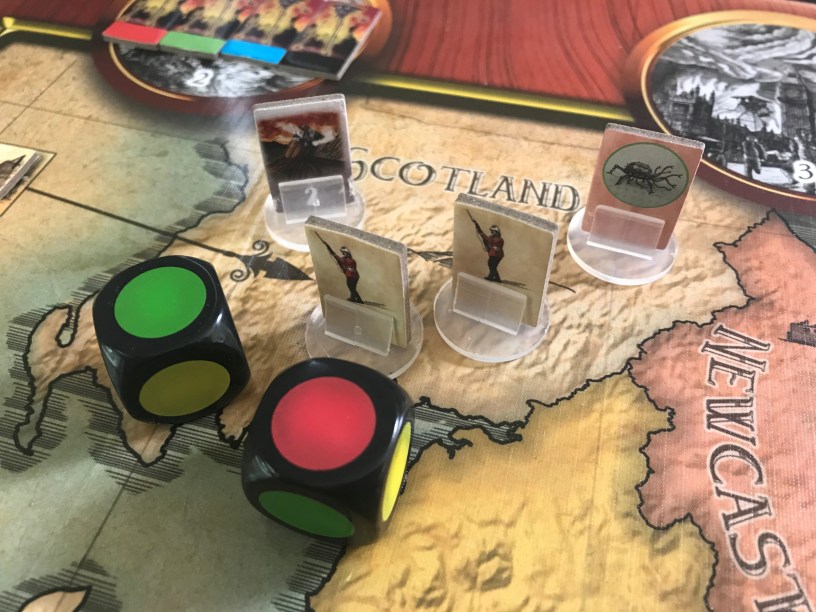
The Human Action Phase is where the player gets a chance to move their units located on the board as well as have their Infantry perform their special abilities including Cylinder Attack and placing Powder Kegs. Each Infantry, Cavalry, Field Gun, Siege Gun, Refugee and special Character (we haven’t talked about this but these Characters come from the Event Card deck) can freely move 1 Zone as their Action during this Phase. This movement is a key part of the phase as players need to maneuver their units to intercept or setup attacks as the Tripod Waves move during the Martian Action Phase. Planning these movements ahead is very key as you only get an opportunity during this Phase to perform movement.
As I mentioned in Action Point 2, the Infantry plays the role of saboteur as they can build Powder Kegs that are placed in Zones awaiting the appearance of a Tripod before blowing up and doing damage or destroying them. An Infantry unit in a Zone may attempt to place a Powder Keg by rolling a die and the following happening:
Green – Rolling Green places a single Powder Keg counter in the Zone.
Yellow – Rolling Yellow will result in the Infantry unit being destroyed.
Red – Rolling Red will result in no effect.
As you can see, these Powder Kegs are difficult to build, only seeing success 50% of the time as there are 3 sides of the die that are Green, but also very dangerous as rolling Yellow means the unit will be removed from the game. It might be dangerous, but this action is very important as it can result in significant damage being done to a Tripod Wave as they enter a Zone where you have built up your forces to attack them. The counter mix included with the game will limit how many of these Powder Kegs you can place. At any point you may choose to remove a Powder Keg counter somewhere from the board to place that Powder Keg elsewhere on the board. There are 8 Powder Keg counters included in the game and it will take you to focus on this action to build all 8.

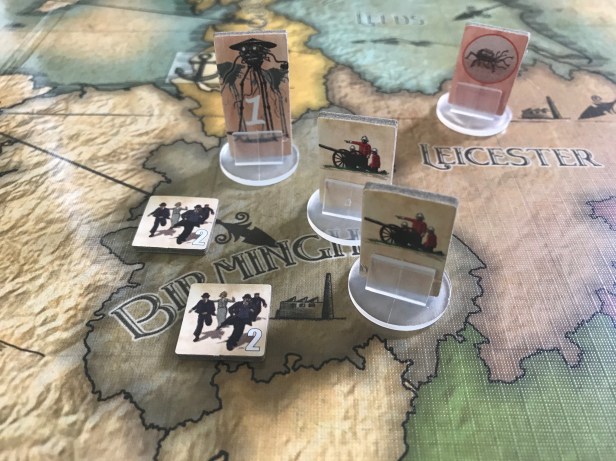
The other action that Infantry can perform during this Phase is that of attacking Cylinders that are located in Zones before they spawn additional Tripod Waves. But in order for these attacks to happen, the Infantry have to have moved into the Zone where a Cylinder is located during the movement portion of a prior Human Action Phase. Meaning, you can’t move into a Zone and perform a Cylinder Attack in the same Human Action Phase. An Infantry unit located in the same Zone as a Cylinder may attempt to destroy one of the Tripods in the Cylinder before it is formed and released. The player will roll a single die and then consult the Player Aid to see the effect.
Green – Rolling Green will result in 1 Tripod being destroyed. Remove that Tripod counter from the Wave’s Staging Area located at the top of the board.
Yellow – Rolling Yellow will result in no effect.
Red – Rolling Red will result in the Infantry being destroyed.

If all of the Tripod counters in the Cylinder are destroyed, you will remove the Cylinder counter from the Zone and that Wave has been defeated before it can even do any damage to you. This is a very important part of the Human strategy and I recommend at least having one Infantry unit doing this in each Cylinder location. Believe me it is easier to destroy them in this manner than when they are released and in a Tripod Wave.
Refugees
The other key units that the player will need to move during this Phase are the Refugees. If you remember, each Zone can only hold a certain amount of Refugees equal to the number of gears showing on the Production counter. Refugees in excess of a Zone’s Gear value are considered captured and will be removed from the board and will result in 1 Martian Victory Point per counter captured. There will be times during the game when a large Tripod Wave, one with 5+ Tripods, will create upwards of 5 Refugees. Most of the Zones have a Production Value of 1 or 2 gears so you will have to move these Refugees strategically to get them out of danger from the Tripods. This will be a key part of your decisions during this phase and the loss of one Refugee through capture really represents a 2 VP swing so be cautious and plan ahead.
Escape Phase
This is the Phase where the Refugees get to attempt to flee. If there is a Refugee in a Zone with a Harbor counter, the player will be allowed to roll a die to see if that Refugee successfully escapes and scores a Victory Point for the Humans. If the Zone doesn’t contain a Harbor counter, the Refugee cannot escape and the player should move the Refugee to a Zone where there is a Harbor or purchase one in the Production Phase. This Escape process is a two stage affair.
The first stage is where the player will roll a die for each of the Refugee counters in the Zone with a Harbor counter trying to escape.
Green – Rolling Green will result in the Refugee counter successfully Fleeing (which is the first requirement of Escape). The Fleeing result means that the Refugee has made it onto a Freighter and must only avoid alerting the Tripods to successfully escape (another die roll is required). But only one of the counters in the Zone. You must roll for each Refugee.
Yellow – Rolling Yellow will result in no effect. This means that the Refugee counter simply remains in the Zone awaiting their next opportunity to Escape.
Red – Rolling Red will also result in the Refugee counter successfully Fleeing.
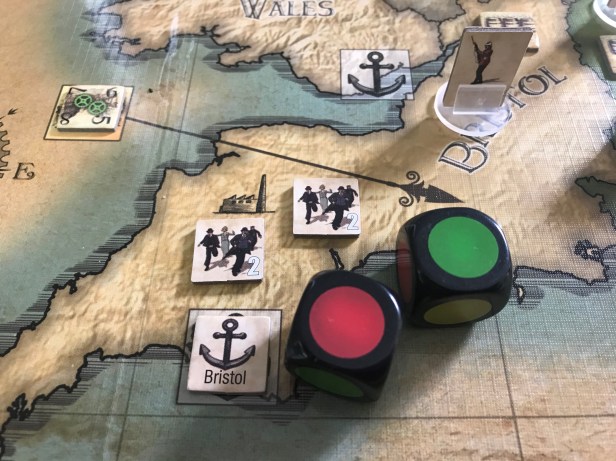
As you can see in the above picture, there are 4 Refugees currently located in Bristol which has a Harbor counter there which allows them to attempt to Escape. The player will first roll a die for each of the 4 Refugees counters. For the first two Refugees, a Green and Red result are rolled. Both of those results mean the Refugees are successfully Fleeing.

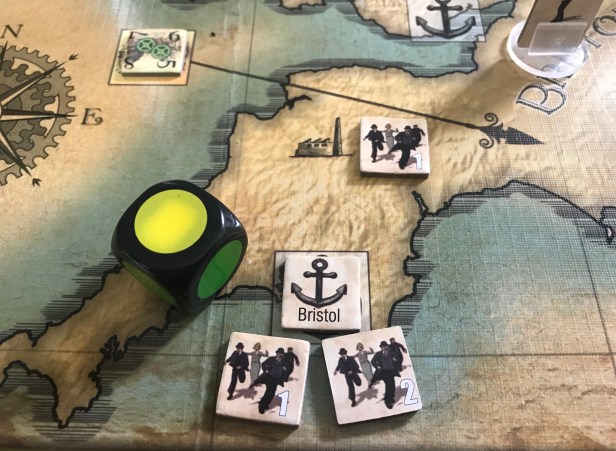
We now roll for the remaining 2 Refugees and get a result of Green and Yellow. Green is a successful Fleeing but the Yellow is a fail and that lone Refugee counter will be forced to remain in the Zone until the next Human Action Phase or Escape Phase.
But as mentioned, just because they successfully got onto a Freighter (the definition of Fleeing) doesn’t mean that they have escaped. The Refugees might still alert the Tripods and be attacked. Again roll a die to determine if all successfully Fleeing Refugees counters in a single Zone Escape without alerting the Tripods. This single roll will represent all of the Refugees in the Zone.
Green – Rolling Green will result in the Refugees successfully Escaping. You will now earn 1 Victory Point for each Refugees counter than escaped.
Yellow – Rolling Yellow will result in a Naval Battle with 1 Tripod.
Red – Rolling Red will also result in a Naval Battle with 2 Tripods.
For the 3 Fleeing Refugees counters we roll a Yellow result which means that the Tripods were alerted to their fleeing Freighters and a Naval Battle will result with 1 Tripod. Had we rolled a Green result, each of the 3 Refugees would have been removed from the Strategic Map and the Human player will score 1 Human Victory Point for each Refugee.
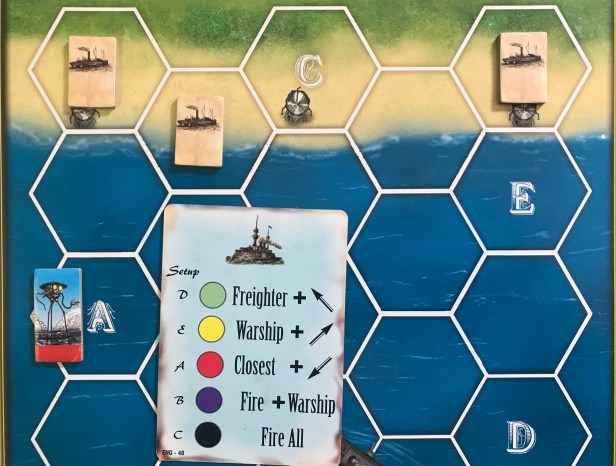
As the Refugees have gotten themselves into a Naval Battle, we will exchange each Refugee point for a Freighter counter and then place those counters on the Naval Battle Board in any top row hex. As you may remember from our discussion of the Land Battle in Action Point 2, the Tripod will have its starting location determined by a card draw. We draw a Naval Battle card and refer to the colored circles along the left edge of the card to determine where the Red Tripod will start. As you can see from the card, Red is identified as starting in the A Hex which is located along the left edge of the Naval Battle Board. This first card only determines the starting location of the Tripod and all instructions will be ignored and the card discarded.

The player then has the option of spending Production Points to purchase Warship counters that can defend the Freighters and attack the Tripods and they can also purchase Battle Plans. In this example, we will purchase 1 Warship but no Battle Plans. The Warship is placed after the Tripod is placed so we decided to put the Warship two hexes away from the Tripod in an effort to not allow it an easy shot to destroy our only line of defense.

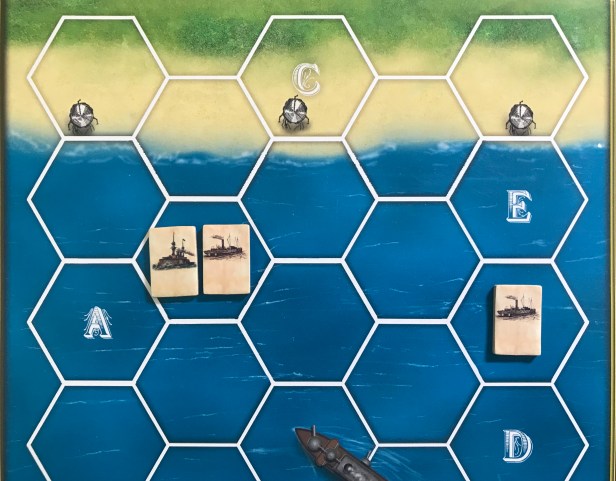
Next it is the Martians turn and they draw a new Naval Battle Card to identify the actions of the Tripod. On this card, you will see that a Red Tripod will take the Fire All action, which is considered a Special Action. It will simply target and Fire upon all targets within range. The farthest range of the Tripod is 3 hexes so two of the Freighters will be fired upon and the Warship will be targeted. If the Tripod was damaged, it cannot carry out any Special Actions and because this card identifies a Special Action as their only action, it would not be able to do anything. Damaging those Tripods is important because it will hinder what they can do to the Humans. In the above picture, the Tripod fires at both Freighters rolling a Red result on the topmost Freighter and missing (needing to have rolled a Yellow result) and a Green result missing the other Freighter in range (needing to have rolled a Yellow result).

The Red Tripod next targets the Warship and rolls a Green result meaning a miss (needed to roll a Yellow result) and the Tripod ends its turn having done no damage to the Human Refugees. A very good result!

The Warship next takes its turn and can move and fire upon an enemy target. It moves one hex closer to the Tripod placing it in the best range needing a Green result and fires rolling a Green. This hit will simply damage the Tripod though and it will still be around to fight another round. But, due to the fact that the Tripod is damaged, it will be unable to carry out any Special Actions. After the attack by the Warship, the Freighters each get to move one hex. The leftmost and center Freigther both move to the right diagonally to get away from the Tripod while the right most Freighter turns on the motors and moves straight down toward safety. The Freighters will successfully escape if they can move to the bottom most row without being destroyed.

The Tripod now draws the next Naval Battle card to identify its actions for this 2nd round of the battle. The card states Fire + Fire. The first Fire will be carried out by the Tripod but the 2nd Fire is considered a Special Action and will be ignored.

The Tripod rolls a a Red result which means they miss the left most Freighter (needed a Yellow result) but hits on its 2nd shot at the other Freighter with a Yellow result. This Freighter is now destroyed and is removed from the Naval Battle Board. This is considered a Capture and will result in 1 VP for the Martians.
On the Tripod’s final shot, they target the Warship but miss with a a Yellow result having needed a Green result. Now the Warship smells blood!

The Warship now fires upon the Tripod and as you can see in the below picture rolls a Green result meaning a hit and the Tripod takes its second damage and will be removed from the Battle Board destroyed.

The Battle is now over as there are no remaining Tripods on the board and the Freighters are free to Escape as they have no resistance on the board. Battles will continue until one side has no units remaining on the board.
After all Battles are finalized, we will now total the Victory Points earned by the Human player. This is pretty simply as you will simply gain 1 VP for each currently Producing Zone, meaning any Zones that has at least 1 Workforce Level showing on their Production counters and gain 1 VP for each Refugee and Freighter that successfully escaped during the Escape Phase. When the Human Victory Point counter reaches 10, it will be started back at zero and advance the Germ counter by 1.
I hope you got a good feel for the Human Action Phase and the Escape Phase and can see that the proper staging of your troops on the board, the use of their special abilities and the proper movement of Refugees counters can lead to a path to victory for the Humans. This game is very difficult as those Tripods are very powerful but with some proper planning and the use of Battle Plans and Warships, the Human player can get many of their Refugees escaped and earn many VP each turn. Once the Germ counter has reached 10, the Humans win. A lot easier said though than done. Good luck!
In Action Point 5, which is the final entry in this series, we will take a look at the Martian Action Phase where the Tripods will look to move, reinforce in place or build the dreaded Flying Machine and the Assembly Phase that can spawn even more Tripods to destroy your hopes.
-Grant

For placing powder kegs, I’m confused. You say rolling red is bad but when you list the effects, you list red as “no effect” and yellow as “destroy the infantry.”
Is it supposed to be the other way around?
This game looks fascinating!
LikeLike
Yellow removes the infantry and red has no effect. I’ll edit that. My mistake. It is a pretty interesting game.
LikeLiked by 1 person