The War of the Worlds is a solitaire board game that puts the player in command of the Human forces in an attempt to mount a defense against the invading Martian Tripods from the famous book by H. G. Wells. There are four versions of the game including England, France, Japan and United States East Coast that all use the same system but offers different challenges with their layout.
In this series of Action Points we will examine various parts of the well laid out Sequence of Play. In Action Point 1 we covered the Production Phase and took a look at the Display Board containing the various regions in England. In Action Point 2 we took a look at the different units, examined the very important and tactical Battle Plans and took a look at the structure of a Battle and how the Land Battle and Naval Battle Cards drive the Tripod attacks. In this Action Point, we will examine the Devastation Phase and take a look into the different types of attacks the Tripods will unleash on the regions.
Devastation Phase
The Devastation Phase is when the Tripods will unleash their various type of attacks on the regions resulting in Workforce loss, creating Refugees, destroying Units located in the region and taking away Human Victory Points. The attacks only take place in regions where a Tripod Wave is present and begins with a roll of a die and then consultation of the very well done player aid.
The one thing that I do really like about this game is that the player aid is very helpful and you can literally play the game without going through the rules 3 or 4 times but generally relying on the information on the player aid.
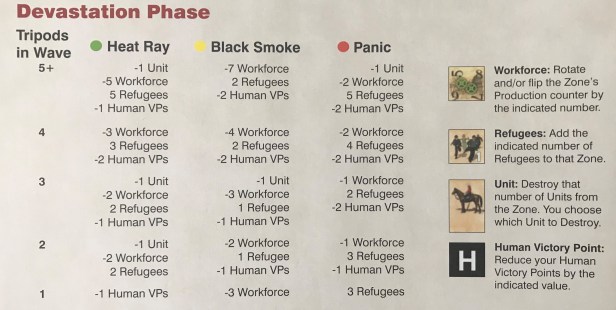
If you look at the above picture, you will notice that you will refer to two different parts of the Devastation Phase chart in order to understand what the Tripods will do. First, you will roll one die and consult the type of attack shown across the top of the chart. A Green result will lead to a Heat Ray, a Yellow result will see the Tripods release Black Smoke and a Red result will cause severe Panic in the Zone.
With that, let’s take a look at the details of the different attacks and compare the damage caused to the Human player.
Types of Attacks
Heat Ray – The Heat Ray is not specifically that much different from other attacks but in its various damages, it tends to create more Refugees and destroy less workforce than the Black Smoke. From the H.G. Wells novel is the following quote on the attack:
In some way they are able to generate an intense heat in a chamber of practically absolute non-conductivity. This intense heat they project in a parallel beam against any object they choose, by means of a polished parabolic mirror of unknown composition, much as the parabolic mirror of a lighthouse projects a beam of light…it is certain that a beam of heat is the essence of the matter. Heat, and invisible, instead of visible, light. Whatever is combustible flashes into flame at its touch, lead runs like water, it softens iron, cracks and melts glass, and when it falls upon water, incontinently that explodes into steam.
Black Smoke – The Black Smoke seems to be a weapon that destroys and poisons the infrastructure of the country as its main damage to the Humans is in their Workforce. It creates less Refugees than the other attacks because it tends to poison the people who die fairly soon after exposure. It also will take a bit more VP’s from the Humans than the other attacks do. From the H.G. Wells novel is the following quote on the attack:
The Martians are able to discharge enormous clouds of a black and poisonous vapour by means of rockets. They have smothered our batteries, destroyed Richmond, Kingston, and Wimbledon, and are advancing slowly towards London, destroying everything on the way. It is impossible to stop them. There is no safety from the Black Smoke but in instant flight.
Panic – This concept of Panic is not necessarily an attack in the game but more the condition of fear created by the Tripod Waves as they move about the country doing their work of destruction. The attack tends to create more Refugees than the other attacks, particularly at the bottom of the range and also destroys Units in the confusion.
Using the Devastation Phase Player Aid
After rolling to determine the type of attack, you will then refer to the Tripods in Wave column to determine the exact effect of the attack. In general, the more Tripods in the Wave the more damaging the attack will be. This is an important consideration that you will need to keep in mind as you go about attacking the Waves as each Tripod that can be eliminated will reduce the negative effect.
For example, take a look at the Heat Ray column and refer first to the 5+ Tripods in Wave row to see that the attack will do -1 Unit, -5 Workforce, create 5 Refugees and will result in -1 Human Victory Point. If you look at the 4 Tripods in Wave row, no units will be destroyed, -3 Workforce will be destroyed (as compared to 5 for the 5+ row), create only 3 Refugees (as compared to 5 for the 5+ row) and -2 Human Victory Points, which is the only result that is higher than the comparison row.
If the Devastation roll causes Unit loss, the player gets to choose which of their units in the Zone to remove. These Units don’t have to be military Units like Infantry, Cavalry or Guns but can be Refugees of any one of the characters provided by the various Event cards.
Workforce loss is a special damage that effects how many Production Points the Human player will receive during the Production Phase. Each Workforce counter is doubled sided with 1-4 shown on one side and 5-8 shown on the other. London has a special blue counter that shows 9-12. When an attack damages Workforce the player will rotate and/or flip the Zone’s Workforce counter until the current Workforce Value shows in the upper right hand corner. If the Zone’s Workforce counter is reduced to zero, the Zone is considered destroyed and you will replace the Workforce counter with a Destroyed counter.
If the attacks cause Human Victory Point loss, the player will reduce their Human Victory Point by that amount on the Progress Track. If the reduction would reduce the counter to below zero, and the player has a Germ Points counter above zero, the Germ Point counter will be moved down one number and the Victory Point counter will be reduced to the value below 10 on the Progress Track. Let’s take a look at the results of one Devastation Phase.
Example Devastation Phase
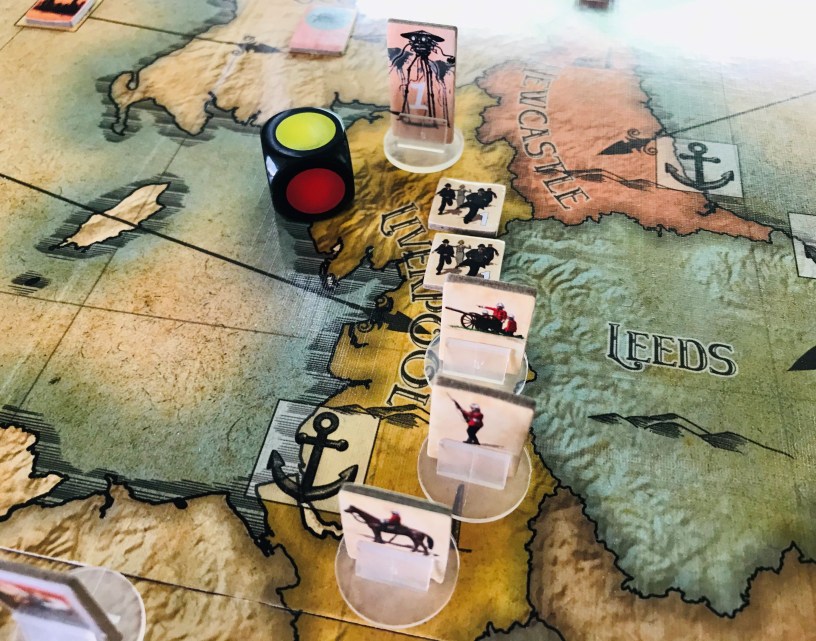
Tripod Wave 1 is currently located in the Liverpool Zone and as you can see from the picture below the Workforce counter sits at 6 and there are three military Units there as well, including an Infantry, Cavalry and Field Gun.

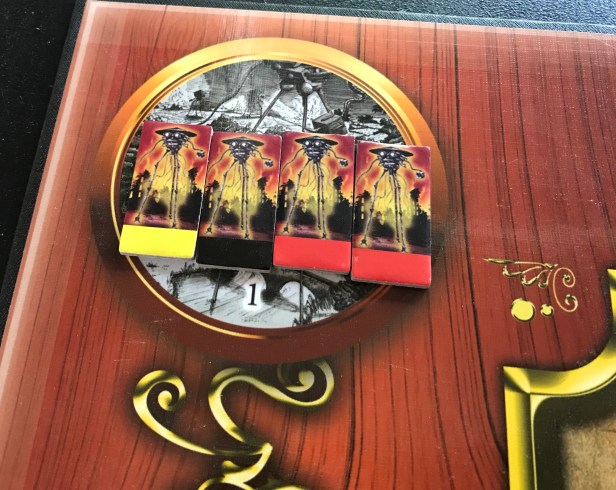
First we need to check how many Tripods the Wave consists of because this will determine the row that we consult on the Devastation Phase chart on the player aid. As you can see in the next picture, Wave 1 contains 4 Tripods; a Yellow Tripod, a Black Tripod and 2 Red Tripods. This will mean we will consult the 4 Tripods in Wave row.
We next roll one die and consult the appropriate column to determine the type of attack. In this case, we roll a Yellow which means the Tripod Wave is using their Black Smoke attack.
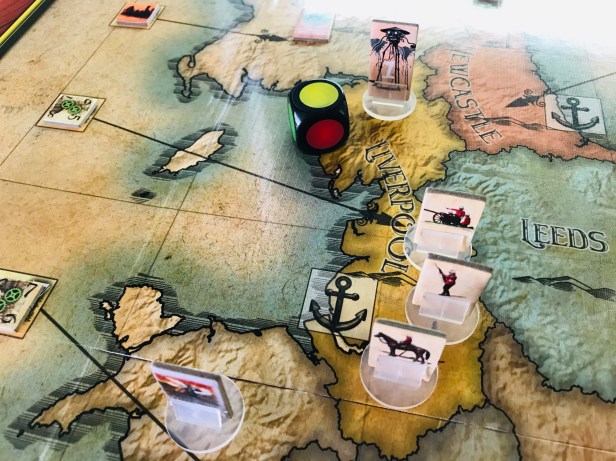
As we consult the Devastation Phase chart on the player aid, we refer to the Black Smoke Attack column and the 4 Tripods in Wave row and see that the result will be -4 Workforce, 2 Refugees created and -2 Human VPs. First, we will adjust the Workforce counter downward by 4, taking the counter from its starting position of 6 to 2. This will require that we flip the counter over to its opposite side which you will notice goes from two Green gears on the counter to one Yellow gear. This means that the Zone will now be creating one less Production Point during the Production Phase.

As we continue to consult the Devastation Phase chart on the player aid, we see that the attack will also create 2 Refugees in the space. As you can see in the picture below, I have placed two different one Refugee counters in the Zone. These Refugees will be vulnerable to capture later by the Tripod so when the Human Action Phase comes around, it is best that these Units are moved to an adjacent Zone, preferably one with a Port so that they can escape earning Victory Points.

Next, we consult the Devastation Phase chart on the player aid again and we see that we are required to lose 2 Human VP’s. In the picture below, you can see that we have 3 VP’s. After losing 2 VP, we will be left with only 1.

Let’s assume for this example, that the Human player had a total of 1 Germ Point on the Progress Track. This means that they have 10 VP as each 10 VP’s earned will move the Germ Point counter up on the Progress Track and the “H” Victory Point marker will be moved to zero until it again builds up to 10 VP which will result in the Germ Point counter moving up one more number.

If we would love 2 VP’s from the Black Smoke attack, we would move the Germ Point counter down to zero and then move the Human Victory Point counter down to 8 VP’s on the Progress Track. Simple but you have to keep on top of it.

As you can see, the mechanics of the Devastation Phase are not difficult at all and boils down to the Tripod Wave making an attack after rolling a die and consulting the Devastation Phase chart on the player aid. The Devastation Phase can be the source of much trouble for the Human player though as if the Waves are left unchecked, they will simply destroy Zone after Zone until they reach London. You must be aggressive with your Units and whittle those Waves down at every opportunity. If you can get a Wave to only 1 or 2 Tripods they will still do damage but it will take them 3 turns to Destroy your Production in any given Zone. The key is keeping their numbers down and not necessarily only in destroying the Tripods.
In Action Point 4, we will dive into the Human Action Phase and Escape Phase.
-Grant
