
The War of the Worlds is a solitaire board game that puts the player in command of the Human forces in an attempt to mount a defense against the invading Martian Tripods from the famous book by H. G. Wells. There are four versions of the game including England, France, Japan and United States East Coast that all use the same system but offers different challenges with their layout.
In this series of Action Points we will examine various parts of the well laid out Sequence of Play. In Action Point 1 we covered the Production Phase and took a look at the Display Board containing the various regions in England. In this Action Point we will look at the different units, examine the very important and tactical Battle Plans and take a look at the structure of a Battle and how the Land Battle and Naval Battle Cards drive the Tripod attacks.
Units
There are 5 different units that the Human player can purchase using their Production Points gained each round. We covered their cost and rules for placement of the units on the Display Board in the last Action Point. Here, I would like to give you the uses of each of these different units before we move into an example of a Battle.

Infantry
Infantry are your soldiers and are your cheapest unit. The Infantry costs 10 Production Points and play only a minimal supportive role during the Battles themselves. The Infantry cannot attack nor destroy a Tripod during Battle but can destroy Tripods before a Wave is formed while inside the Cylinders during the Human Action Phase. They can however attack Tripods indirectly by building Powder Kegs and they can also protect Guns by building Earthworks on the battle field.
If a Battle takes place in a Zone with a Hill symbol the Guns in the Zone gain up to 2 free Earthworks counters that can be distributed amongst the Guns. Then the work of the Infantry begins as they can build additional levels of Earthworks for a Gun that they are located in the same space as.

Each Infantry unit on the board can attempt to build Earthworks on one Gun that is located in their space. They perform this action by rolling a die and consulting the following results.
Green – Rolling Green will result in building 1 Earthwork for a Gun.
Yellow – Rolling Yellow will result in building 2 Earthworks for a Gun.
Red – Rolling Red will result in building 1 Earthwork for a Gun, but the Infantry unit will be destroyed.
Their other role of the Infantry is that of saboteur as they can build Powder Kegs that are placed in Zones awaiting the appearance of a Tripod before blowing up and doing damage or destroying them. An Infantry unit in a Zone may attempt to place a Powder Keg by rolling a die and the following happening:
Green – Rolling Green places a single Powder Keg counter in the Zone.
Yellow – Rolling Yellow will result in the Infantry unit being destroyed.
Red – Rolling Red will result in no effect.
As you can see, these Powder Kegs are difficult to build, only seeing success 50% of the time as their are 3 sides of the die that are Green, but also very dangerous as rolling Red means the unit will be removed from the game. It might be dangerous, but this action is very important as it can result in significant damage being done to a Tripod Wave as they enter a Zone where you have built up your forces to attack them but we will cover this during our look at the Martian Action Phase.
Cavalry
Cavalry cannot destroy a Tripod during a Battle either but they can offer some major advantages to the Human player in the form of Battle Plans. They can also change the direction of a Tripod Wave’s movement destination during the Martian Action Phase.
The Cavalry can deploy a Battle Plan during the Planning segment of the Battle Phase which happens at the beginning of a Battle right after Earthworks have been constructed by the Infantry. For every Cavalry unit in a Zone where a Battle will be taking place, the player will roll a die to determine if they are able to pull a Battle Plan counter from the cup. The die roll will be cross referenced to the following:
Green – Rolling Green will result in randomly drawing 1 Battle Plan counter from the cup.
Yellow – Rolling Yellow will result in the player choosing 1 Battle Plan from the cup but the Cavalry unit will be destroyed in the process.
Red – Rolling Red will result in no effect.
These Battle Plans can be used during the Battle in which they are acquired but are discarded at the end of the Battle if not used. We will cover the 6 different Battle Plans in the next segment of this Action Point.
In addition to rolling and randomly drawing these Battle Plans during a Battle, the Human player can also spend Production Points to buy Battle Plans. If you pay 5 Production Points, you will be able to randomly draw 1 Battle Plan counter. If you pay 10 Production Points, you can choose 1 Battle Plan counter.
The Battle Plans can be used at any time during the Battle so they can be held until that key moment or used immediately.
Guns and Siege Guns
At the outset of a Battle, the Human player will place all of their Guns or Siege Guns into the hexes that have an Artillery Image in the hex.
A Gun rolls one die during each attack while a Siege Gun rolls 2 dice. The result needed to hit is based on the range from the Gun to the target hex. A Gun or Siege Gun can attack a Tripod up to 3 hexes away. The color needed to hit is based on that range. At Range 3, a Red result will hit causing 1 damage to the Tripod. At Range 2, a Yellow result is needed to score a hit doing 1 damage and at Range 1, a Green result is needed to hit and will do 1 damage to the Tripod.
Warship
The final unit we will look at is the Warship, which is only used during a Naval Battle. A Naval Battle only happens when Refugees are attempting to flee from a port and are detected by a Tripod. These Naval Battles only occur during the Escape Phase so we will cover that process during our look at that phase. At the outset of a Naval Battle, the Human player can spend 4 Production Points to purchase a Warship. These Warships protect fleeing Refugees from the Tripod attacks. There is no limit to the number of Warships that you can buy and you place them after the Tripods have been placed on the Naval Battle Board.
Now that we have looked at the different type of units, let’s take a look at the 6 different Battle Plans and their uses.
Battle Plans
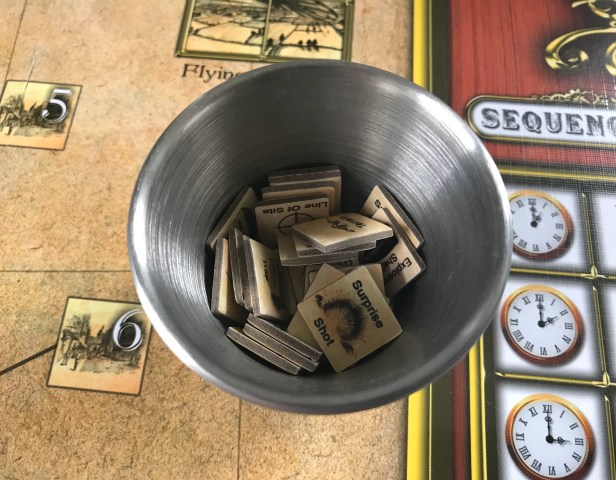
There are 6 different types of Battle Plans available to the player. With 4 of each Battle Plan in the draw cup, the chance of drawing each of the different types is the same.

Explosive Shell – After a Gun or Warship attack damages a Tripod, destroy that Tripod. This is a very good Battle Plan as it takes two hits to destroy a Tripod.
Kriegspiel – When a Battle Card is drawn during a Battle Phase, draw a 2nd Battle Card and choose which of the two you wish to use. After you examine the instructions on the two cards, you can take the one that is best for the situation. This can be very valuable and really safe your bacon for that round.
Line of Site – Re-roll and die. Missed that shot on the Tripod that would destroy it? Roll again. The Tripod just got a lucky hit on your last Gun on a long shot Red range hit? Make it re-roll and most likely miss saving your Gun.
Surprise Shot – Place this Battle Plan on one of your Guns or Warships. The first time the Gun or Warship fires, it will roll 2 extra dice. This can be very powerful as if you can somehow save it for short range, where there is a 50% hit chance, you can do some major damage and destroy a few Tripods, or at least damage a few.
Terrain – Every Gun or Warship may Fire 2 times during this round. Wow, talk about some major fire power particularly if paired with something like Surprise Shot or Explosive Shell.
Trap – Roll a die. If you roll a Green, damage up to 2 undamaged Tripods. If all of the Tripods are already damaged, the Trap has no effect. I love this one as it makes 2 Tripods on the brink of being destroyed and can really level the playing field.
As you can see, these Battle Plans are literal game changers and if used appropriately, with a little bit of luck mixed in with good dice rolls, you can win battles and stop a Wave from decimating your Zones and reducing your Production. With that being said, let’s move to looking at an example and discussion of the Battle Phase.
Battle Phase
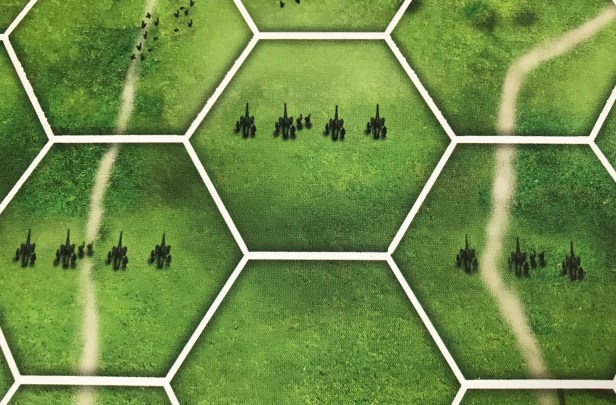
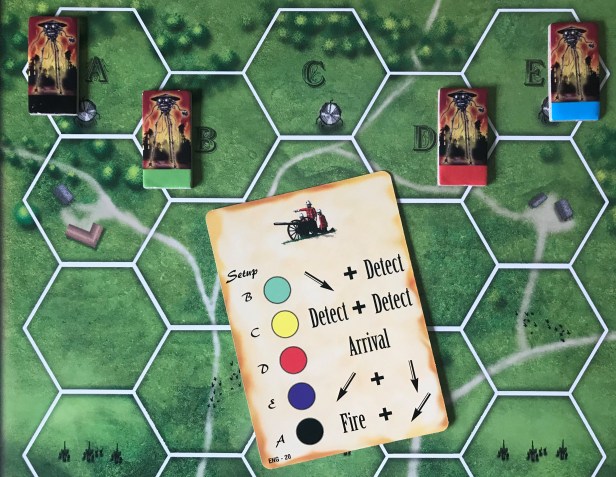
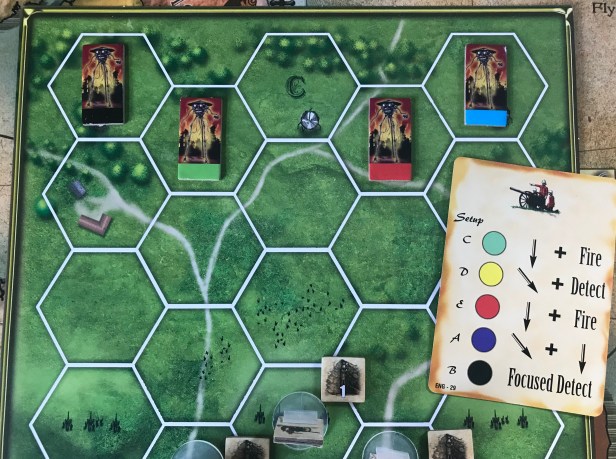
One of the key concepts in the Battle Phase is that of Initiative. The advantage to having Initiative means that the Human player can set up the Tripods first and then place their units on the board. This Initiative is determined solely on whether the Battle is taking place in a Zone with a Hills symbol or not. The player then will draw a Land Battle Card and refer only to the capital letters and colored circles along the left edge of the card. These letters refer to the letters printed on the Battle Board in the top row of hexes and the colors refer to the Tripods in the Wave. In the below picture, the card drawn states that the Green Tripods will be placed in row B, the Red Tripods will be placed in row D, the Blue Tripods (and be careful that the color on the card look like Purple but I assure you it was meant to be Blue) will be placed in row E and the Black Tripods in row A. This card is then discarded and will not be referred to any longer.
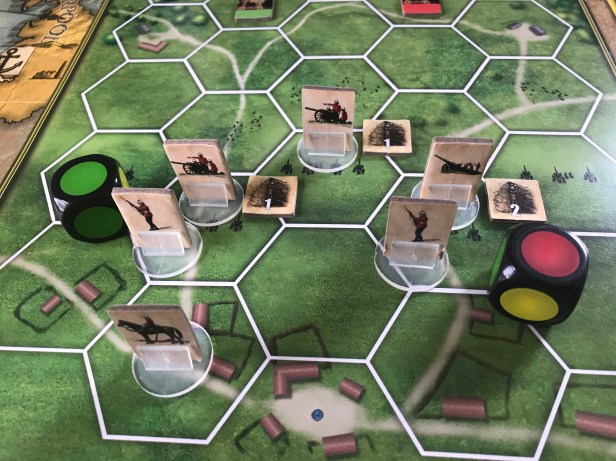
The Human player will then place their Guns and Siege Guns into the various hexes in the middle of the Land Battle Board where the Artillery symbols are drawn. This can be really important as if the player has Initiative they can place their Guns to take advantage of the Tripods location. After the Guns are placed, all other units are placed on the Battle Board, either the Infantry into a hex with a Gun or Siege Gun so that they can build Earthworks or behind the Guns in the end of the rows. As they cannot attack the Tripods during the Battle the player should place them to avoid interaction with the Tripods as much as possible as the Tripods will fire on them or if they move into their hex to capture them.
The player will now go through the process described above to place Earthworks counters and draw and purchase Battle Plans to use during this Battle. In the picture below, we assume that the player rolls well and randomly draws the Trap Battle Plan and also spends 5 Production Points to purchase an additional draw and pulls out the Terrain Battle Plan.

The Martians will then take the first action of each Battle, regardless of Initiative. The player will then draw a Battle Card for the Martians to determined what actions they will take. As above, the player will match the color of the Tripods with the instructions on the card and carry them out in order from top to bottom.
The Martians will take the following actions, once again as outlined on the Battle card.
Detect – The Tripod will roll against the closest Gun with an Earthworks counter. The success will be determined by the range. A successful Detect will remove one level of an Earthwork. When a Gun’s Earthworks have all been removed, the Gun is Revealed and can be fired upon by the Tripods.
Fire – The Tripod will roll against the closest Revealed Gun. To destroy a Gun, the Tripod will roll a die and a hit will be determined by the range.
Move – The Tripod will advance one hex toward the bottom of the Land Battle Board. It may enter a hex already occupied by another Tripod. Angled arrows indicate that the Tripod will move down and to the left or right. If the Tripod cannot move in the direction stated on the card it will simply move one hex down.
The Martians may also take the following Special Actions as outlined on the Battle Card. If a Tripod is damaged, they will only perform the first action listed on the Battle Card. This is why getting them damaged is so important. These Special Actions are as follows:
Arrival – A new random Tripod appears on hex C and will join the battle.
Detect All – The Tripod will roll to Detect each Gun within range.
Double Move – The Tripod will simply move twice straight down.
Fire All – The Tripod will fire at all Revealed Guns in range.
Focused Detect – The Tripod successfully Detects the nearest Gun in range lowering the Gun’s Earthworks by 1 without a roll.
Focused Fire – The Tripod destroys the nearest Revealed Gun in range without a roll.
High Activity – The Tripod will make 2 Detect attempts against the closest Gun with an Earthworks counter. It will then make 2 fire attacks against the closest Revealed Gun in range.
As an example of how this process for a Battle flows, refer to the pictures below.
The card drawn has the Green Tripods moving down and then performing a Fire although they cannot find any targets as the Guns are not yet Revealed, there is no Yellow Tripod so no action is taken, the Red Tripod moves down and also cannot find a target as all Guns are not yet Revealed, the Blue Tripod moves to the right (although it cannot as there is no viable hex to the right) and then moves down one hex and the Black Tripod performs a Focused Detect but cannot do that as no Guns are in range as they are all at least 4 hexes away.

The Human player then gets to take their actions and can fire at any Tripod in range of their Guns. Every time that a Gun protected by Earthworks is fired it will lose one level of Earthworks. These Earthworks hide the Guns from the Tripods and when removed, the Tripods will fire on any Gun that is exposed that is in range. Guns fire with one die while Siege Guns use 2 dice.
At this point, we will choose to use the Trap Battle Plan and roll to possibly damage two different Tripods. We roll a Green and can now damage the Blue and Red Tripod. I am trying to protect the Siege Gun as it is my best unit and making it so I can take out those two Tripods will accomplish that. Now that they are damaged, they will be unable to use any Special Actions listed on the Battle Card and they only need one more hit to be destroyed.
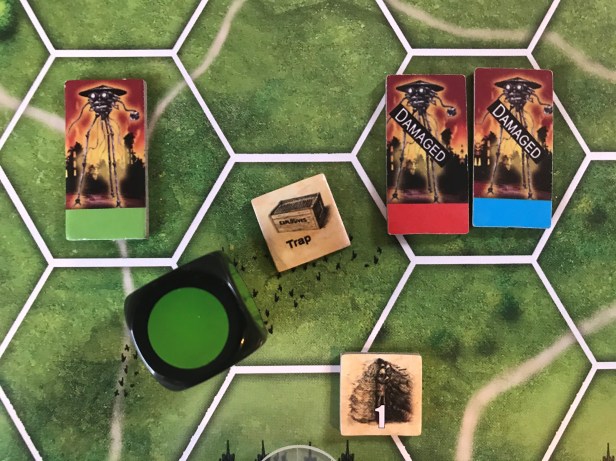
Because three of the Tripods are in range (Yellow range), I also decide to use my Terrain Battle Plan which allows each Gun to fire twice this round. If I get lucky, I can almost end this threat now.

The Siege Gun rolls two dice on their first of two attacks thanks to the Terrain Battle Plan and scores one hit with a Yellow. I remember to reduce my Earthworks counters by 1 from 2 to 1 as I fired. The Red die misses. I decide to destroy the Blue Tripod with my one hit. You don’t have to call out a specific target only a hex.

With the Siege Guns second attack, I score a hit with a Yellow roll and destroy the damaged Red Tripod. I also remove my final Earthwork counter as I fired a second time this round. I then move to the Gun located in the center and fire at the undamaged Green Tripod and need to roll a Yellow to hit. My first attack is a miss with a Green and my second roll is a hit with a Yellow. I flip the Green Tripod counter over to its damaged side and I have to remove my only Earthwork counter for this Gun as it fired.

I have two shots with the final Gun located on the left flank and miss with my first roll (Green) but score a hit with my final roll with a Yellow destroying the Green Tripod. I have to remove the Earthwork counter. The turn is now over and we return to the top to draw another Battle Card for the Black Tripod.
While I will not show you the next action, the Battle will last until either all of the Tripods are destroyed or all of the Human units have been destroyed or captured. After the Battle is over, the player will return their remaining units, along with any Earthwork tokens, to the Display Board in the region where the Battle occurred. If the Tripods were victorious you will simply return them to the appropriate Tripod Staging Area and then proceed to the next Battle or to the Devastation Phase.
This example of a Battle should show you two things. One, it is very possible to defeat the Martians if you have the right units and have prepared with Battle Plans. And two, that Battle Plans really are the difference. They can turn only a few units into a very effective killing machine. Without the Battle Plans, it will boil down to how well you can roll your dice and will the correct colors to inflict hits on the advancing Tripods. But, even with that, one of the reasons that I was successful was because I damaged two of the Tripods before the Battle even started with the Trap Battle Plan and then was allowed to have each Gun fire twice during this round with the Terrain Battle Plan. I would hot have been successful if I only fired once with each gun and would have maybe have damaged a few of the Tripods and possibly destroyed one. Battle Plans are really, really, truly important along with having Cavalry units to draw them, along with making sure you buy at least one additional Battle Plan almost every battle.
In Action Point 3 we will examine the Devastation Phase and take a look into the different types of attacks the Tripods will unleash on the regions.
-Grant
