
Stalingrad: Inferno on the Volga is a block wargame that recreates one of the most brutal battles of World War II being that of the siege of the City of Stalingrad located on the Volga River by elements of the 6th Army and 4th Panzer Army. The game is designed as a solitaire game where the player controls the attacking Germans and the game’s AI controls the defending Soviets.
In Action Point 1 we looked at the basics of the two types of Movement and the two types of Attack. In Action Point 2, we examined the Combat Sequence and its various steps, including the dreaded Rubble Roll, and showed a few examples. In Action Point 3, we looked at the map, and the process by which it was created, and also looked at some of the other chrome including the great card play system. In Action Point 4 we looked at the final action available to players in the Call for Reinforcements action. In this Action Point, which is the final entry in the series, we will take a look at the Soviet AI and how it operates.
In it’s Solitaire Mode, Stalingrad: Inferno on the Volga is a passable solitaire game where the player controls the attacking Germans and must seize the city of Stalingrad as soon as possible. The Soviet side simply follows a logic algorithm, whereby decisions are fully implemented by the Artificial Intelligence, and the German player only needs to move/draw the Soviet Units/Cards following the criteria described below, not revealing the Soviet Units/Cards until the Showdown step of Combat.
Before I go any further with this I want to offer my opinion on this solitaire system. It is not going to blow your socks off. It is very functional and frankly works for the conflict and the goal of the game but it is really very simple. What I mean by saying it is simple is that it doesn’t require a lot of decisions being made by the player, as everything is generally decided by reference to a flowchart and a die roll. It keeps the game light and generally quick playing but doesn’t provide a mental workout by the player. The only part that I don’t really care for is the Movement determination where you will roll a die, refer to a spray diagram and then move those blocks as dictated by the roll. This will result in a lot of the movements not happening as if the Soviet blocks can’t move there because they are running off of the board or their movement would take them into the Volga River, a card is drawn instead. This can create a continuous loop of non-movement which will simply run the Soviet Card deck out and result in a loss as the game ends as soon as the last card is drawn. But this is the puzzle that you have to solve. You must be aware of the situation on the board, and the results from the algorithm and die roll each Soviet turn, and then must do what you have to to avoid the loop.
Soviet AI
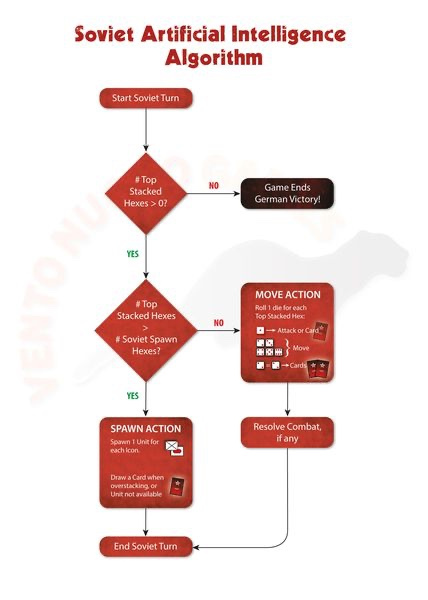
The Soviet AI is governed by the following algorithm which compares the number of Soviet Top Stacked Hexes to the number of Soviet-controlled Soviet Spawn Hexes (#3, #7, #9, #13, #15, #19). You might be asking yourself what the heck is a Soviet Top Stacked Hex? Well, it is really pretty simply described by saying the hex or hexes on the board containing the largest Stack by number of Units. Or in another way, the hex that has the most Soviet Units. Remember, that a hex can only contain 4 Units so it isn’t really that hard to figure this out. As the game progresses, you may end up with 4-5 of these Top Stacked Hexes in any given turn and that is when the choices start to get a bit more interesting.
The algorithm allows the AI to make decisions based on the situation that is unfolding during the game. For example, if they don’t have many Units on the board, and have a lot of the same number of Units in hexes, they will most likely bring more Units on the board. If there are fewer Top Stacked Hexes, the AI will decide to move the Units on the board to adjacent hexes to create more of a difficult road for the Germans to make it to Spawn Hexes.
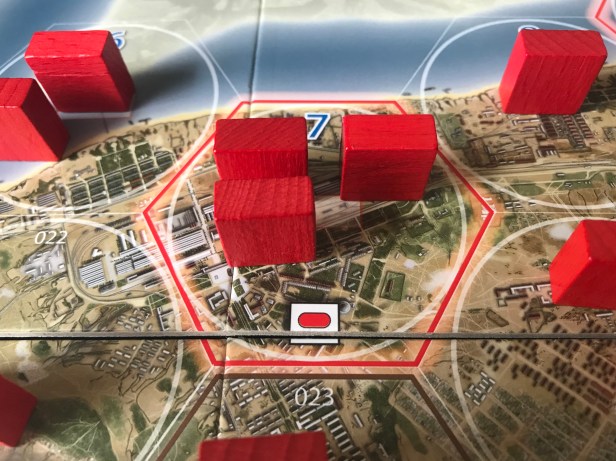
Let’s take a look at a simple example of a Top Stacked Hex in the following picture.

In the above picture, there is only one hex that qualifies as a Top Stacked Hex. Can you find it? Hint, it contains 3 Soviet Units. The answer is that it is located between two Soviet Spawn Hexes (hexes 13 and 15) near the center of the map.
After you have determined what a Top Stacked Hex is, you now go back to the algorithm to find out what the AI does this turn.
1. If the Soviets control at least one Soviet Spawn Hex, go to step 2; otherwise draw a Card from the Soviet deck, add it to the Soviet hand, and then proceed to step 5;
2. Check the Soviet Top Stacked Hexes on the board;
3. Separately count the number of Soviet Top Stacked Hexes and Soviet-controlled Soviet Spawn Hexes;
4. If the number of Soviet Top Stacked Hexes is:
A. Greater than the number of controlled Soviet Spawn Hexes, then the Soviets must perform a Spawn Action;
B. Equal to or below the number of controlled Soviet Spawn Hexes, then the Soviets must perform a Movement Action;
5. The Soviet turn ends and play moves to the next German turn.
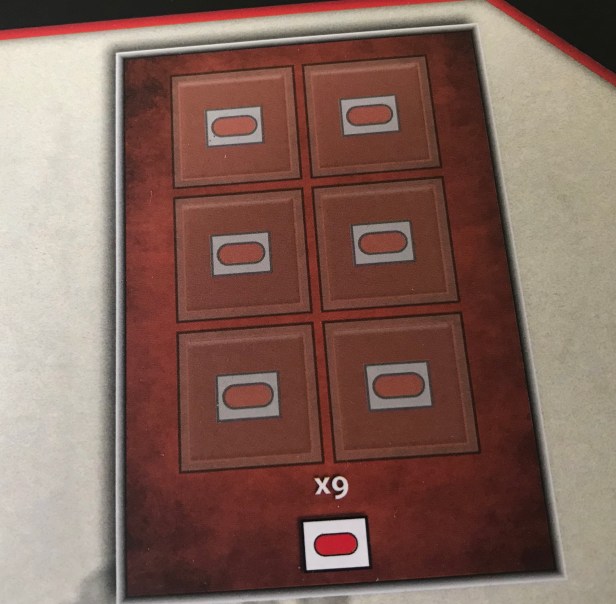
A Spawn Action is defined as bringing new Soviet Units onto the board. The Soviets will deploy the following Units via a random draw and at random Strength from
the Infantry/Tank Spawn Pools into each Soviet controlled Soviet (not German) Spawn Hex, in this order:
– each in hex #3 then in hex #19;


– in hex #9 then in hex #15;

– in hex #13;
– in hex #7.

The type of Unit that is spawned in each of these hexes is denoted on the board with NATO Symbols and is either a Tank or an Infantry Unit. The maximum number of Units the Soviets may spawn in any given turn is nine (six Infantry and three Tanks). If the Spawn Hexes are controlled by the Germans, then they will not spawn units and you will simply move to the next Spawn Hex in order. If the Spawn Hexes are fully stacked with 4 Units, the Soviets will draw a card and add it to their hand. The player should not examine these cards when they are drawn so that they don’t know what might come when they are played in combat.
There is an exception to this rule though with a few of the hexes. If there are already three Units in hex #3, #13, or #19, then only one Infantry is Deployed and no Card is drawn. Any time a type of Unit is required to spawn, but that Unit’s Pool is empty, the Soviets draw one Card for each Unit not available. So for example, if the Soviets need to spawn a Tank in Spawn Hex #3 and #19, but the Tank Pool is currently empty of Units, the Soviets will then instead draw one Card for each of the Tanks that could not spawn.
This is the part where you can watch things and try your best to anticipate what might happen with the AI to make sure you are attacking to provide defeated and destroyed Soviet Tanks and Infantry units back into the pools for drawing.
The Soviet Movement Action is quite a bit different than the Spawn Action and will see the Soviet defenders move to adjacent hexes, or in a worse case scenario, move nowhere and draw a card thereby ushering in the end of the game more quickly.
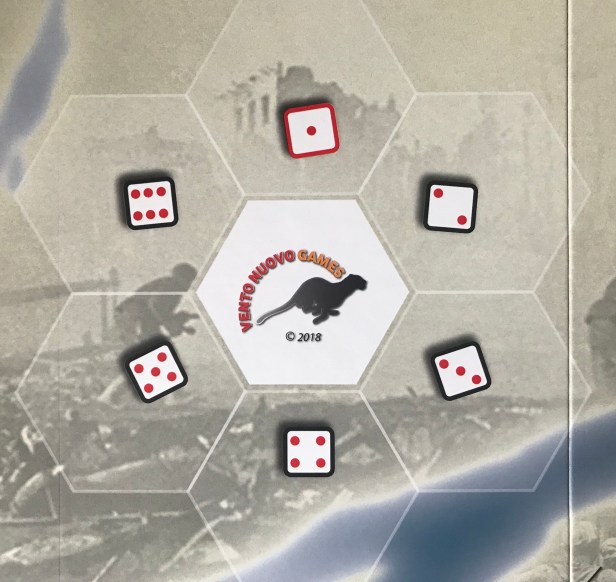
When the algorithm determines that a Movement Action is the action it will take, the Soviets will simply roll one die for each of their Top Stacked Hexes. As each die is rolled, it is placed on the hex, and then a new die is rolled for the next Top Stacked Hex and so on until you have a result for each such Top Stacked Hex. These die rolls follow an order which is the northernmost hex (or the closest to the Volga if two or more hexes are farthest north) and then continuing south.
The maximum number of dice rolled is six, as the Soviets may control a maximum of six Soviet Spawn Hexes (the German Spawn Hexes X, Y, and Z do not count). If the number of Top Stacked Hexes is seven or higher, which really doesn’t happen very often, the Soviets will always perform a Spawn Action. Once the Soviets have rolled for all of their Top Stacked Hexes, each die roll will be resolved starting from the lowest die roll up to the highest. Die rolls can result in Movement, drawing a Card, or a Hasty Attack. Each die roll must be resolved, even if the number of Units in its hex changes.
For a die roll from 2 through 6, choose a random Unit in the Stack without looking at it or changing its orientation and move it into an adjacent hex corresponding to the die roll on the Soviet Compass pictured below.
There are however three circumstances under which the Soviets draw a Card instead of performing a Movement:
A. If two or more die rolls are identical, then the Soviets draw one Card for each identical die roll and do not move a Unit from that hex;
B. If a Movement cannot be made, either because there is not a playable hex (those marked with a letter W, X, Y, and Z or a number from 1 to 105) in that direction (if the move would land the Unit in the Volga River or off of the board), there are no Units in the hex left to be moved, or because the hex in that direction is already occupied by four Soviet Units, the Soviets then draw a Card;
C. If the die roll is a 1, unless this generates a Soviet Hasty Attack (see below), the Soviets draw a Card.
If a Movement cannot be performed because a German Stack occupies the hex the Soviet Unit would have moved into, then the Soviet Stack must perform a Soviet Hasty Attack and the player will resolve the combat before proceeding to resolve the next die roll. In a Soviet Hasty Attack, the Soviet Stack must Attack the German Stack and must play a Card,
randomly chosen from the Soviet hand, whilst the Germans cannot play any Card.
I have seen many people discuss house ruling this Movement action by re-rolling if the rolled result causes a Unit to be unable to move. I think this is fine but really defeats the purpose of the rule. The rule is there to make this game tough to win, plain and simple. I know that the AI doesn’t seem all that smart and also doesn’t seem very aggressive as they will only Attack if they have no other choice, but you have to remember the history. The Soviets were caught off-guard in August 1942 and had to move their troops into the City of Stalingrad to slow the advance of the Germans. They built up their numbers, bringing in more troops and destroying German troops as the Germans struggled to resupply and bring up proper assault units. The weather was a big issue as well as it began to grow cold, the German soldiers were fighting against not only the Red Army but also Mother Nature as they didn’t have the right clothing, equipment and their machines began to break down in the rubble and from the cold. The AI knows that its real goal is to simply survive. They don’t aggressively Attack, but simply bide their time to run the Germans ragged and get to the point where the City is saved.
A note on these cards that the Soviet AI will draw and use and which if their deck runs out, the game is over and will result in a loss for the Germans. There are only 28 of these cards. That means that you have about 25-30 turns to get the job done. At first, the AI will not draw cards until they start to get enough Units on the board and then those Units will start moving and the pain will start for the Germans. Those cards can disappear quickly. Sometimes 2 or 3 per turn once things get rolling. You have to pay attention to the deck and consider how your actions will either prevent future card draws or slow the Soviet AI down. Remember earlier where I mentioned that the Soviet AI will draw a card if they cannot place a Tank Unit during a Spawn Action. You have to make sure that there are plenty of Tank Units available by destroying them through Attacks. You must Attack early and often and keep the pressure on the Soviet AI. Aggressive play will also eliminate several of the Spawn Hexes and slow down the units coming onto the board that you will have to fight through. I like to defeat the wings first and then meet my troops in the center from all sides. But you must be aggressive. I cannot stress this enough.
In conclusion, I have enjoyed my plays of the game. It is light and the rules are fairly easy to understand. There also are several ways to increase the difficulty that we didn’t necessarily discuss in this series but I think it is hard enough already. A key to a good solo game for me is the challenge. If I am able to game the system and win easily, I will have little desire to return to the game and try again. But, if each win is difficult and takes all of my effort to obtain, those victories become sweeter and make we want to repeat that feeling. Stalingrad: Inferno on the Volga does that well. The game is not my favorite but definitely has a place on my shelf and will appeal to many East Front aficionados.
-Grant
