
Stalingrad: Inferno on the Volga is a block wargame that recreates one of the most brutal battles of World War II being that of the siege of the City of Stalingrad located on the Volga River by elements of the 6th Army and 4th Panzer Army. The game is designed as a solitaire game where the player controls the attacking Germans and the game’s AI controls the defending Soviets.
In Action Point 1 we looked at the basics of the two types of Movement and the two types of Attack. In this Action Point, we will examine the Combat Sequence and its various steps, including the dreaded Rubble Roll, and show a few examples.
Units
Before we look at the Combat Sequence though we have to first look at what determines the Strength of a unit or the number of dice each unit will roll and the unit’s Firepower which determines the chance of the unit scoring a hit.
Unit Strength
The Strength of a unit is simply denoted by the number of dots along the top edge of the unit block. This will range from 4 to 1. The current Strength of a unit is shown by the side of the block that is on the top of the block as it is standing up. When the unit takes a hit it’s Strength will be reduced by rotating the block 90 degrees counter-clockwise. When the unit is reduced below it’s minimum Strength the unit will be eliminated.
The Strength of the unit tells the player how many dice it will roll in Combat. The game uses 6-sided dice. For example, a unit with 4 dots showing on the top edge of the block will roll 4d6 when it attacks.
Unit Firepower
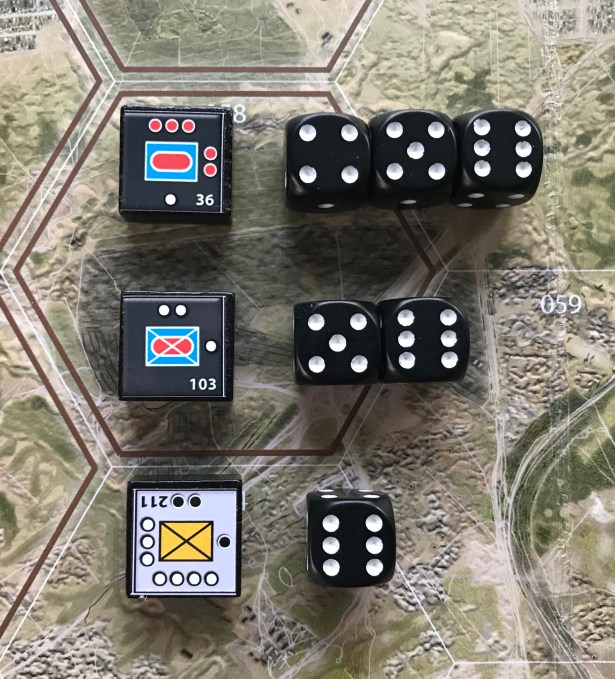
Firepower determines the chance of a unit scoring a hit with each die roll. Firepower is represented by the color of that unit’s dots. There are three colors used to denote Firepower including black, white and red.
In the picture above, you can see the difference between the three colors. Black dot units are the weakest and will only hit with a 6. White dot units will hit with a roll of a 5 or 6 and red dot units will hit on a 4, 5 or 6.
Let’s now take a look at the Combat Sequence before we move to a few examples of Attacks.
Combat Sequence
The Combat Sequence is identical for both sides, with but one exception. The German player can make only one Attack per turn, while the Soviet side may make up to six. Soviet Combats are resolved in a specific order, and each Combat is completely resolved before another one starts. The Combat Sequence is pretty simple but is lengthy with several steps as follows.
Once either a Hasty or Deliberate Attack is chosen, Combat is declared and the following sequence is applied. The Soviet side must play a random card from the Soviet hand if they have one, and keep it face down until Showdown. This mandatory card is played even if it is the Soviets who are Attacking. There are 28 Soviet cards and these are the game timer and attacks will end the game more quickly. If resolving a German Deliberate Attack, the German player may then play a Card of their choice face down.
This then brings us to the Showdown where both sides’ face down cards and units involved in the Combat are revealed simultaneously. First you will reveal the Soviet Card and apply its effect followed by the German Card effect being applied;
If the German attack is a Deliberate Attack and the hex the attack is into is an Urban Hex, a Rubble Roll will be performed. Combat then is simultaneous unless the hex is an Urban hex in which case the the Defender always rolls first or there is a Clear hex then the Germans may roll first if the Hoth card is in play and Combined Force Bonus is available. Once the Attack is complete, then the winner will Advance after Combat which is mandatory if the Attacker wins where at least one Unit is required to Advance. Blitz Movement is then carried out for the German if the Hoth card is in play. To wrap up the process, units are concealed. Now that you understand the process of the Combat Sequence, let’s take a look at how Close Combat is mechanically resolved.
Rubble Roll
One of the more interesting parts of the design is this concept of a Rubble Roll when attacks occur in an Urban Hex. The siege of Stalingrad was a bloody and vicious street to street and building by building battle that ultimately led to a majority of the standing structures being reduced to nothing but rubble. This concept is inserted into the Combat Sequence when the combat occurs in an Urban Hex and will be determined by a modified die roll.
If Rubble is created in an Urban Hex it gives the defender Double Defense (attacker requires two hits to inflict one actual hit on a defending unit) when defending in such a hex. Rubble may be generated in an Urban Hex only in one of two different ways:
1. By the play of a Soviet Anti-Air Card, of which there are four in the Soviet deck. When these cards are played they cancel the effect of a German airstrike card
(including the Rubble Modifier), if played, and immediately place a Rubble Marker in the Hex without the need for a Rubble Roll.;
2. A German Deliberate Attack with a successful Rubble Roll. The Rubble Roll is successful if the sum of 3d6 is greater than 18. In addition to the dice roll, there are various cumulative modifiers that can effect the roll and make it more likely. The rubble modifier (+1/+2/+3) indicated on a German Card if played during this combat; +1 for each hex from which the Germans are Attacking in into this Urban Hex (+1/+2/+3/+4/+5/+6); and +1 for each German Panzer/Panzer Grenadier Unit Attacking. If the result of the roll is greater than 18, a Rubble Marker is immediately and permanently placed in the Urban Hex. No more than 15 Rubble Markers (in 15 hexes out of the 27 Urban Hexes in the game) may be placed during a game. After all of the available markers have been placed, future Rubble Rolls are simply ignored.
I can tell you that Rubble can make your job of defeating the Soviets that much more difficult and you must be careful how you go about your attacks when you are attacking Urban Hexes.
Close Combat
Units engaged in Close Combat will roll the same number of dice as their Strength (number of dots), with their Firepower (what result they hit on) given by the color of the dots. During Close Combat, both sides will roll for their units simultaneously, adding up their total number of hits. I recommend rolling different colored dice for each of your units for ease (red, white and black dice) or you can just roll them separately noting the hits based on the Firepower of each unit. Each unit will only roll its dice once per combat. Each actual hit causes a reduction of the strongest enemy unit. Which unit is the strongest, and thus which takes the next hit, may change throughout the combat if multiple hits are inflicted on the same Stack in the same combat. If two units have the same Strength, the German player chooses which unit is reduced.
As with any good wargame, there are two exceptions to simultaneous Combat:
1. In an Urban Hex, the defender rolls first, and their hits are immediately applied to the
attacker before the attacker rolls with their remaining units (if any);
2. A German attacker rolls first and immediately applies hits if the Combat is in a Clear Hex, the Hoth Leader Card is in play, and the Combined Force Bonus is available. The Combined Force Bonus comes into play when a battle occurs only in a Clear Hex in which the Germans have both Infantry and Tank units while the Soviets do not (this is a very important distinction). For purposes of the Combined Force Bonus Panzer Grenadiers are considered a mixed formation consisting of both Tanks and Infantry and they always
benefit from this bonus, even when attacking alone, while all the other German Units need one of each for this bonus to be applied.
Let’s take a look at a few examples of this process. The first example will involve a Hasty Attack through a Rough Hex while the second example will be more complex with a Deliberate Attack from two hexes into an Urban Hex, which will allow for a card to be played by the Germans.
Hasty Attack
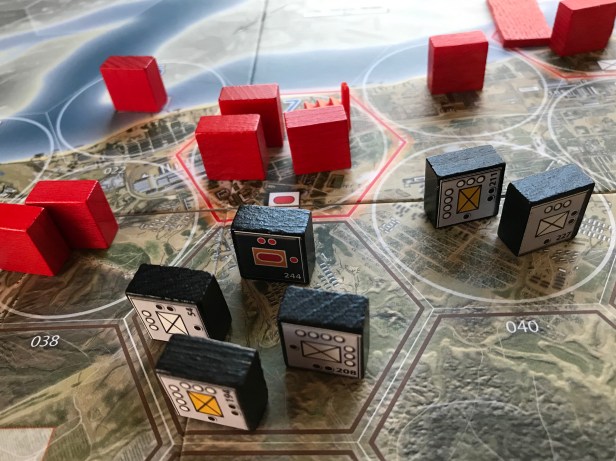
Remember back to Action Point 1 and the definition of a Hasty Attack, which is that units take a one hex movement and then attack. In this example, you will see that three German units starting in Hex W (a German spawn hex) have moved up into a Rough Hex in order to attack the Soviet unit located in Hex 2 which is just south of a Soviet spawn hex.

This example is at the outset of the game and means that the Soviets have no cards in their hand to play and the German player cannot play a card as they are attempting a Hasty Attack. Cards can only be played during a Deliberate Attack by the Germans. After movement is complete, the units are then revealed and the Soviets have a 4 dot 35th Soviet Guards unit at full strength so this will not be a cake walk but should be a German victory in the end.

This attack will happen simultaneously as the combat takes place in a Clear Hex and the Soviets do not have the Chuikov Leader Card played which allows them to always perform Opportunity Fire and attack first. The Soviet unit will be rolling 4d6 (represented by the white dice) while the Germans will be rolling 7d6 (represented by the black dice). Remember that a unit’s Firepower is determined by the color of their dots. The Soviet unit is a white dot unit and will hit on a roll of 5 or 6. The German Panzer unit is a red dot unit and will hit on rolls of 4-6 and the two Panzer Grenadier units are both white dot units and will hit on roll so a 5 or 6. In this instance, the Germans do not gain the Combined Force Bonus as the Hoth Leader Card is not in play. They do qualify for the bonus as they are attacking with Tank and Infantry and this is a Clear Hex but alas they will not get the bonus as they are missing the card.

The Soviet rolls 4d6 and gets a 2, 3, 5 and 6 which will score two hits. The German rolls 7d6 and with the white dot units rolls a 2, 3, and two 5”s which will score two hits and the red dot unit rolls two 4’s and a 5 scoring three hits for a total of 5 hits. Both sides will now reduce their strongest units first with the first hit and then proceed to continue reducing the next strongest unit until all hits are absorbed.

The Germans must absorb 2 hits and first must reduce the 2nd Panzer unit as it is the strongest unit with 3 dots. This unit is rotated 90 degrees counter clockwise from 3 dots to 2 dots. There is still one remaining hit to absorb and now the German player must make a choice as they have three units that all are tied for the strongest unit. The choice is really very simple as they wish to retain their highest Firepower unit (the 2nd Panzer) as its 2 Strenght so they choose to reduce the 79th Panzer Grenadier unit by rotating it 90 degrees counter clockwise from 2 dots to only 1 dot.

The Soviets have a 4 dot 35th Soviet Guards unit that has to absorb all 5 of the German hits. It only has 4 dots so it is eliminated. The Germans have won the battle.

Now that the battle is complete, and the hex is cleared of all Soviet units, the German stack will Advance after Combat which is mandatory that at least one of the winning units advance. In this case, the German player would choose to advance all three units in the cleared hex as it will set up a future Deliberate Attack on the Soviet spawn hex to the north. All units are then concealed. If Soviet units had survived, they would have been turned up to conceal their strength from the German player. For the solo game, it is not important for the German player to worry about concealing their units. I typically just leaved them laying down for ease of play.

Now that you have seen an example of a Hasty Attack that was pretty simple and understand how the Combat Sequence flows let’s now show you a bit more complex encounter in a Deliberate Attack into an Urban Hex with card play.
Deliberate Attack
Now we move into the deeper and a bit more complex side of the Combat Sequence with a Deliberate Attack on an Urban Hex from several adjacent hexes. In this example, we have a German Deliberate Attack from Hex 023 and Hex 024 into Hex 7 which is a Soviet spawn hex as well as an objective hex that must be controlled by the Germans to win the game. The German forces consist of a 2 dot Panzer unit (244th Panzer) paired with three Infantry units, one that 2 dot (black) Infantry unit, a 3 dot (white) Infantry unit and a 4 dot (white) Infantry unit in one hex and two 3 dot Infantry units together in the adjacent hex. As you can see there are three defending Soviet units that will remain concealed until after the Showdown.
Because the Soviets have a card in hand and because the Germans are taking a Deliberate Attack, each side will play a single card face down during the Showdown. The Soviets cards will be resolved first followed by the German card. These cards typically offer some type of combat bonus in the form of extra attack dice or an event that attacks or reduces an opponent’s units.

We next move to the Showdown phase where the cards and both side’s units are revealed and the the card effects are resolved. In the picture below, we see that the Soviets have played the Anti-Tank Card and the Germans played Sniper. We also see that the Soviet units are revealed and are not terribly tough with two 2 dot (white) Tank units and a 3 dot (black) Infantry unit. The cool looking factory in the space has no game effect but does represent the Traktor Factory.
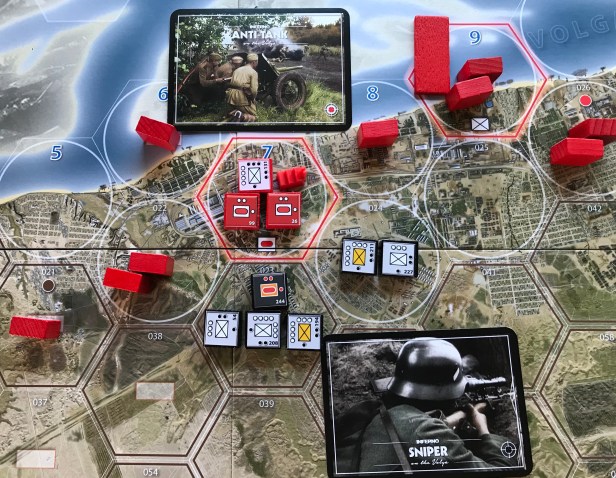
The Anti-Tank Card will be resolved first and it simply targets the strongest German tank in a stack and reduces it by one strength point. You can see that the Panzer unit has now been rotated 90 degrees counter clockwise from 2 dots to only 1 dot. The German Sniper Card does a similar effect and targets the strongest Infantry unit in the hex and reduces it by one strength point. You will notice that the Infantry unit is rotated 90 degrees counter clockwise from 3 dots to 2 dots.

The played cards are now discarded and we move to the Rubble Roll as the attack was a German Deliberate Attack into an Urban Hex. The German player will roll 3d6 and then modify that roll according to the above listed modifiers and if the roll exceeds 18 a Rubble Marker will be placed in the space. The attack adds a +3 modifier to the roll as the attack is coming from two different hexes (+1 for each hex) and a Panzer unit is involved. The roll was two 5’s and a 6 for a total of 16 and then added to with the +3 modifier for a total Rubble Roll result of 19.

A Rubble Marker is placed in the hex and will now make it so that 2 hits are needed to reduce a unit in that hex by one strength point. In essence, this means that in order to eliminate the Soviet defenders, the Germans will have to inflict a total of 12 hits. A tall order. Let’s get to the dice rolling.

The Soviet will get to fire first as they are defending in an Urban Hex. They will roll only six dice and four of those dice will hit on a 5 or 6 and two of the dice from the Infantry unit will hit only on a 6. The dice will be rolled and the German will have to absorb those hits prior to their chance to fire so this is very important for the Soviet defender.

The four white dice, which need a 5 or 6 to hit, are rolled and result in a 1, 2, 5 and a 6 scoring only two hits. The German player will have to reduce the four dot 208th Infantry unit by one strength point and the three dot 194th Infantry unit located in Hex 023 by one strength point.The 194th Infantry unit now is reduced to a 2 dot black unit which had it’s chances of hitting reduced. Other than that this was a good result for the Germans. Now we move to the German attack.

The Germans will be rolling a total of 14 dice needing 12 hits to eliminate the Soviet defenders due to the Rubble Marker. The 244th Panzer rolls 1d6 and hits with a 5 (needing a 4, 5 or 6 to hit), the 54th Infantry rolls 2d6 and hits once with a 6 (needed a 6 to hit), the 208th Infantry rolls 3d6 and hits once with a 5 (needed a 5 or 6 to hit), the 194th Infantry rolls 2d6 and hits once with a 6 (needed a 6 to hit), the 211th Infantry rolls 3d6 and hit twice with a 5 and 6 (needed a 5 or 6 to hit) and the 227th Infantry hits twice with a 5 and 6 (needed a 5 or 6 to hit). This is a total of 8 hits which is really a very good result.

The Soviets take the 8 hits by reducing the 131st Infantry by two strength points, the 26th Panzer by 1 strength point and the 99th Panzer by 1 strength point. Each of these strength points required two hits to reduce due to the Rubble Marker in the space from the Rubble Roll. The Soviets defenders have held and lived to fight another day although they are terribly weakened and will only be rolling 2d6 the next time the Germans attack unless they can get some additional units to move into that space.

After the dust has settled and all the units have been reduced the surviving units will be concealed and the turn will move to the Soviets who may attack back or will reinforce their units holding the Traktor Factory.
Combat is a very important part of the game and you must understand how best to manage your attacks to ensure that you are successful. Ensuring a good mix of good Firepower units, like Panzers, mixed in with high volume of dice rolling units such as Infantry will provide the optimal number of chances to inflict damage on your enemy. But beware of the dreaded Rubble Roll in an Urban Hex because you can avoid causing rubble with some restraint because if the Soviets are allowed to dig in it can be nigh impossible to dislodge them before those units are reinforced with fresh healthy 3 and 4 dot units. The Combat Sequence is pretty well done and easy to follow and I really enjoyed rolling those dice. I also really liked the cards and only wish that there was more opportunity to obtain them for the Germans as they can make a big difference with difficult or marginal attacks.
In Action Point 3, we will take a look at the chrome added to the design such as the fantastic researched map and the great card play system.
We also published an interview with the designer Emanuele Santandrea and it gives a lot of great insight into the design: https://theplayersaid.com/2017/12/14/interview-with-emanuele-santandrea-designer-of-stalingrad-inferno-on-the-volga-from-ventonuovo-games/
-Grant

Thanks for a greaat read
LikeLiked by 1 person
You are most welcome. Glad you enjoyed the series.
LikeLike