
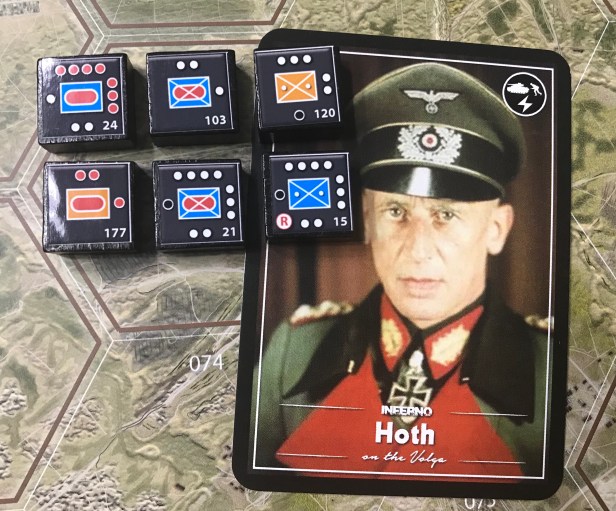
I love a good solitaire game that is well designed and that offers a challenge. Recently, I have played several of these types of games but came across a new one in Stalingrad: Inferno on the Volga a few months ago. The game was funded on Kickstarter in late 2017 and was delivered at the end of 2018. Stalingrad: Inferno on the Volga is a block wargame that recreates one of the most brutal battles of World War II being that of the siege of the City of Stalingrad located on the Volga River by elements of the 6th Army and 4th Panzer Army. The historical conflict was highlighted by street to street fighting in an urban setting that had been reduced to rubble by continual artillery and air bombardment. The game itself can be played in one of four different modes, with one of those being a solitaire system where the player takes the role of the Germans attacking the City of Stalingrad while the AI controls the Soviet defenders that works quite well, although is not as dynamic as I would have liked to see, but that is the subject for a later post.
In this series of Action Point posts, I would like to cover the basic elements of the game, including the various forms of Movement and Attacks available, examine the Combat Sequence and its various steps, take a look at the nice chrome added to the design such as the fantastic researched map and the great card play system, explain how the Germans call for reinforcements and examine how the solitaire AI system works.
Movement
I will be honest here. The thing that took me the longest time to get down was movement. It is not that the rules aren’t clear, they are really pretty well done, it is just that there are a lot of conditions that must be met to allow for each of the different types of movement. There are two different types of movement available, Long Movement and Short Movement. Sounds pretty simple right? A player can choose to take either one Long Movement or break this movement up with two Short Movements. I will discuss each of these types of movement and their advantage below. Before we get into that though, it is important to understand two distinct things about movement. Separating Blocks from the moving Stack is referred to as a Breakdown, and a moving Stack ending its move in the same hex as another Stack (without violating the stacking limits) is called a Join-up. And the second point to remember is that Maximum Stacking is four Units per hex. A Stack is defined as a group of one to four Units in the same hex.
Long Movement
A German Stack in a Hex not adjacent to a Soviet Stack may move up to two Clear Hexes, provided that both these entered hexes are not adjacent to a Soviet Stack. The first entered hex may contain a German Stack, but it cannot participate in the move, and Stacking limit is ignored while moving through it. Joinup, Breakdown, and Combat are not allowed with Long Movement.
So the basic thing you need to get out of Long Movement from a thematic and real world element is that this action is a full out move as quickly as possible in order to gain as much ground as possible. You cannot do this type of aggressive movement when you are harassed by the enemy at any time during the movement, either at the outset or when you come to a halt. That is the reasoning behind not being able to take this action while you are adjacent to a Soviet Stack.
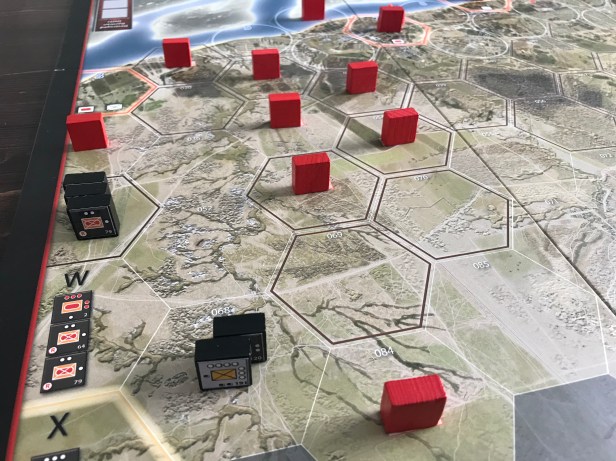
Here is a look at a Long Movement illustrated on the board so you get a good feel for how it works and its constraints. The blocks that are considering a Long Movement in this example are the three units located in the X spawn location in the bottom left hand corner of the picture. The units that started in the W spawn location have previously performed a Hasty Attack (more on this later in the post) and have cleared the path to allow for this Long Movement.
First thing to notice in this picture is that there are no Soviet Stacks located in adjacent hexes to the three units that are undertaking this Long Movement nor are there any Soviet Stacks within three hexes. Therefore, the first requirement is met. Next, you will notice that all of the hexes located in front of the stack are Clear Hexes. I must diverge a bit here from this discussion to give you a definition of the various types of hexes.
There are three type of hexes including Clear, Rough and Urban.
A Clear Hex is without major buildings or rough terrain and a Long Movement is eligible through this type of hex. There is no Rubble Roll required (we will cover this in a later post) and Simultaneous Combat is how combat will be carried out meaning both sides roll dice and attack at the same time taking losses after rolls are completed. Blitz Movement is also allowed and is covered later in this post. A good example of Clear Hexes are Hex 052, 068 and 084.
A Rough Hex is identified with a brown line on the outside of the hex. In the picture below, Hex 069 and Hex 070 are Rough Hexes. A Rough Hex represents rough terrain such as forests, gullies and hills but without major buildings. A Long Movement is not eligible through a Rough Hex. There also is no Rubble Roll and combat is Simultaneous Combat.
An Urban Hex is denoted by the presence of a large white circle and contains major buildings. Long Movement is not allowed through an Urban Hex and when combat occurs it will cause a Rubble Roll and the Defender will always fire first.
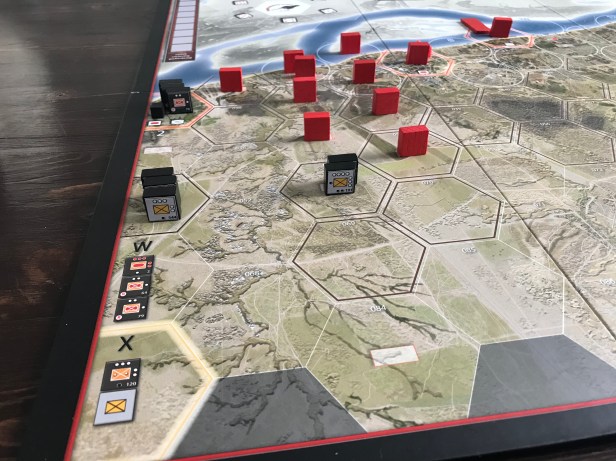
To continue the example, the three units move into their first hex, which is the German controlled W spawn hex located adjacent to their starting location, and then move their second movement into Hex 1 located to the north of and adjacent to the W spawn hex. There action is now complete and they cannot perform any additional moves nor combats this round. Long Movement is simply built to get your units up to the front where they can attack the Soviet blocks.
In the middle of the map is where this Long Movement becomes extremely important as you will have pretty significant units that start the game here but are far away from the main conflict. You must first dispatch the few stubborn defending Soviet Stacks there and then will have free reign to Long Move your way to the front but this will take a minimum of 4-6 turns, unless the dice are unkind and it takes you a few rounds to deal with the Soviets there. Now let’s take a look at Short Movement.
Short Movement
A combination of up to two German Stacks or Substacks broken down from one Stack may be moved to adjacent hexes (or an adjacent hex) that are not adjacent to or contain any Soviet Stacks. Breakdown and Join-up are permitted, but no Combat is allowed. When using this Action, the German player can choose to move no Units, which means he effectively is passing his turn.
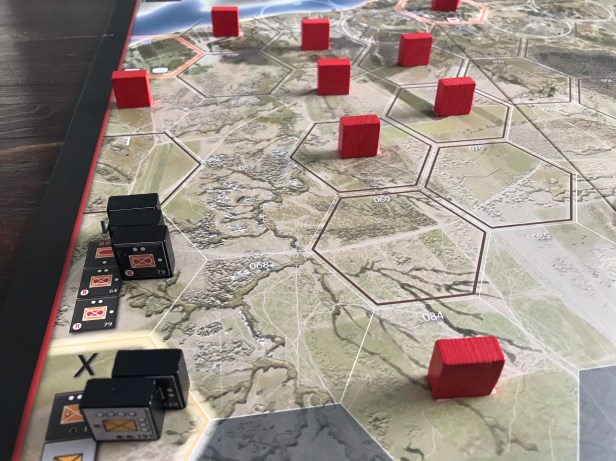
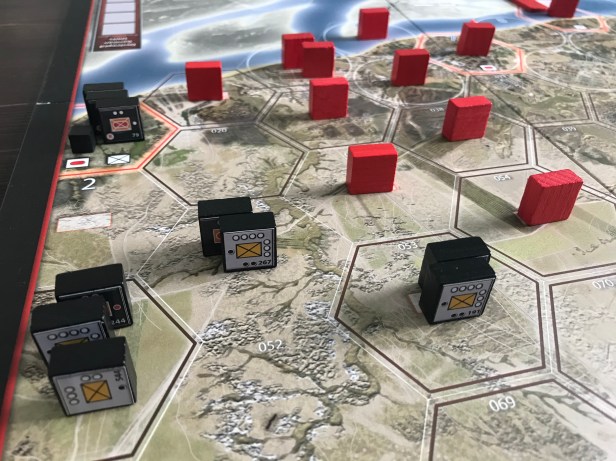
In the picture above, you will see that Short Movement is not allowed in this situation. There simply are no hexes that are not adjacent to a Soviet Stack. Well, you might be asking how you are supposed to move at all from this starting position in the game? The answer to that question is that you CANNOT! Not with Movement, but you can combine movement and attack in a little move called the Hasty Attack. But first, I want to tell you about Blitz Movement.
Blitz Movement
When a combat is won the attacker must advance into the just vacated hex with at least one of their attacking units which is referred to as Advance After Combat. After completing the Advance After Combat into a Clear Hex, and if the General Hoth card is in play for the Germans, each German Blitz Unit (signified by a dark background and consisting of Panzers, Panzer Grenadiers and Motorized Infantry) that advanced may elect to move again into any adjacent empty of enemy Units Clear Hex (I love this description as it is very clear!). The Stack may split up into four different empty of enemy Units Clear Hexes, possibly leaving the original hex empty.
This third type of movement is very important for the German player as it simply gives them one additional movement point to advance their units on the enemy. This simple additional hex can be the different between getting to a Soviet Urban Hex before it gets to heavy with reinforcements and becomes like a fortress. It is important for the German player to have Hoth in play as this Blitz Movement and the extra benefit from Combined Force Bonus are vital to their success.
Attacks
There are two different types of attacks available in the game and each has their benefits and drawbacks. Let’s take a look at these attacks.
Hasty Attacks
An attack in which preparation time is traded for speed in order to exploit an opportunity. This is basically when units take a one hex move and fire. For a Hasty Attack, the German player moves one Stack which is not currently adjacent to any Soviet Stack into a hex that is adjacent to a Soviet Stack in order to make a Hasty Attack. This is where you want your move to end adjacent to a Soviet Stack which is very different from the earlier Long and Short Movement we looked at. This attack can be directed against only one adjacent Soviet Stack, and all the German Units in the Stack must participate in the attack.

In the above picture you will notice that the starting German units in their spawn hexes have the ability to make a Hasty Attack from the get go as there are three Soviet Stacks in three nearby hexes. This generally will be the first move of every solo game you play as it is very important to clear some room to operate in and important to knock out the Soviet spawn hex located in the upper left hand corner of the picture.
The Germans decide to attack to the north and to the east to clear out the area of operations near their spawns to allow future recruited units the option of taking Long Movement to get to the front more quickly. Hasty Attacks involve a single movement of one hex and then you are into combat. We won’t look at the Combat Sequence in this post but will in Action Point 2. This post is simply about Movement and how it works with the two types of attacks.
Breakdown and Join-up without violating Stacking limit is allowed during Movement and during a Hasty Attacks; but when using Join-up the moving Stack must combine and attack with units already adjacent to the target. A Stack starting its turn adjacent to a Soviet Stack may not make a Hasty Attack unless it is joined up by a Stack that moved into it during this action. A Hasty Attack does not allow card play by the Germans nor do the attacks cause Rubble Rolls. This is illustrated in the above picture as the two German units stacked in Hex 036 are going to be part of a Join-up and are starting adjacent to the target. Two German units from Hex 1 move into Hex 036 at the outset of the Hasty Attack to join with the two stacks there. Pretty simple a good strategy to use in order to bolster your chances of success during attacks as you will roll more dice with the four units than with only two.

Deliberate Attack
A type of offensive action characterized by pre-planned and coordinated deployment of firepower and movement to close with and destroy or capture the enemy. If this action is played, then no movement occurs and there is no Breakdown or Join-up. The German player may choose one Soviet Stack adjacent to one or more German Stacks and make one attack against it with some or all of the adjacent German Stacks. The German player may also play a Card from his hand. The German player may choose which Stack(s) will perform the attack, but all the Units in the selected Stacks must attack. A Deliberate Attack may generate Rubble.
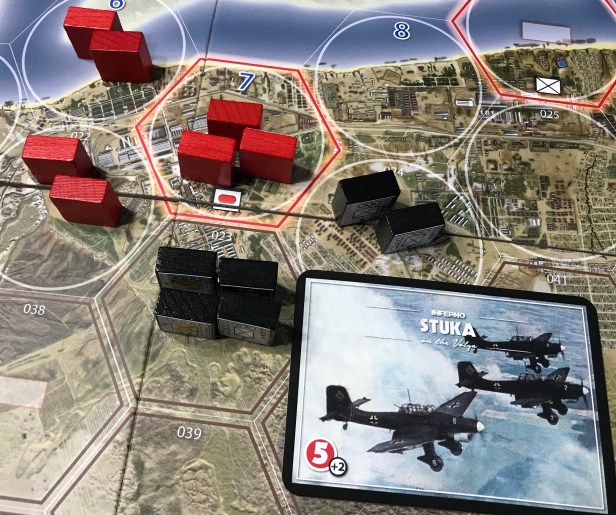
In the below picture, the German units in Hex 023 and Hex 025 are each performing a Deliberate Attack against the Soviet Stacks in Hex 7 which is a major spawn point for the Soviet defender. Because each of the stacks started adjacent to the target, there is no movement involved and this type of attack allows for better coordination and utilization of available resources such as cards in hand. This is the major difference in the two types of attack as cards can only be used when a Deliberate Attack is used. This hex is an Urban Hex so the Defenders will get to roll their attack dice first and remove any casualties from the attacker before they get to roll their dice but this still is a very strong move for the Germans especially since they also are playing the Stuka card which will allow them to roll 5 additional dice. The only downside to this attack is that due to the two stacks attacking from different hexes and the presence of armor, and with the card being played that gives a +2 modifier to the Rubble Roll, this could cause rubble which will make it harder for the Germans to score hits but we will cover this in a later post.
As I mentioned at the outset of this post, movement was a hard concept for me to get down but once I did there wasn’t a concern and this game is actually a fairly rules light fast playing simulation of the assault. A solo game can be played between 60-90 minutes and really is a pretty satisfying experience.
In Action Point 2, we will take a look at the Combat Sequence and go through a few examples of Combat.
We also published an interview with the designer Emanuele Santandrea and it gives a lot of great insight into the design: https://theplayersaid.com/2017/12/14/interview-with-emanuele-santandrea-designer-of-stalingrad-inferno-on-the-volga-from-ventonuovo-games/
-Grant

The “fabulous“ AI of this game:
You roll one 6 sided die and the the AI unit will go to the hex side the die rolled…
Half of the time it will result in the AI unit throwing itself into the Volga river… which results in a discard of a card in the AI deck, … so the player loses the game faster…
Utter garbage and an insult to proper developped solo games.
Seriously.
LikeLike
Hey Grant, thanks for the write up – great game and super helpful! One quick clarifying question re: your Long Move example. You note that “the German controlled W spawn hex located adjacent to their starting location, and then move their second movement into Hex 1 located to the north of and adjacent to the W spawn hex.” Here’s my question: Since Hex 1 has a thick brown line (indicating Rough Terrain — as seen in your first photo in this thread), wouldn’t the troops be unable to move into Hex 1 on a long move? (However, they *could* move into Hex 052 in that photo as it is clear and doesn’t have any Soviet troops in adjacent spaces?) Thanks for your perspective – and keep up the great work! – Curt
LikeLike