A few years ago, I discovered a great solitaire game called The Wars of Marcus Aurelius from Hollandspiele that dealt with the Romans attempting to pacify Barbarian hordes from the north in the Danube provinces during the Marcomannic Wars in 170-180 AD. Now the designer has taken that system and applied it to another period in Roman history when the Goths and Vandals, as well as a pretender named Constantine, were assaulting Rome itself and one man was asked to defend her from her enemies. Flavius Stilicho was a high-ranking general who rose from humble beginnings to become one of the most powerful men in the Western Roman Empire. After many years of victories against a number of enemies, both barbarian and Roman, a series of political and military disasters finally allowed his enemies in the court of Honorius to remove him from power, culminating in his arrest and subsequent execution in 408. In Stilicho: Last of the Romans the player must survive these attacks from enemies both external and internal and quell all three advancing enemies.
In Action Point 1, we covered the Mapsheet focusing on the three Fronts down which your enemies advance, but also covering the different spaces and boxes that effect play such as the Olympius Track, Game Turn Track, Army Box, Leader Box and Recovery Box. In Action Point 2, we looked at the cards that drive the game and examined the makeup of both the Enemy Deck and the Roman Deck. In Action Point 3, we took a deeper look into the Roman Phase and examined how cards are discarded to take one of nine different actions. In Action Point 4, we dove into a few examples of Battles and how they are resolved, including utilizing pacified enemies against your raging enemies, a very cool addition to this game that should be considered before using. In this Action Point, which is the conclusion to this series, we will take a look at a few points of strategy that will help you do better in the game.
Strategy Points
First point that I wish to make is that I don’t consider myself an amazing tactician. But I do believe that all games can be a bit more enjoyed if you follow some basics of strategy. There are always things that the players should be focused on and remember as they play that will help guide their decisions and give them a greater chance at victory. These points that I am sharing for Stilicho: Last of the Romans are such guiding principles.
Distribution of Available Comitatenses
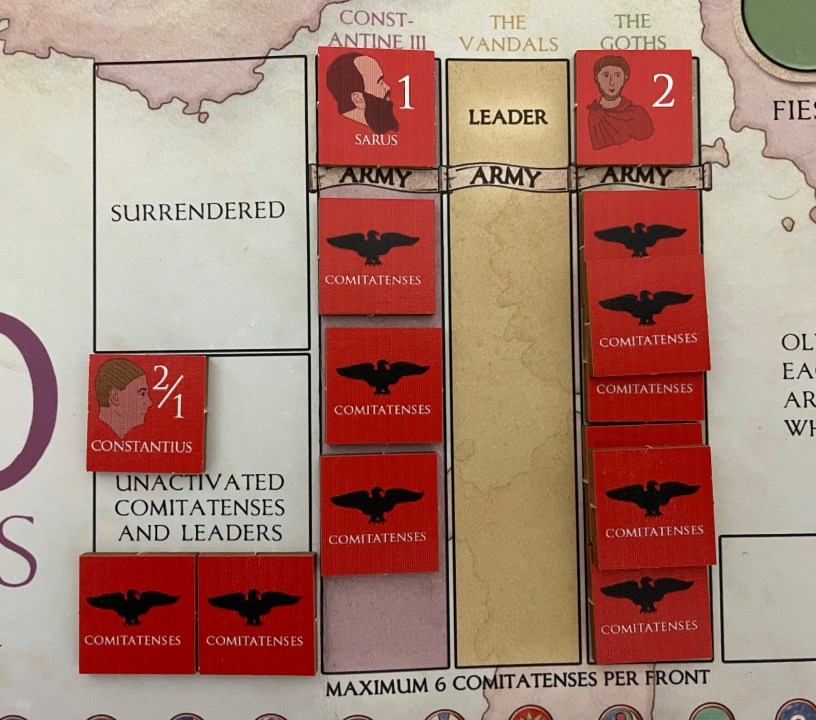
One of the most important assets available to players, other than the cards, are their activated Comitatenses. These are your soldiers used to fight back the advancing Barbarians and having the right amount to do the job is key and you have to focus on getting more to available any chance that you have. At setup, the player will start with 12 Comitatenses along with 2 Leaders that they can distribute between the Army Boxes or place as Garrisons in the three key cities of Arelate, Roma and Ravenna. Because you only have 2 Leaders to start, including Sarus and Stilicho, and because you cannot place Comitatenses in an Army Box without a Leader, you must place them between 2 Army Boxes. You also have a limit of 6 Comitatenses in any one Army Box so you cannot over stack and make a super army.
My first point of strategy is that you must focus on defeating The Goths (see point #2 below) so with that in mind, I recommend that you place your Comitatenses as follows: 3 Comitatenses can be placed as Garrisons in the three Walled City spaces. You don’t want to make it too easy on Constantine III and you want to at least slow his advance down if possible by placing these speed bumps out. This will leave you with just 9 Comitatenses to play with so you will want to make the best choice possible. I always start the game with Stilicho leading the army that goes against the Goths and will place the maximum 6 Comitatenses in this army. This gives you a base Attack Value of 8 (+1 for each of the 6 Comitatenses + +2 for Stilicho’s Attack Value = 8). This makes this army a pretty formidable force that will be able to stack up against The Goths Attack Value of 5 (or 4 if they have been become Demoralized) or 6 later in the game as their counter gets replaced by an Event Card.
This leaves just 3 Comitatenses available to the player and I recommend that you place all 3 in the Constantine III Army Box along with Sarus. This is considered a delaying force and by no means is meant to be an offensive juggernaut to take down the pretender. Their Attack Value will be just 4, which when compared to Constantine III’s Attack Value of 6 (or 5 if Demoralized) is not a great ratio, although it is doable if you need to as Constantine approaches Ravenna where you will lose the game. To me this is the optimal distribution of Comitatenses and will serve you well as you go about trying to quell the unrest and revolt in the empire.

My final comment about this distribution is in regards to the remaining 2 Unactivated Comitatenses and the Leader Constantius who are located in the Unactivated Comitatenses and Leaders Box. These will only come into the game through the play of certain Event Cards, namely Battle of Faesulae, Notitita Dignitatum or Constantius. Because you will need these additional Comitatenses to maintain order and keep defeated tribes out of the fight, you will want to get these into the game by Turn 4, after which you should have The Goths subjugated and will have to maintain a decent Pacification Value on their Front with the number of Comitatenses and Leaders in that Army Box to defend against the dreaded Oathbreaker Check. If you don’t have these 2 additional Comitatenses out, you will find that your army is more difficult to maintain at its optimal Attack Value of 8 to go against the stubborn invaders. I recommend that you play these three cards when drawn every time, no matter what your plan of action is or what you believe is most important. If you pass and use the cards to discard to take an action, you may not see them again for a long while, if ever and you cannot afford to not get these resources out.
Focus on the Goths First
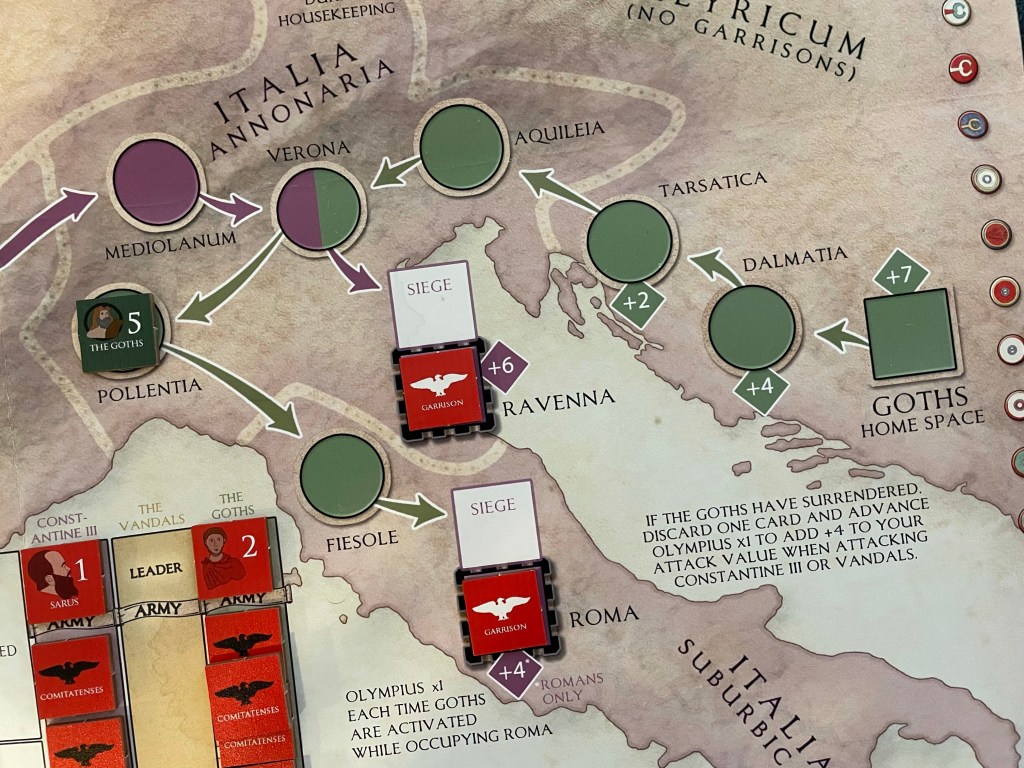
Your most beatable enemy is the Goths. The reason that I feel this way is that they have a middling Attack Value at the start with a 5 (4 if they have become Demoralized), which is right in between the three barbarian tribes (Vandals have a 4 while Constantine III has a 6) and they have generally lower Terrain Bonus values on their Front as compared to the others. With their starting position on the Front being in Pollentia, you will have to push them back a full 5 spaces and then defeat them in their Home Space but this is still your best chance at making progress toward your victory condition of having all tribes quelled by game’s end. The Vandals start in Durocortorum, which is just 3 spaces from their Home Space and Constantine III has just 1 space to their Home Space. Perhaps the biggest benefit to defeating the Goths first though is that you can then recruit them to your service in attacking both the other enemies. The benefit of this cannot be overstated as that +4 bonus, while a bit costly, makes victory against both the Vandals and Constantine III more imminently doable.
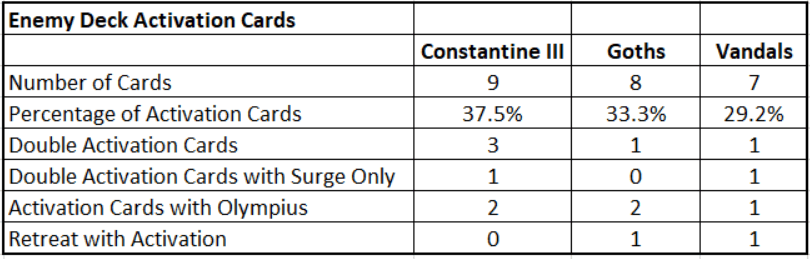
I know that I recommend going after the Goths first, but the reason that at setup you put your 3 Comitatenses and Sarius on Constantine III’s Front Army Box is because his advancing toward Ravenna will spell doom as you will lose the game if the Capital City of Ravenna falls. Also remember the makeup of the Enemy Deck that we discussed in Action Point 2. There are 24 Activation Cards in the Enemy Deck. 9 of the Activation Cards will activate Constantine III (although only 8 of these cards are in the deck at the start as one of the activations is added in during the Late War at Turn 6), 8 will activate the Goths and only 7 will activate the Vandals. So Constantine III and the Goths are your greatest threat here as they will be activated most often. Here is a look at the breakdown of the Activation Cards by Front:
So in summary, go after the Goths, get them subjugated where you can use them against Constantine III and then go directly for Constantine III as he can end the game with a run of activations. The Vandals should be managed and saved to defeat at the end when both other enemies are subjguated.
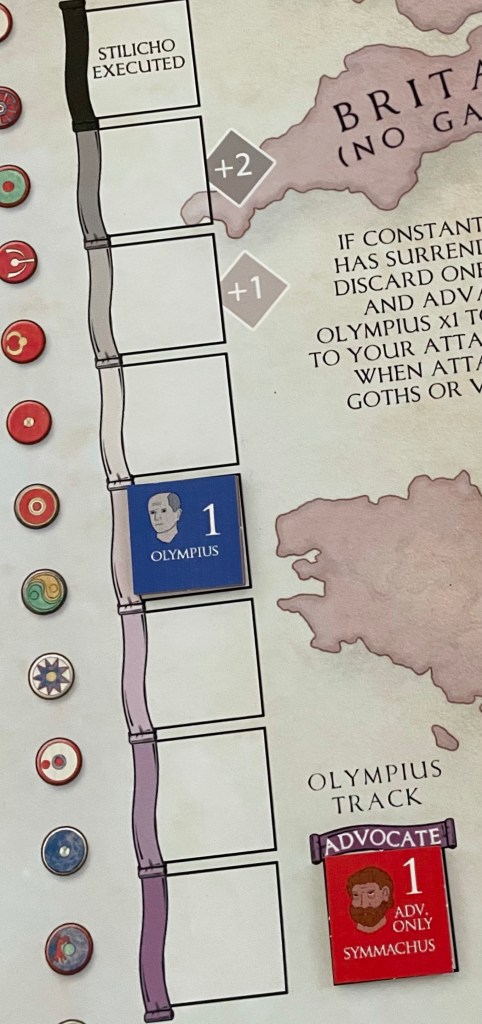
Always Keep One Eye on Olympius
The sneak Olympius can be just as devestating an enemy as Constantine III, the Goths or the Vandals. And as such, you must pay attention to where he is. The Olympius Track, which represents the devious Olympius’s attempts to undermine Stilicho in the Imperial Court of Emperor Honorius, is the source of many a headache and caused me to lose this game far more often than any of the attacking Barbarians. Olympius can be moved up and down the track through the play of cards, both negatively and positively. Enemy Cards will always move him up the Track toward the untimely execution of Stilicho while the play of Roman Cards will keep Olympius in check and move him downward. An Advocate Box is located to the right of the Track and holds a Leader named Symmachus who is assigned to oppose these machinations.
Olympius can really be the source of a lot of trouble as if he reaches the end of his track you will lose your head resulting in an automatic loss. You simply cannot let this one get out of hand and have to watch it at all times. The main reason for this is that his movement is really out of your hands and is based on bad luck. Olympius will be moved from you rolling a 1 on an Attack led by Stilicho, from Enemy Event Cards and from certain Surge Effects. I have found that bad luck will come in waves and if you wait too long to address this it might be too late. You simply cannot let this get out of control and I feel that you must address the Olympius Track before the Difficulty Values on the track increase to above +1. Don’t wait and be proactive and you will control Olympius but remember using your cards for this action will take away from your other goals so it is always a balance and sometimes is a touch choice. But, that is one of the things that make this game great…choices!
Not All Cards are Made Equal
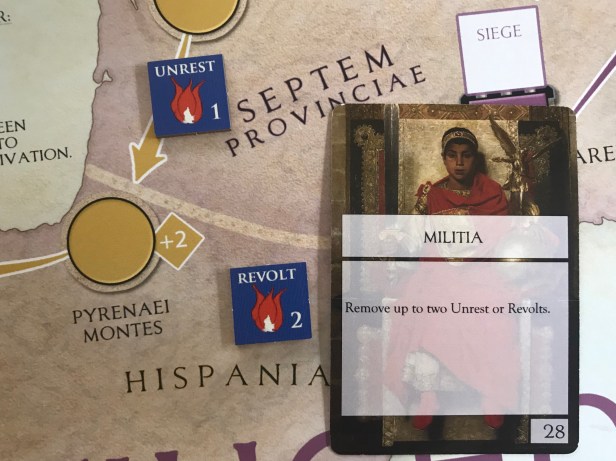
There are some events that are just too important to your efforts to ever discard to take an action as they provide you with such great benefit and are more efficient than taking individual actions. Don’t get me wrong though the playability of a card is always dependent on when in the course of the game the card is drawn. An example of what I am talking about is the Militia Roman Card. This card allows for the player to simply remove two Unrest or Revolt Counters from the board. No roll needed. This is a huge benefit as you normally have to discard a card to take the action and also then roll a d6 and roll higher than the value printed on the counter, higher than 1 for an Unrest Counter and higher than a 2 for a Revolt Counter. You must think about these cards as value actions as you get better results for less of a resource commitment.
There are several other cards included in the Roman Deck that are simply too good to not play for the printed event when they come up in the deck. About the only time they should be discarded for an action is if that action is going to save the game or has a chance to end the game, such as being discarded to attack an enemy while in their Home Space causing them to Surrender! I call these cards “Bite the Bullet” Cards because when you use them, you just have to grin and bear it that you have no other choice because the game has been conspiring against you.
Those cards include 4 different cards that retreat Olympius (Imperial Wedding, Serena, Allies in the Senate and Panegyric), 3 cards that provide additional Comitatenses and Leaders (Constantius, Battle of Faesulae and Notita Dignitatum) and one card that places a Truce Marker on an Enemy of your choice and allows you to ignore their activations (Temporary Truce). These cards are fairly rare and really are the only way to do certain actions that unless you have no other choice, or if you are fortunate enough to have drawn them early while there is nothing bad happening, then and only then should you consider discarding these for an action.
Deal with Unrest Before It Grows Into Revolt
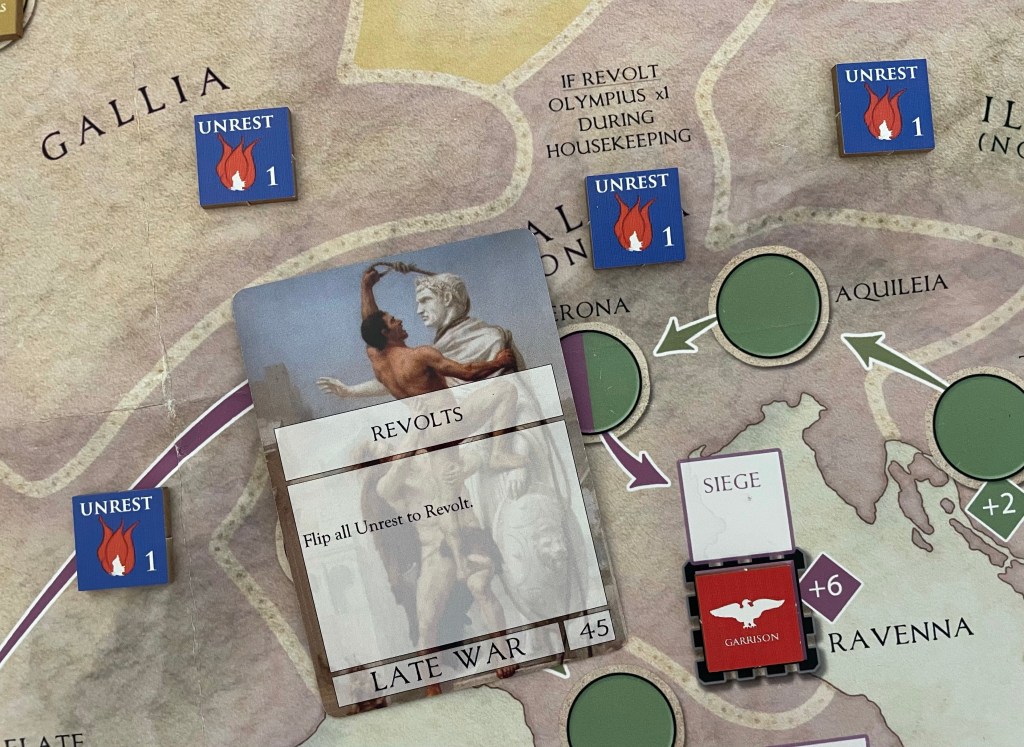
Throughout the game, Enemy Cards will place Unrest or Revolt Counters in a Diocese on the Mapsheet. They first get placed as Unrest Counters and then as other cards come up they will instruct the player to flip them from their Unrest side to their Revolt side as the populace of the Diocese have become fed up with Roman rule and the lack of improvement to their lifestyles. If these Unrest or Revolt Counters build up then the player is in for trouble as they will effect their attacks against Enemies in those locations (adding +1 or +2 to the Attack Value of the Enemy in that location) and can lead to the game coming to an ignominious end as if there are 5 Revolt Counters on the map during the Check for Defeat Phase then the game ends immediately in a loss due to Anarchy.
If the players ignores these brushfires, they will find them growing out of control and will have to spend a lot of their actions available for a few turns to try and get these under control as they simply cannot be ignored. Part of your strategy with this element is that you need to understand how many cards in the Enemy Deck will place these Counters in the first place. This is not a recommendation to do any card counting or to memorize what has come out and what has not but it is good to know the general statistics of the cards. There are 6 Place Unrest/Revolt cards in the Enemy Deck and players should be aware that they can come up at any time. There is one that is particularly nasty called Revolts where the player will be directed to flip all Unrest to Revolt and can really be a kick in the stomach if you have let things get out of control. Just keep up with this and try to remove at least 1 such counter each turn. This way you will stay ahead of the destructive wave and won’t be buried by it.
Don’t Ignore the Surge
Surges are the newest and most devious addition to the game and they simply make the game that much more difficult but I do enjoy having to figure out how to deal with this new mechanic. As you play, this will build and as the third card gets placed into the Surge Spaces from the Enemy Deck, bad things will happen. These bad things are typically in the form of activations of the various enemies on the Fronts to move ahead toward their goal. But, they also will cause other undesirable effects such as Olumpius moving up the Olympius Track, Reshuffling of the Enemy Deck getting all those bad cards you have already endured back into the rotation for you to possibly face again and to Embolden a Demoralized Enemy and flipping it back to its stronger side. You have to manage this part of the game as best you can and there are several cards at your disposal that can aid you in this effort. There are 4 Roman Cards that specifically address the Surge mechanic and provide the player with ways around the nasty effects.
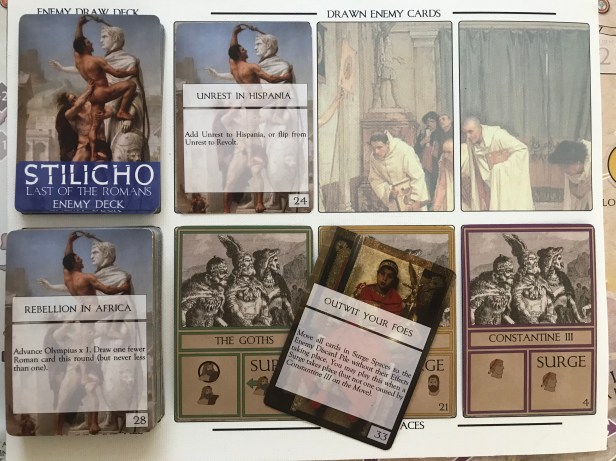
These four cards either replace an Enemy Card located in a Surge Space (Defectors, Envoys and Deception) or they get rid of the cards in the Surge Spaces and allow the Surge effects to be skipped (Outwit Your Foes). The best part about the cards that replace an Enemy Card in a Surge Space is that they not only get rid of the nasty card but they actually provide you with a positive benefit. For example, Deception actually allows you to Retreat an Enemy of your choice one space on their Front, while Defectors allows the player to deploy one Comitatenses from the Recovery Box to an Army Box or to place them on the map as a Garrison. Envoys doesn’t offer a benefit. Using these cards in this way will obviously take away the opportunity to discard them to Attack, Counter Olympius, Suppress Unrest or other important actions but that is simply what you have to do in order to survive this game. Never pass up an opportunity to get rid of a nasty Surge card. You will regret it if you don’t.
Stack Your Battle Cards
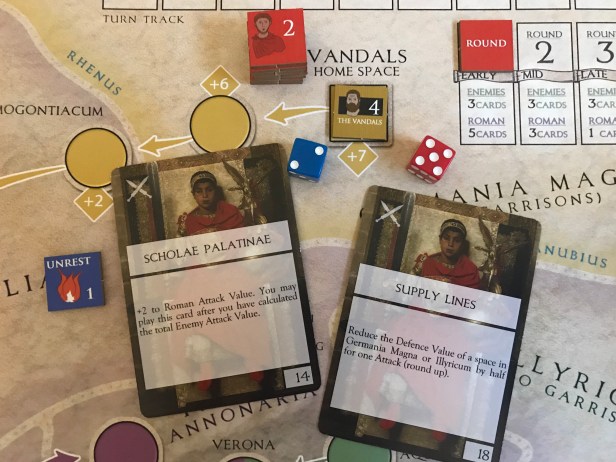
This point cannot be stressed enough. The benefit of the Battle Cards is so very important to your chances of winning this game. Not so much during the first few turns of the game as you will be battling the enemies on the various Fronts and having pretty good success against them. But the moment that the Barbarians approach their Home Spaces, things will get decidedly more difficult as you will see them gain Attack Strength modifiers from the Terrain Bonuses and making them harder to defeat without bringing in the help of Battle Cards. I have said this about the Event Cards in this game but I also feel that the Battle Cards are simply indispensable. Sometimes holding a Battle Event or 2 over from one Round to the next is a key decision that players will have to make as those 2 cards alone might not be enough but if you can draw 1 or 2 more key Battle Cards then you might be able to make a run at one of the Enemies you have pushed all the way back to their Home Space. Stacking Battle Cards in your hand will allow you to have more options and allow for a more concerted push against an Enemy to push them all the way back rather than just winning a single battle here or these. Use the Battle Cards wisely, allowing them to mellow in your hand until you gain the advantage that you really need to make your Attacks hit home and subjugate your enemies. Knowing when to play them and conversely when to hold them is an acquired skill that you will get through multiple plays but once you do your luck will change and you will find that you have more success with them than without.
Don’t Ever Use a Reserve Action…Unless It Means Life or Death
As you know, you can discard a card from hand to add +1 to any die roll, whether in a Battle or in dealing with Olympius or Unrest. This Reserve Action should only be used in extreme circumstances when failing a roll is really bad. The reason that I say that is that you are literally burning your resources in the form of cards to gain a marginal increase in a result. For each card you discard in this manner, you are foregoing another action that you could be performing on the board that might be more important to your success. You just need to consider what you are doing as you are discarding your cards. And, I would say never discard more than one card for this action. If you miss by 2, then tough. Just try harder and roll better next time! Because your cards are limited you just can’t afford to throw them away. Personally, I have only really done this Action a handful of times as it simply is a waste unless you are in trouble and there is no other choice. Then it is definitely not a waste and may be the only thing that saves you from defeat.
I hope you have success in using my points of strategy. I cannot say that I am an expert at the game or that I consistently win, because I still lose even when using these strategy points, but if you use these points in your game you will do better than if you don’t. I really have enjoyed playing Stilicho: Last of the Romans and have come to truly appreciate the design and its fascinating mechanics. If pressed to say which that I like better, The Wars of Marcus Aurelius or Stilicho, I would have to say Marcus Aurelius, probably for no other real reason other than that game was my first exposure to this system and designer. I definitely enjoyed the Surge mechanic. Well, saying enjoyed is not exactly what I mean as I am not a sadist and don’t like losing but it was a change to the system that was a good addition that created an even more challenging experience. I also liked the ability to use your subjugated enemies to your benefit to attack other barbarians. Some really great evolutions to the system and I look forward to future designs from Robert DeLeskie.
-Grant
