
Last year, I discovered a great solitaire game called The Wars of Marcus Aurelius from Hollandspiele that dealt with the Romans attempting to pacify Barbarian hordes from the north in the Danube provinces during the Marcomannic Wars in 170-180 AD. Now the designer has taken that system and applied it to another period in Roman history when the Goths and Vandals, as well as a pretender named Constantine, were assaulting Rome itself and one man was asked to defend her from her enemies. Flavius Stilicho was a high-ranking general who rose from humble beginnings to become one of the most powerful men in the Western Roman Empire. After many years of victories against a number of enemies, both barbarian and Roman, a series of political and military disasters finally allowed his enemies in the court of Honorius to remove him from power, culminating in his arrest and subsequent execution in 408.
In Stilicho: Last of the Romans the player must survive these attacks from enemies both external and internal and quell all three advancing enemies.
In this series of Action Points, we will cover the Mapsheet focusing on the three Fronts down which your enemies advance, but also covering the different spaces and boxes that effect play such as the Olympius Track, Game Turn Track, Army Box, Leader Box and Recovery Box, take a look at the cards that drive the game and examine the makeup of both the Enemy Deck and the Roman Deck, cover the Enemy Phase and discuss how the Enemy cards are used and when a nasty Surge can be triggered and its effects, dive into the Roman Phase and examine how cards are used for the printed event or discarded to take one of nine different actions, take a look at a few examples of Battles and how they are resolved, including utilizing your pacified enemies against your raging enemies and finally take a look at a few points of strategy that will help you do better in the game.
Mapsheet
Hollandspiele really picked up their game in the graphics department for this game as the Mapsheet is simply a work of art worthy of being framed and hung on my gaming room wall! When compared to the map for the aforementioned The Wars of Marcus Aurelius, this one is a step up in the use of colors, the integration of graphical elements like the symbols around the edge of the map and the crispness and clarity of the type and the addition of relief elements such as the Alps mountains.
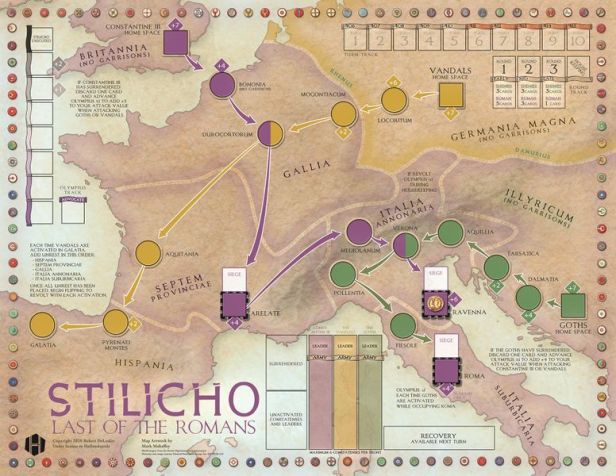
The Mapsheet represents the European territories that were controlled by the Western Roman Empire during the early 5th century. The Mapsheet is further divided into seven different dioceses (a governmental area in the Roman Empire that was governed by an imperial vicar) including Hispania to the west, Septum Provinciae south of Gallia, Gallia, Britannia to the far north, Italia Annonaria in the center, Italia Suburbicaria located on the Italian peninsula and Illyricum to the east. Germania Magna is also shown on the Mapsheet to the northeast but is not under Roman control.
Fronts
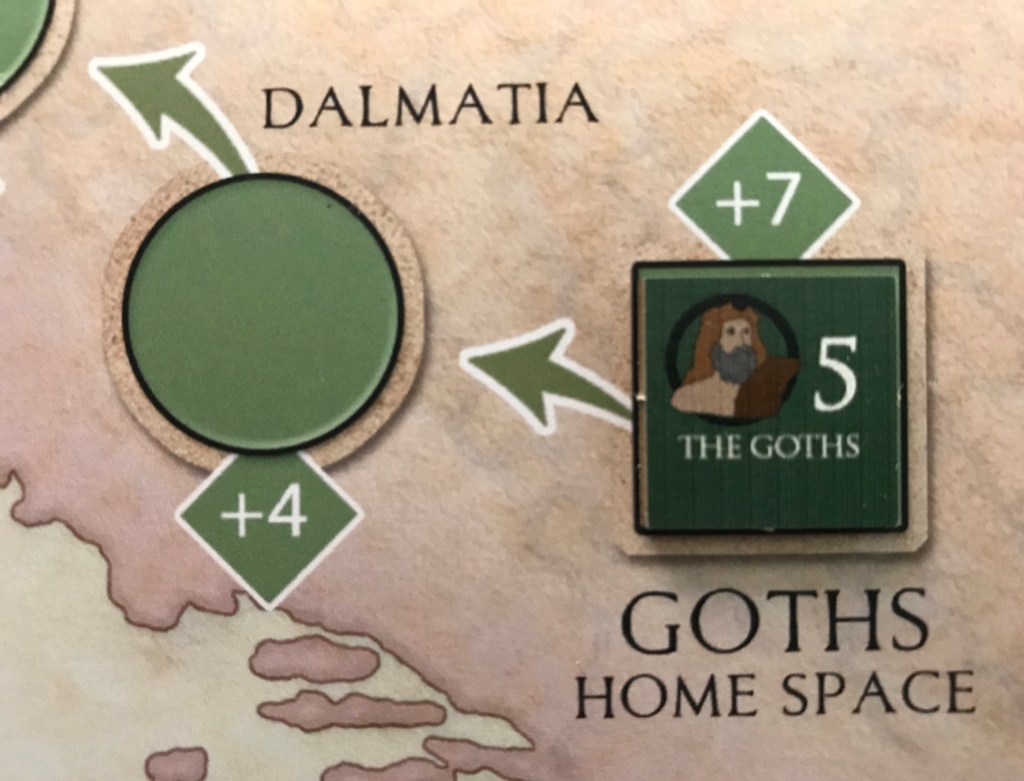
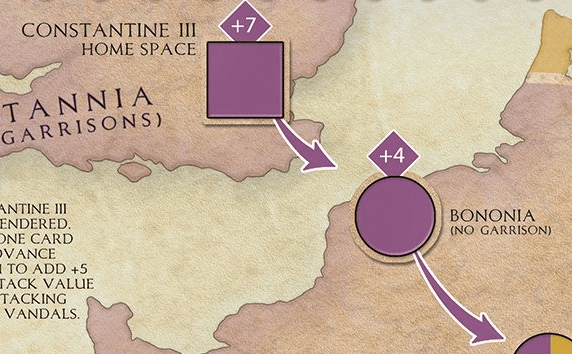
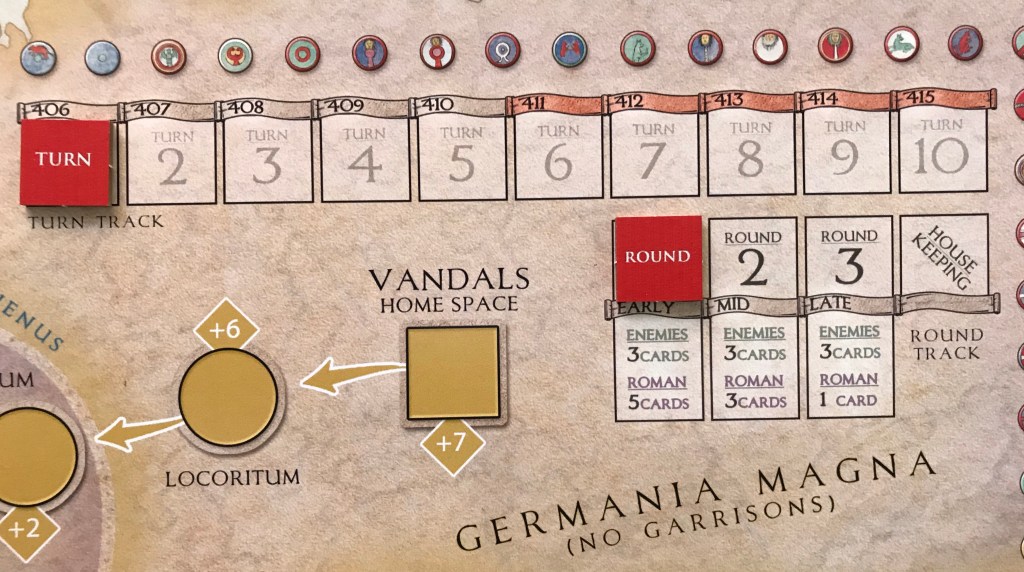
As you can see there are three different Fronts represented on the Mapsheet that originate in the Home Space of the Barbarian tribe or, in the case of Constantine III, in Britannia with his Legions. The three enemies include the Vandals on the yellow Front, the Goths on the green Front and Constantine III on the purple Front. These Fronts are represented by a series of colored spaces, both squares and circles, connected by sweeping arrows.
You will also notice that as the different Fronts cross, they have both colors noted in the space denoting that this is an area where the two enemies can come in contact with each other as they advance or retreat. These are referred to as Collisions. There are two of these crossings of Fronts; one in Gallia at Durocortorum where the Vandals and Constantine III can come in contact and the other in Italia Annonaria at Verona where the Goths and Constantine III can intersect. When a Collision occurs, and if one Front advances and the other Front is resting there in that crossover space, a battle between your enemies can happen where they each roll a D6 and add their Attack Value. The higher total result will force the other to retreat one space back toward their Home Space on their Front and this can be very beneficial for the player. But, don’t get your hopes up as these Collisions really only happen about 1 time per play, maybe twice if you get lucky. Take it as a nice bonus if it ever happens!
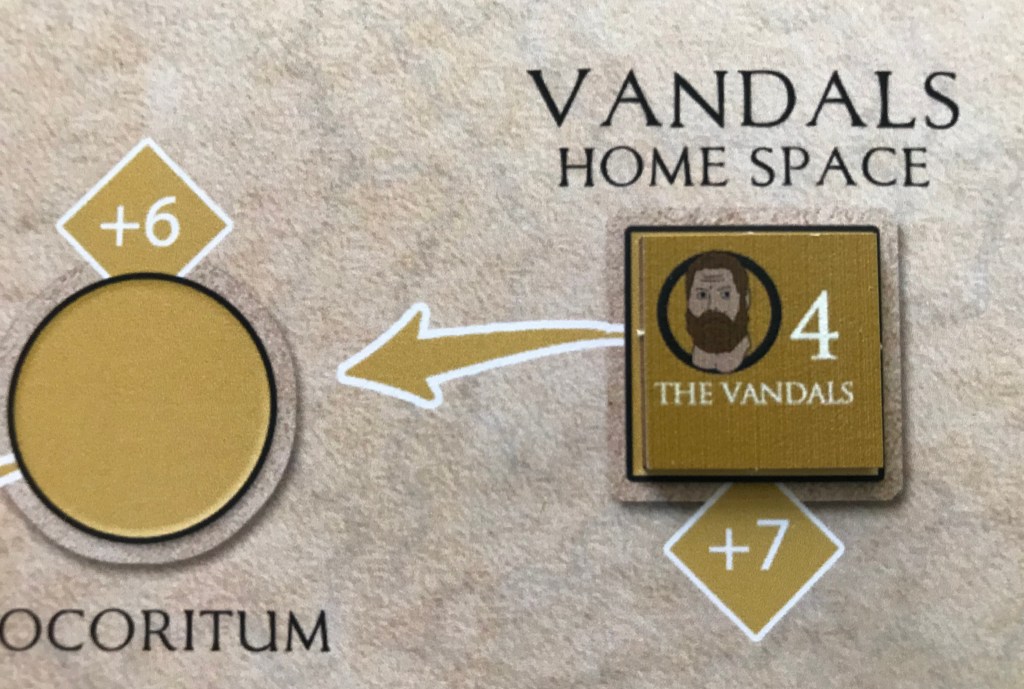
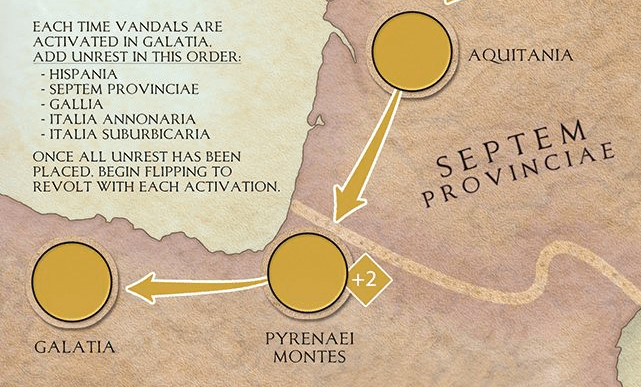
Each of the Fronts has an ultimate end goal for the Barbarian Horde or Usurper and they terminate in these spots. The Vandals Front will end in Galatia and there are a set of special circumstances associated with that space. When the Vandals have reached Galatia, and each time that they activate from the play of an Enemy Card, the player will have to add an Unrest Counter per activation on the Mapsheet which represents the growing loss of Roman control over the Dioceses. Unrest Counters triggered by Vandal activations are placed in a specific order and if there is already an Unrest or Revolt Counter in the Diocese, the player will simply place the
Unrest Counter in the next Diocese without Unrest or Revolt. This order is as follows: Hispania, Septum Provinciae, Gallia, Italia Annonaria and Italia Suburbicaria. If all of the Dioceses already have an Unrest Counter when the Vandals activate, flip one Unrest Counter to its Revolt side following the same order. If in the event that all Dioceses have Revolt Counters then no further action is required.
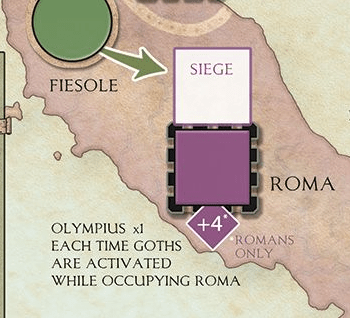
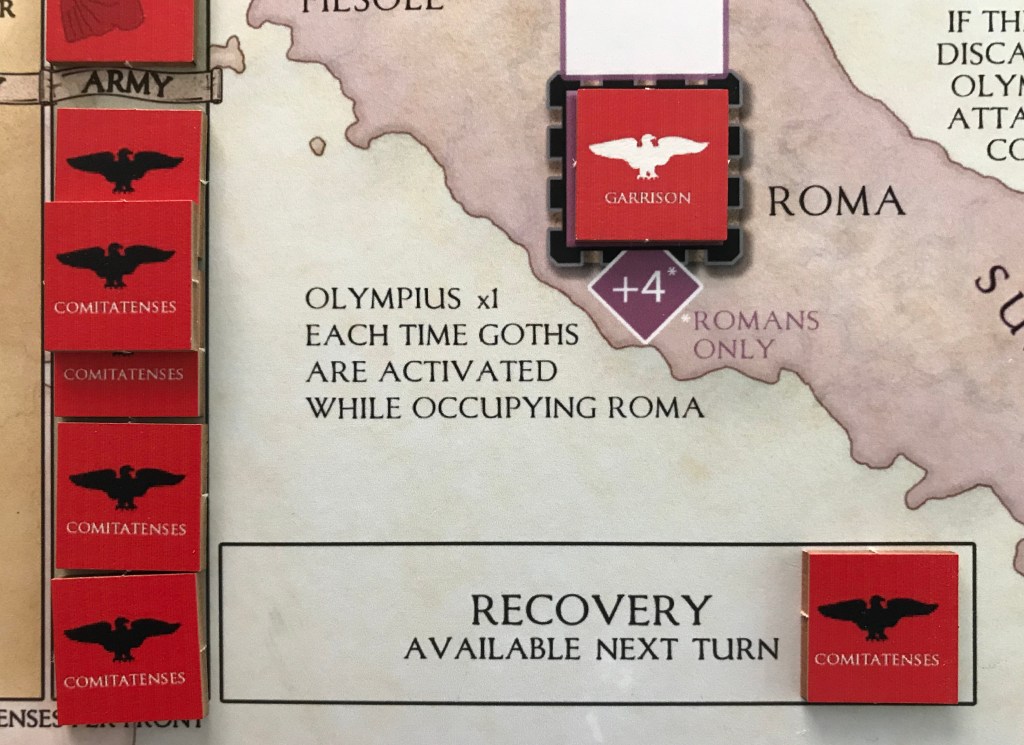
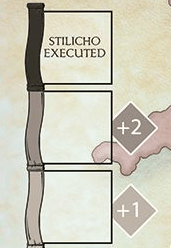
The Goths Front will end at Roma and similar to Galatia there are special circumstances that occur. If the Goths are activated while occupying the Walled City space of Roma, Olympius advances up his track one space per activation, which represents political pressure to recapture the Eternal City. We will cover the Olympius Track later in this post but him advancing is a bad thing and you don’t want that to happen or you will lose your head and the game as you will be executed.
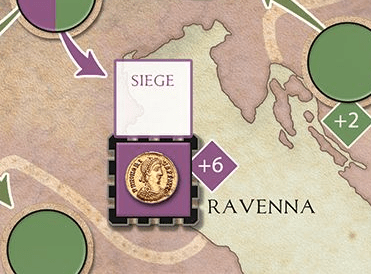
The Constantine III Front will terminate in Ravenna, which was the capital city of the Western Roman Empire. If he enters the Walled City space
of Ravenna, the game ends immediately in defeat by Usurpation. This is bad so you want to make sure to stop Constantine III first as he can make you have a really bad day!
Enemies will advance from space to space along these Fronts following the
arrows when a card is played from the Enemy Deck that activates them. If called to retreat, they will retreat in the opposite direction towards their Home Space. Enemies cannot retreat past their Home Space and if occupying their Home Space and instructions are given that would move them back further these are simply ignored.
Army Box and Leader Box
Each of the Fronts has a corresponding Army Box and Leader Box located at the bottom of the Mapsheet that is the home for Roman Comitatenses (troops) and the individual Leader assigned to that Front. At the start of each round, the player has the option of moving around their Comitatenses and Leaders to be used against certain Fronts.
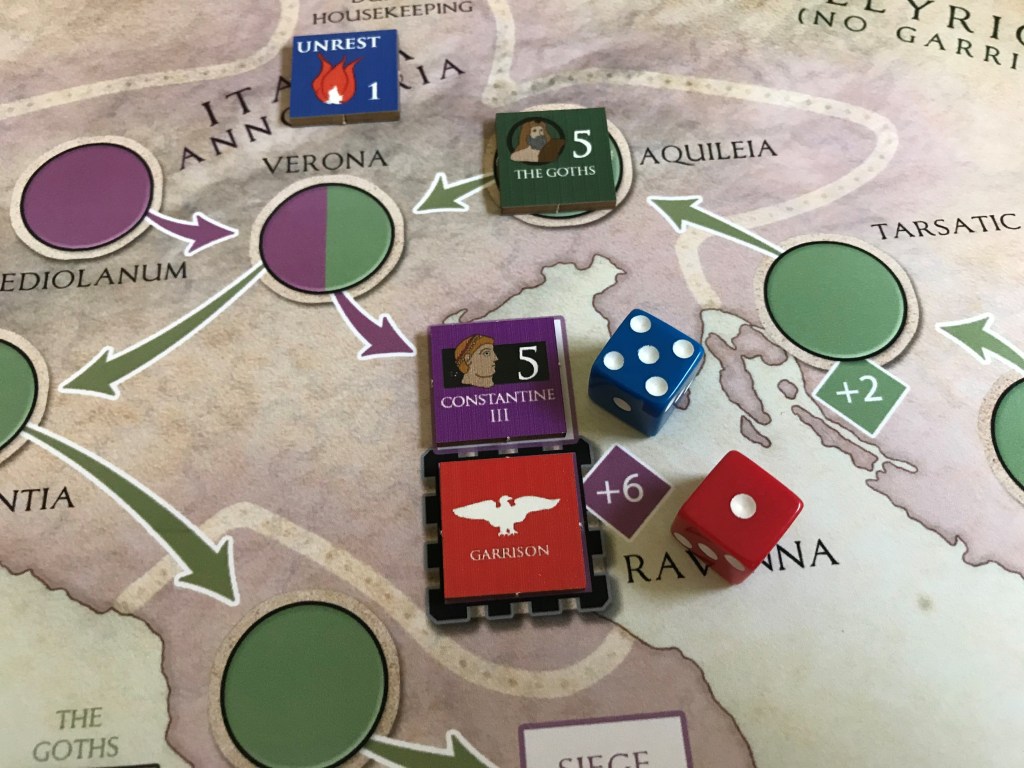
At the start of the game, the player will only have limited access to their available troops and Leaders. To start, the player will have only 12 Comitatenses to deploy in the Army Boxes and can only assign a maximum of 6 per Army Box. The player also can assign Comitatenses as Garrisons in map spaces to a maximum of 1 per Diocese. Also at start, the player will only have two of their Leaders available, including Stilicho and Sarus. Constantius is located in the Unactivated Comitantenses and Leaders Box to start the game and will only appear when a certain card is played. The player will assign Stilicho to command one of the armies by placing him in a Leader Box, and Sarus to a different army’s Leader Box. In both cases, those armies must have at least 1 Comitatenses.

Word to the wise about this aspect of the game. You must remember that your total Attack Value is simply a complicated mathematical formula (sarcasm alert) of Leader Attack Value + 1 Attack Value per Comitatenses in an Army Box + D6 Roll. I know that is hard to understand so let me give you an example. In the below picture, you will see that Stilicho has been assigned to The Goths Front and has 5 Comitatenses with him in the Army Box. This means that the base Attack Value is 7 (2 for Stilicho + 5 for the Comitanses). When attacking this number will be added to the roll of a D6 and compared to the Attack Value of the Enemy that is being attacked.
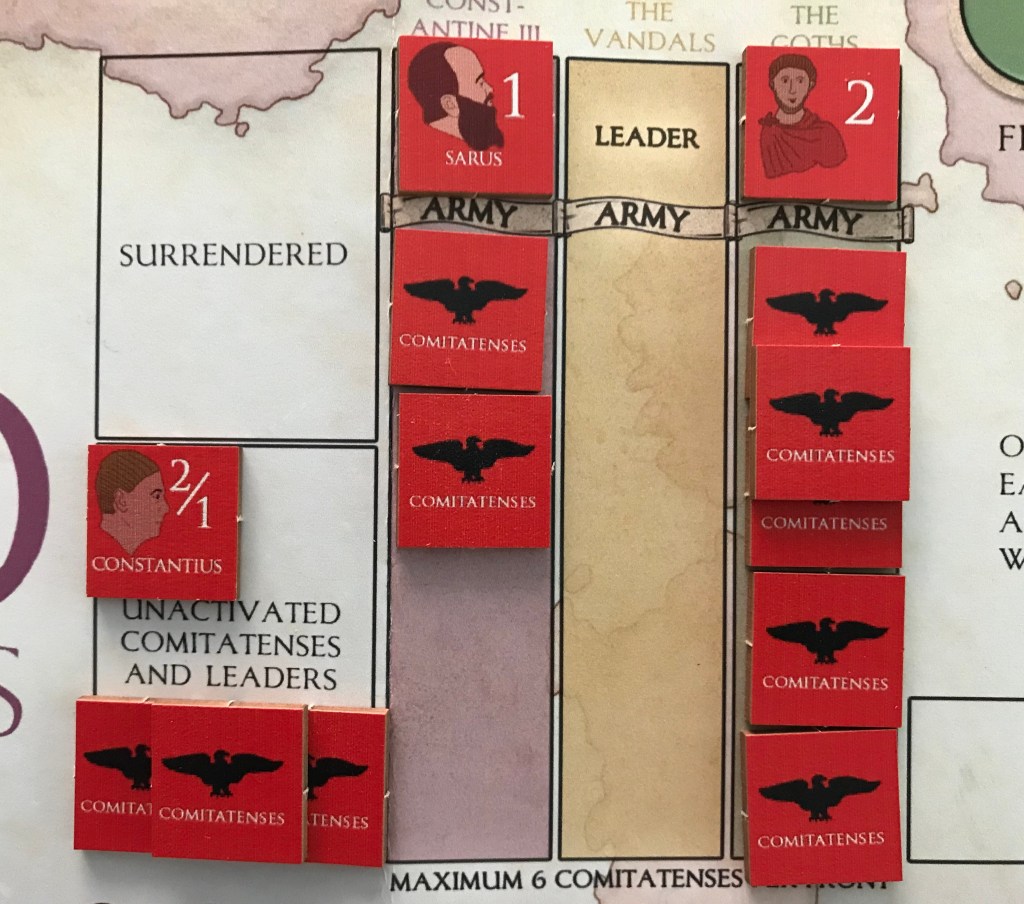
Also remember that with a maximum of 6 Comitatenses per Army Box, Stilicho can have a maximum base Attack Value of 8. When added to a D6 range of 1-6, this means that his Attack Value can range from a 9-15 without adding any Event Card bonuses from playing the printed Event or +1 from discarding a card. To start, the player will typically place three Garrisons on the map (in Arelate, Ravenna and Roma) and then place 6 Comitatenses with Stilicho and 3 with Sarus to account for all 12 given at the beginning. This will mean that Sarus’ Army is much weaker than Stilicho and really is only there for an emergency attack if for some reason the Front he is defending gets activated with each card drawn. I typically like to try and Pacify the Goths first as Constantine III is pretty damned tough and the Vandals can’t really do much damage to you except for inciting Unrest and Revolt, which can be managed early.
One other point about the Fronts and the Home Spaces is that it gets harder to defeat your Enemy and Pacify them as they retreat to their familiar surroundings. As you will notice in the Defense Values that are assigned to the final two spaces before the Constantine III Home Space below, it gets much tougher. These Defense Values are added to the Enemy’s Total Defense Value in Battles and can make them quite formidable and difficult to defeat unless you have the right Event Cards to play or are able to convince your already Pacified Enemies to aid you in defeating them.
Recovery Box
As Battles occur, there will be inevitable losses and from time to time card effects will cause a Comitatenses to be eliminated and the player directed to place the unit into the Recovery Box. Also, if a card directs the player to obtain a new Comitatenses or Leader from the Unactivated Comitatenses and Leaders Box these arriving Leaders and Comitatenses will also be placed into the Recovery Box. You will notice that units that are placed here must spend their entire turn here and will become available at the start of the next turn.
Siege Spaces and Walled City Spaces
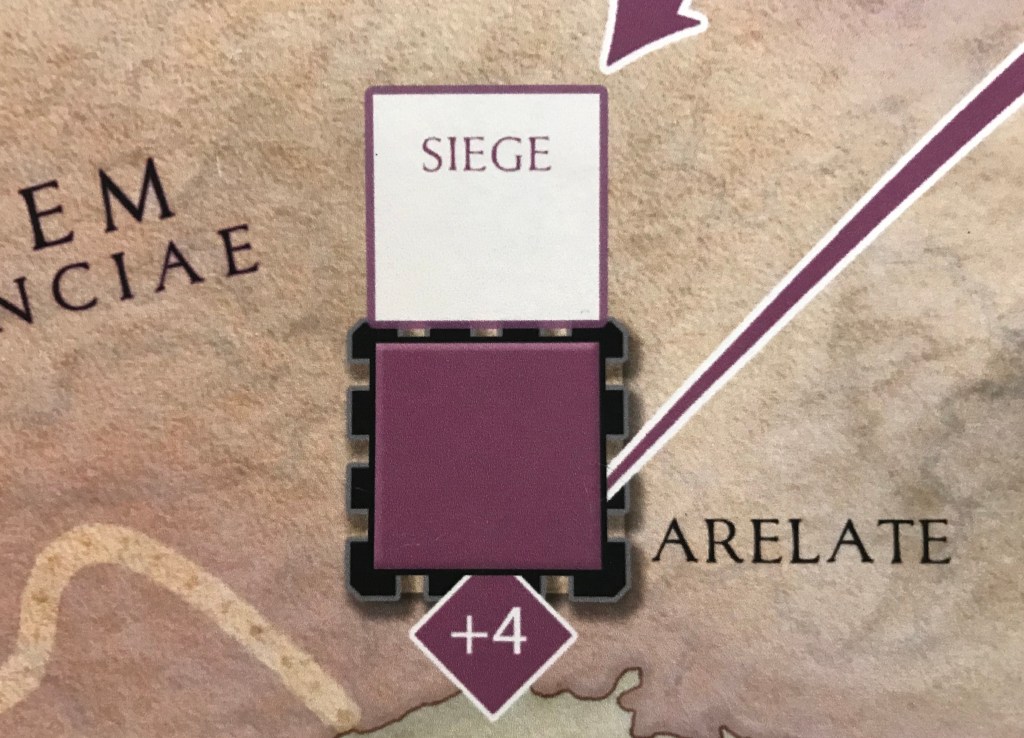
There are a few special spaces that I want to cover including Siege Spaces and Walled City Spaces. There are only three Siege Spaces on the Mapsheet and they are attached to Arelate, Ravenna and Roma and act as a speedbump to the advance of an Enemy into those major cities. If an activation or card effect causes an Enemy to advance into a Walled City that holds a Garrison, the Enemy will move into the attached Siege Space instead. This is only the case when that Walled City Space has a Garrison. Ay other time the Enemy would simply move into the Walled City Space bypassing the Siege Space. Once an Enemy enters a Siege Space, it will always end its activation for that card, even if there are further icons
remaining that would normally cause the Enemy to move again. This delay and speed bump represents the time necessary for the Enemy to establish the siege.
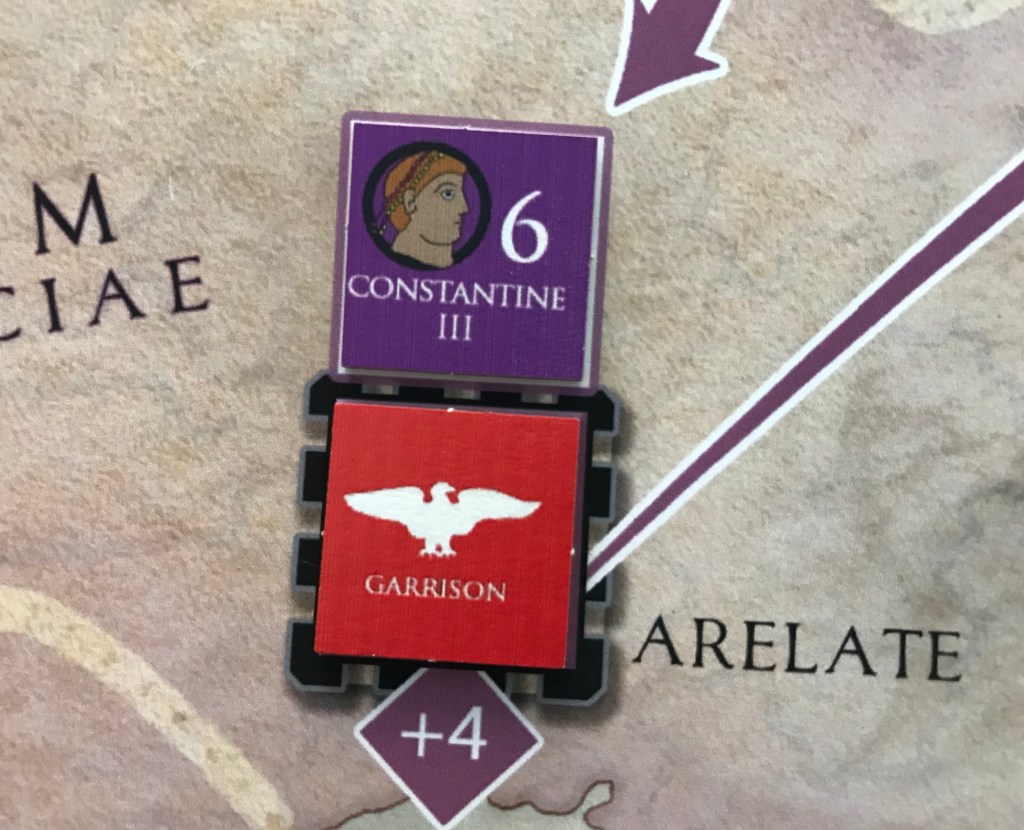
When an Enemy in a Siege Space is Activated by a later card draw (remember it ends all activations on the card that caused it to move into the Siege Space), it will then attack the Garrison. If the Garrison is removed
for any reason such as the result of the attack, the player’s Deployment choices or card effects like Garrison Overrun, the Enemy will immediately advance into the Walled City Space. It is also important to remember that Enemies will never retreat into a Siege Space. They retreat from the Walled City attached to the Siege Space to the next non-Siege Space on their Front.
The Siege on the Walled City process is also very simple as the player will simply roll a D6 and add to it the Garrison’s Attack Value, which is only 1, as well as the Defense Value of the space it occupies. The Defense Value is printed in the diamond shaped box at the bottom of the Walled City and ranges from +4 to +6 (only in Ravenna). They player may also take what is called a Reserve Action to increase the Garrison’s Total Attack Value, which is accomplished by discarding a card from hand for a +1 bonus, but you cannot play any cards for their effects on the Garrison. The higher total wins and the player will reroll in the case of a tie (minus any bonus from a Reserve Action unless the player decides to discard an additional card).
Olympius Track
On the map you will also find the Olympius Track, which represents the devious Olympius’s attempts to undermine Stilicho in the Imperial Court of Emperor Honorius. Olympius can be moved up and down the track through the play of cards. Enemy Cards will always move him up the Track toward the untimely execution of Stilicho while the play of Roman Cards will keep Olympius in check and move him downward. An Advocate Box is located to the right of the Track and holds a Leader named Symmachus who is assigned to oppose these machinations.
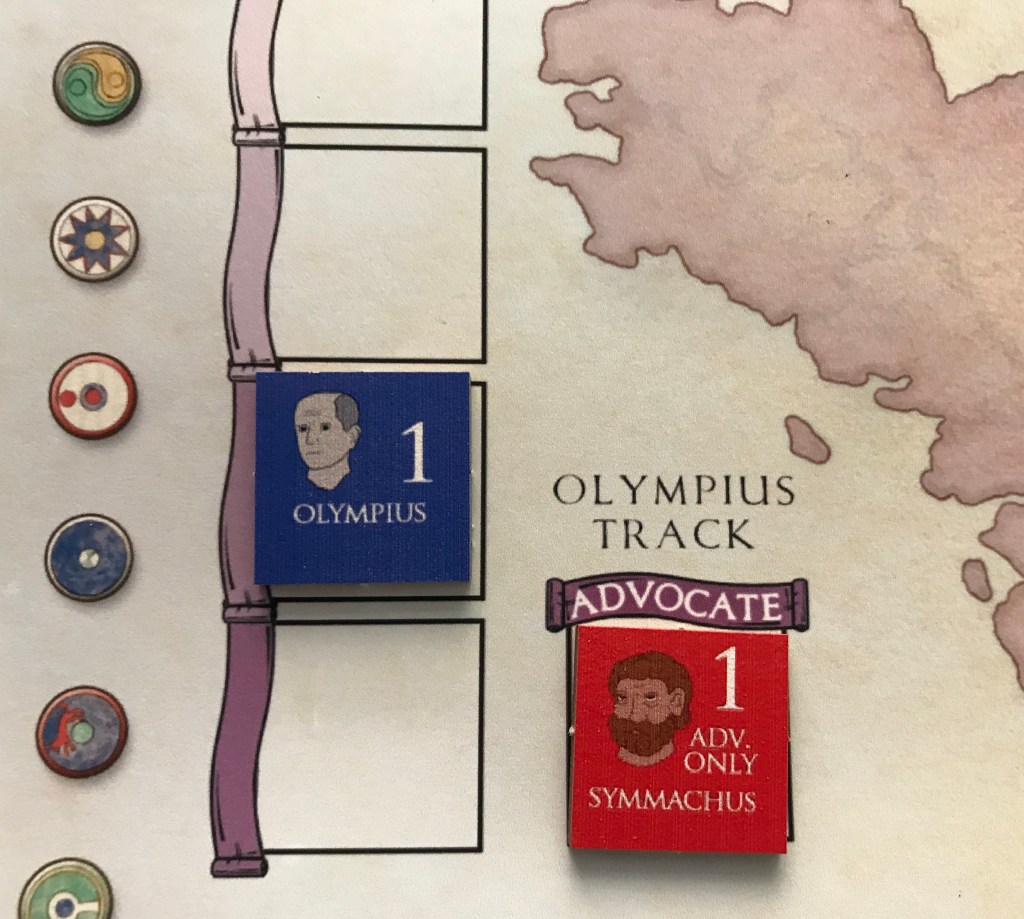
Near the top of the Olympius Track you will notice that there appear a few numbers in diamonds to the right attached to certain boxes. This is a Difficulty Value that is added to Olympius’s printed value when the player attempts to counter his influence in the court.
This process is very simple as well and requires the player to roll a D6 and add it to the Attack Value of the Leader in the Advocate Box. If this total is greater than the sum of Olympius’s printed value (either a 1 or 2) plus the Difficulty Value of the space he occupies on the Olympius Track, Olympius will retreat one space. Any ties on this roll will be rerolled and the player may also take Reserve Actions to modify the total as they could in Battles.
Game Turn Track and Round Track
What Map would be complete without a Game Turn Track and a Round Track to keep track of where you are at in the game and the process of a turn. Printed at the top right side of the Mapsheet is found these items. You will notice that the game has 10 turns, in which the player must pacify all three Enemies in order to win while keeping Olympius under control as well. The Round Track also reminds the player how many cards they will draw each round as well. Each Round will always see the Enemy draw three cards from the Enemy Deck and fully execute the activations found there. Then the player will get to draw 5 cards during Round 1, 3 cards during Round 2 and only 1 card during Round 3. Cards can be carried over from Round to Round and then also from Turn to Turn with some limitations depending on what Event Cards have been played by the player to that point.
Stilicho is a very well designed and interesting solo experience that plays in 60-90 minutes. But, due to the unforgiving nature of the random card draws and its reliance on dice luck, that admittedly can be mitigated through cagey card play and proper decisions, the game can be over very quickly. In fact, my first play lasted only 2 rounds and was over in about 10 minutes. Remember that the historical Stilicho only made it to Round 3!
In Action Point 2, we will take a look at the cards that drive the game and examine the makeup of both the Enemy Deck and the Roman Deck.
-Grant

Looks suspiciously like a ‘state of siege’ game. Hope not.
LikeLiked by 1 person
It uses some of the form of States of Siege but is very different in how it plays out.
LikeLike
Looks really interesting. Gonna give it a try.
LikeLiked by 1 person
You won’t regret it.
LikeLike
reer01, do try the game – I am really enjoying it.
LikeLike