
We played Imperial Struggle a few weeks ago and the game is even better than it’s predecessor Twilight Struggle. Very different, but better. I didn’t think that was possible but it is. I still like TS a lot but this game fills a whole new niche and I have really enjoyed exploring it. Imperial Struggle deals with what historians refer to as the Second Hundred Year’s War and covers the period of 1697 through 1789 stretching over four different wars. The game uses cards and Investment Tiles to allow the player to take various actions that change their fortunes across the globe with diplomacy, economic growth, and if all else fails war. Players will score Victory Points from the domination of Regions, controlling various Markets and from victory on the field of battle. There are so many options and strategies available in this game that it makes for a very deep and lasting experience that only gets better with time and more plays.
In Action Point 1, we covered the map focusing on the different Regions and Sub-Regions and the various spaces, boxes and lines located in each. In this Action Point, we will examine the very interesting limited action selection mechanic using the Investment Tiles and the Advantage Tiles that enhance them and what that means for the player and their efforts.
Investment Tiles
Imperial Struggle uses a very interesting limited action selection mechanic where the player can choose from a number of Investment Tiles to take two different Actions called a Major Action and a Minor Action during one of their four rounds each game turn. I say limited action selection because there are three different types of Actions in the game including Economic, Military and Diplomatic and only two of these can be taken each round. These Investment Tiles each contain a top portion and bottom portion with a different Action listed as well as a number of Action Points identified that can be used for those Actions. Therefore, each round a player will only get to take two different Actions from the three available and these choices will be limited by the number of Action Points the selected tiles convey.
The players will alternate choosing from the available Investment Tiles found in the Investment Tile Display and once used the tiles will be placed in the Used Investment Tiles Box. At the beginning of a Turn, there will be 9 of these Investment Tiles laid out to choose from and once chosen the spaces are not refilled until the next Turn. Therefore, the players will have to choose from what is available for the round and make the best use of the Actions there to execute their strategy.

Before we dive any further into things like strategy or how to use these Investment Tiles, let’s take a look at the anatomy of the tiles and some of the different symbols contained on them and their meaning.
Investment Tile Anatomy
Each Investment Tile grants two Actions called the Major Action and the Minor Action. The larger symbol of the two that appears on the top half of the tile indicates that this Action is the Major Action. You will also see that to the right is listed a large number which is the number of Action Points that this Action will have available to use this round. The Minor Action is shown on the bottom half of the tile in a much smaller size than the Major Action. As you can also see on this example there are a few other symbols that can appear on the tiles. These are the Military Upgrade Symbol which means that a Basic War Tile can be exchanged when the Investment Tile is taken and the Event Symbol which means that the player can play an Event when that tile is taken.

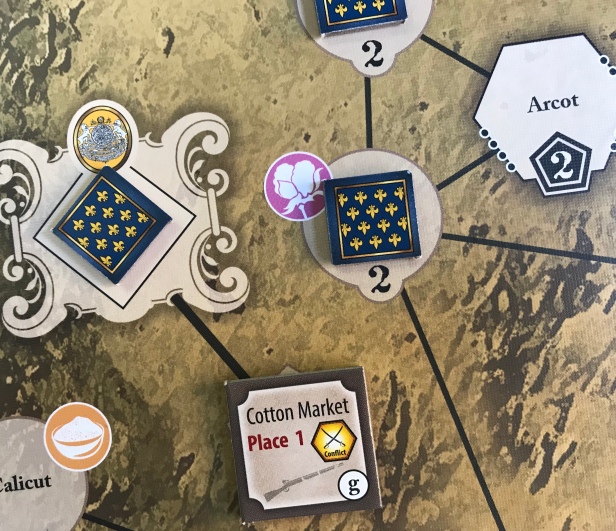
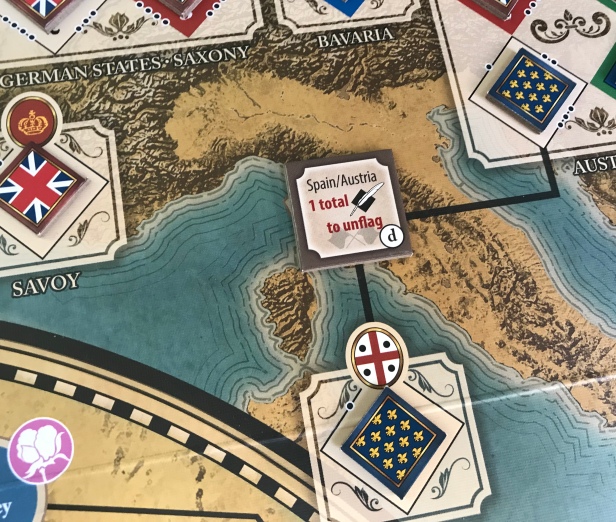
As mentioned before, there are types of Actions on the Investment Tiles. The coins represent an Economic Action, the 18th century grenade represents a Military Action while the quill pen represents a Diplomatic Action. The black icons seen behind the symbols for the different Action types correspond to the types of spaces those Actions can affect on the board. Look at the picture above and you can see that the black symbol behind the coins is a circle, which means that Economic Actions can interact with Markets which are represented by circles on the map, the black hexagon behind the grenade means that Military Actions are used to interact with Naval spaces and Forts which are represented by hexagons on the map and finally the black diamond behind the quill, which looks an awful lot like a piece of paper, means that Diplomatic Actions can interact with Alliance and Political spaces on the map that are diamond shaped.
Major and Minor Actions
We have already covered some of the basics of the Major and Minor Actions but I want to make sure you understand a bit more about these Actions on the Investment Tiles and some of their limiting factors. Major Actions always confer between 2 to 4 Action Points of the indicated type while Minor Actions confer 2 Action Points.

Minor Actions are more limited than Major Actions though and have various restrictions. For example, a player may spend the Action Points from a Minor Action for just one Action, meaning they cannot use one point here and another point there. This can include shifting a single space, purchasing a single Bonus War Tile or removing a single Conflict Marker from the map. But, there is also a restriction on certain Actions as Minor Actions may not be used to remove your opponent’s flags or Squadrons, unless the space that is targeted already has a Conflict Marker. If a space with a Conflict Marker is shifted using a Minor Action, the Conflict Marker is removed normally.
The only other restriction is when Action Points from a Diplomatic or Economic Action are used in different Regions on the map. This is allowed but there is a price to pay of 1 additional Action Point for each Region beyond the first. This can be a very limiting factor for the player’s goal of affecting multiple Regions but this is where the importance of Advantage Tiles comes into play.
Advantage Tiles
We have not discussed Advantage Tiles yet but they can be obtained by controlling all of the spaces that connect to their location on the map. Once controlled, the controlling player will place that Advantage Tile on their player board and can use it’s ability to influence future Actions. The moment that the player loses control of any of the connected spaces on the map to the Advantage Tile through a change in control of a space or losing their flag, the Advantage Tile is returned to the map and the space will have to be controlled again to gain the Advantage Tile back. The Advantage Tile also cannot be used by the controlling player if there is a Conflict Marker found in any of the connecting spaces. The Conflict Marker doesn’t force the player to return the Advantage Tile to the map but they cannot use it’s ability until that Conflict Marker is removed. This is very thematic as the advantages are sometimes tied to peace in order to work, such as industry, agriculture or alliances.
So what do these Advantage Tiles offer to the controlling player? Advantage Tiles are simply tiles with special abilities that can be used by the controlling player once per Game Turn. The player will mark the tile with an Exhausted Marker to denote it has been used and then will enact the benefit. These Advantage Tiles can be used at any time during a player’s Turn but may not be used on the same Action Round that it was obtained from the board. A player may only activate two Advantage Tiles per Action Round and may not use more than one in any Region. Some of the Advantage Tiles allow the player to place out Conflict Markers, which cause lots of negative effects for their opponent in the spaces placed in such as not counting towards Domination of a Region or scoring for Markets.

They also offer discounts to certain Actions but will require the player to spend the appropriate Action Points such as with Diplomatic Actions or Military Action benefits, the player will have to spend either Diplomatic Action Points or Military Action Points to get the benefit. Seems logical to me. It is important to remember that when utilizing the special abilities of the Advantage Tiles that the costs in AP’s to effect a space can never be lowered to below 1.
Now that you have an idea of how you utilize the Advantage Tiles, let’s take a look at a few of the different tiles available. In the picture below, I have shown you 5 different types of Advantage Tiles that offer the ability to manipulate the costs of Military Actions, reduce outstanding debt, reduce the costs of Unflagging an enemy space and placing Conflict Markers in certain specific Regions. As the player is developing their strategy, they should pay attention to the different Advantage Tiles and plan to obtain the ones that fit well with that strategy. There are a lot of different tiles to choose from as there are 22 tiles placed on the map at the start of the game.

Distribution of Investment Tiles
The game contains 24 different Investment Tiles. 9 of these tiles are placed in the Available Investment Tiles area of the Investment Tile Display and a Turn consists of 8 of these tiles being selected by the players in an alternating fashion and then taking the Actions allowed by the tiles during that player round.

There are 8 Investment Tiles that have their Major Actions focused on each of the different Actions in the game so they appear to be very balanced. The tiles also appear to be balanced among the different number of Action Points they confer and lower numbers are mitigated or compensated for less Action Points with either an Event Symbol or a Military Upgrade Symbol. As you can see in the picture below, there are no Event Symbols or Military Upgrade Symbols found in the Minor Action section of the Investment Tiles if they confer 4 Action Points for the Major Action. But, as the Major Action Action Points are reduced below 4 they compensate with these added symbols. As you can see in the picture below on the three shown 3 Action Points Major Action tiles they have the Event Symbol and on the 2 Action Points Major Action tiles they have both the Event Symbol and the Military Upgrade Symbol.

The Event Symbols are a tad bit harder to use than the Military Upgrade Symbols as you have to have a matching Event Card in your hand so they appear on the 3 Action Point Major Action Investment Tiles while they also appear on the 2 Action Point Major Action Investment Tiles but where you also see the appearance of the Military Upgrade Symbol. In our plays, I have found that this balancing attempt was successful and occasionally preferred as you may have a plan for the round that involves a card in your hand that can give you a much greater benefit than just 4 Action Points.
I really feel that the limited action selection mechanic used in the design with the Investment Tiles was a stroke of genius. It creates the need to plan for the current Round, as you must know what it is that you wish to accomplish when it comes time to choose, and also gives lots of different options with the use of Advantage Tiles and Event Cards. I also have found that you can look at the board state, and where your opponent stands in relation to you, and can divine where they might be heading this turn with their choices in tiles. This gives you the option of playing spoiler to stop them from doing what you know they are trying to do to protect your interests. But, you cannot do this often as you have to be enacting your strategy as you have goals that you want to accomplish not just trying to stop your opponent.
I also really enjoy that each round is different. With each round comes new Investment Tiles and with new tiles come new opportunities and the player that can manage what they have and make the best out of the tiles that are dealt to them will find themselves being victorious in the struggle. This is one of the greatest parts of CDG’s and similar tug of war style games, that of trying to “make lemonade out of lemons”. The player that can remain flexible, yet keep their eye on their round by round objectives and also deal with the difficulties that will inevitably come from their opponent’s chosen Actions will ultimately be crowned the victor in the Second Hundred Year’s War.
In Action Point 3, we will take a look at the various Event Cards and Ministry Cards available to the players and get an idea for how these fit into the design.
-Grant

Great interview thanks
LikeLike