
The very first game from GMT Games that I played was Twilight Struggle, which is a 2-player card driven game that pits the United States of America versus the Soviet Union during The Cold War. That game is one of my favorite games of all time and still is exciting to play even though I have played it over 25 times with Alexander as my opponent. The global struggle for control of regions and countries, along with the smattering of military action that is included, makes for a very compelling grand strategy experience.
Who thought that lightning could strike the same spot twice but it appears that it has. We played Imperial Struggle a few weeks ago and the game is even better than TS. I didn’t think that was possible but it is. Imperial Struggle deals with what historians refer to as the Second Hundred Year’s War and covers the period of 1697 through 1789 stretching over four different wars. The game uses cards and Investment Tiles to allow the player to take various actions that change their fortunes across the globe with diplomacy, economic growth, and if all else fails war. Players will score Victory Points from the domination of Regions, controlling various Markets and from victory on the field of battle. There are so many options and strategies available in this game that it makes for a very deep and lasting experience that only gets better with time and more plays.
In this series of Action Points, we will cover the map focusing on the different Regions and Sub-Regions and the various spaces, boxes and lines located in each, we will examine the very interesting limited action selection mechanic using the Investment Tiles and the Advantage Tiles that enhance them, take a look at the various Event Cards and Ministry Cards to get an idea for how these fit into the design, take a look at the Game Sequence including the differences between Peace and War Turns, Action Rounds and the different actions available including Diplomatic, Military and Economic Actions, delve into how the Wars resolve themselves and the consequences of them and finally take a look at how a Turn is scored and how the game is won.
Map
The first time I saw a picture of the map I thought it looked like a total mess. It was pretty and all but just seemed jumbled, crowded and like someone had drawn lines and boxes all over it haphazardly. But, after playing and now seeing how things tie together, the map is a stunning work of art that makes playing the game easy as it is very intuitive and clear.

Regions
The map for Imperial Struggle is divided into four different Regions around the globe and depicts the areas where Britain and France historically struggled for control. The Regions are contained within thick black lines drawn around the area depicted and have a clearly marked border. It is very easy to see these different Regions and while there is no name printed on the map, if you know geography you will have no problem. The four Regions represent only a portion of our globe and don’t have much of a connection to South America, Asia or Africa. Two of these Regions are further divided into sub-Regions.
The four Regions are as follows:
• Europe including Spain, Italy, Central Europe including the German States, Austria, Bavaria, Dutch Republic and Prussia, Ireland, Scotland and to the east Sweden and Russia. The European Region is very important as it is the source of a potential 2VP per round to the player who dominates the Prestige in the Region. We will discuss this later but there are a lot of Alliance spaces in Europe and these will grant bonus strength when resolving Wars, provided the country containing the space is on the Bonus Strength list for a given theater.

• North America includes Canada and present day Ohio east to the Eastern Seaboard. This Region is divided into sub-Regions using a white meandering line. The Region is separated into the Northern Colonies which are located to the south of the dividing line and contain Massachusetts, New York, Pennsylvania to the west as well as Maryland, Delaware, Rhode Island, New Jersey and Virginia. None of these colonies are explicitly shown or called out on the map but you can see the various ares clearly marked with circles named Chesapeake, Hudson Valley, Massachusetts Bay, etc. There are also some key forts called out in this sub-Region including Ohio Forks, Champlain Valley (Fort Ticonderoga) and Halifax.

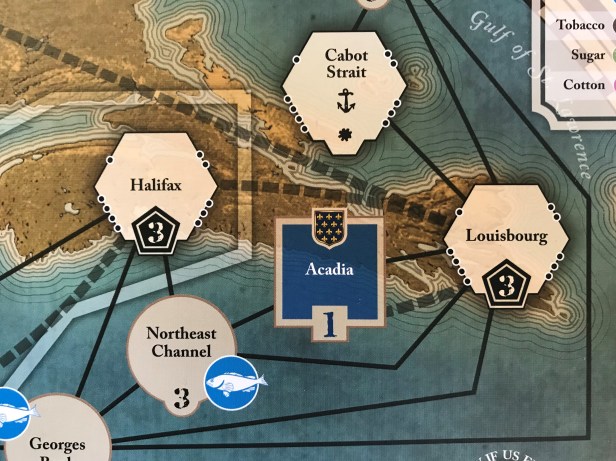
The other portion of the North America Region is Canada both north and east of the white dividing line. This sub-Region includes Quebec & Montreal and Acadia to the east. This sub-Region also includes several key ports and sea zones including the Gulf of St. Lawrence, Louisburg, Georges Bank and the Cabot Strait.

• The Caribbean includes the Southern Colonies such as Carolina’s and Georgia as well as key trading areas in the Atlantic Ocean and Caribbean Sea such as Florida, Louisiana, Cuba, the Bahamas, Jamaica and Puerto Rico. There are also two areas in the Region that allow the player to influence Buccaneers and Privateers in assisting with controlling commerce on the high seas. These areas are connected to Advantage Tiles that will grant a bonus to the player who controls them.

• The India Region is also divided into two separate sub-Regions similar to North America. The same white line meanders through the eastern portion of the Region to divide the Carnatic Coast from the Hooghly River.

The Carnatic Coast sub-Region is located to the south of the dividing line and contains various key ports like Madras and Pondicherry. There are several different types of Markets here and Forts that can be built to protect them. This sub-Region also contains a few Alliance opportunities to gain access to Advantage Tiles from the Nizam and Mysore Tribes.
The Hooghly River sub-Region is located to the north of the dividing line and contains several base areas including Chandernagore and Calcutta. The Hooghly River is represented on the board and serves as a Naval Port where players can locate a Squadron to protect their trade routes and Markets in the sub-Region. This sub-Region also contains one Alliance opportunity to gain access to Advantage Tiles from the Maratha Tribe.
Various Boxes
There are a few different types of boxes included on the board that aid in playing the game such as the General Records Track that keeps track of Victory Points, Treaty Points and each Nation’s Debt Limit and Available Debt and the Game Turn Track that reminds the player when Wars will occur and what turn it is as well. The game consists of six Peace Turns, interrupted by four different Wars including the War of the Spanish Succession, the War of the Austrian Succession, the Seven Years’ War and the American War of Independence. If you look at the picture of the Game Turn Track below you will see that the first two Peace Turns and the War of the Spanish Succession makeup what is referred to as the Succession Era which covers from 1697-1722; the next two Peace Turns along with the War of the Austrian Succession and the Seven Years’ War are referred to as the Empire Era and covers 1722-1753 and finally the last two Peace Turns and the American War of Independence are referred to as the Revolution Era and covers 1764-1789.
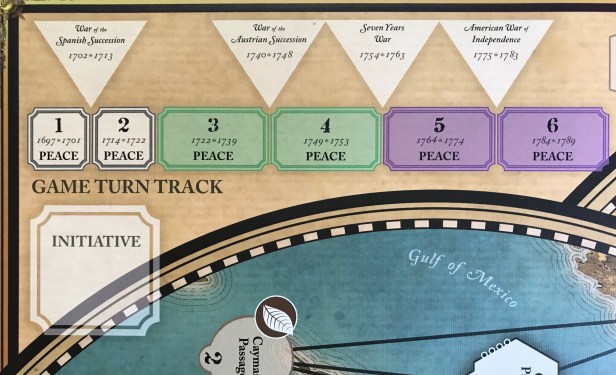
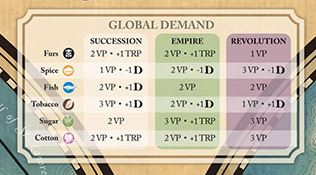
You will notice that each Era has a different color on the Game Turn Track and these colors coincide with boxes on the game board such as the Global Demand Box. Different VP’s will be scored for the same goods according to what Era it is when the scoring takes place. The colors as simply there to remind you of that fact.
There is also a Navy Box that appears in the middle of the game board and this is where players will place newly built Squadrons into before using Military Actions to place them on the map. At the start of the game, the British has two Squadrons in the Navy Box while the French only have one Squadron.
There also is an Award Box located in each of the four Regions. At the beginning of each turn, one Award Tile will be assigned face up in each Region. At the end of the turn the player controlling more flags and Squadrons in each Region will receive the associated Award Tile and score VP and take Treaty Points according to the tile. This tile is face up for the entire turn so that players know what it is that they are fighting for. Sometimes it might be wise not to invest so heavily into a Region that is not going to score Victory Points and place your flags and Squadrons into other higher scoring Regions. But, don’t let this be the only reason that you place your influence into specific Regions. You never want to get so far behind in a Region that you cannot possibly catch up. I like to spread my influence around the globe among the four different Regions and take a measured approach, only stacking up in a certain Region when it makes sense.

Spaces
The four Regions have five different types of spaces located on the map that are used to control various goods and to dominate the Regions. These include Political Spaces, Market Spaces, Territories, Naval Spaces and Forts.
Political Spaces
Political Spaces are diamond-shaped and represent understandings and agreements with important elements of different political entities. Each of these Political Spaces contains a number referred to as the Political Cost that represents the difficulty of obtaining these trade agreements. The game tries to model the effort involved in placing your influence into these spaces and represent your relationship with local political leaders and tribe chieftains as well as the amount of effort to reach these areas. Throughout the game, there will be game effects that can increase or reduce a Political Space’s Political Cost. This Political Cost though will never be lower than 1.
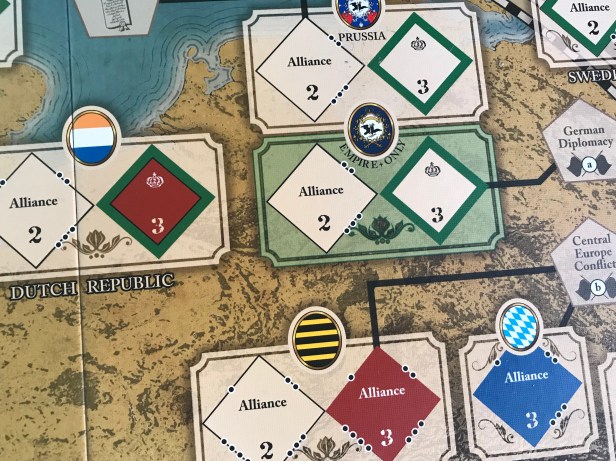
Some Political spaces are unavailable to the players at the start of the game and are color coded with the same colors appearing on the Game Turn Track that relates to the Era in which they are available. A good example of this is the Prussia Political Spaces. Here there are two spaces available at start, and two more below them that will become playable at the beginning of the Empire Era. These Political Spaces are very important and add to a players total influence in an Region when it comes time to score those Regions.

Market Spaces
Market Spaces are round spaces that represent the various trading infrastructure of each Empire including things such as trading posts, economic arrangements, shipping lanes, port facilities and other commercial assets. Each Market contains a number in the space that represents its Economic Cost.

This cost represents the expense and investment required to reach the good that is available in that area, collect the good and then transport it out to make use of the good in other markets or back in Europe. These Markets deal in various commodities that were demanded in the old world and include Fish, Furs, Spice, Sugar, Tobacco and Cotton. If a commodity is in Global Demand, then at the end of the turn the player controlling more Markets of that commodity will earn a reward as indicated on the Global Demand Table.

Territories
Territories are square spaces and represent physical control of the land. These Territories are different than Political Spaces and Markets though as Territories cannot change hands during Peace Turns as a result of Political Actions. They only do so as a result of Wars. Territories serve as an anchor point for expansion. The player can only expand into areas where they have influence normally but in the case of Territories they can expand into them as a result of the gaining of Conquest Points as a reward for victory in a War. If a player happens to lose Territories in a Region, their other controlled spaces are in danger of becoming isolated and can be lost.

Naval Spaces
Naval Spaces are hexagonal spaces located in both oceans and on rivers or along coastlines and represent the opportunity to deploy sufficient naval strength to generate a military and economic advantage. The only way a player can take control of a Naval Space is to spend a Military Action and place a Squadron in that space.

Naval Spaces are marked with an asterisk at the bottom which means they have a variable cost. Placing a Squadron in a Naval Space normally costs 1 but if an enemy Squadron is present it will cost either 2 or 3 to displace that Squadron (depending
on where the phasing player’s Squadron is. As with Political Spaces, some Naval Spaces have green borders and these are designated as Prestige Spaces, and likewise will count towards earning bonus victory points in Europe. Like Political Spaces, Naval Spaces also use dot indicators to show which Wars they will confer bonus strength in for easy reference.

Forts
Forts are hexagonal and represent well-funded military installations and logistical infrastructure for soldiers. Forts can become Damaged during Wars or due to various Events. A Damaged fort does not count towards the Forts strength bonus during war resolution, and can be Repaired by either player during a Peace Turn. Building a Fort requires Military Action and then adds to the total presence in a Region when scoring for control.

Conquest Lines
The final element we need to cover on the Map is the concept of Conquest Lines. Conquest Lines represent a potential axes of advance in the Regions and are only used and relevant during a War Turn. The Conquest Lines appear on the map as dashed lines. In order to capture a Territory that has any Conquest Line connections, the player must first control at least one space connected to that Territory with a Conquest Line. Once a connection has been determined, they must then spend Conquest Points.
In the below picture, we will look at Louisbourg in North America as an example. Louisbourg has three Conquest Lines attached to it, including one from Acadia, one from Quebec & Montreal (not shown on map), and one from Halifax. The first two enable Louisbourg’s controller to seize the Territories they connect to in Wars as a result of Conquest Points. The third is used only when playing with optional rule 12.3 (Tougher Forts) in which case it enables the capture of Halifax. Halifax is a special area because it is really hard for anyone other than the French player to get to it as you have to control Louisbourg to get to it.
If you remember at the beginning of this piece, I said that I was none too impressed with the map upon first glancing at it. Now, after playing the game and actually understanding how things work, I am really impressed with the way this board has been laid out to take advantage of some historical situations and to encourage certain strategies. As the game unfolds over the course of 6 Turns, players will be rewarded for their understanding of how their holdings and political alliances will benefit them and how they can be effected by the outcomes of War. Players have to use their limited actions wisely in order to build up an engine that can return Victory Points turn after turn. Waiting to do those things that will score you points to just before they will score will find you unable to create the links and connections to do so. This game rewards long term planning, and especially planning with an eye toward connections. You can keep your opponent boxed in with the appropriate capture of a Fort, placing a Squadron in an area and utilizing alliances with tribes to perform more efficient actions. But, I feel as if I am getting ahead of myself as those are elements for discussions in the rest of this series.
In Action Point 2, we will examine the very interesting limited action selection mechanic using the Investment Tiles and the Advantage Tiles that enhance them and what that means for the player and their efforts.
-Grant

Thanks Grant, I felt the same way about the board. First when I read the rules I thought what a mess and how for heaven’s sake is this going to be a fun game!? But after two playthroughs of the first rounds the game really opens up so to speak. I really like this game a lot although I lost both games…
LikeLiked by 1 person
After playing, it become very clear how it all fit together. I love the map and find it to be one of the best components in the game. It is so vivid it almost sucks you into the game.
LikeLike
Great read. Thanks. Would love to see a proper teach and offline playthrough.
LikeLiked by 1 person
Enjoyed the gentle pace with which you walked me through aspects of the map, Grant…appreciated the liberal pictures to illustrate the points being made, too.
LikeLiked by 1 person
No problem. Glad you enjoyed it. I look forward to writing the other posts as well as playing again soon. Two times isn’t enough.
LikeLike
Thanks, this is very helpful! Looking forward to part 2!
LikeLiked by 1 person
You never say how many can play the game. Two player? More?
LikeLike